Mobile Robot Control 2021 Group 2
Team
Soshala Weerathunge: 1563890
Shaun Boyteen Joseph: 1554972
Rishi Ramkannnan: 1537415
Markus Fuernkranz: 1585495
Yaodong Li: 1536532
Daiwei Fan: 1594516
Introduction
In situations where there is increased stress on hospital systems (in cases of pandemic for example), it is a common occurrence that hospital staff work overtime and are too few in number to meet the workload. In such cases, there is possibility of reduced quality of service that can be provided to the patients undergoing treatment. There are several ways to combat this problem. The most effective solution is to incorporate autonomous robots that can reliably perform those tasks which do not necessarily require the expertise of hospital staff such as doctors and nurses. This will free doctors and nurses to engage in more important work. The behavior of the PICO robot has been designed to perform the task of reliable point to point motion. The robot is able to move from any starting location to a desired target location while seamlessly avoiding obstacles and walls. The design of this complex behavior of the robot is accomplished in two stages.
In stage 1, the robot behavior is designed to tackle the obstacle room challenge, where the robot has to exit a room as fast as possible. This stage will form the foundation of the PICO behavior upon which additional capabilities are to be incorporated (in stage 2) to obtain the finished product.
In stage 2, additional capabilities such as obstacle detection, obstacle avoidance, target identification and many more are incorporated for the purpose of passing the Hospital Challenge. Completion of stage 2 will result in our finished product, PICO for Hospital applications.
Design Document
We have created a design document to facilitate the successful completion of the robot design. The design document contains information regarding various aspects such as robot requirements, software functions that contribute to robot behaviour, components of the robot and their specifications, interfaces and many more. This document will be the platform on which the entire robot design procedure is carried out.
The Design Document is provided here. File:4SC020 Design proposal.pdf
Stage 1: Escape Room Challenge
Introduction
The escape room challenge comprises the first stage of the design of the autonomous robot. This challenge was performed virtually using a simulator with the designed robot behaviour. The Escape Room competition is subject to several environmental and challenge specifications, which are provided below:-
Challenge Specifications:-
1. PICO should not bump into walls
2. PICO should make at least one sensible move every 30 seconds.
3. Total time to complete the challenge is 300 seconds.
4. Maximum translational speed of the robot is 0.5 m/s and the maximum rotational speed is 1.2 rad/s.
Environment Specifications:-
1. The shape of the room is rectangular.
2. The orientation of the corridor is perpendicular to the wall.
3. The walls need not be perfectly straight, the corners need not be perfectly perpendicular and the walls of the corridor might not be perfectly parallel.
Robot behaviour to tackle the Escape Room Challenge
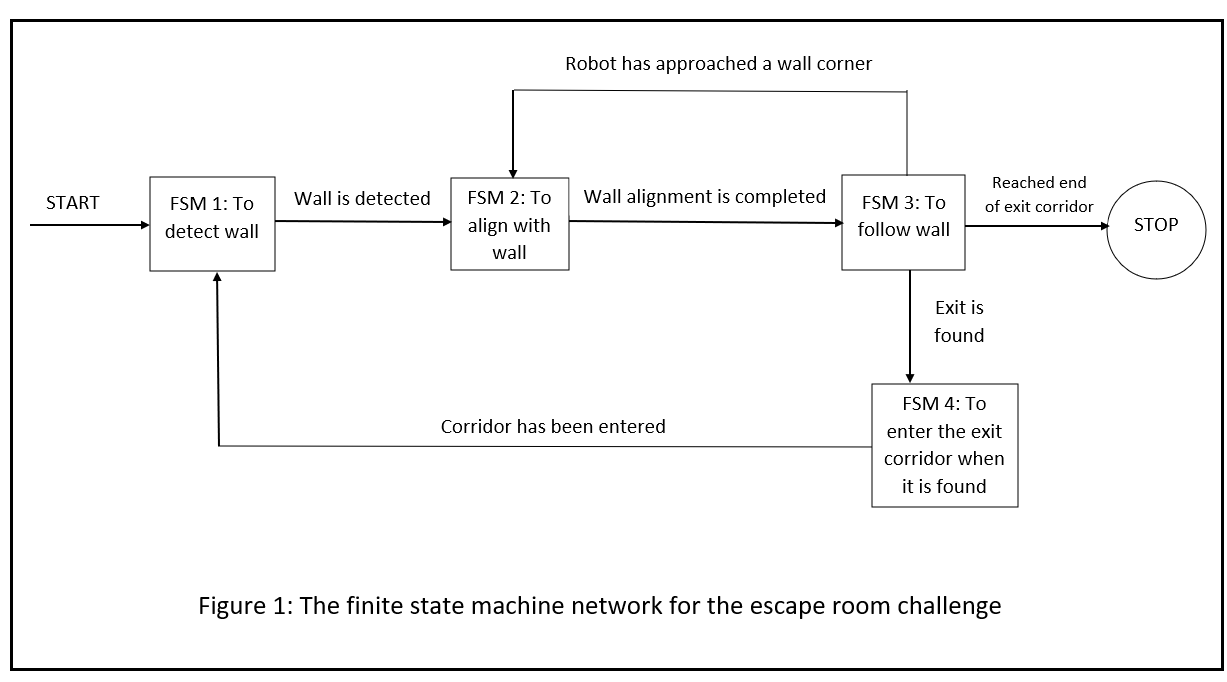
The behaviour scheme designed to tackle the Escape Room Challenge consists of 4 Finite State Machines (abbreviated as FSM), which are as follows:-
FSM 1: To detect wall
FSM 2: To align with wall
FSM 3: To follow wall
FSM 4: To enter the exit corridor when it is found
The Finite state machine network is presented in figure 1.

Finite State Machine 1: To detect wall
The Robot enters the Finite State Machine 1 either when there are no walls within a preset "minimum distance" from the robot or the robot has entered the exit corridor. In this FSM, the robot is programmed to translate in the forward x-direction with maximum velocity until it reaches the preset "minimum distance" from the wall. The value of the "minimum distance" that we used was 0.35 meters. This quantity was obtained as a result of trials and experimentation. Once the robot has detected a wall, it is programmed to switch to Finite State Machine 2.

Finite State Machine 2: To align with wall
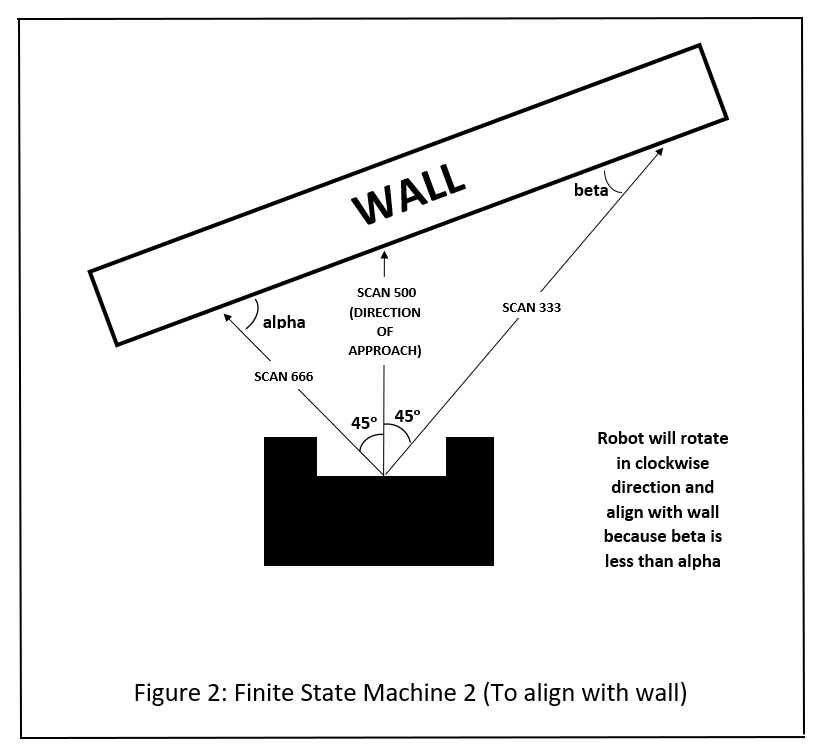
Once the robot successfully detects a wall, it enters Finite state machine 2. In this FSM, the angle (alpha) enclosed by the 666th laser scan and the wall is calculated. Similarly, the angle (beta) enclosed by the 333rd laser scan and the wall is calculated. The significance of the 333rd laser scan and the 666th laser scan is that they make a 90-degree angle with respect to scan number 0 and scan number 1000 respectively, which helps in implementing the algorithm to align with the wall. If the angle enclosed by the 666th laser scan and the wall is greater than the angle enclosed by the 333rd laser scan and the wall, then the robot will rotate clockwise until it aligns parallel to the wall. Likewise, if the angle enclosed by the 666th laser scan and the wall is lesser than the angle enclosed by the 333rd laser scan, then the robot will rotate anti-clockwise until it aligns parallel to the wall. Refer to figure 2 for a visual depiction of the algorithm. Once the robot has aligned with the wall, it is programmed to switch to Finite State Machine 3.
Finite State Machine 3: To follow wall
This is one of the most important State Machines in our robot behaviour implementation because the successful and robust completion of the escape room challenge relies heavily upon the ability of the robot to follow walls reliably.
This Finite State Machine was implemented using PID control. The error signal is a scalar defined to be the difference between the preset "minimum distance" (0.35) and the instantaneous distance of the robot from the wall. The control input is the angular velocity of the robot. Once the tuning parameters, Kp, Ki and Kd of the PID controller were tuned, we defined the PID regulation as follows,
control input = Kp*(error) + Ki*(sum of previous errors) + Kd*(instantaneous rate of change of error)
Finite State Machine 4: To enter the exit corridor when it is found
As a result of the Finite State Machines 1, 2 and 3, the robot will eventually be within a preset "minimum distance" of 0.35 meters from a wall regardless of the starting position. This means that either one of the laser scan points which are perpendicular to the 500th scan point on either side (scan:167 and scan:833) will eventually always detect a wall around the preset "minimum distance" value of 0.35 meters. Now, when the robot passes through a wall containing the exit, both scan:167 and scan:833 will simultaneously, either not detect any obstacle within its maximum range (30 meters) or detect a wall beyond the preset "minimum distance" (0.35 meters). This condition is exploited to confirm that the exit has been detected. Once the exit is detected, the robot enters Finite State Machine 4. At this moment, the robot stops the translational motion and then performs pure rotation by a preset angle (90 degrees) obtained from tuning. As a result, the robot aligns itself to enter the corridor. After the robot enters this orientation, the robot is programmed to translate in the forward direction to guarantee that it enters the corridor. This marks the completion of Finite State Machine 4. The robot is programmed to then re-enter into Finite State Machine 1 to exit the room and thus complete the challenge.
Explanation of the Robot behaviour
As the escape room challenge commences, the robot begins from a random starting point. The first step of the robot behaviour is to enter into Finite State Machine 1, where the robot tries to find a wall. Once the robot detects a wall, it tries to align itself parallel to the wall. This is accomplished by entering into Finite State Machine 2. Upon successfully aligning parallel to the wall, the robot executes a wall-following manoeuvre by entering into Finite State Machine 3. The use of a carefully tuned PID controller ensures smooth motion and maintenance of the set "minimum distance" (0.35 meters) from the wall. As a result of the Finite State Machines 1, 2 and 3, the robot will eventually be within a preset "minimum distance" of 0.35 meters from a wall regardless of the starting position. This means that either one of the laser scan points which are perpendicular to the 500th scan point on either side (scan:167 and scan:833) will eventually always detect a wall around the preset "minimum distance" value of 0.35 meters. Now, when the robot passes through a wall containing the exit, both scan:167 and scan:833 will simultaneously, either not detect any obstacle within its maximum range (30 meters) or detect a wall beyond the preset "minimum distance" (0.35 meters). This condition is exploited to confirm that the exit has been detected. Once the exit is detected, the robot enters Finite State Machine 4. At this moment, the robot stops the translational motion and then performs pure rotation by a preset angle (90 degrees) obtained from tuning. As a result, the robot aligns itself to enter the corridor. After the robot enters this orientation, the robot is programmed to translate in the forward direction to guarantee that it enters the corridor. This marks the completion of Finite State Machine 4. The robot is programmed to then re-enter into Finite State Machine 1. Now, since the robot is already in the corridor, the FSM 1 will ensure that the robot detects any one of the walls of the exit corridor and subsequently follows the wall to complete the challenge.