Embedded Motion Control 2018 Group 4
Group members
| TU/e Number | Name | |
|---|---|---|
| 1032743 | Shuyang (S.) An | s.an@student.tue.nl |
| 0890579 | Leontine (L.I.M.) Aarnoudse | l.i.m.aarnoudse@student.tue.nl |
| 0892629 | Sander (A.J.M.) Arts | a.j.m.arts@student.tue.nl |
| 1286560 | Pranjal (P.) Biswas | p.biswas@student.tue.nl |
| 0774811 | Koen (K.J.A.) Scheres | k.j.a.scheres@student.tue.nl |
| 0859466 | Erik (M.E.W.) Vos De Wael | m.e.w.vos.de.wael@student.tue.nl |
Files
File:EMC Group4 Initial Design.pdf
File:EMC Group4 Final Design Presentation.pdf
Initial Design
Goal
The main goal of the project is to enable PICO to autonomously map a given room and subsequently determine and execute a trajectory to leave this room. For the initial Escape Room Competition, the predefined task is completed once the finish line at the end of the corridor is crossed. For the Hospital Room Competition, the goal is to map all rooms situated in the complex, after which the robot returns to a given position from where it must be able to identify a placed object in order to position itself next to it. However, both competitions include several constraints:
- The robot must complete the task without bumping into any walls.
- The individual tasks must be completed within five minutes.
- The robot should not stand still for more than 30 seconds during the execution of each of the tasks.
Plan
Escape Room Competition
1. Initially, PICO should make a 360° turn once, to gather information about the surrounding environment.
2. It should act accordingly depending upon the initial data that is gathered. The following three scenarios are possible:
- A wall is detected, then it should go to the nearest wall and start following it.
- A door is detected, then it should go to the door, cross the finish line and stop.
- Nothing is found, then it should move forward until it detects either a wall or a door.
3. While following a wall, the following two scenarios are possible:
- Another wall is detected, then it should start following the next wall.
- A door is found, then it should go through the door and cross the finish line.
Hospital Competition
1. Initially, PICO should make a 360° turn once, to gather information on the surrounding environment.
2. It should start following the wall along the corridor, until a new door is found.
3. Then, it should enter the room through the new identified door, and start following the walls of the room. While following the walls of the room, it should identify all the corners of the room from the data gathered, and then exit the room. Also, while performing this task it is possible that a new door is detected inside the room, then it should enter that room and follow the same protocol as mentioned before.
4. Once PICO is in the corridor again, it should start searching for new doors, and explore each of the rooms similarly as mentioned above.
5. While performing these tasks, PICO simultaneously needs to create a map of the whole hospital. Once the whole hospital is mapped, it should park backwards to the wall behind the starting position.
6. After that, depending on the hint given, PICO should find the object in the hospital and stop moving close to it.
Requirements
In order to follow the plan and reach the goal that was defined earlier, the system should meet certain requirements. From these requirements, the functions can be determined. The requirements are given by:
- The software should be easy to set-up and easy to upload to PICO.
- The software should not get stuck in deadlock or in an infinite loop.
- PICO should be able to run calculations autonomously.
- PICO should be able to make decisions based on these calculations.
- Walls, corners as well as doors should be detectable. This means that the data provided by the sensors must be read and interpreted to differentiate between these items.
- Based on the sensor data, a world model should be constructed. Hence, this model should store information that functions can refer to.
- PICO should be able to plan a path based on the strategy and autonomous decision-making.
- PICO should be able to follow a determined path closely.
- PICO should be able to drive in a forward, backward, left and right motion.
- PICO should be able to turn with a predefined number of degrees (-90°, 90°, 180° and 360°).
- PICO should also be able to turn with a variable angle.
- The speed of each of the wheels should be monitored.
- The total velocity and direction of PICO should be monitored.
- The distance moved in any direction by PICO should be monitored.
- Detect when and for how long PICO is standing still.
- PICO should be able to either drive the entire rear wheel across the finish line or to stop moving close to the designated object for respective competition types.
Functions
In the table below, the different type of functions are listed. A distinction is made between the difficulty of the function, i.e. low-level, mid-level and high-level functions. In addition, a distinction is made between functions that depend on input for the robot and functions that determine the output.
| Low-level | Mid-level | High-level | |
| Input | Read sensor data |
|
|
| Output |
|
Avoid collision |
|
Components and specifications
The hardware of PICO can be classified into four categories, which can be seen in the table below.
| Component | Specifications |
| Platform |
|
| Sensors |
|
| Actuator | Omni-wheels |
| Controller | Intel i7 |
The escape room competition features the following environment specifications:
- PICO starts at a random position inside a rectangular room, which features one corridor leading to an exit.
- The corridor is oriented perpendicular to the wall and ranges in width from 0.5 to 1.5 meters.
- The finish line is located more than 3m down the corridor.
Most notably, the differences between the escape room competition and the hospital room competition include:
- PICO will start in the hallway of the hospital.
- The hospital features three to six separate rooms.
Interfaces
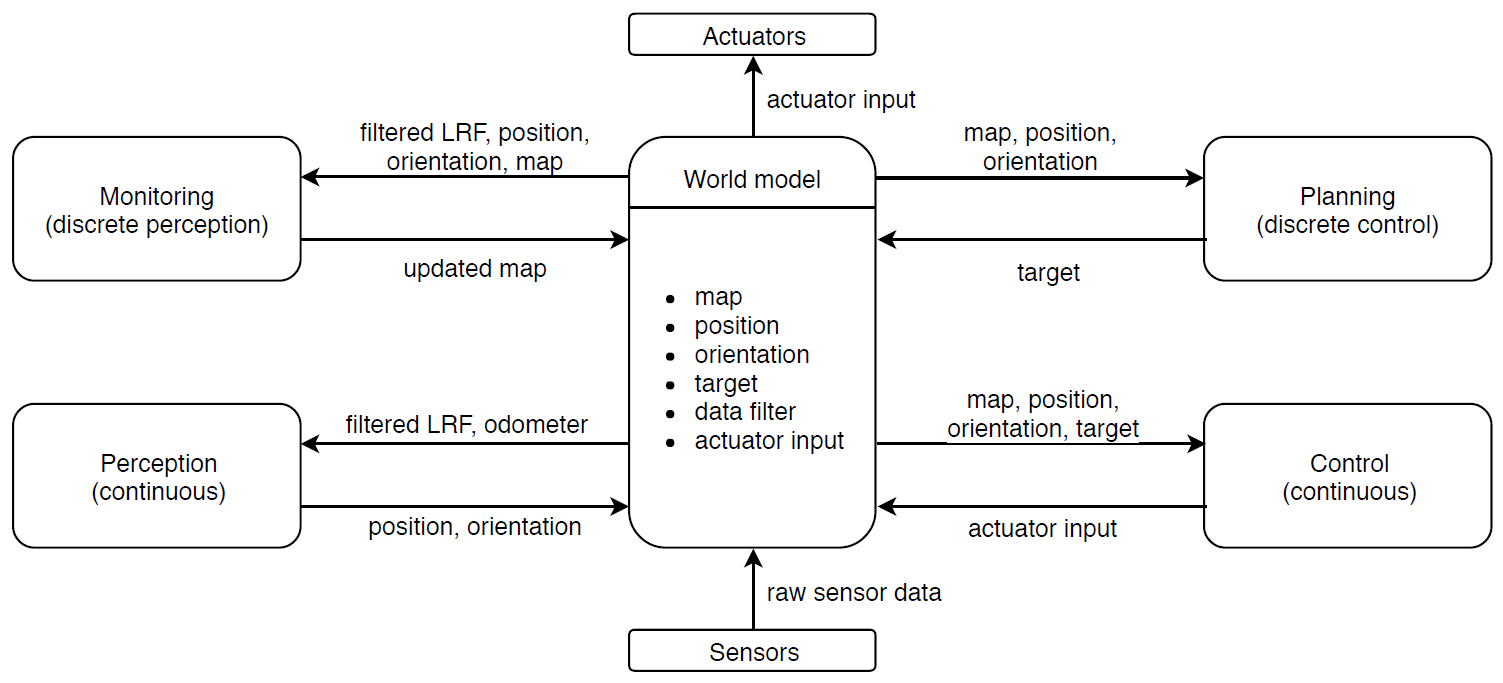
The interfaces for the initial design and the information exchanged between each interface are depicted in Figure 1. This figure shows how the code will be constructed, with separate functions that receive a certain input and give a certain output. For example, the planning interface will receive the current map, position and orientation. Based on that, it will decide on a target. That target will be used by the controller to determine the actuator input. What is not depicted clearly in this figure is the division between the world model and the registry. The world model contains information regarding the location of the corners and doors in the room. However, info like the current LRF data and the actuator input are not part of the world model. These are stored in the registry.
Wall detection
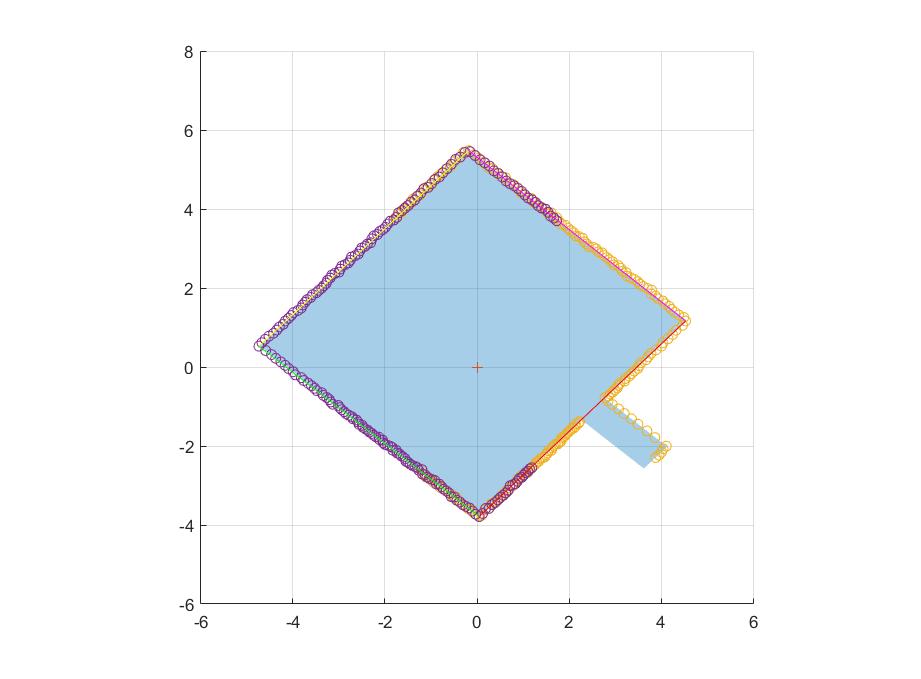
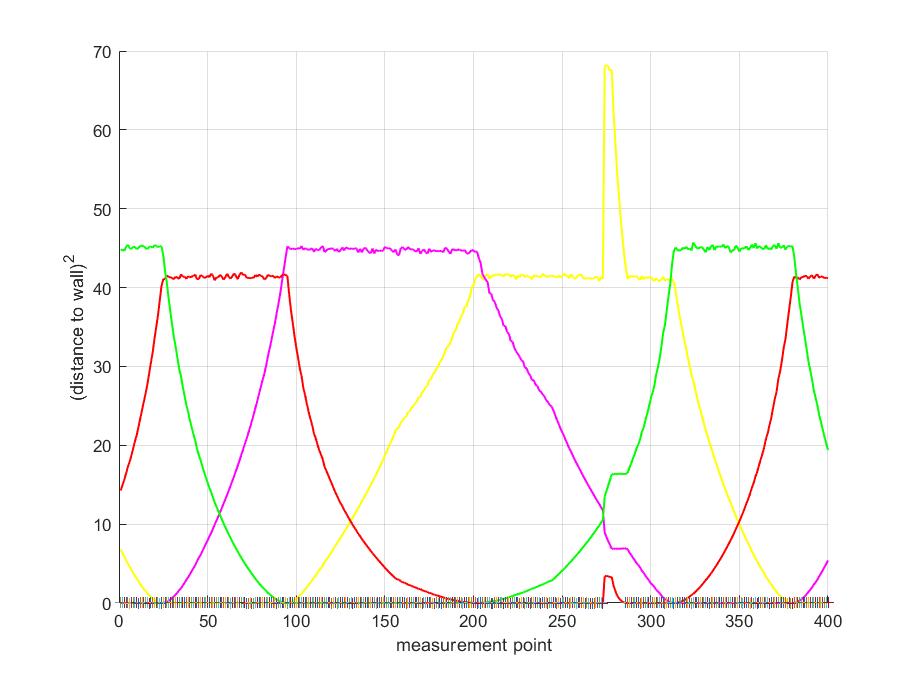
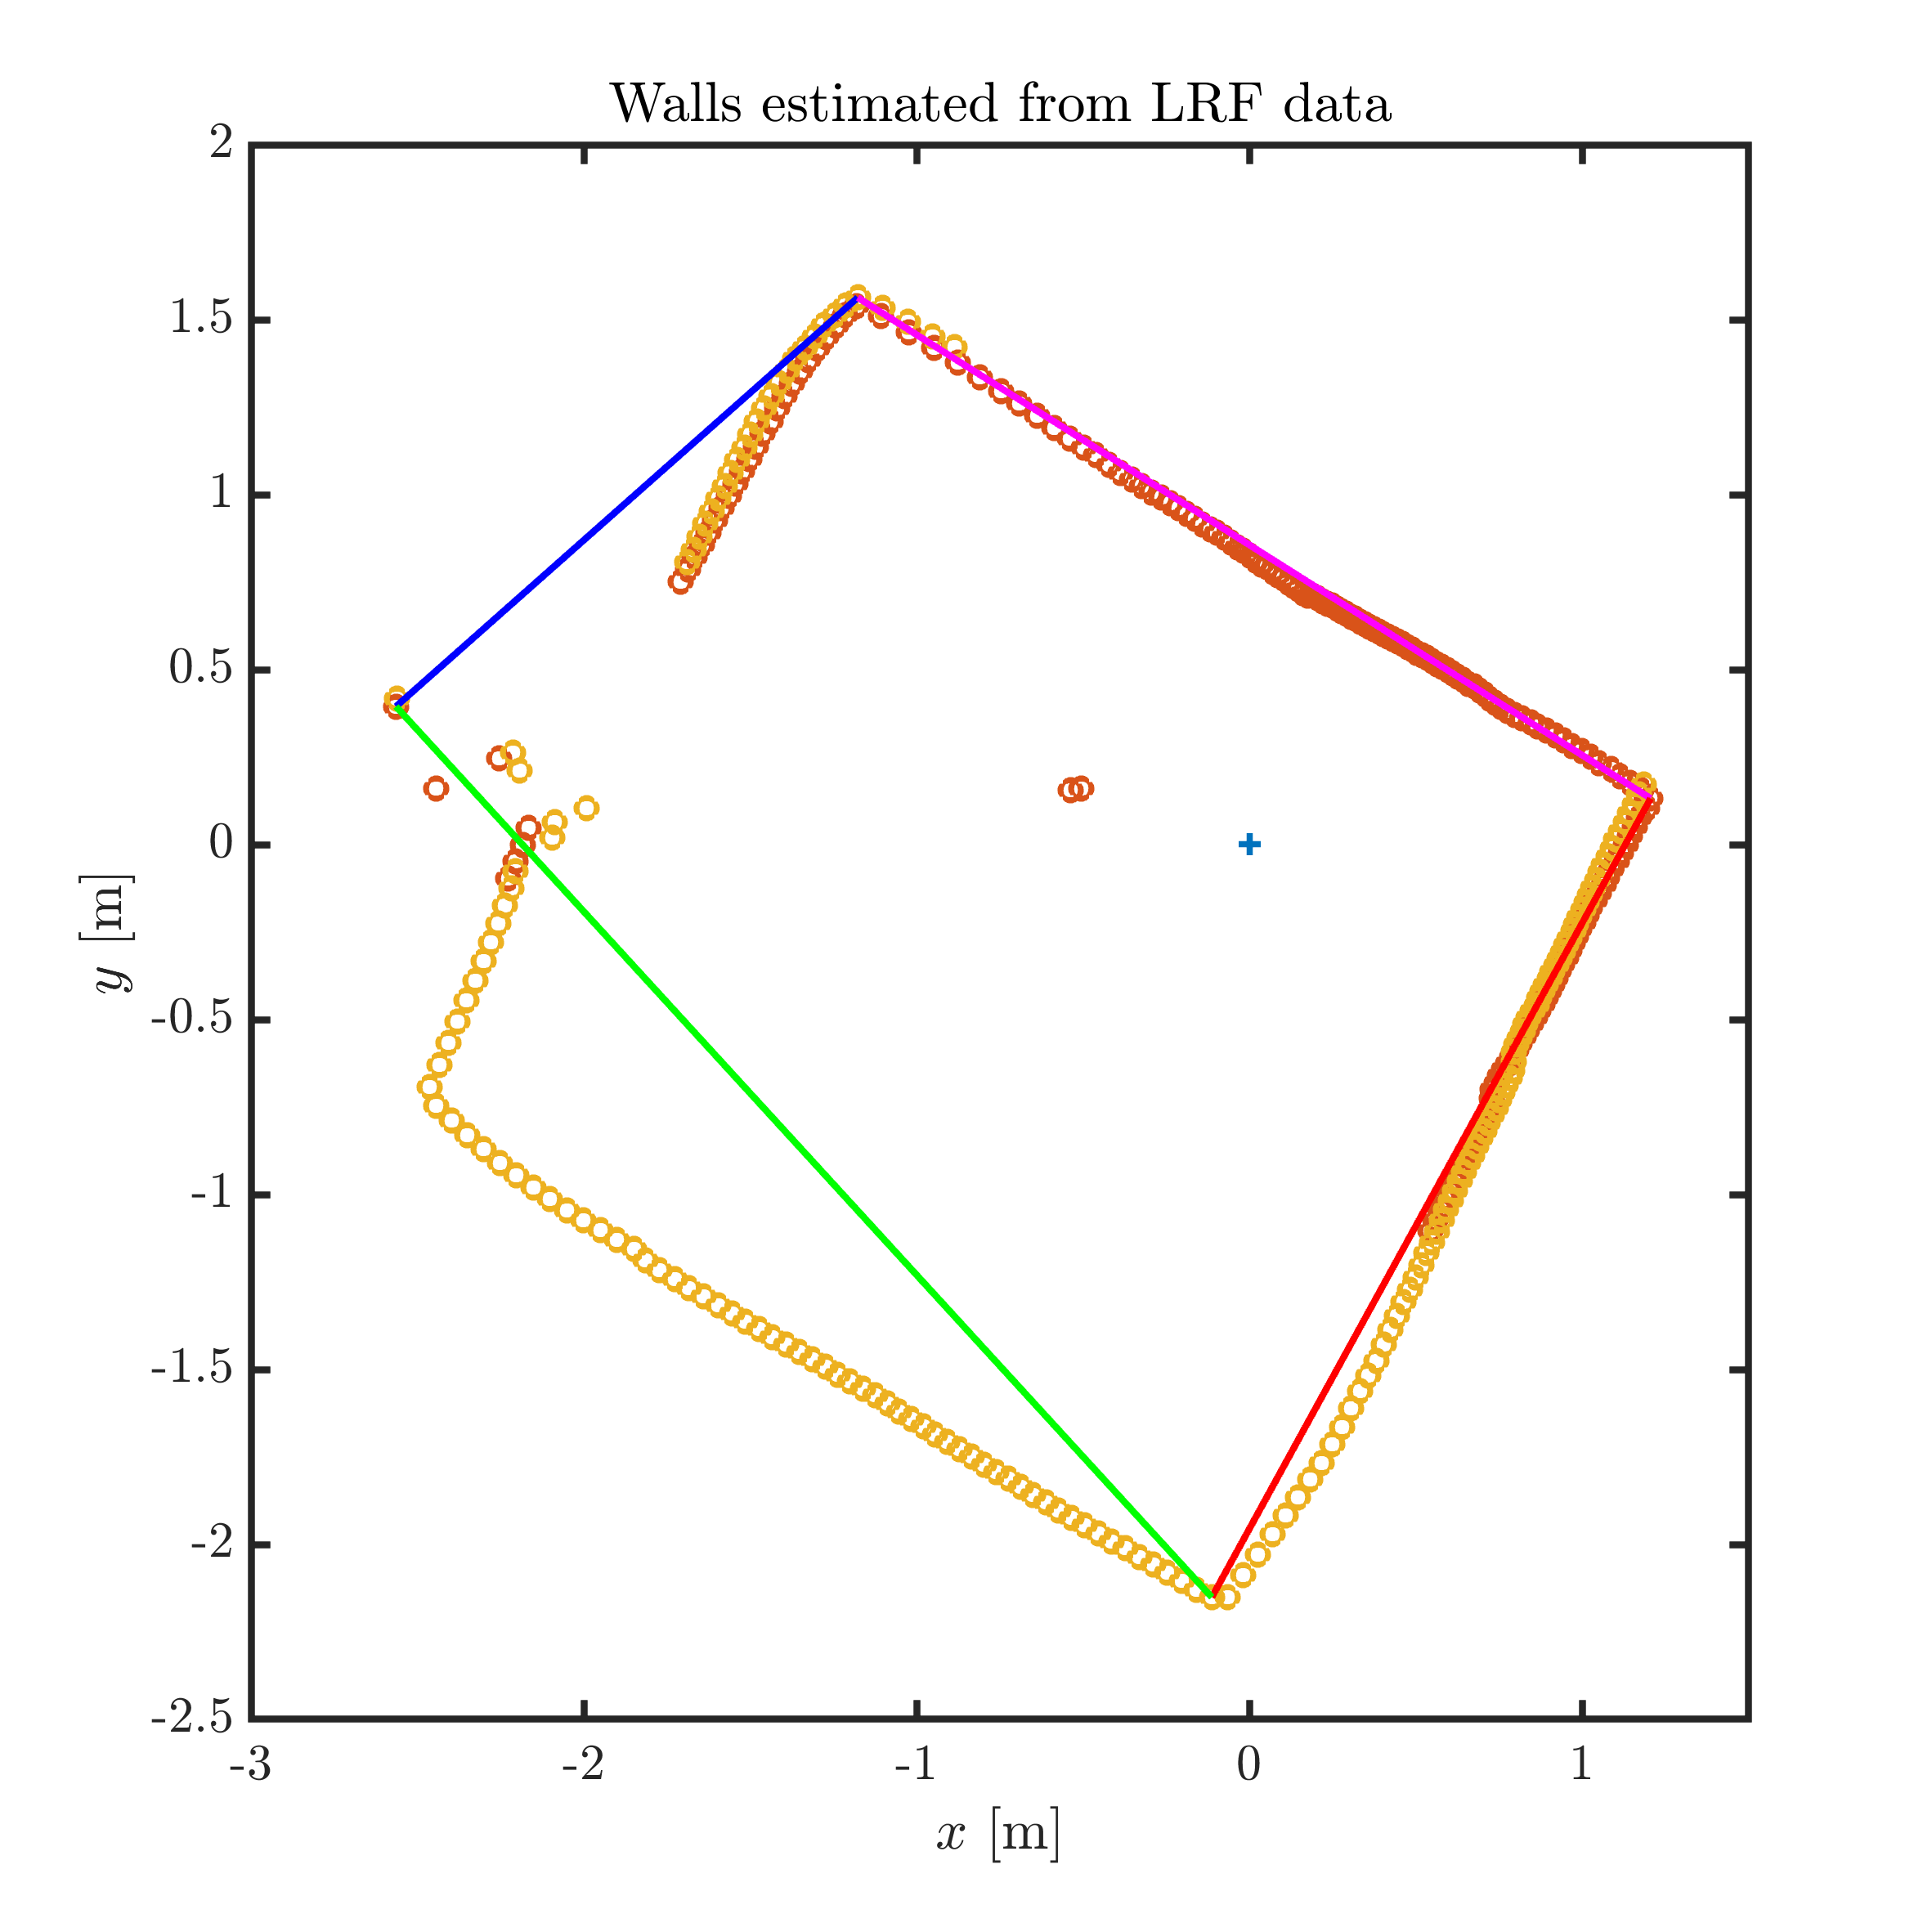
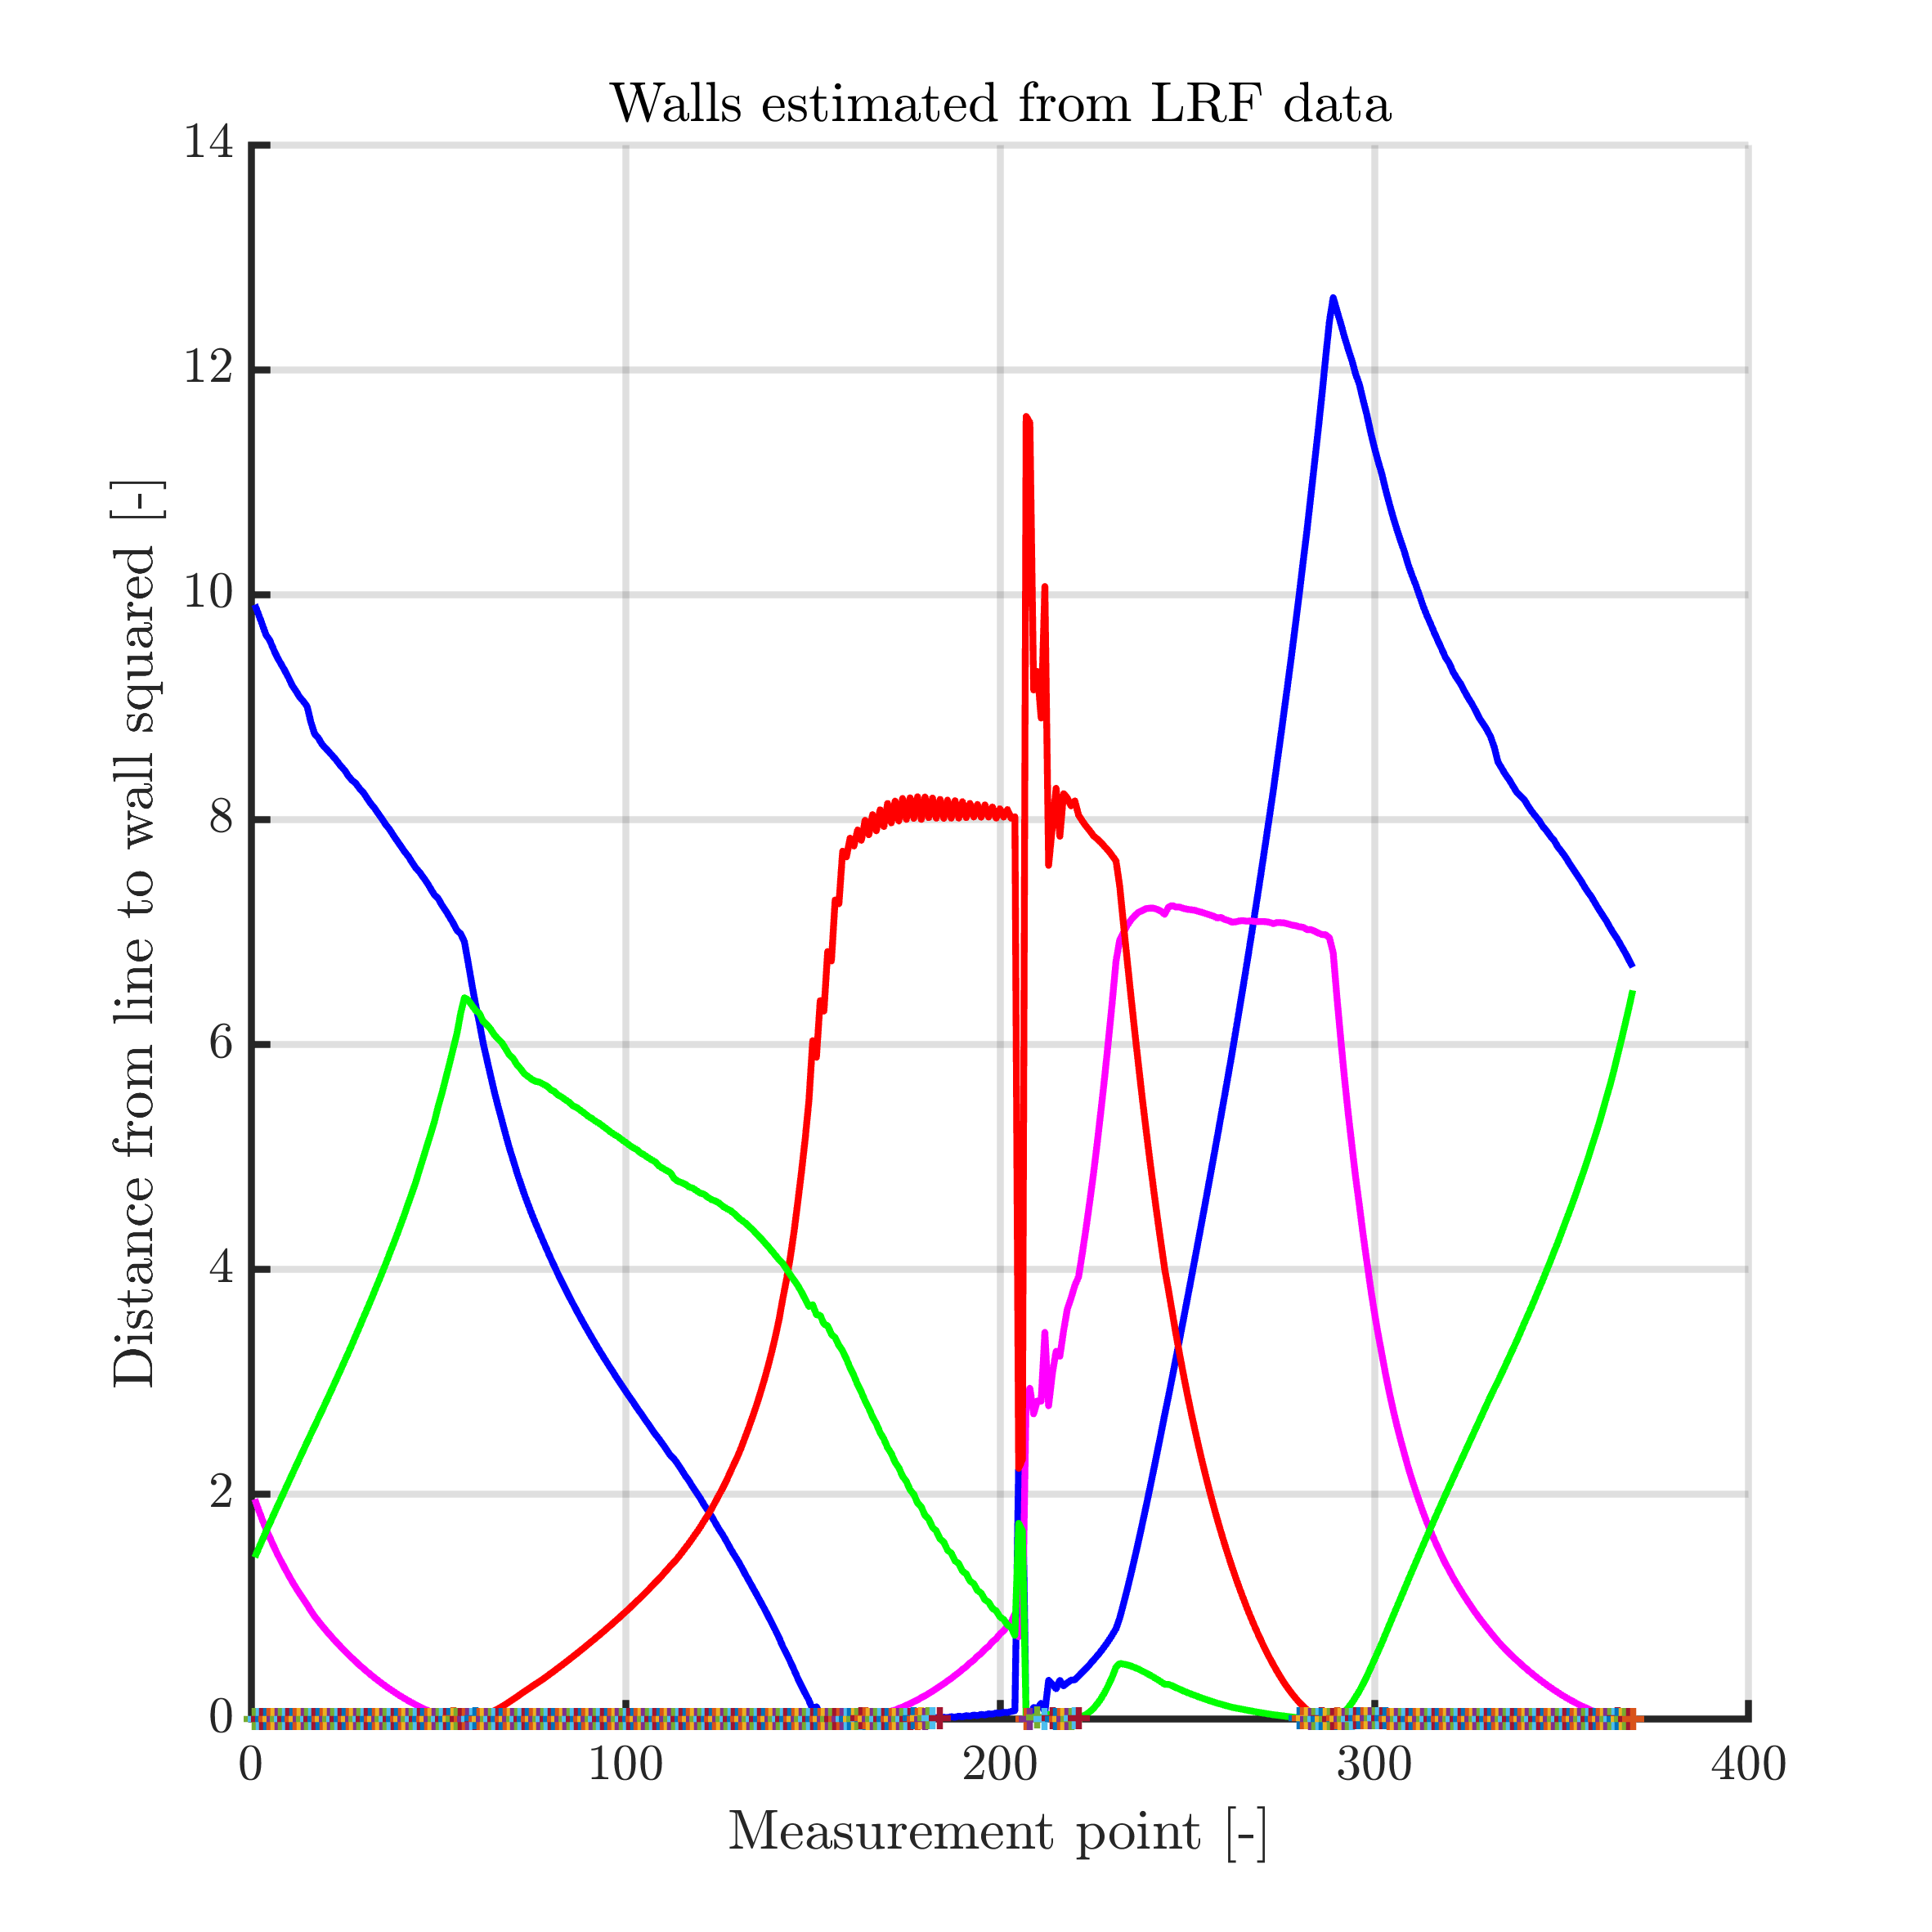
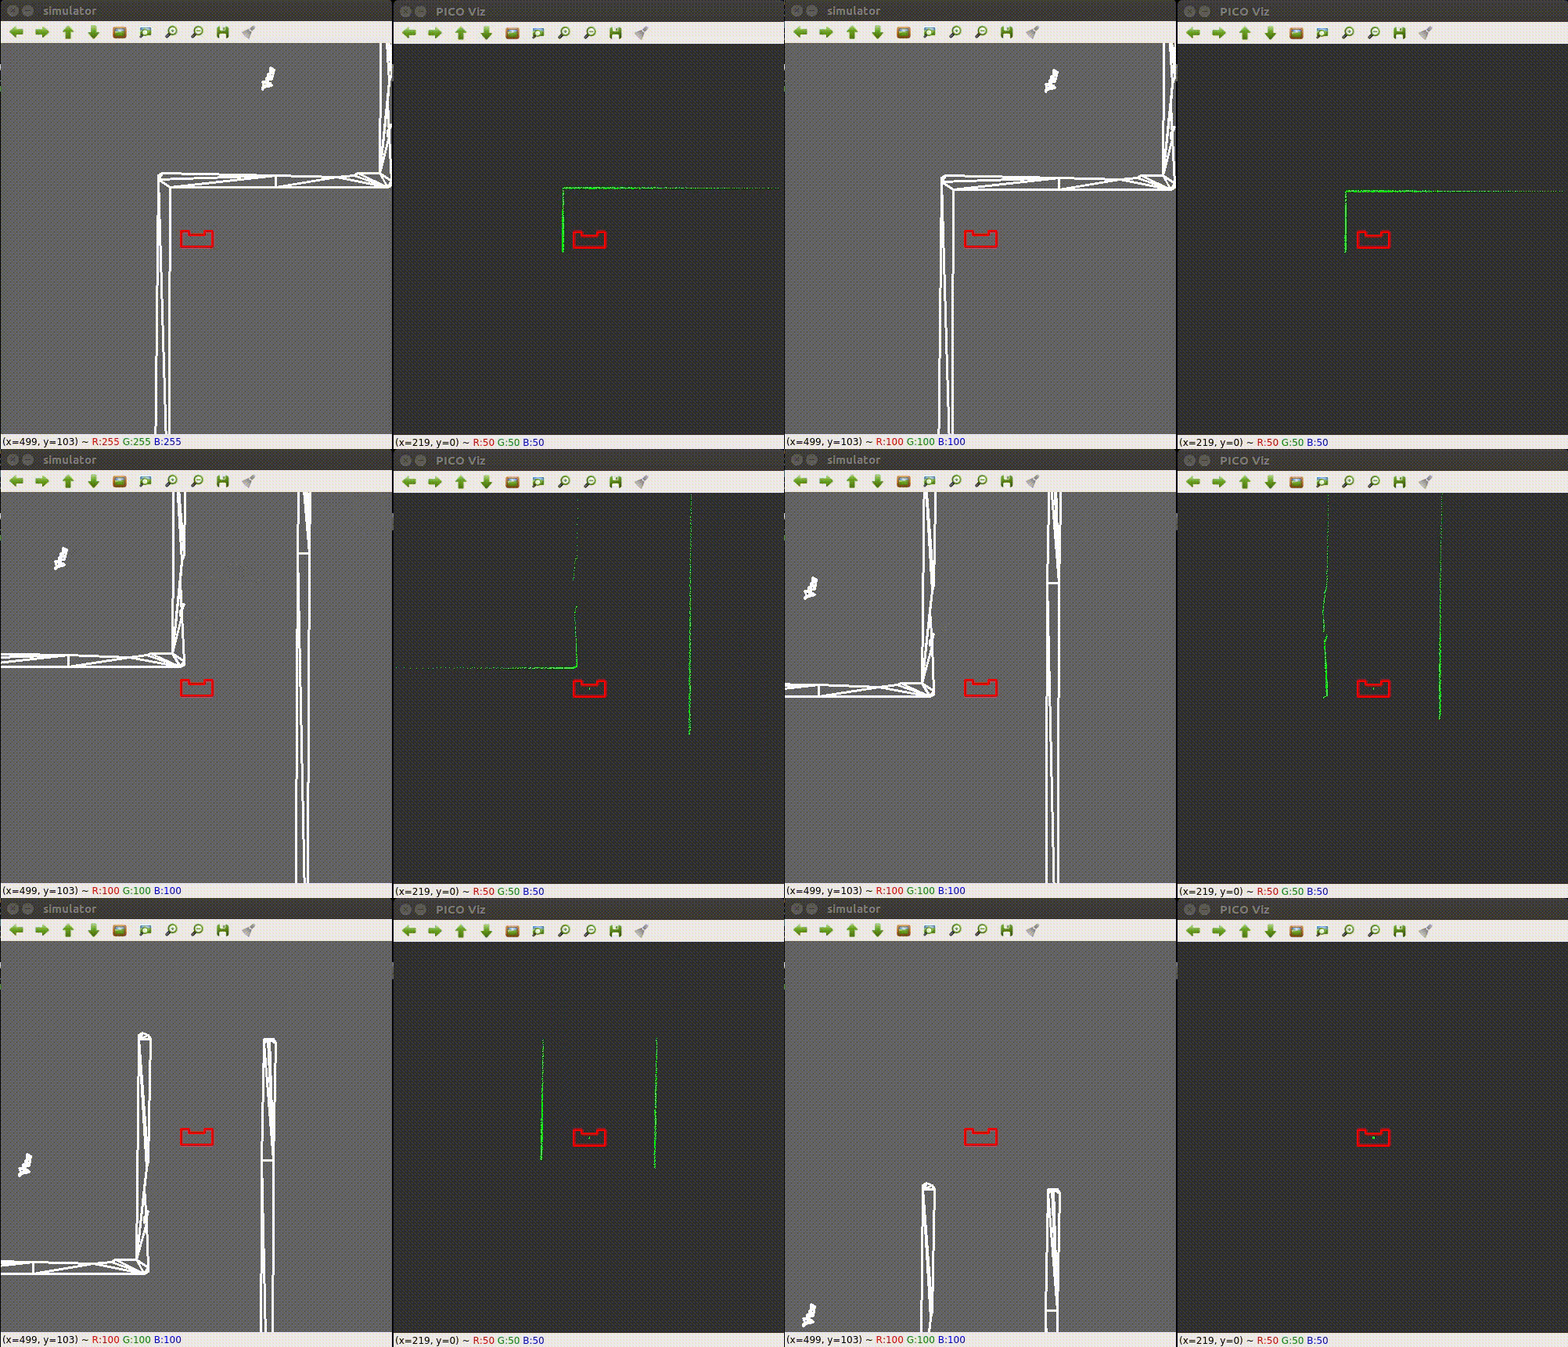
In the initial design, it was attempted to map the walls of the room using the LRF data. Two sets of scans were made; one from the initial point and one after a 180 degree turn. The data was filtered to remove outliers and after that, it was attempted to fit lines through the points. In the figures below, it can be seen how these lines were mapped. In order to recognize walls, corners and doors, the distances of each point to each of the fitted lines was determined. That can be seen in the graphs on the right. A long horizontal line means there is a series of points with an equal distance to a certain line, therefore this gives two opposite walls. The high peak in the middle of one of these horizontal lines is the location of the door. The angles at which these walls and doors were detected could be determined via Matlab, and a setpoint could be based on that. However, due to time constraints, this algorithm was not implemented in C++ before the challenge.
The upper two figures show the LRF points, the fitted lines and the squared distance from each of the points to the line for a simulation. The lower two figures show the same for an actual measurement, where PICO was placed in a room and gathered these results.
 |
 |
 |
 |
Escape Room Competition
The aim was to implement the wall detection algorithm during the escape room challenge. However, due to time constraints it was not implemented in time. Therefore, it was chosen to use a potential field algorithm in combination with a wall follower instead. These algorithms were not yet tuned, and as a result did not perform as expected during the challenge. PICO followed the first wall, but bumped into the second wall while turning. Therefore, he could not complete the challenge.
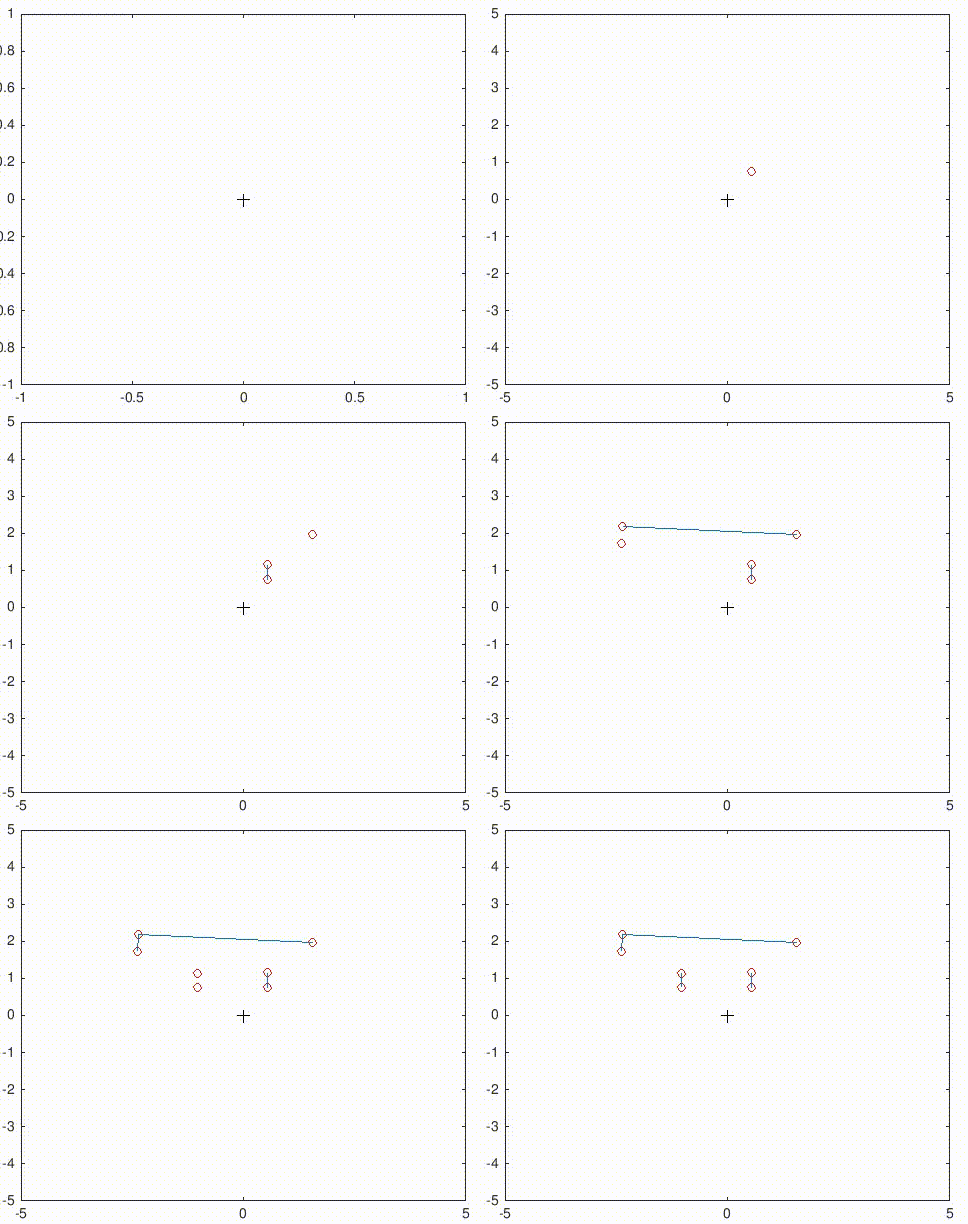
After the challenge, several decisions were made. Because of the difficulties with implementing the self-made wall recognition algorithm, it was decided to use the proven method of Split-And-Merge instead. Also, it was decided not to use the potential field algorithm and wall follower for any further steps, since these were only a last-minute attempt at finishing the challenge. In the GIFs underneath, the split-and-merge algorithm is applied to the escape room challenge in simulation. The door is recognized fast, and the robot moves to a setpoint in front of the door. Using this algorithm with appropriate tuning on the actual robot, it is believed that the challenge could be completed.
Final Design
For the final design, work is done based on the interfaces that were set up for the initial design. The plan that was mentioned before has been updated based on new information, and consists of the steps mentioned in the next paragraph. These steps and their implementation are explained further in the section on the planning and discrete control.
Approach for the Hospital Competition
In the following steps, the proposed approach for the hospital competition is explained.
1. PICO will be oriented facing the corridor. Initially, it should scan what's in front of it and see whether a door is visible.
2. If a door is found initially, PICO should position itself before the door. Otherwise, it should start following the wall along the corridor, until a new door is found and position itself in front of it again.
3. Then, it should enter the room through the new identified door and stop, one meter into the room. Then it should scan, turn 180 degrees and scan again. It will determine all the corners of the room from the data gathered and thereafter exit the room. The information about the room, e.g. the location of the door and the corners, will be saved in the world model. While performing this task it is possible that a new door is detected inside the room, then it should enter that room and follow the same protocol as mentioned before. Information regarding whether a door has been entered before will be saved in the world model.
4. Once PICO is in the corridor again, it should start searching for new doors and explore each of the room similarly as mentioned above.
5. While performing these tasks, PICO simultaneously needs to create a map of the whole hospital. Once the whole hospital is mapped and the end of the corridor is reached, it should park backwards to the wall behind the starting position.
6. For the second part of the challenge, PICO should determine what room requires the most doors to reach (this is the high level hint). This information can be found based on the information in the world model.
7. Then, the consecutive door locations are used as setpoints for PICO to follow towards the right room.
8. When the room is reached, PICO will scan its surroundings and try to find a series of data points deviating from the known location of the walls. This will indicate the location of the object, after which a setpoint can be generated.
9. PICO will move to the setpoint next to the object and stand still, stating that it has found the object.
World Model and Registry
The center of the interface figure that was shown before is actually divided into two parts: the world model and the registry. The registry contains all current data, for example the position and orientation of PICO, the sensor data, a filtered version of the sensor data, the actuator inputs and the current target and setpoints. This is all relevant information that should be accessible for the functions, but should not be part of the actual world model.
The world model itself consists of different classes that each have their own properties. There are rooms and corridors, which are numbered and contain a collection of doors and corners. The doors have a state (used and unused), coordinates and a destination. The corners have coordinates as well. Using the coordinates of the doors and corners, the lines that form the walls of each of the rooms can be mapped. This information can then be used to determine the location of the object in the final challenge. Since the destination of each of the doors is known, it is possible to determine which room needs the most doors to reach and thus use the high-level hint. The known coordinates of the doors can then be used to generate setpoints to actually reach that room.
Discrete Control - Planning
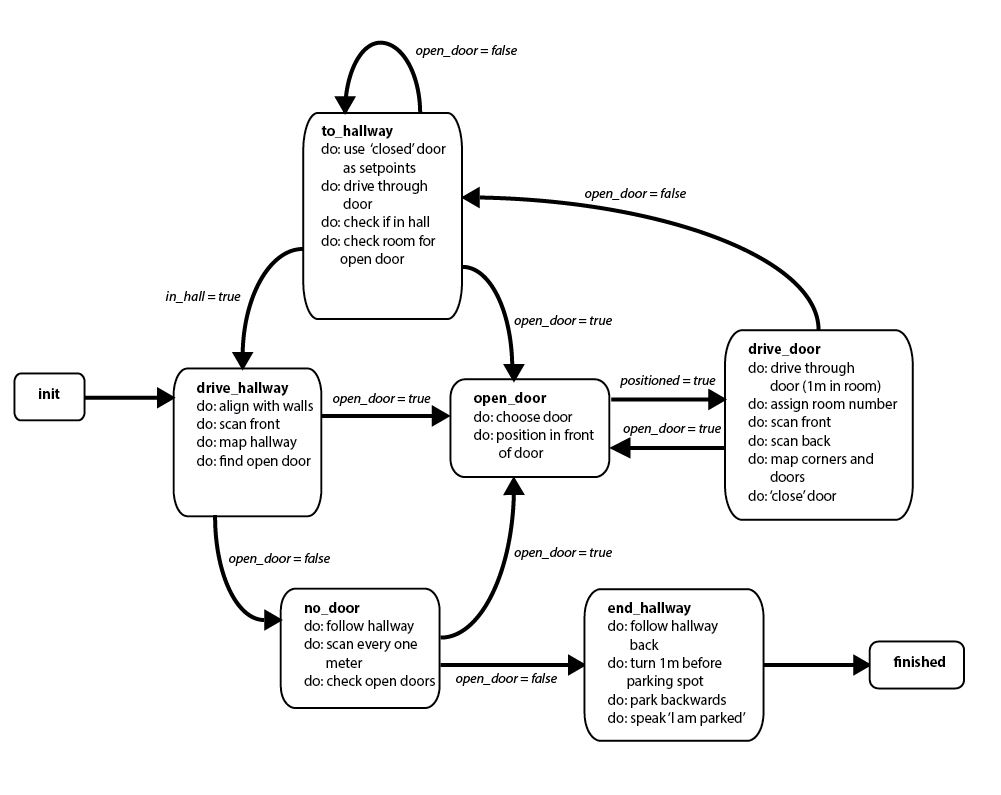
For the hospital challenge, discrete (state) control will be required. Therefore, the following two state machines have been designed for the two parts of the challenge: mapping the hospital and finding the object. The first state machine works based on 'open' and 'closed' doors. Any door that is found that has not been entered yet, is saved as an 'open' door. When PICO starts this challenge in the hallway, he will scan what is in front of him. This might show an open door. If so, PICO will enter the room through this door. If PICO cannot identify an open door, he will drive one meter further into the hallway and scan again. When PICO has entered a room, he will assign a number to this room and save the coordinates of the corners and doors in the world model. The door through which he has entered will be closed, and he will check the room for open doors. If an open door is found, PICO will enter the next room through this door and repeat the process. If PICO does not find a new open door, he will return through the closed door and eventually get back to the hallway to continue his journey through the hospital.
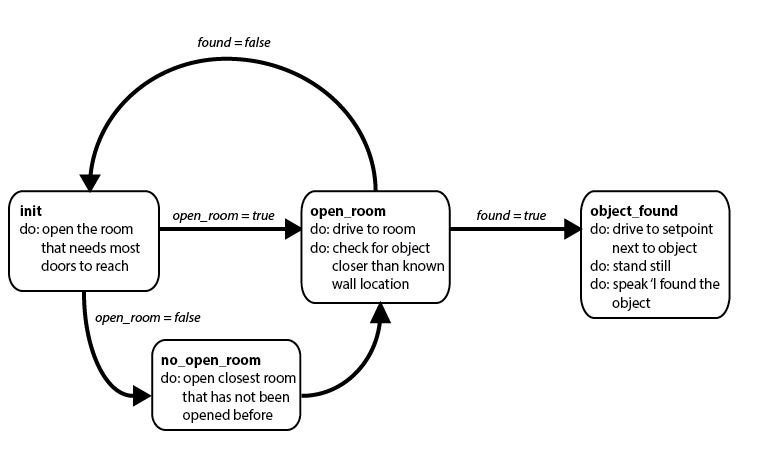
When the entire hospital has been mapped and PICO has stated that he is parked in the correct spot, the next state machine will start running. The principle of open and closed doors will now be applied to rooms. PICO will open the room that needs the most doors to reach, and go towards that room. When he has reached the room, he will scan it and check if there is an object, which will present itself as a series of points closer to PICO than the wall that would be expected at that sensor angle. If no object is found, the closest room that has not been opened, will be opened and PICO will continue his search there. When the object is found, PICO will stand next to it and tell that he has accomplished his task.
Continuous Control
To perform high level tasks and to make PICO move to a setpoint generated by the discrete controller, low level continuous control is required. The job of the low level controller is to reach the desired set point as accurately as possible, while avoiding collision with walls. Therefore, the wall collision avoidance algorithm is integrated with the low level controller. The low level controller is a simple proportional controller, with two different gains for the x (Px) and y (Py) axis.
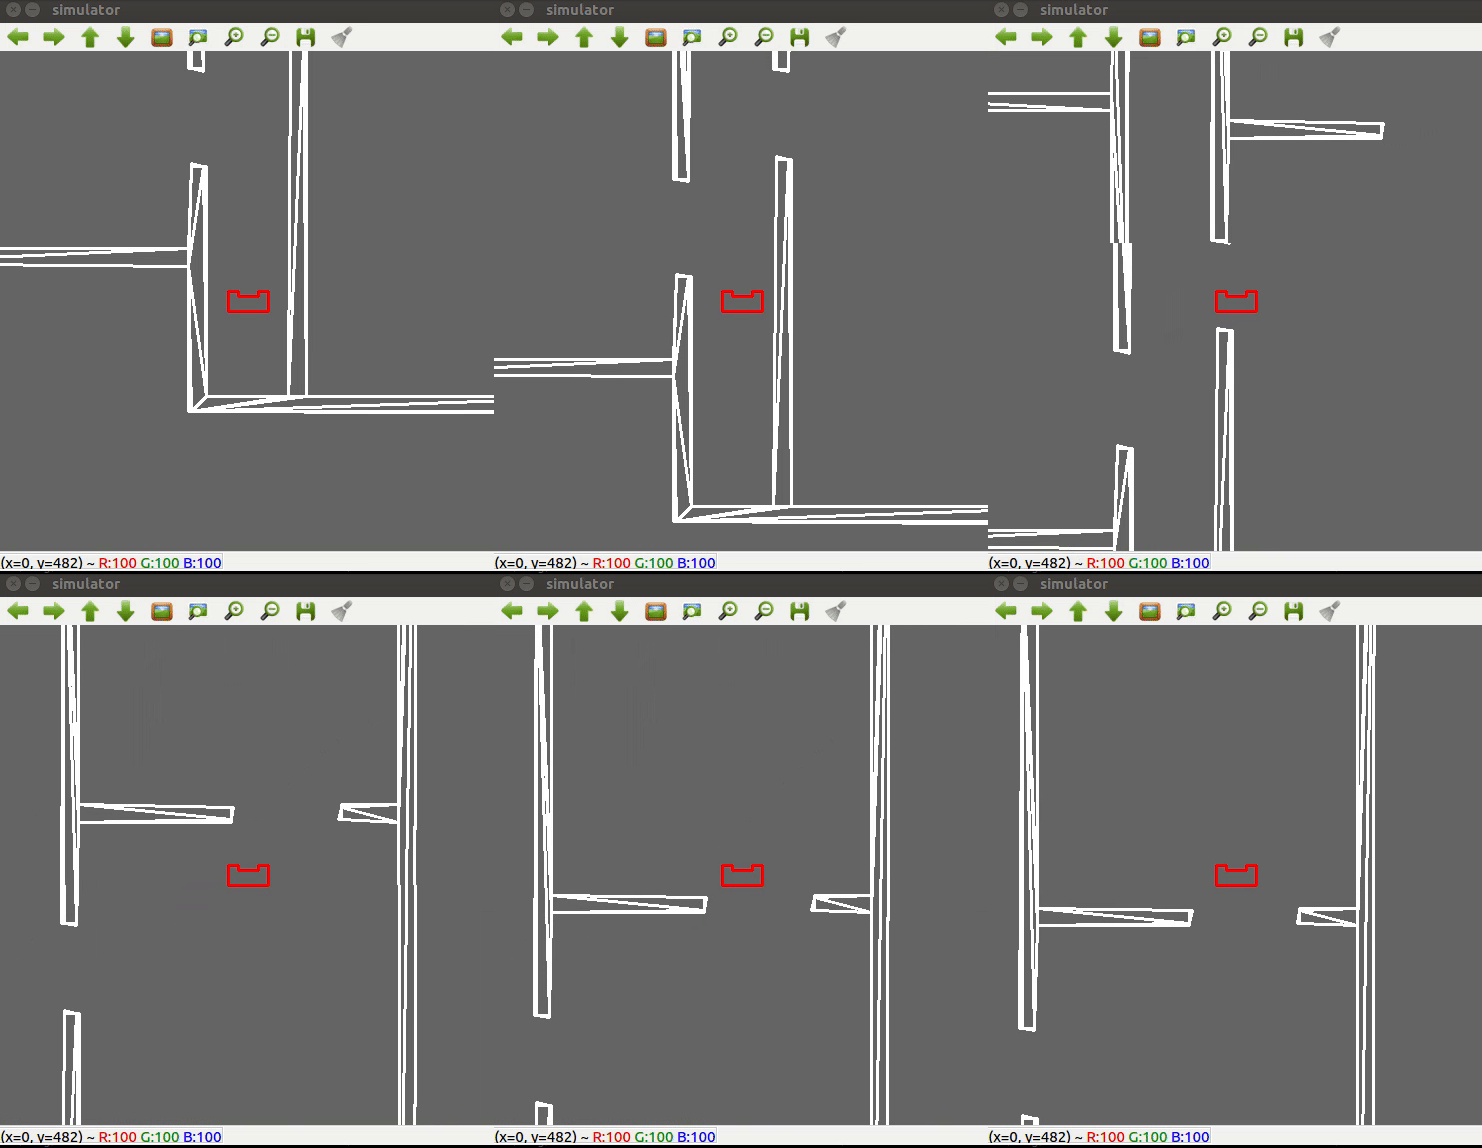
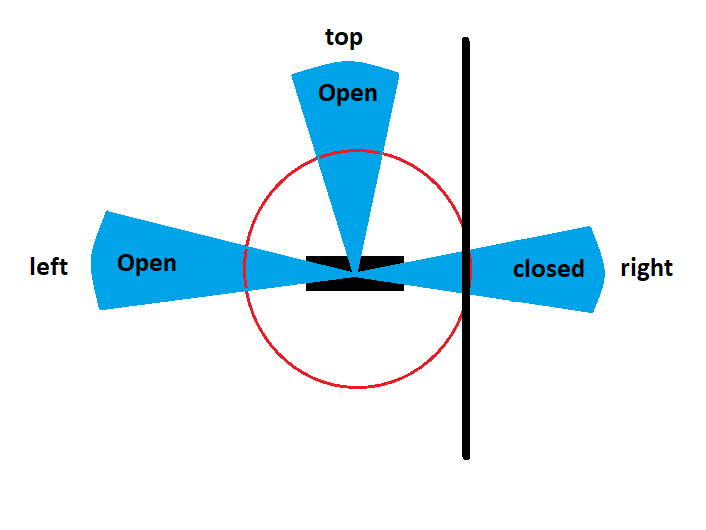
The wall avoidance algorithm is based on data from the laser range finder. The beam of the laser range finder is categorized into three sections: left, top, and right. In each section the data from laser range finder is checked to see whether there is a wall nearby, by setting a minimum threshold on the data from laser range finder. If at any instant, PICO detects a data point that is closer than the given threshold, it marks the section containing that data point as closed space and tells the controller that it cannot move any further to that side. This is done by setting the proportional gain of the controller to 0 for that side, until PICO identifies that there is enough space to move towards that side again, which might happen when PICO sees a door. The width of each section of the beam is tuned to 30°, as it is observed that for a very large beam width, PICO cannot identify a door as an open space if the width of door is too small. Also, the minimum threshold is kept to 40cm to prevent any collisions with walls or any other obstacles. The gif shows PICO moving to a set point while avoiding collision with walls.
This idea of continuous control and wall collision avoidance is motivated by the way our predecessor (Group 4 of Embedded Motion Control 2017) implemented their space recognition algorithm.
 |
 |
Perception
The perception part of the interface will receive filtered LRF data and odometry data, so that it can determine the position and orientation of PICO based on that data. The LRF data has been averaged over several scans, outliers have been removed and one out of every five data points is selected, resulting in 'filtered' LRF data. The odometry data is assumed to be inaccurate, since the omniwheels of PICO tend to slip often. Therefore a way is found to improve the position estimation using the LRF data as well.
Using the split and merge algorithm in the monitoring part of the interface, markers are defined. These markers are the corner points found by the algorithm. Once PICO is in a room and has made an initial scan, the location of the corner points is known and it can be used to improve the estimation of new positions of PICO in that same room. The split and merge algorithm is slower than the odometry updates, but it can still be run within 5ms. Therefore, it can be used regularly to improve the odometry data. The difference between the previous and current positions based on odometry is compared to the difference in the location of PICO relative to the markers. These two position estimates are then averaged, and since the LRF data is assumed to be more accurate this is weighted more.
One disadvantage of this approach is that it is required to have markers defined in a room, before the odometry data can be improved. Therefore everything will be relative to the odometry-based position estimation that is made when the room is first entered. This leaves room for errors. It is assumed that for the monitoring and mapping, the perception will be accurate enough to get a rough mapping of the location of the corners and doors. This will be enough to generate setpoints and paths, and to recognize the object in the final part of the challenge. Also, the control will include an algorithm that monitors the distance to the wall and prevents PICO from driving into a wall.
Monitoring
Primary Feature Detection: Find gap
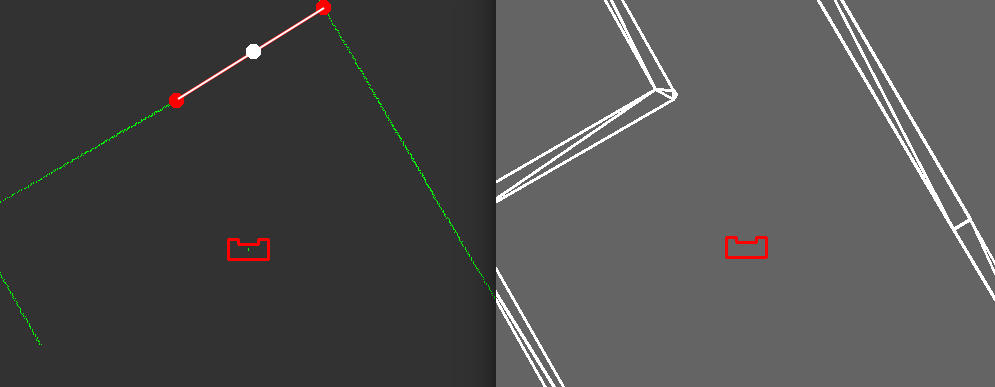
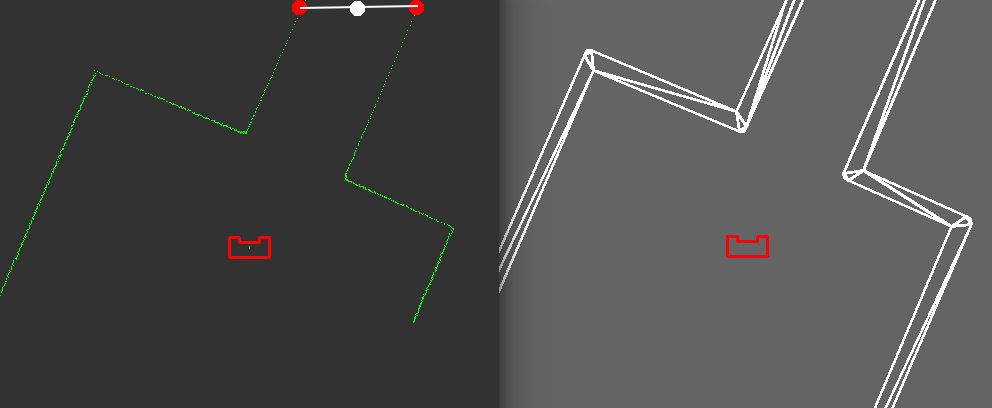
For the escape room challenge, a primary feature detection strategy to find the gap within is used. This is also part of the advanced feature detection. After making a scan, the distance between every two neighboring points is calculated. If the distance larger than the threshold, it could be said those are two line segments. The number of segments could only be either one, or more than one. If PICO faces a closed room it could only find one segment, otherwise the last point of first segment and the first point of last segment are used as future points. As shown if the following figure, the middle white point is always in the middle of the corridor.
Advanced Feature Detection: Split and Merge
The split and merge algorithm is used to identify and locate corners and doors based on the data provided by the perception. Based on the identified corner and entry points, the hospital can be be divided into rooms. The algorithm is implemented in the following way, and it's visualized in the figure from group 2 of last year (http://cstwiki.wtb.tue.nl/index.php?title=Embedded_Motion_Control_2017_Group_2).
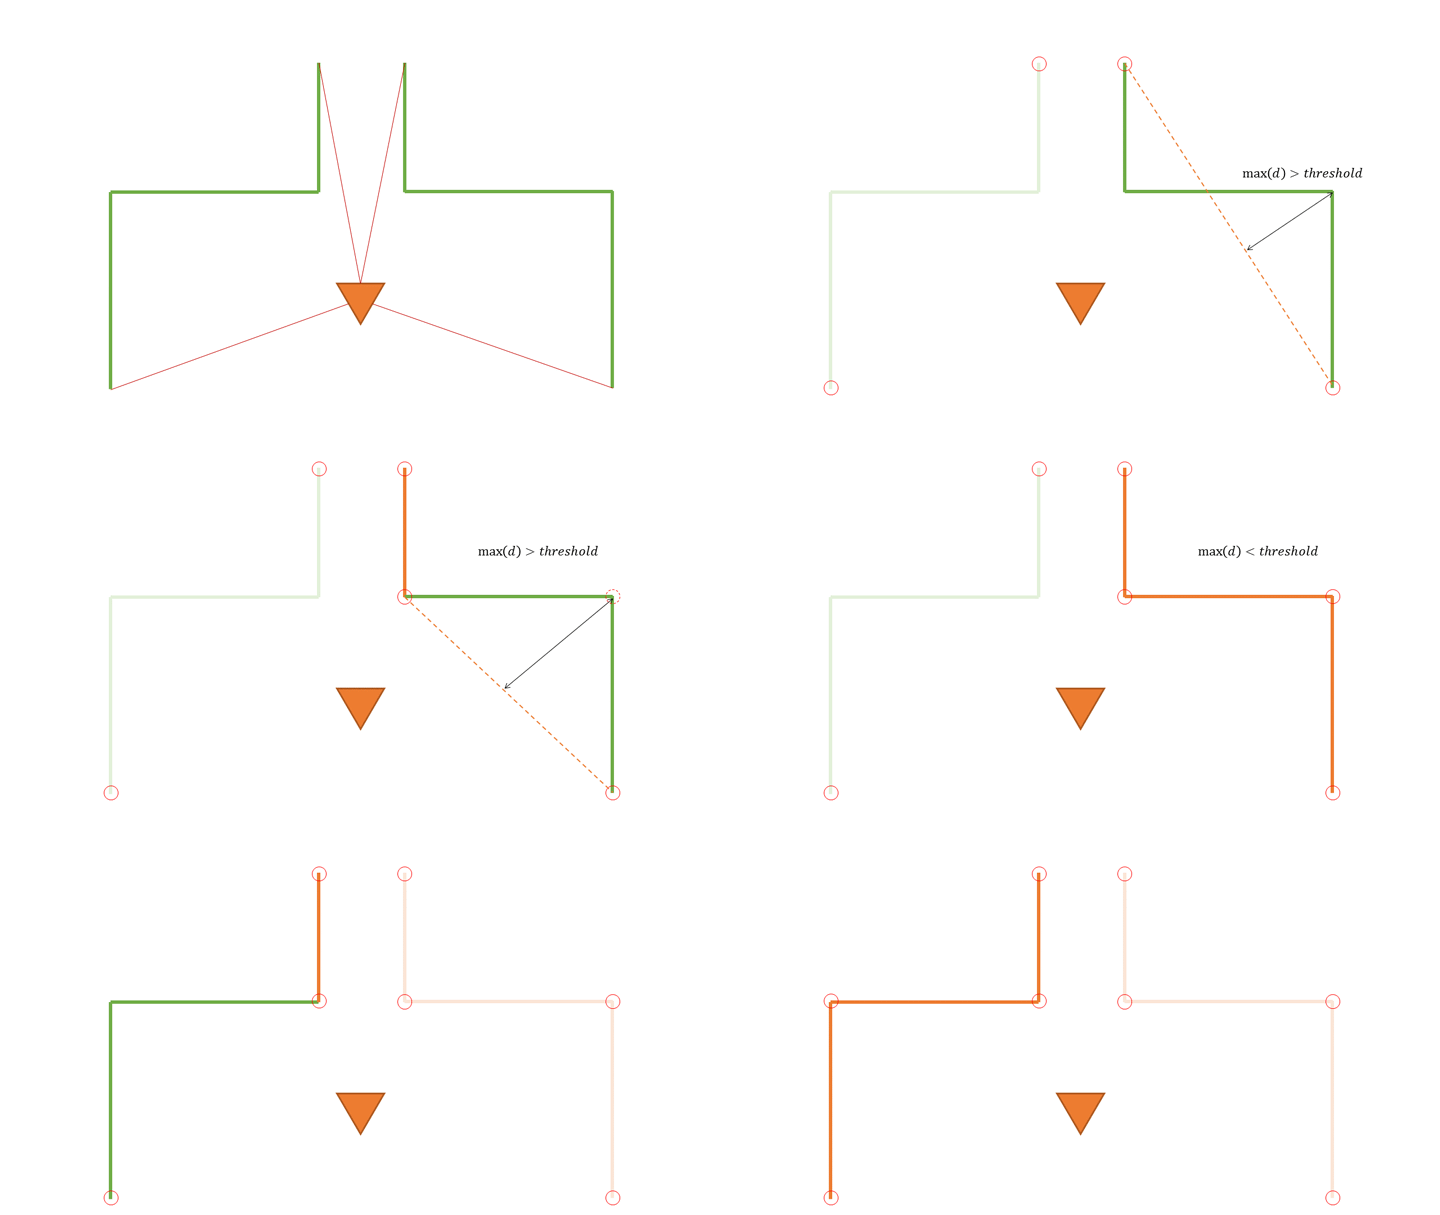
1. Preprocessing the data (input: laser range finder, odometry, bias)
- Remove points that are not of interest: for each individual scan the LRF-data is limited to a scope of 180 degrees.
- Convert the LRF-datapoints from polar coordinates to Cartesian coordinates, make modification according to the bias-factor resulting from the localization.
- Use push_back() to store both the processed LRF- and odometry data into a vector.
2. Merge multiple scans (optional)
- Merge possible overlapping parts from multiple scans, in order to avoid duplicates.
3. Identify linesegments (input: processed LRF-data)
- Determine if the distance between two consecutive laser points is larger than the set threshold.
- If true, store the indices A and B of these two laser points in a vector. The first and final laser point are also used as endpoint of a segment.
- Output: the initial- and endpoint indices of each segment after removing duplicates.
- Determine if the distance between two consecutive laser points is larger than the set threshold.
4. Identify feature points
- For each linesegment fit the line crossing through the initial point as well as the end point, characterized by the equation:
[math]\displaystyle{ ax+by+c=0\; }[/math]
where a, b, c are the parameters of the line:
[math]\displaystyle{ a=\frac{y_{1}-y_{2}}{x_{1}-x_{2}}; \qquad b=-1;\qquad c=\frac{x_{1}y_{2}-x_{2}y_{1}}{x_{1}-x_{2}} }[/math]
- calculate the shortest distance from this fitted line to each datapoint within the section using:
[math]\displaystyle{ \Delta=\left|\frac{ax_{0}+by_{0}+c}{\sqrt{a^2+b^2}}\right| }[/math]
- find the datapoint with the largest distance to the fitted line, and check if the distance is smaller than the wall threshold.
- if true, declare it's a wall between two points, go to the next step;
- if false, declare it's a corner, replace the initial point with the found corner, go back to step 1 in this function and write down the max distance points index.
- connect two points that are declared as wall
- connect each corner point with increasing index within current section
- connect current sections initial point with the minimal index corner point, and connect the maximum index corner point with the end point
- output: a 2D vector, every row contains all the feature point within that section
- find the datapoint with the largest distance to the fitted line, and check if the distance is smaller than the wall threshold.
5. convert from index to point structure
- extract index from input, assign their corresponding coordinates and type flag to point structure
- distinguish three type of feature point:
- the temporary point, or intermediate point
- the corner of room
- the point of exit
6. Merge map (update world model)
- push_back() new feature point to vector with point structure
Test Result
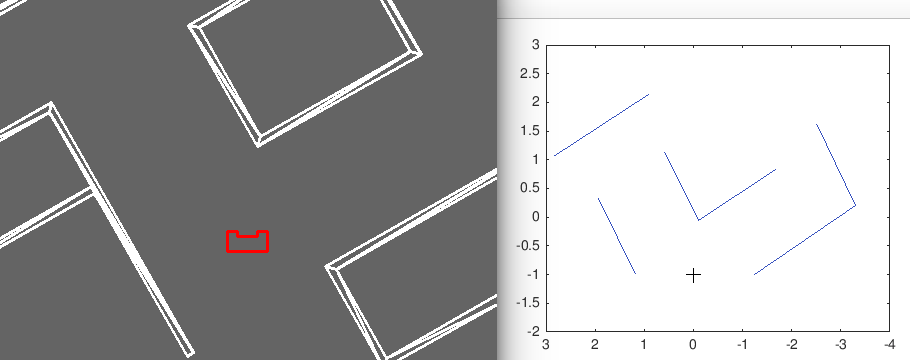
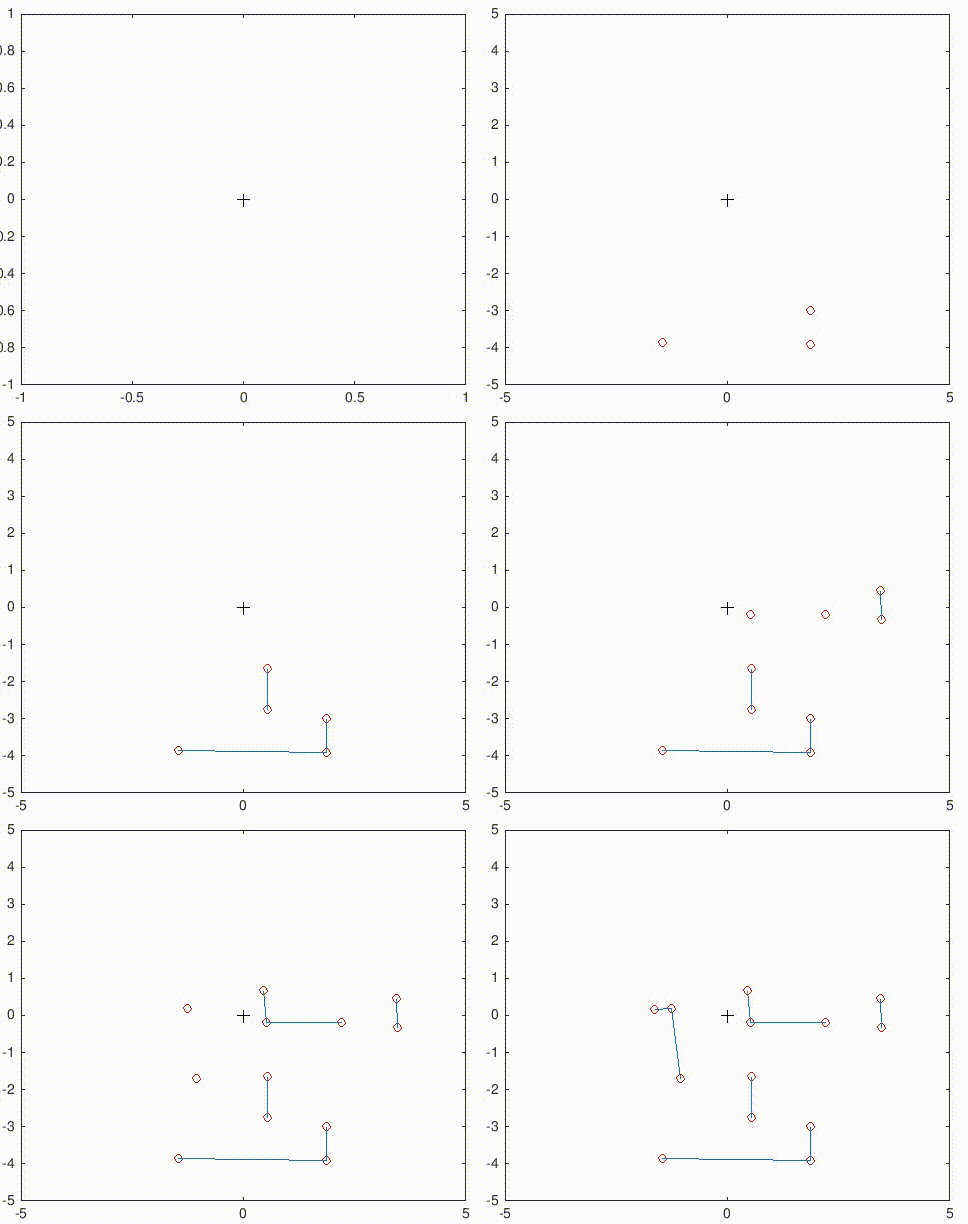
Static : These are some results of the implementation of the split and merge algorithm in simulation. On the left, the simulation environment is visible. On the right, the corner points that are found can be seen, as well as the lines that are fitted through these points.
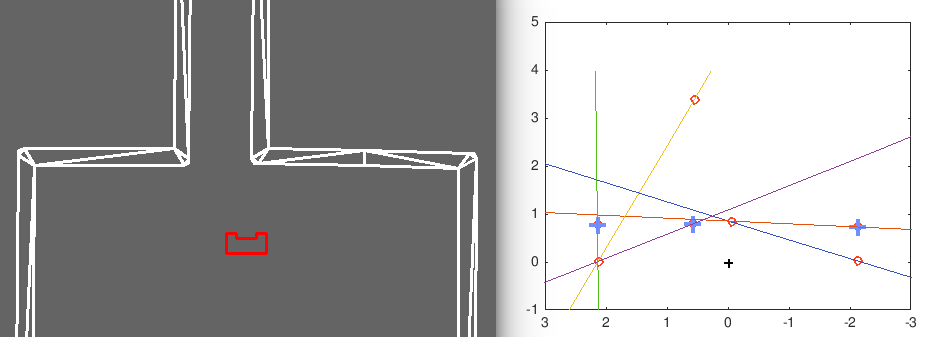
|
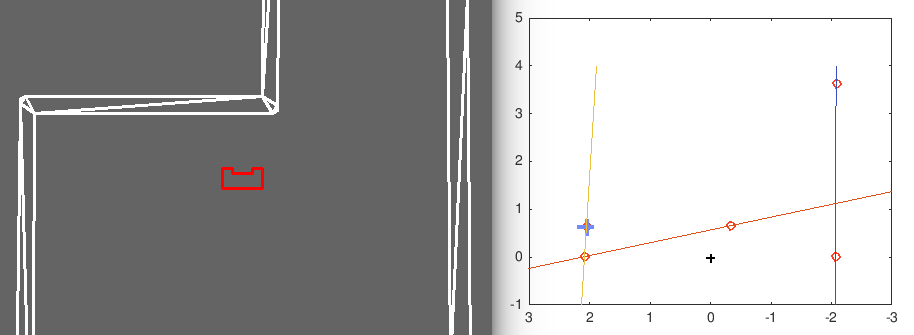
|
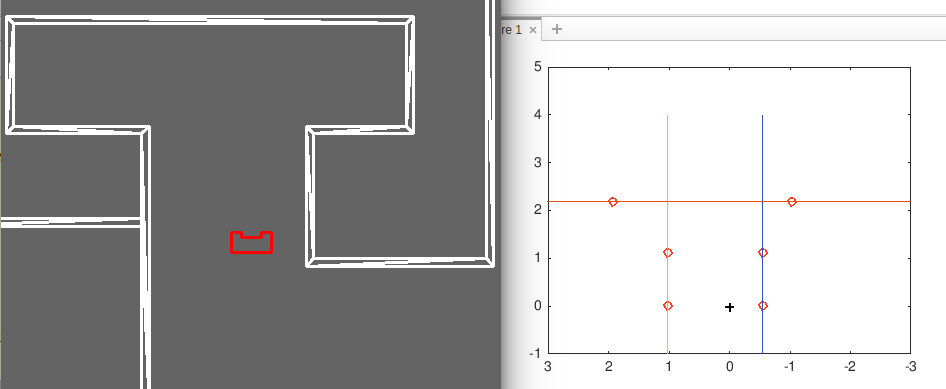
|
|
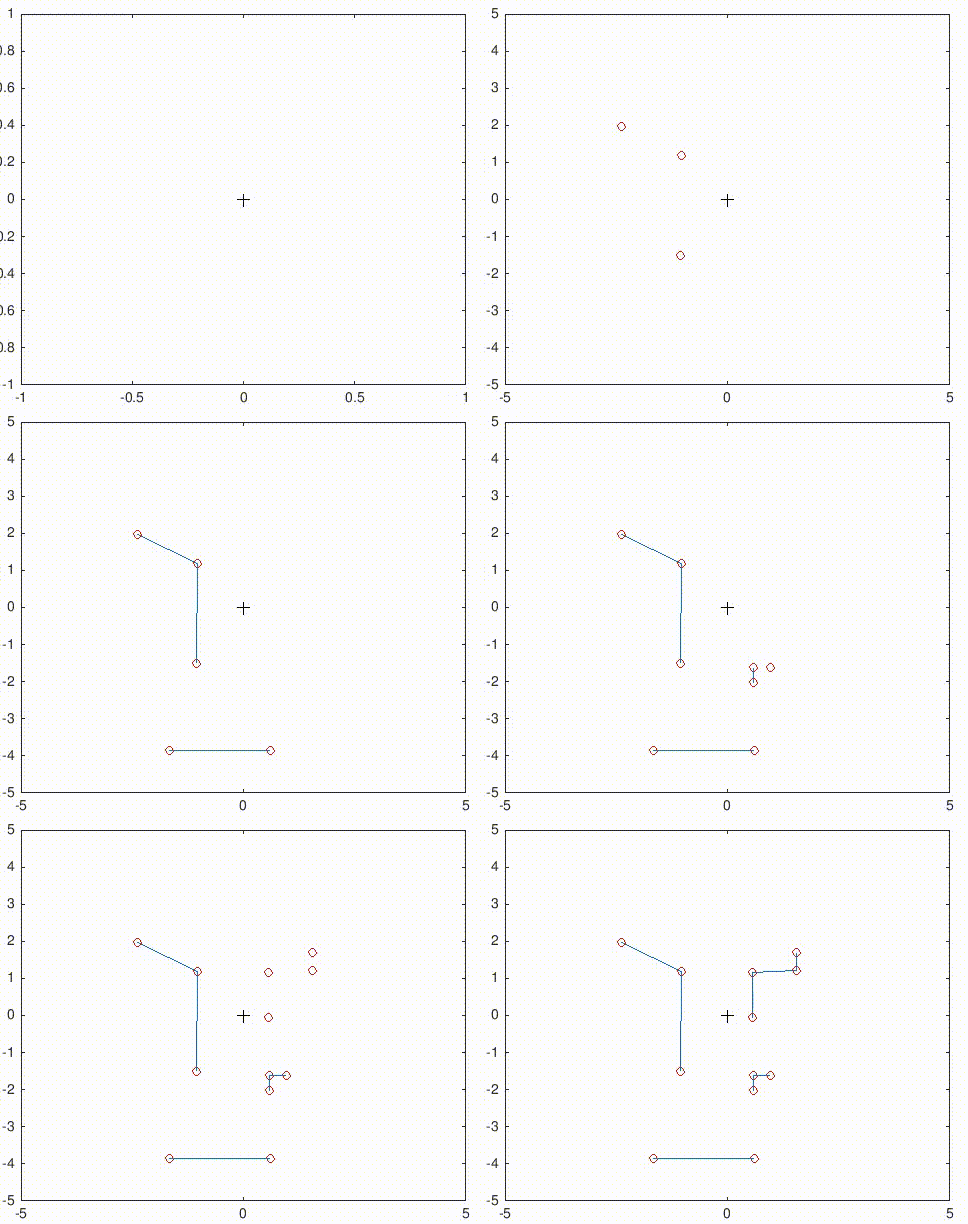
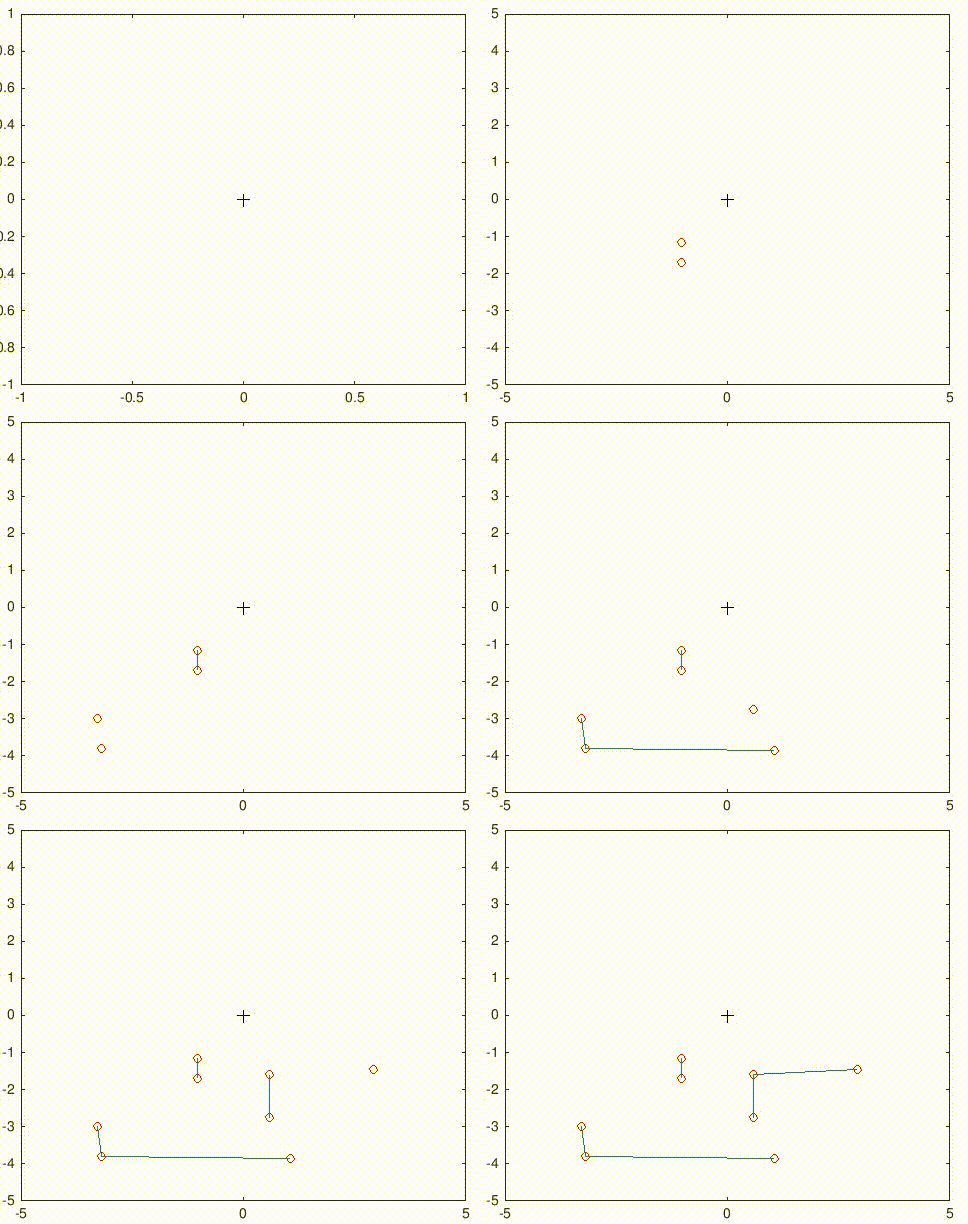
Dynamic : The working of the split and merge algorithm is illustrated further in the simulation gifs that can be found below. Since the corresponding simulator gif is too large to play fluently, it can be found using this link: http://cstwiki.wtb.tue.nl/images/Split-Merge-Simulator.gif
|
|
|
|
Advanced process
There are several tricks with the split and merge algorithm which are explained below. With these improvements the algorithm is more robust and it can extract more information.
Prevent missing feature point:
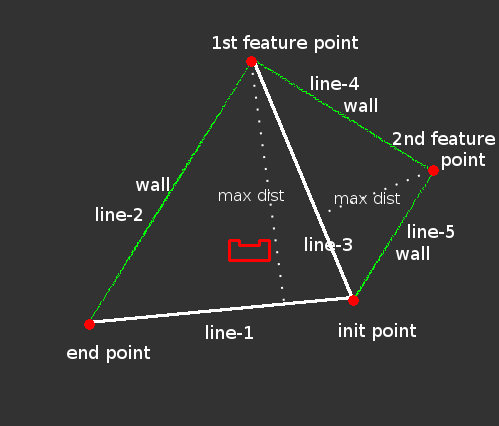
This happens when a corner point that has a large index, far away from the inital point, is detected first. Then the initial point is updated with the found feature point, and the possible feature point with a smaller index that's closer to the initial point is missed. In order to solve this, a found feature point will not only be connected to the end point. Instead, two lines will always be connected from the last found feature point to its neighbouring features or endpoints. Then, it can be checked if there is a wall in between or if there are any other feature points in these fitted lines. The figure below shows a simple scenario, in which the first line is created with the initial point and the end point of that section. Then the first feature point is found, because it has the largest distance to the line. This point is then connected with the initial point and the end point, creating lines two and three. In line three, one more feature point is found. Therefore line four and five are connected to the existing point. This process is continued until all lines are verified as a wall.
Evaluate the quality of the detected feature:
In order to evaluate the quality of a detected feature, it is possible to check the size of a continuous section, i.e. the number of points in each section. If it's less than a certain threshold, that section is removed because its point density is too low. In the program the threshold is tuned between three and six. This gives kind of a trade-off between the possibility of missing a feature and improving the poor mapping quality.

Distinguish different type of feature points:
With the basic split & merge algorithm, the feature points and the end point of a laser beam could be found. To distinguish these points within a section, first the number of feature points, i.e. the size of section, is checked. If the size is two, then all of them should be intermediate points. If it contains more than two points, then the distance is calculated from PICO to the feature point and its neighbouring points as well. There is a preset variable to determine which point before and after the feature point should be used for distance calculation. From one side to the feature point and the other side, if the distance goes down and goes up, it should be a exit point, while if the distance goes up and goes down, it should be a room corner.

Only feature within current space:
During every scan, the section of split & merge that's outside of the current space is not of interest and may even cause confusion when updating the map. To overcome this drawback it's ideal to just keep the section within current space. This could be divided into two cases, the scanning in the corridor and in the room. Both cases use a boundary as a constraint to filter the data.
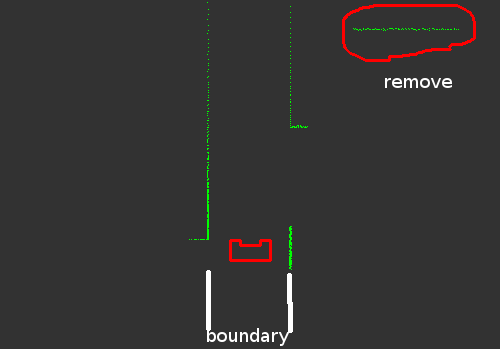
- Scanning in corridor: the boundary could be seen as the y coordinates of the wall. Initially PICO scans and gets the y coordinates of the -90 degree laser beam and of the 90 degree one. After that, every time that PICO scans in corridor, it should just check two conditions to see if a whole section's y coordinates are outside of the boundary, and if the distance from the boundary to the found section is larger than a threshold. Whenever these two conditions are satisfied, this section is erased from the vector.
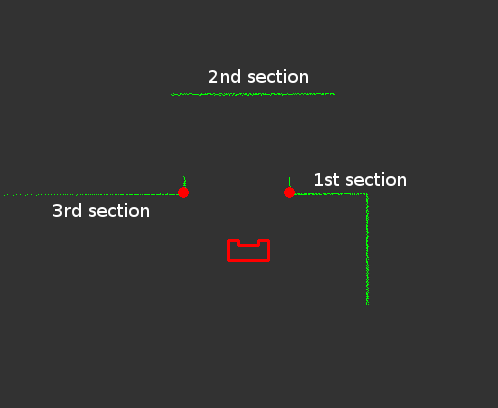
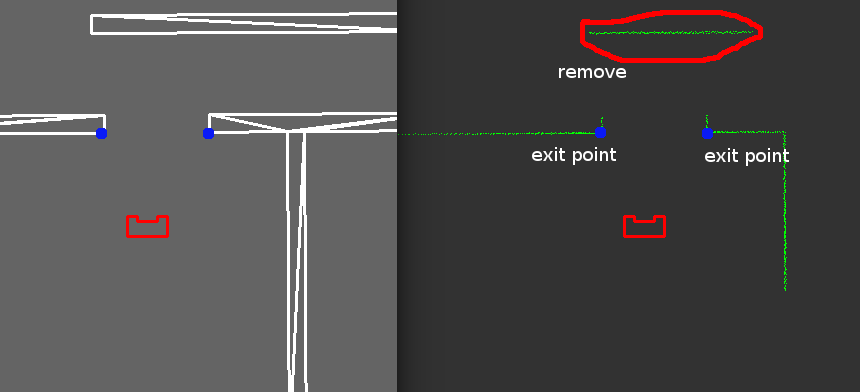
- Scanning in room: this is more complex than the case in the corridor, as there is no fixed boundary. If PICO faces a closed room, i.e. there are three walls without a door around PICO, all the sections that are detected would be within in this room. If PICO faces a wall with an open space, it may detect two exit points of the door, or even more between the door. This could be divided into:
- Two exit points - remove all sections between the certain two sections that have exit point, as they are not of our interest
- More than two exit points - remove all sections between the first and the last section that has an exit point, because only these two exit points are part of the door of current space
Define a door:
Ideally, a door is defined by two exit points. In reality this does not happen every time, either due to a door not being in the middle of the wall, or because the scanning doesn't cover the whole open space, so that only one or even none of the exit points is found during a scanning. The procedure of finding a door could be divided into two scenarios.
1. Find door from corridor
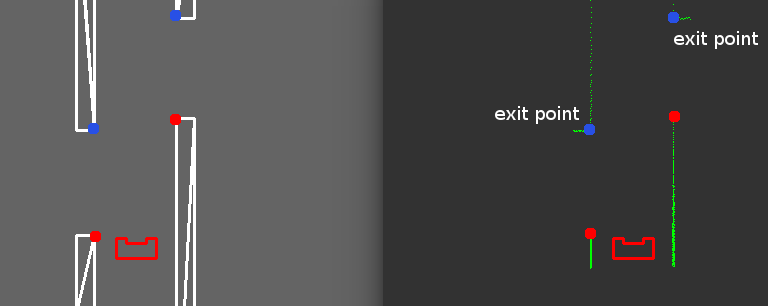
- From previous advanced feature detection, PICO may find some exit point from corridor, as the blue points shown in figure below. If the y coordinate of exit point is positive (left hand side), it is assumed the first point of next section is another exit point, as the red point shown in figure. If the distance between this hypothetical point and the exit point satisfies the 0.5-1 meter condition and their y coordinates difference is within a threshold, this is defined as a door.
- Similarly, if the found exit point has a negative y coordinate (right hand side), it is assumed the last point of previous section is another exit point, and do the same check. Based on this method, PICO could find as much door as possible even with limited scanning data.
2. Find door from room
PICO enters a room, makes first scan, turns back and scans again. Since the door could be in the middle of a wall or at a corner, this could also be divided into three scenarios.
- Find two or more exit points
If the door is at the middle of a wall, PICO may find at least two exit points. Based on the advanced feature detection mentioned before, it could be distinguished which section not belongs to current space. Thus a door could be easily defined by the first exit point and the last exit point, as shown below.
- Find one exit point
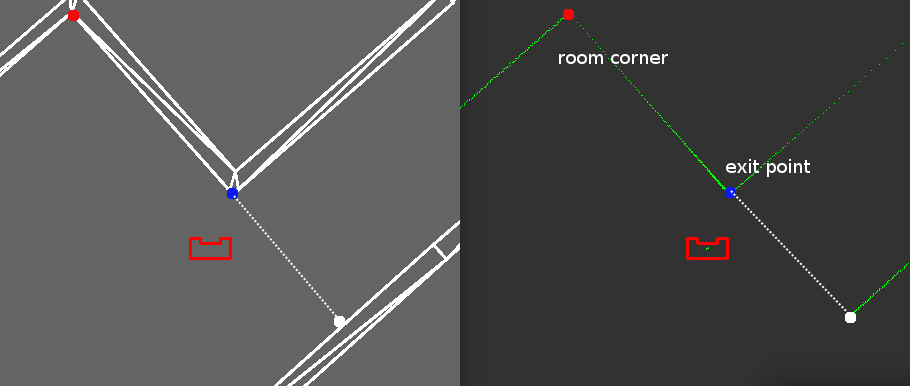
If the door is at a corner of the room, or is not facing directly to PICO, it may find only one exit point, as the blue point shown below. In this scenario, it is checked if there is a corner of the room as the neighbor point of the exit point. If there is, as the red point shown, the line from the corner of the room to exit point is extended. Then, the intersection with the rest part of the room is found, as the white point shows. Then the intersection point and the exit point could define a door.
- Find no exit point
The worst case comes when there is a door, but PICO may not find any exit point at first scan. In this case, if the segment number is larger than one, it indicates there should be a gap. Then the problem could be converted and solved by the primary feature detection mentioned before. PICO could use the found middle point of open space as the set point, drive there and scan once more.
Limitations
1. Wrong corner point
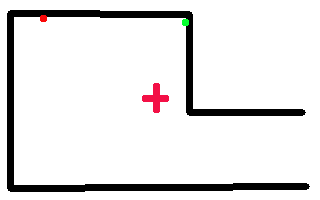
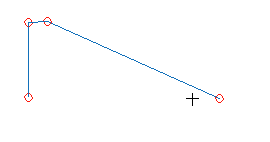
From simulations with different room setting, it is observed that split and merge works fine when PICO is not positioned straight in front of a wall. However, if PICO's x-direction is perpendicular to the wall, it's easy to find the wrong corner.
This is caused by the method that is used to calculate the distance of points within a certain section to the initial end-line, which is explained in step 4 above. When the wall is (nearly) parallel to PICO's y-axis, there might be several points with a similar maximum distance, and one of these points could happen to be a non-existing corner, which is indicated by the red point in the figure below.
Possible solution:
- Since the laser range is 0-270 deg, use 0-180 deg and 90-270 deg to detect feature, double check and avoid the parallel scenario.
- When a corner is found, check its neighbouring points. If they could form a right angle, then it's concluded this is exactly the corner point.
- When a wall parallel to PICO's y-direction is detected, rotate over a small angle and scan once more.
 |
 |
Mapping results
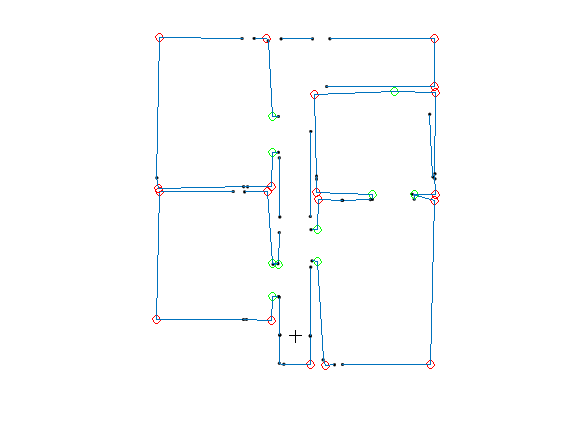
The figure below shows an example of mapping using split & merge in the simulator. Since we haven't integrated perception into the project and the localization is purely based on odometry data, the result is not perfect. The location of the walls is approximately correct, but they are not entirely straight. This would be worse in reality, since the odometry data is even less reliable in that case.
Hospital Competition
Due to the limitation of time and incomplete components of interfaces, we finally only used monitoring and continuous control interfaces to compete in the hospital challenge. While integrating the monitoring and control interface several problems were faced because of which a complete integration could not be done before the challenge. A few problems that were encountered are as follows:
1. The continuous controller was designed to make PICO reach given a set point with no walls in between current position of PICO and the setpoint. This was done because it was planned that the discrete controller would set the setpoints. Since that was not possible, monitoring itself was used to give out the setpoints to the continuous controller by evaluating the midpoint of the door, which at times can lead to setpoints with a wall between PICO and the set point.
2. The scenario of turning PICO when an opening is found was not considered while designing the continuous controller, as we did not foresee this situation. Thus, PICO always moves sideways, forward and backward w.r.t. to the absolute frame of reference, which can lead to a collision with a wall when PICO is moving backwards towards a given setpoint, as no LRF data is available in that case.
3. Also, we experienced that the code was not able to make PICO move after the first set point was reached. Although we tried to debug the problem, we were not able to resolve it completely before the challenge.
4. Without the perception part, the precision of re-localization was not good enough. The monitoring uses an argument bias to make a correction of the coordinates of the found feature, which has to be set to zero in reality. In simulation it works fine with only odometry data but on the real robot, the error is larger than the threshold used in the monitoring function, and the same feature point could not be relocated well. Also, continuous control highly depends on accurate odometry data, which is a very big limitation while implementing the controller on PICO without good odometry data.
5. Incomplete integration of monitoring into the world model caused the detected feature points to only be stored in the format defined by monitoring part. It's useful to plot the map but not easy for other components to use, especially regarding the storage of the states of PICO and using the high level hint.
Therefore, in the end our code was capable to identify all the feature points of the map, but because of unsuccessful integration with the continuous control, PICO could only move to the first door that was identified by monitoring.
Although not all things did go as expected, a few things really worked out well. The monitoring algorithm correctly identified the first door and the setpoint. Also, the controller could track the setpoint well without any collision with the walls. Had the controller been properly integrated with monitoring, it would have been possible to map the full hospital. Also, with the availability of all the required interfaces and with proper interfacing the challenge could have been completed.
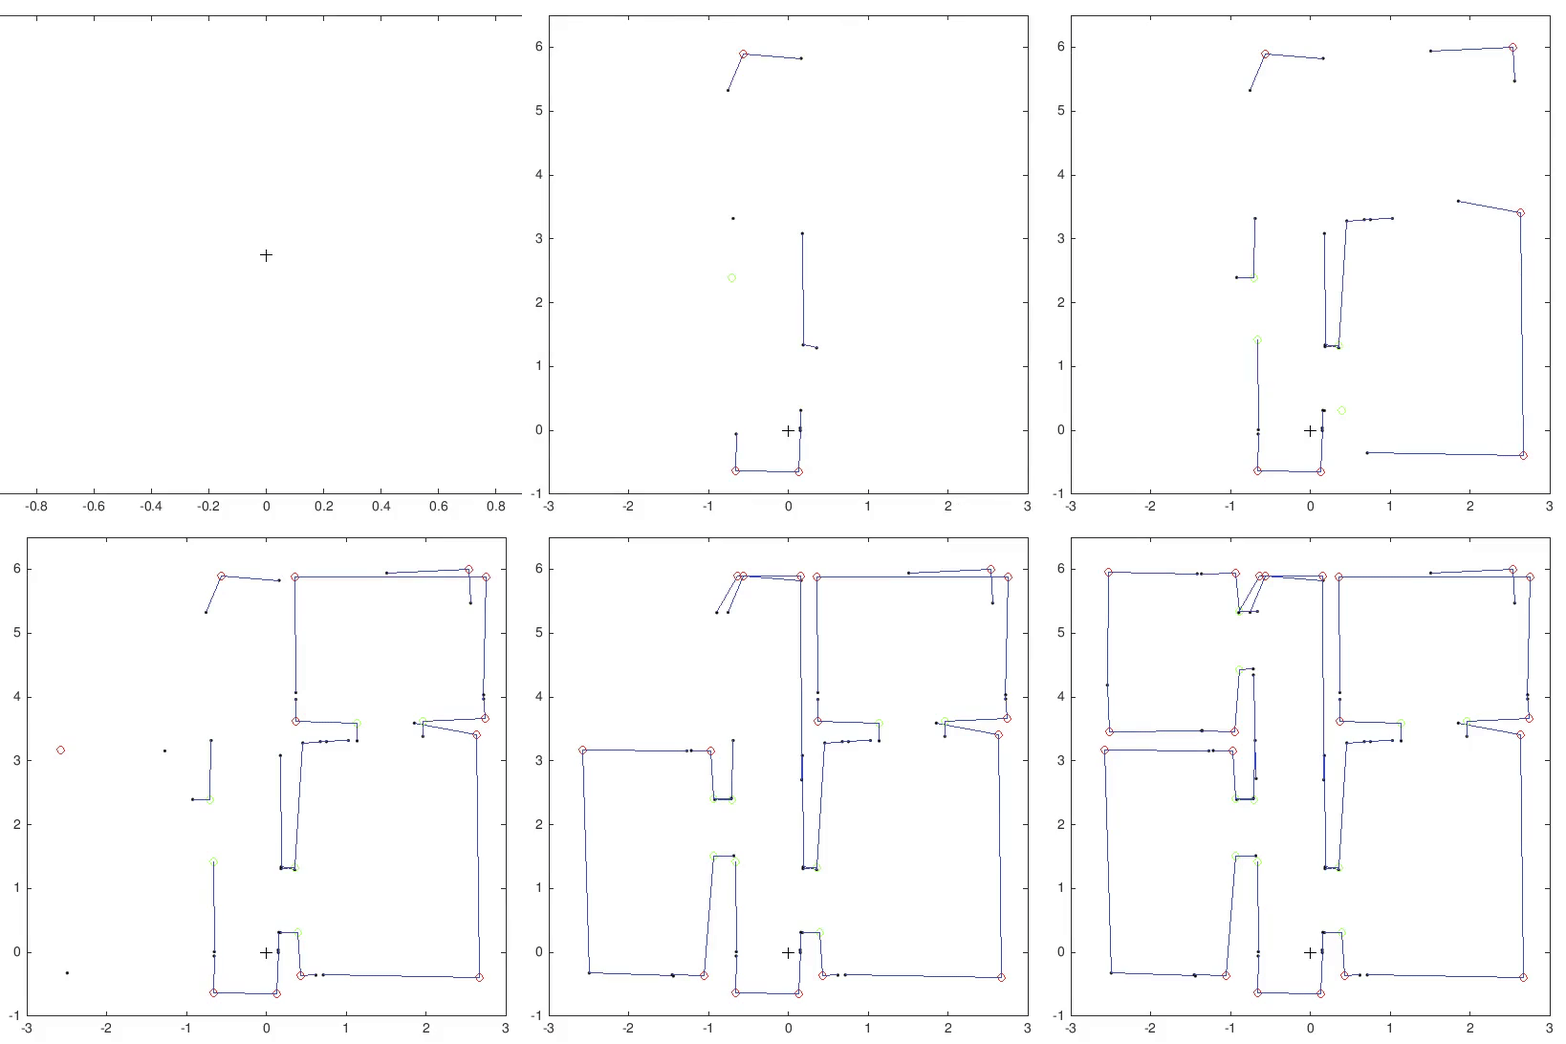
The figure below shows the monitoring and mapping procedure of the hospital challenge map in the simulator. However, it's simulated using only odometry data and the re-localization precision is not perfect without perception.
Interesting code snippets
For the monitoring part, we mainly use the split & merge algorithm, together with some advanced feature detection methods that were mentioned above, such as distinguishing different types of feature points. We also use door-definition to specify where the door of current space is.
We are also very proud of the (internal) structure of the map. This structure provides a clear hierarchy, and can therefor be used to easily do discrete planning. Because the underlying connections between all the rooms are saved, navigation through different rooms becomes a trivial task.
Conclusions and Discussion
Unfortunately PICO was not able to escape the room in the initial competition or complete the set challenge inside the hospital with the implemented code. For the escape room competition the decision was made last moment to switch strategy from the initial design of fitting lines to a wall-following principle. Instead of spending a lot of time on developing the concept of fitting lines through the data points, the implementation of the wall-follower could have been improved significantly if the decision to rethink our strategy had been made at an earlier stage. During the hospital challenge, though PICO was able to identify the first door and position itself in the initial room in order to scan the inside, the code malfunctioned once the robot had to turn around and continue to the next room.
Despite the fact that the code did not enable PICO to complete the mapping of the hospital, there are certain aspects to our code that we are particularly proud of. For instance, the decision to create a registry separate of the world model provided the opportunity for interfaces to be developed independent of each other. All interfaces can store and request varying data regarding position, orientation, sensor data and setpoints from the registry. Independent of the registry, classes such as rooms, doors and corners are stored. Also, the split and merge algorithm implemented in the monitoring interface proved to work quite well in scanning and identifying the different structural aspects of the hospital.
In hindsight, it turns out that the general structure describing the interaction between the world model and the other interfaces should have been implemented in C++ in an earlier stage. Even though the main architecture was well defined conceptually, writing the corresponding code was postponed to a later stage. This in turn led to a lack of time to finish other aspects of the code at the end of the project. Had this general architecture been defined earlier on, then different parts of the required code could be divided among the group members who can work on it individually, while still ensuring compatibility with the other segments of code. Also, the initial concept of the state machine itself could have been made significantly less complex, featuring fewer functions and interactions. This way, the state machine would be more straightforward to implement in the discrete control part and from that it would be more efficient to build a framework around it. In short, the state machine was too complex, causing the implementation and further development of other interfaces to take more time than expected. Hence, the design of the initial architecture turned out to be of vital importance for the remainder of the course.
Moreover, one significant pitfall was to think that we have to create all code from scratch. The limited time frame of this course forces you to be able to implement existing pieces of code and adapt it to meet your own requirements.
Recommendations
Based on the work done during the course, several valuable insights and recommendations for future work are stated:
- First of all, start learning to write code in C++ as soon as possible. Having a proper understanding of the structure, language and implementation saves a lot of precious time during the debugging phase.
- In order to enhance productivity, different aspects of the code must be divided among the group members. However, this implies that the main architecture of the different interfaces and their respective interactions should already be constructed in C++. This way it is clear what is required from each assigned task in terms of the input it needs and the output it provides to the others. Group members can work on their assignment separately, while still ensuring that the written code is compatible with the work of others.
- Due to the limited time and testing capacity available during the course, the main focus of the design should be to implement an as plain and simple code as possible; there is simply not enough time to create an extensive, complicated piece of code for the PICO robot.
- Likewise, already existing libraries, packages and algorithms should be implemented as much as possible in order to create the entire code needed in an efficient manner. Writing and debugging a new version of code for a certain task that has already been covered by others is just a waste of time.
- In addition, the simulator provides a useful tool to try and debug new pieces of code. Since actual testing time with PICO is limited, all tests should be prepared thoroughly in the simulator in order to efficiently use test time. However, it should be taken into consideration that the provided simulator does not account for all different aspects of the motion behavior of PICO. Hence, all simulated code should be verified by means of real-life testing.
- The escape room competition should be viewed as an intermediate opportunity to test the working of the code up untill that point: it is not a goal in itself. Focusing solely on escaping the room can result in having to start from scratch when coding for the hospital competition. Rather write the code in such a structure that it can be used in later stages of the hospital competition as well.