Embedded Motion Control 2016 Group 6
Group Members
| 0717576 | R. Beenders | r dot beenders at student dot tue dot nl |
| 0774887 | M.P. Bos | m dot p dot bos at student dot tue dot nl |
| 0772526 | M. Cornelis | m dot cornelis at student dot tue dot nl |
| 0746766 | S.J.M. Koopmans | s dot j dot m dot koopmans at student dot tue dot nl |
Design
This report describes in a concise manner the steps that were taken to come to the first draft of the program-architecture for the PICO robot. Firstly the requirements are stated on which the program- architecture is based. Followed by a global explanation of the structure of the eventual program. The components of the robot are shortly discussed followed by the (expected) specifications. Finally the interface is discussed.
Requirements
- The robot has to operate autonomously
- The robot is not allowed to collide with anything
- The robot must find the door and request to pass it
- The robot has to solve the maze within 7 minutes and within 2 tries
Functions
The global structure of the program-architecture can be seen in the figure below. As becomes clear from the picture the code was created from the top down. The requirements were translated into a clear goal. First it was established what was needed to achieve the goal. To determine the location of the door and to solve the maze some kind of model of the world is needed. To create this model and move through the world tasks are needed. The door is found and the maze solved through a combination of the world model and tasks. To perform the tasks several skills are required. What skills are available is limited by what the robot can do. Several skills are defined based on the sensors and actuators present in the robot. A more in-depth explanation of what the tasks and skills can be found below.

Goal
The requirements that directly describe the goal are encompassed below:
- The robot must first find the door and request to pass it
- The robot has to solve the maze as fast as possible
The collision avoidance is incorporated on a lower level because it has to hold for all tasks, this means collision detection and avoidance will be designed as a skill that is used for all tasks involving movement. The requirement that the robot has to operate autonomously is incorporated per default.
Environment context
Contains an array of structs which describe the location, amount of connections and state of orientation- points. Also contains the location and rotation information of the robot. Whether locations are described relative to each other or to some absolute origin is to be decided and will depend on the approach that is used to move the robot through the maze and update the world-map. Experiments will show whether the odometry can be sufficiently corrected by using the laser or some other form of calibration in orientation-points can be applied.
Tasks
The tasks can be divided into two groups: feedforward and feedback. Feedforward tasks are 'choose path' and 'create reference'. 'Choose path' will let the robot decide which way to drive from an intersection. 'Create reference' will create a straight line (between the walls) which the robot should follow. Feedback tasks are 'analyze crossing', 'follow reference' and 'check if door opened'. 'Analyze crossing' will allow the robot to check which directions are open and which are not. The world has four defined directions: North, West, South, East (N,W,S,E). The robot should also determine if the intersection is actually a dead-end or open-space. 'Follow reference' should let the robot follow the created reference line by use of a controller. 'Check if door opened' should make the robot wait for five seconds to see if the door actually opened (since the robot can't always see the difference between a door and a wall).
Skills
The robot has several skills which are driven by the robot (actuators and sensor), which are used in tasks. The following six skills, defined as: 'follow path', 'rotate 90 degrees', 'detect lines', 'request door', 'detect crossing/open-space/dead-end' and 'collision avoidance'. Follow path allows the robot to drive forward along a straight path towards the next node. Rotate 90 degrees makes the robot rotate for (about) 90 degrees, so that it will face the next direction (N,W,S,E). Detect lines should create straight lines out of the raw data received from the LRF. This will allow the robot to create a local version of the world with straight walls. Request door uses the beep sound which will make the door open. There are some requirements for the door to open (for example, the robot has to stand still). Detect crossing/open-space/dead-end should let the robot see when it is done traveling along a path, and it has found a crossing (or open-space or dead-end). This can be done by noticing that the walls on the left and right have disappeared. Collision avoidance should be a sort of emergency brake, which makes the robot abruptly stop once it gets too close to a wall.
Robot
The robot has some actuators and sensors, which are described below.
Components
The robot consists of both actuators and sensors. The actuators are the wheels, which can drive and rotate the robot. Besides that there is a beep function which can be used to open doors. The sensors are the Laser-Range-Finder (LRF) which can detect the distance to nearby walls, and the odometry which can measure how much the wheels rotate.
Specifications
The robots maximum speed is 0.5 m/s translational and 1.2 rad/s rotational. The LRF has a width of about 4 rad (from -2 to 2 rad), with a resolution of about 1000 points. The actual measurement accuracy of the odometry is not very important, since the wheels slip a lot. The two driving wheels aren't parallel to each other, which causes this slip. The accuracy of the information found by this odometry could therefor be very low.
Interfaces
When the program is running it should print which task the robot is performing. When a task has finished correctly a complete message is displayed. Any errors that occur will be printed with explanation of the error. A timer is used to determine how long tasks take. This information can be used to find what situations make tasks take longer and which tasks take longer in general. The code can then be optimized accordingly. Besides text there will also be a visualisation of the world-mapping. The detected lines will be drawn until a crossing is analyzed and will then be replaced by a node. As the robot solves the maze, the nodes will be connected and a node-map of the maze will be slowly built.
First Presentation
The first presentation can be found here: http://cstwiki.wtb.tue.nl/images/EMCPresentationGroup6.pdf
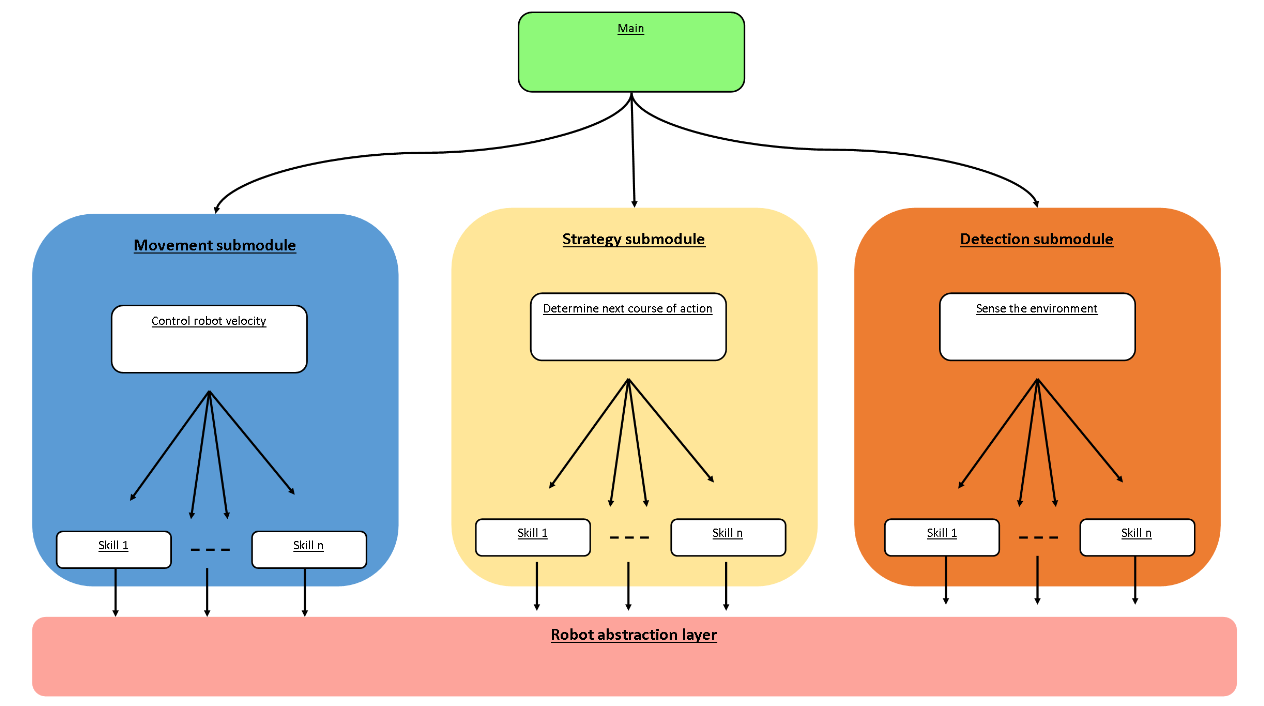
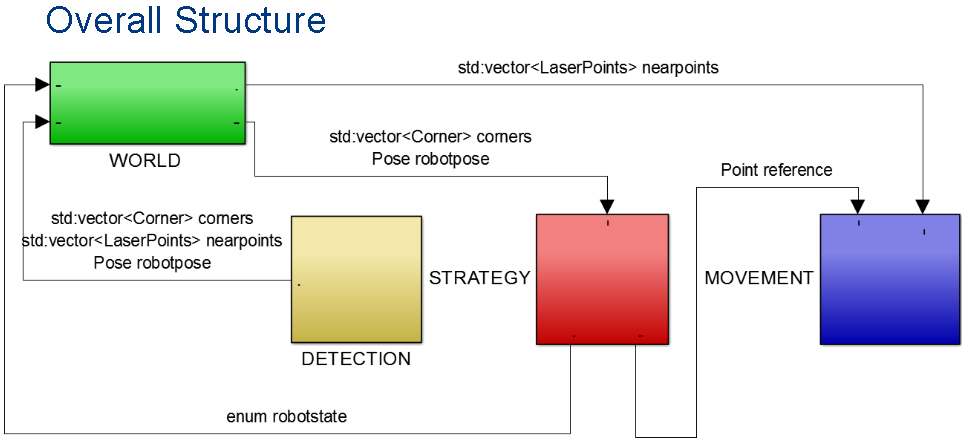
During the first presentation, the idea for three different submodules has been introduced. These submodules are: movement, strategy, and detection. The idea of this is to decouple the system. The detection module will always try to scan the surroundings, no matter what strategy and movement are doing. Which is exactly what is desired. Strategy will always try to compute how to handle situations and where to drive. Movement will actuate PICO to drive towards the desired point, without bumping into walls.
Corridor Challenge
Code
A simple code has been set up for the corridor challenge. It consists of good detection (walls, multiple types of edges) which will definitely by useful for the maze challenge. Besides that PICO will use a few laser sensor values to drive straight through the path. If PICO gets too close to a wall, the wall will repel PICO by actuating in y direction. Once PICO gets close enough to the second edge (the one which is the furthest away from PICO at the start), PICO will stop and start rotating. Then PICO should at some point detect two sharp edges and rotate until PICO is facing the exit. The last step is to simply drive forward (again with laser sensor values to stay away from walls).
Challenge
The challenge failed twice, with the same mistake. The problem was that the second edge was detected twice (two points very close to each other were both set as edge-points). That is why PICO thought that the exit was between those two points, and drive directly into that edge.
Retry
During the testing time, we decided to test PICO again, with new code. The problem for duplicate edges has been fixed by stating that two edges must be at least a certain distance away from each other. Besides that some values (for example push-force from walls) have been tuned better. With these settings, PICO can solve the maze in about 14 seconds.
It should be noted that due to some miscommunication, we didn't get the opportunity to get two test hours before the corridor challenge. If we had the test time (which was used here to optimize the corridor challenge code) before the challenge, we may have been able to successfully end the challenge.
Final Presentation
The final presentation can be found here: http://cstwiki.wtb.tue.nl/images/EMCFINALPresentationGroup6.pdf
The presentation contains:
- A short recap on the corridor challenge
- Our new model, including multi-threading
- In-depth explanations about each module, see picture below
Code Explanations
Multithreading
To make sure there different modules can run independently, multithreading has been implemented using ZeroMQ[1]. Multithreading allows a clear distinction between the role of each thread. It also improves modularity; threads should not be hindered by the absence or crashing of another thread. If the thread depends on another one for proper execution, it is easy to detect whether the latter is active with for example a polling function including a time out period. Should there be no proper result from the polling function, the thread can act accordingly and still execute the tasks it can do without the dependency.
For this project, the main goal was to not have the tasks of each module interfere with one another and to divide the code. The magnitude of this project is rather small in comparison to real life programs. Therefore, the gain in execution speed and modularity might not be that major. However, it is generally a good idea to have a solid base for a project with future considerations in mind. This is even more important with greater groups of programmers and more complex systems.
User interface
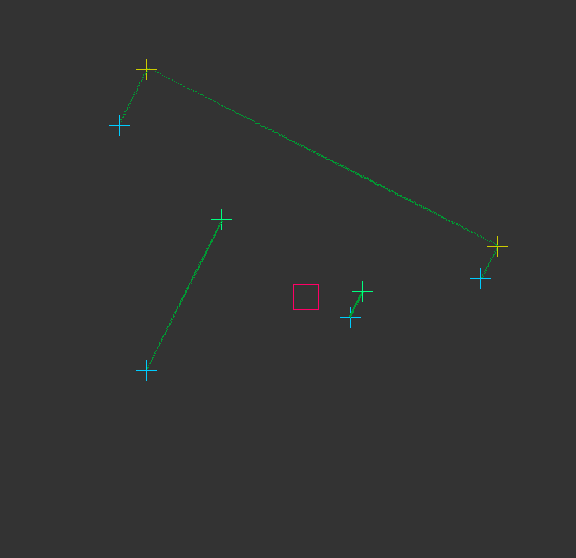
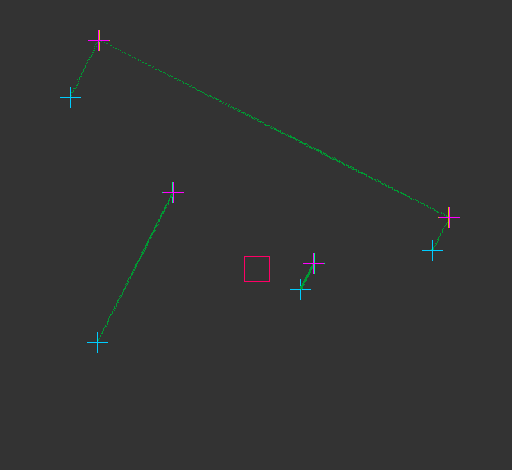
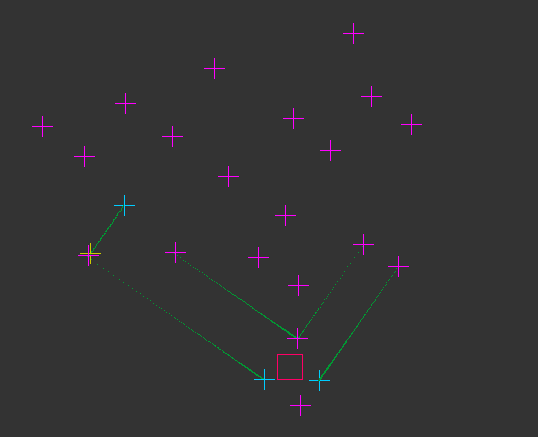
To be able to get real time feedback from PICO, a simple user interface has been made using the library Xlib [2]. This user interface is mainly used to verify what the robot sees and therefore had played a big role in designing and debugging the detection module. In this user interface, the following points are shown:
- Dark green dots visualize the current laser data.
- Blue crosses define the edges which cannot be defined as corners with the current data, e.g. edges of the vision and parts of the walls.
- Green crosses define the sharp corners.
- Yellow crosses define the hollow corners
- Purple corners define the detected corners used for EKF-SLAM.
And example of the vizualisation can be seen in the figures below. A movie showing the EKF-SLAM algorithm in action can be seen in the EKF-SLAM verification movie at [6]
Detection Module
The core of the detection module is the loop defined in code snippet (1). The loop can be summarized as an execution of Simultaneous Localization And Mapping with an Extended Kalman Filter (EKF-SLAM). The execution fires whenever there is new data available as defined by the function in code snippet (2).
Detection algorithm
To be able to properly execute EKF-SLAM, landmarks have to be defined and detected. The corners of the maze are used as landmarks to solve the maze using EKF-SLAM. The corners are detected using the function defined in code snippet (3). This function checks for range jump and for laser point which neighborhood approximately form a 90 or 270 degree angle. Approximation has to take place due to the fact that the world is not ideal; the LRF is subject to disturbances. Consequently, many "corners" may be detected close to each other (which was the main problem of our corridor challenge implementation). To counteract this phenomenon, an algorithm extracts the best corners from the set of assumed corners. This algorithm is shown in code snippet (4). The algorithm converts all assumed corners into subsets of assumed corners close to each other and returns the corner that is closest to 90 or 270 degrees per subset.
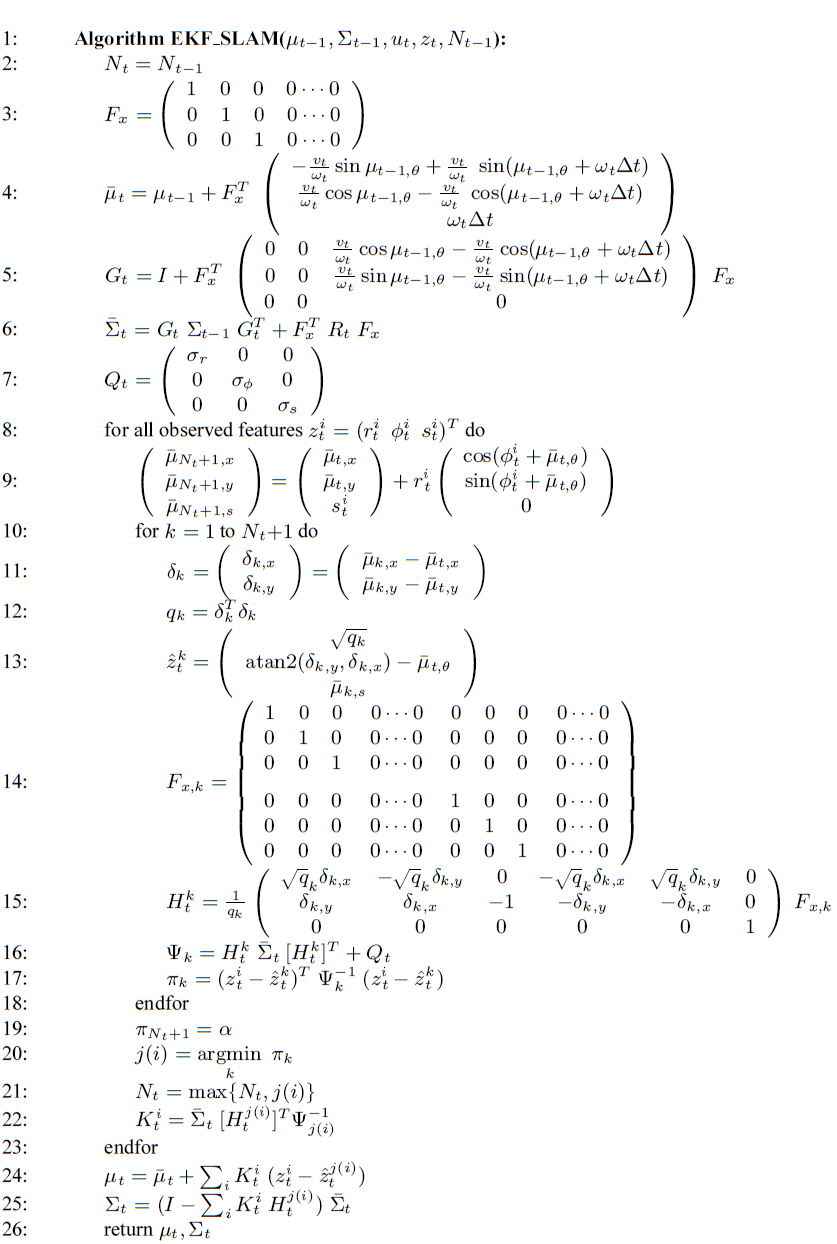
The actual EKF-SLAM implementation is shown in the figure below, taken from [3]:
The main difference between this algorithm and the actual required algorithm is that there are no visible signatures present for landmarks, therefore they only consist of an actual position in the world defined by polar coordinates. Furthermore, using the transformation matrices shown in steps 3 and 14 are computationally very inefficient. The matrices are replaced by "more computation friendly" lines of code within the algorithm. The algorithm is shown in code snippet (5), where each step corresponding to aforementioned algorithm is stated. Note that that the gradient matrix H at step 15 is different than in [3]. For our implementation the standard gradient did not work and had to be corrected. The matrices are realized using the OpenCV library [4]
Verification
To test the algorithm, a maze is created and PICO is put in it. The program pico-teleop is used to drive the robot around and the landmarks are verified using the user interface. A video of PICO driving in the real world can be seen at [5] and the corresponding verification at [6]. From this verification we can conclude that the EKF-SLAM algorithm is correctly implemented and can be used to correct the robot and landmark positions which allows for accurate mapping and useful data for the strategy and movement modules.
Strategy Module
Due to the absence of one of the team members and the long time it took to implement EKF-SLAM the strategy module did not get finished before the maze challenge, what follows is a description of the state machine that was planned to be used during the maze challenge but could not be realized due to the lack of time. The strategy module uses the landmark map created by the EKF-SLAM algorithm in detection. Since it is known that the walls are approximately axis-aligned, meaning all angles are 90 degrees, PICOs direction can be simplified to 4 base directions. If the EKF-SLAM algorithm is initialized after PICO has aligned itself with a wall, the top of the map (direction directly in front of PICO) can be seen as the north direction. Since the robot pose and landmark location are both known in an absolute frame, they can be translated to the robot frame. Coordinates in the robot frame are used to tell movement where to go and trigger the guards that switch PICOs state.
Initialization
When PICO starts strategy has to tell PICO to align itself with a wall, once this has happened the robot state changes and the EKF-SLAM algorithm is started. The node map is empty and the state is set to exploring new paths.
Exploring
If no landmarks are visible PICO randomly drives until it finds a landmark (note: the complete absence of landmarks could theoretically never happen if the maze is built to the given specifications and known range of dimensions). The list of landmarks is filtered so only visible landmarks are taken into account. From the visible landmarks the closest one that is in front of PICO is picked and its position is translated to robot coordinates. It is also known what kind of landmark it is and whether it is to left or to the right of the robot. PICO aligns itself either next to the landmark (edge or sharp corner) or diagonally to the landmark (hollow corner) by sending a reference to movement. Strategy keeps updating this reference until it becomes small enough and then it switches state.
Node analysis and placement
Once PICO is aligned with the landmark it will look for other landmarks with similar x or y-coordinate with compatible type that would indicate a possible path. If other compatible corners are found a node is calculated. If the node does not exist yet a node is placed. This is done by a node placing function that takes a number of landmarks and a type as input and outputs absolute coordinates. The position of the node is stored as a set of landmarks and a type, meaning that the node placing function can give the nodes position with updated landmarks ensuring that the node-map gets updated properly as well. Besides the position the node gets an ID-number and for each of the four directions it gets a number of how many times the robot left or entered through that side. If the same node is detected again the state of the directions gets updated.
Crossing a node
To ensure the same node doesn’t get detected over and over again an extra state is needed for PICO to cross the crossing and drive slightly out of sight of the landmarks before it continues exploring. If it gets to a new intersection it will randomly pick a direction. If an old node is detected it takes the direction with the lowest number. If all paths are visited once PICO has to turn around and drive back the way it came following the Trémaux algorithm. Crossing the node can be done by first putting the reference on top of the node (middle of the crossing). After this strategy can call a function that changes the direction of the robot (North, East, South, West). After the robot is turned in the correct direction it will drive between the landmarks that denote the path and change state 5 centimeters after passing the landmarks before returning to the state exploring. This is to ensure that the robot doesn’t recognize the landmarks next to it as a new intersection.
Dead end
Once a dead end is hit PICO will beep, wait a couple of seconds, check if the door is opened if this is the case it will cross the door and place a node. If the dead end is not a door, PICO will turn around and resume exploring, the dead end detection is implemented in the node analysis and placement. When a hollow corner is detected and another hollow corner is close enough this denotes a dead end.
Open space
An open space can also be detected by node analysis and placement. If a single corner is found and no other landmarks are close enough to create a sensible crossing, a node is placed on a set distance from the found corner. This node is seen as having two openings depending on the direction of the hollow corner that was observed.
Movement Module
The movement module receives a reference from the strategy module given in robot coordinates. This means movement simply has to drive towards the given reference. To prevent collision, potential field navigation is implemented. Potential field only reacts when PICO gets too close to the walls. If detection and strategy work as they should then the robot should always drive safely to the next reference, since strategy should provide clear straight paths to the movement module. In this case potential field is used to just keep the robot straight and away from the walls.
Maze Challenge
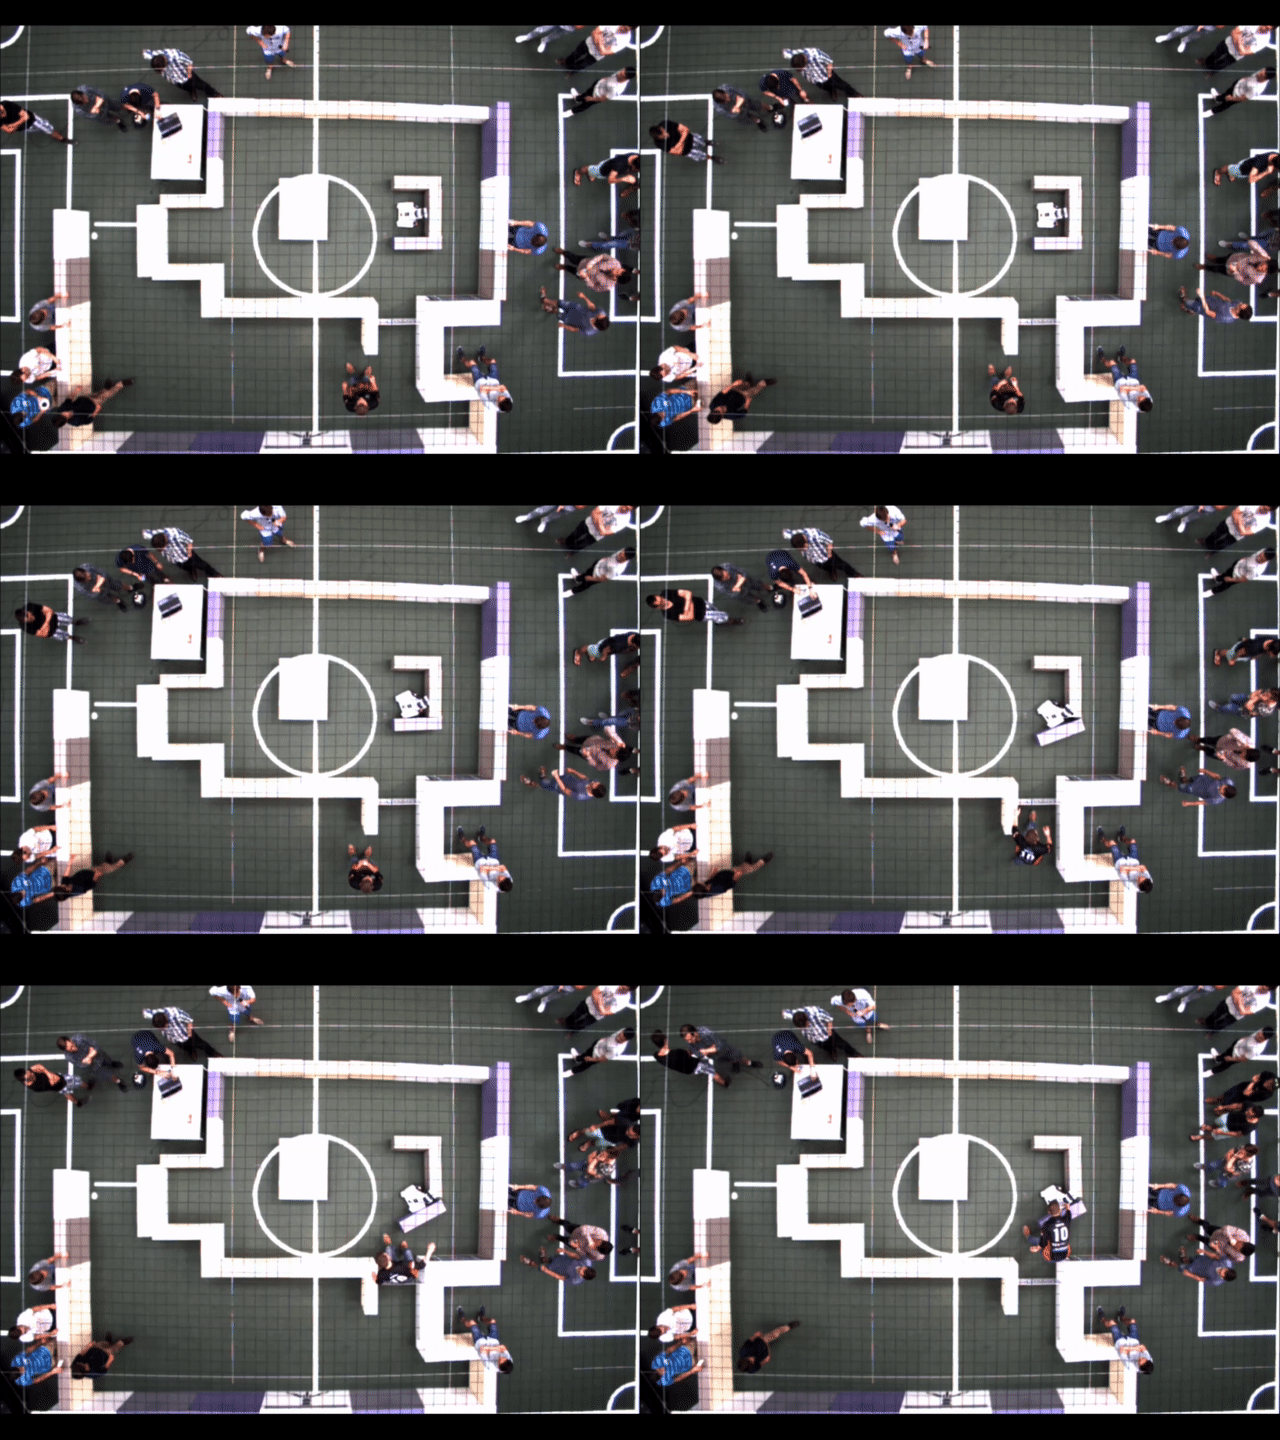
The maze challenge failed twice (in the same way) because the code wasn't fully finished yet. The detection worked very well, the movement worked fine enough, but the strategy module simply wasn't finished. Because the strategy module should place a reference point (which the movement module can drive to), the movement had nothing to drive towards. In anticipation to not being able to properly finished the strategy module, it has been decided to make a simple movement script, which could drive without reference point. The chance of solving the maze was very small, but at least it was an opportunity to show that detection worked well. However, this new movement module (which was made in quite a short time) wasn't tuned properly and caused PICO to run into the nearest wall twice. There are some ideas for why PICO ran into a wall. What seems most logical is that this happened: PICO sees the wall in front of him (still far enough away), but PICO considers the wall to be close, and therefor tries to turn. What may have happened next is that the potential field didn't work well in case there is a wall in front of PICO, which therefor didn't prevent PICO from running into that wall. The result can be seen in the gif below.
Lessons Learned
During the entire process of this course (so not only coding), a lot of lessons have been learned. The most important ones are:
- It is necessary to make a good planning, and if possible assign a project leader who keeps the planning in mind. This way the priorities will remain correct (which has not always been the case for us) and the overall progress will be steadier.
- Communication is the key to good teamwork. Bad communication (or lack of communication) caused a few misunderstandings. This meant that sometimes, a part of code was missing or not compatible with the rest of the code, causing the entire programm to fail.
- It is better to first focus on a working code, before turning towards details.
Code snippets
(1) Detection main loop: https://gist.github.com/anonymous/fb926ffddbfac24d19c9268c61de8f5c
(2) Detection data check: https://gist.github.com/anonymous/93d2ac7d88fde436319b10270279adb3
(3) Detection detect edges: https://gist.github.com/anonymous/097bb3bdfed2ed05f741589a9ffb9363
(4) Detection best corners: https://gist.github.com/anonymous/f48db1088560bb15d2f7d6592bde0dc9
(5) Detection EKF-SLAM algorithm: https://gist.github.com/anonymous/6cc8fbd9e7c1e685f2382b13a73f1509
References
[1] ZeroMQ main site: http://zeromq.org
[2] Xlib Wikipedia page: https://en.wikipedia.org/wiki/Xlib
[3] Sebastian Thrun, Dieter Fox, Wolfram Burgard (1999-2000), Probabilistic Robotics
[5] OpenCV main site: http://opencv.org
[5] PICO EKF-SLAM test movie: https://www.dropbox.com/s/27syqwyijami179/PICO_SLAM_real.MOV?dl=0
[6] PICO EKF-SLAM verification movie: https://www.dropbox.com/s/a3z19la0iu52stq/PICO_SLAM_sim.mp4?dl=0
