Embedded Motion Control/Corridor competition 2016
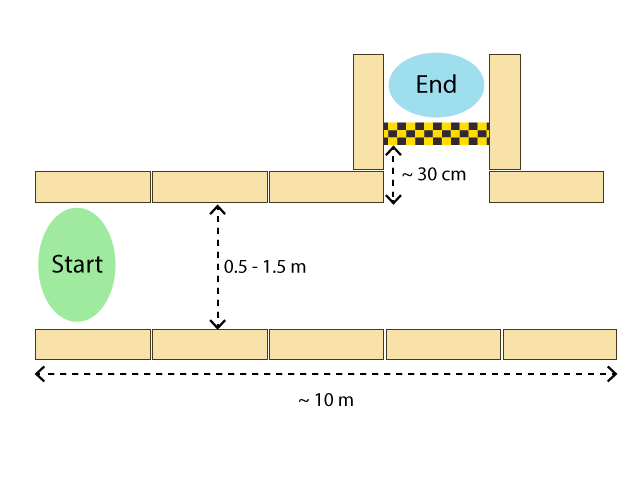
An intermediate review will be held on May 18th, 15.45h at the RoboCup soccer field. During this challenge, called the corridor competition the students have to let the robot drive through a corridor and then take the first exit. The precise location of this exit will not be given in advance. Some facts:
- Set-up
- Make sure your software is easy to set-up, i.e:
- Your software can be updated with one easy command, e.g. 'git pull'
- Your software can be compiled using 'cmake' and 'make'
- To start your software, only one executable has to be called
- If your set-up deviates from this method, let us know as soon as possible!
- The software of all groups will be updated on the robot before the challenge starts
- This way, teams starting the challenge have as much time as teams that do the challenge at the end
- Make sure your software is easy to set-up, i.e:
- The corridor:
- The exit can be either left or right
- It is not known beforehand how far the exit is located from the start (somewhere between 1 and 10 meters)
- The opposing end wall (on the far end) will be open
- The walls are approximately parallel to each other
- Note: the walls might not be perfectly straight
- The distance between the walls is not known in advance, but will be reasonable (somewhere between 0.5 and 1.5 meters).
- The distance between the walls will be fairly constant throughout the corridor, 'fairly' meaning that we build the corridor by hand, and the distance may change a little along the corridor.
- At the exit, the finish line is located approximately 30 cm from the side of the corridor (Notice: approximately, so don't just drive forward for 30 cm!). The walls that can be used to align PICO will be a little bit longer.
- Start, goal and limits:
- PICO will start with its laser range finder between the walls
- PICO will be approximately facing the end of the corridor. (Notice: approximately, so don't just drive forward for n seconds!)
- You have finished the assignment if PICO did not drive into walls, took the correct turn and the entire rear wheel is across the finish line.
- Maximum speed (is limited in PICO): 0.5 m/s translational, 1.2 rad/s rotational. By the way, that's pretty fast (compared to last year's 0.2 m/s), so be careful! You don't have to drive that fast!
- Scoring:
- Try not to touch the wall! Slightly touching is OK, however, bumping (i.e., driving head-on into a wall) is not allowed! If PICO hits the wall, we decide whether it counts as bumping. If PICO bumps into the wall, that trial ends immediately.
- Every team has two trials (= max one restart). A trial ends if:
- PICO bumps into the wall
- PICO has not moved or has not made sensible movements (as judged by the tutors) for 30 seconds
- The total time limit of 5 minutes per group is reached
- The group requests a restart (on the first trial)
- restart means:
- PICO restarts at the beginning of the corridor
- CORRIDOR time (= time used for scoring) is reset, BUT
- TOTAL time keeps running
- Every team has a total of 5 minutes
- There will be no second attempt if first attempt was successful
Next you can see an example of a corridor:
