PRE2023 3 Group3
This project was guided from start to finish by René van de Molengraft and Elena Torta.
Group members
| Name | Student ID | Current Study Programme |
|---|---|---|
| Patryk Stefanski | 1830872 | CSE |
| Raul Sanchez Flores | 1844512 | CSE |
| Briana Isaila | 1785923 | CSE |
| Raul Hernandez Lopez | 1833197 | CSE |
| Ilie Rareş Alexandru | 1805975 | CSE |
| Ania Barbulescu | 1823612 | CSE |
Problem statement
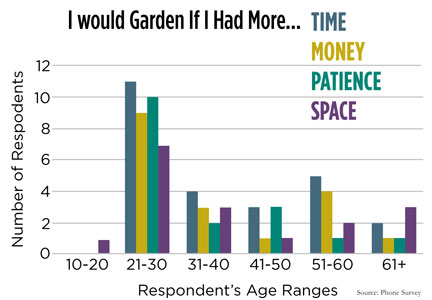
In western society, having a family, a house, and a good job are what many people aspire to have. As people strive to achieve such aspirations, their spending power increases, which allows them to be able to afford to buy a nice home for their future family, with a nice garden for the kids and pets. However, as with many things, in our capitalist world, this usually comes at a sacrifice: free time. According to a study conducted by a student team at Manchester University [2], the three main reasons why people don't garden which made up 60% of the survey responses included time constraints, lack of knowledge/information, and space restraints. Gardening should be encouraged, due to its environmental benefits and many other advantages[3].
In the past decade, robotics has been advancing across multiple fields rapidly as tedious and difficult tasks become increasingly automated [4], this is not any different in the field of agriculture and gardening [5]. In recent years, many robots have become available that aid farmers in important aspects such as irrigation, plantation, and weeding. These robots are large mechanical structures sold at a very high price meaning their only true usage is in large-scale farming operations. Unfortunately, one common user group has been left behind and not considered when developing many features of this new technology in gardening and agriculture, the amateur gardener. Amateur gardeners, often lacking in-depth knowledge about plants and gardening practices, face challenges in maintaining their gardens. Identifying issues with specific plants, understanding their individual needs, and implementing corrective measures can be overwhelming for their limited expertise. It is no surprise that traditional gardening tools and resources often fall short of providing the necessary guidance for optimal plant care, so another solution must be found. This is the problem that our team's robot will be the solution to. We cannot help the fact that some people do not have a space to garden, but we can address the other two common problems. So, the questions we asked ourselves were:
"How do we make gardening more accessible for the amateur gardeners?"
"How do we provide the necessary guidance and information?"
"How can we make our product aid time efficiency?"
Objectives
The objectives for the project deliverables that we hope to accomplish in the next 8 weeks can be represented as MoSCoW requirements. To determine the importance of each requirement we will be sorting them into 4 categories of priority. These 4 categories of priority are: Must, Should, Could and Would. Normally speaking for “MoSCoW” you would use Won’t for ‘W’, but since we create our own requirements it is not really needed to make clear what we won’t be doing and therefore rather use a fourth category of priority; Would. Since for this project we want to definetely complete most of the requirements that we set out, we define most requirements as Must's.
| Requirement ID | Requirement | Priority |
| The Robot | ||
| R001 | The robot shall cut the grass while traversing the environment. | M |
| R002 | The robot shall map the garden and store it in its memory. | M |
| R003 | The robot shall traverse the garden avoiding any obstacles on its way. | M |
| R004 | The robot shall detect different types of plant diseases and their location through the use of cameras and sensors. | M |
| R005 | The robot shall know its GPS/RTK location at all times. | M |
| R006 | The robot shall send a signal to the mobile application when it detects a diseased plant. | M |
| R007 | The robot shall make a noise when the user wishes to find the robot through the app. | S |
| The App | ||
| R101 | The app shall provide a button to start the robot. | M |
| R102 | The app shall provide a button to stop the robot. | M |
| R103 | The app shall display a notification to the user when a plant disease is detected in a specific region. | M |
| R104 | The app shall display the location of the robot on the map at all times. | M |
| R105 | The app shall present the user with an option to schedule the operation times of the robot. | M |
| R106 | Upon disease detection, the app shall provide the user with necessary information to aid the affected plant. | M |
| R107 | The app shall display the location of the unhealthy plant on the map when a user clicks on a specific notification. | M |
Users
Who are the users?
The users of the product are garden-owners who need assistance in monitoring and maintaining their garden. This could be due to the fact that the users do not have the necessary knowledge to properly maintain all different types of plants in their garden, or would prefer a quick and easy set of instructions of what to do with each unhealthy plant and where that plant is located. This would optimise the users routine of gardening without taking away the joy and passion that inspired the user to invest into the plants in their garden in the first place.
What do the users require?
The users require a robot which is easy to operate and does not need unnecessary maintenance and setup. The robot should be easily controllable through a user interface that is tailored to the users needs and that displays all required information to the user in a clear and concise way. The user also requires that the robot may effectively map their garden and identify where a certain plant is located. Lastly, the user requires that the robot is able to accurately describe what actions must be taken, if any are necessary, for a specific plant at a specific location in the garden.
Deliverables
- Research into AI plant detection, mapping a garden and best ways of manoeuvring through it.
- Research into AI identifying plant diseases and infestations.
- Survey confirming and asking about further functions of the robot.
- Interactive UI of an app that will allow the user to control the robot remotely, which implements the user requirements that we will obtain from the survey. The UI will be able to be run on a phone and all of its features will be able to be accessed through a mobile application.
- This wiki page which will document the progress of the group's work, decisions that have been made, and results we obtained.
- A simulation in NetLogo that shows the operation/movement of the robot in the environment.
- A trained model for recognising plant diseases.
- Final design of the envisioned robot.
Through these deliverables, we aim to showcase the design of our robot and the user experience. These deliverables are nicely tied together. The research that we do stands at the core of our other deliverables, in particular, it aids the training of the plant recognition model and that of the final design. The survey that will be sent out, will help us design the user interface of our mobile application and confirm some of our literature and features. The trained model will show that it is feasible to have reliable plant detection when it comes to the designed robot, and will set the foundation for an extensive plant disease recognition model. The simulation in NetLogo shows how the robot will navigate the field and some of the information from this deliverable is sent to the mobile application, exactly as the robot would if it had already be manufactured. Finally, everything related to these deliverables and their progress is shown on this wiki page.
State of Art
Our robot idea can be separated into multiple functionalities: automated grass cutting, disease detection in plants and an app to control your automated robot. The combination of all of these features in a gardening robot targeted to amateur users is currently non-existent, however these individual features have already been implemented in more specialised robots. Therefore, it is very useful to explore the current state of the art of all of these distinct features individually, with the end goal of then using state of the art to avoid creating existing technology from scratch for our final robot. Moreover, it allows us to identify whether such a market for these technologies exists, and to understand what our target costumers will prefer.
Automated Gardening Robots
TrimBot2020

The TrimBot2020 was the first concept for an automated gardening robot for bush trimming and rose pruning. It began as a collaboration project between multiple universities, including ETH Zurich, University of Groningen and University of Amsterdam. Trimbot2020 was designed to autonomously navigate through garden spaces, maneuvering around obstacles and identifying optimal paths to reach target plants for trimming, which was done with a robot arm with a blade extension.
EcoFlow Blade
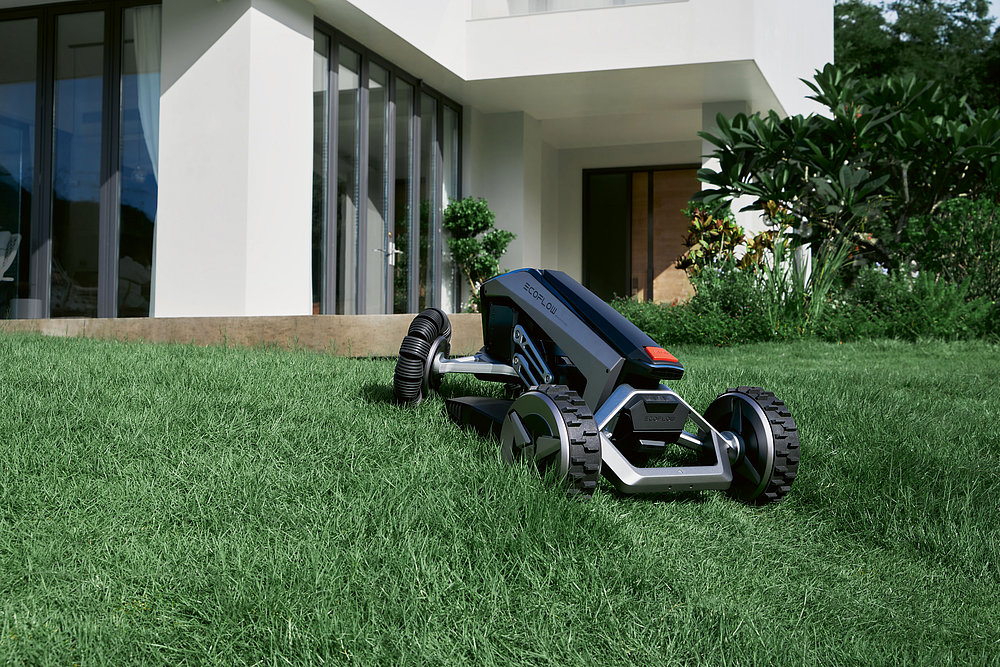
Standing at nearly 2600€, the EcoFlow Blade is an automated grass trimming robot, meant to reduce the time needed to maintain the user’s garden. At first use after purchase, the user will use a built-in application on their smartphone to direct the robot, tracing the edges of their garden. This feature saves the user the need to add barriers to their garden, allowing a more straightforward interaction with the user. Once done, the robot will have a map of where to cut, for it to work automatically. TMoreover, the robot comes with x-vision technology designed to avoid obstacles in real time, ensuring that it doesn't break and that it won't destroy objects or hurt people.
Greenworks Pro Optimow 50H Robotic Lawn Mower

Standing at 1600€, the Greenworks gardening robot also focuses on mowing gardens. Greenworks has made multiple versions for different garden sizes, spanning from 450-1500m2. The Pro Optimow’s features are also integrated with their own app, which allow the user to schedule and track the robot, as well as specifying any areas that need to be managed more carefully, like areas that are more prone to flooding. The boundaries of the garden are set with a wire, and the robot navigates the garden with random patterns, cutting small amounts at a time.
Husqvarna Automower 435X AWD

Finally, the Husqvarna Automower is designed for large, hilly landscapes, capable of mowing up to 3500m2 of lawn, as well as having great manoeuvrability and grip for rough and slanted terrains. This robot again has an integrated app, which works with the robot’s built-in GPS to create a virtual map of the user’s lawn. Moreover, the app allows the user to customise the robot’s behaviour in different areas, whether it be cutting heights, zones to avoid, etc. The Husqvarna gardening robot also uses ultrasonic sensors to detect objects and avoid them. The robot also requires the user to set up boundary wires to map out the garden. Finally, the Husqvarna is integrated with voice controls such as Amazon Alexa and Google Home, allowing the user to command the robot easily.
Plant (Disease) Detection Systems
LeafSnap

LeafSnap is an app on iOS and Android that claims to have plant identification and disease identification built in, by scanning images through the camera. They claim to have an accuracy rate of 95% at identifying the species of the plant, as well as having instructions for how to care for each specific species. Moreover, it sends reminders to the user to water, fertilise and prune their plants. LeafSnap is able to identify plants thanks to a database with more than 30000 species.
PlantMD
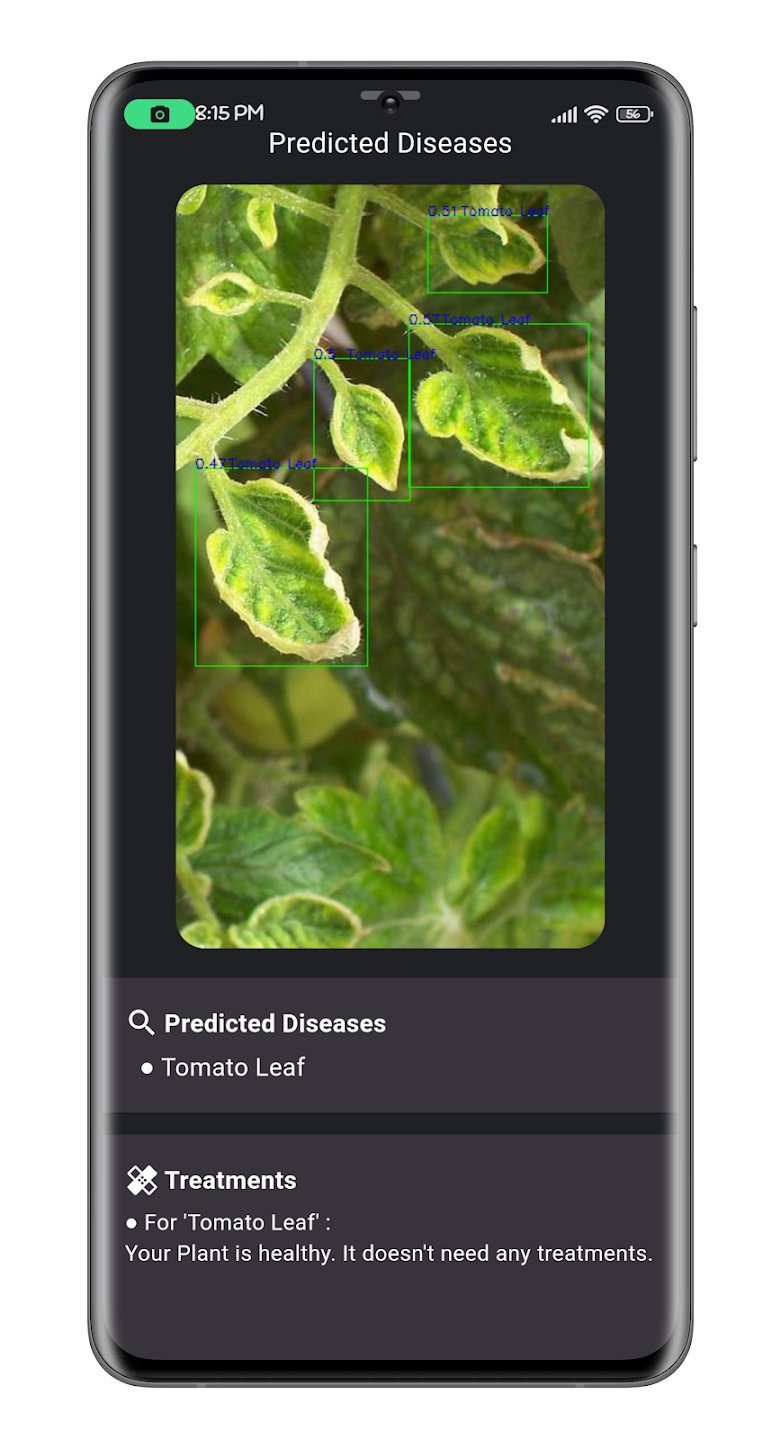
PlantMD is an application that employs machine learning to detect plant diseases. More specifically, they used TensorFlow, an open-source software library for machine learning developed by Google, focused on neural networks. The development of PlantMD was inspired by PlantVillage, a dataset from Penn State University, which created Nuru, an app aimed at helping farmers improve cassava cultivation in Africa.
Agrio

The app allows farmers to utilise machine learning algorithms for diagnosing crop issues and determining treatment needs. Users can snap photos of their plants to receive diagnosis and treatment recommendations. Additionally, the app features AI algorithms capable of rapid learning to identify new diseases and pests in various crops, enabling less experienced workers to actively participate in plant protection efforts. Geotagged images help predict future problems, while supervisors can build image libraries for comparison and diagnosis. Users can edit treatment recommendations and add specific agriculture input products tailored to crop type, pathology, and geographic location. Treatment outcomes are monitored using remote sensing data, including multispectral imaging for various resolutions and visit frequencies. The app provides hyper-local weather forecasts, crucial for predicting insect migration, egg hatching, fungal spore development, and more. Inspectors can upload images during field inspections, with algorithms providing alerts before symptoms are visible.
Inspection Robots in Agriculture
Tortuga AgTech[13]
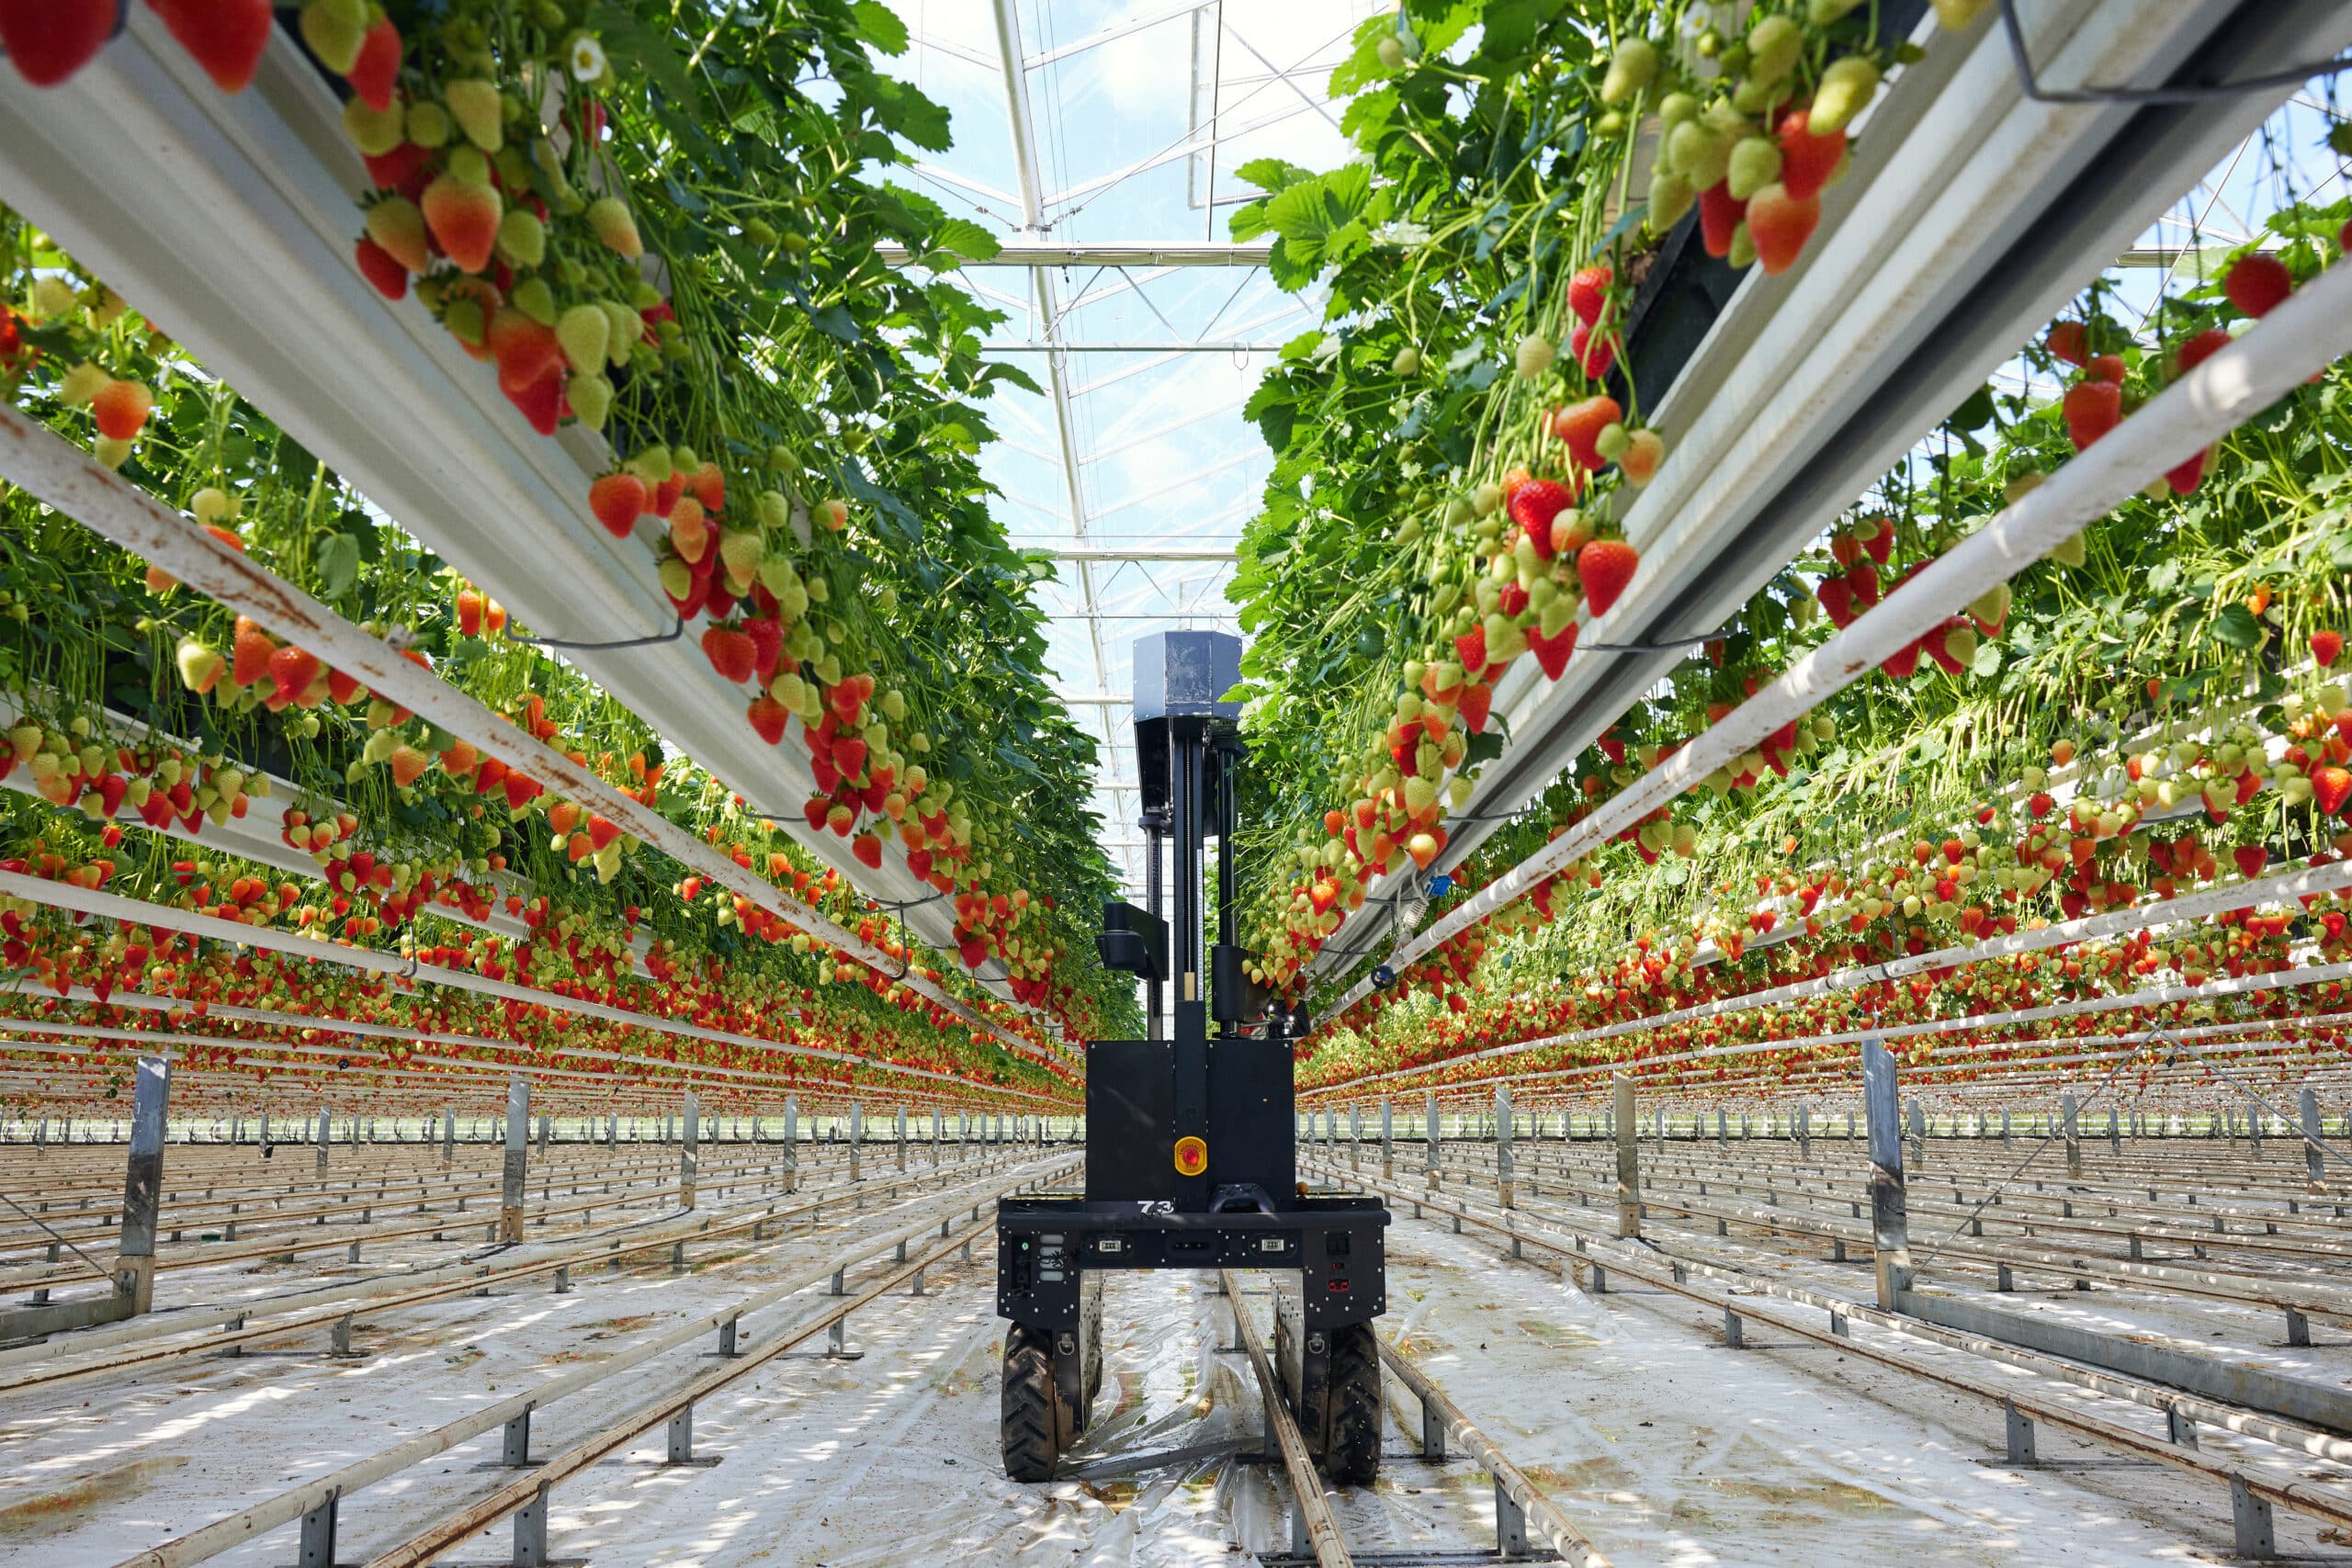
The winners of Agricultural Robot of the Year 2024 award, Tortuga AgTech revolutionised the field of automated harvesting robots. The Tortuga Harvesting Robot are autonomous robots designed for harvesting strawberries and grapes, using two robotic arms that “identify, pick and handle fruit gently”. To do this, each arm has a camera at its end, and the AI algorithms identify the stem of the fruit, and command its two fingers to remove the fruit from the stem. Moreover, the AI has the ability to “differentiate between ripe and unripe fruit”, to ensure that fruit is picked only when it should be. After picking a fruit, it will place them in one of the many containers it has in its body, having the ability to pick “tens of thousands of berries every day”.
VegeBot[15]
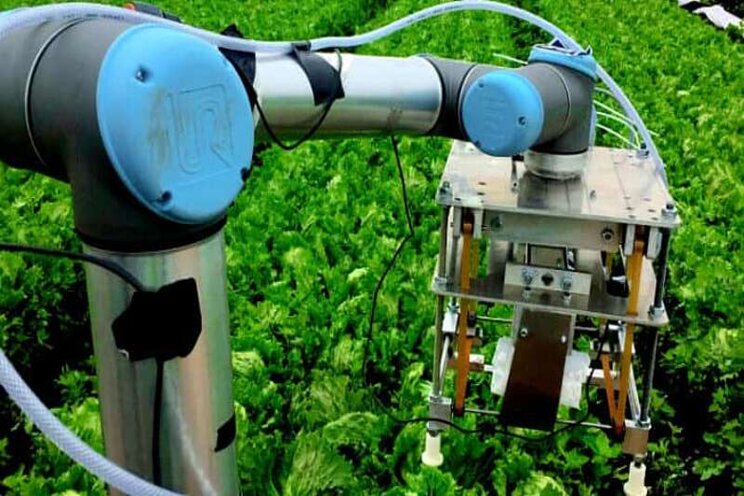
Designed at the University of Cambridge, the VegeBot is a robot made for harvesting iceberg lettuce, a crop that is particularly difficult to harvest with robots, due to its fragility and growing “relatively flat to the ground”. This makes it more prone to damage the soil or other lettuces that are in the robots surroundings. The VegeBot has a built-in camera, which is used to identify the iceberg lettuce, and to check its condition, including its maturity and health. From there, its machine learning algorithm decides whether to pick it off, and if so, cuts the lettuce off the ground, and gently picks it up and places it on its body.

Regular Robot Operation
As with any piece of technology it is important that the users are aware of its proper operation method and how the robot functions in general terms. It is important that this is clear for our robot as well. Upon the robot's first use in a new garden or when the garden owner has made some changes to the garden layout, the mapping process must be instantiated in the app. This mapping will be a 2D map of the garden which will then later allow the robot to efficiently traverse the entire garden during its regular operation without leaving any part of the garden unvisited. In order to better understand this feature one, can compare it to the iRobot Roomba. After the initial setup phase has been completed the robot will be able to begin its normal operation. Normal operation includes the robot being let out into the garden from its storage place, and traversing through the garden cutting grass while its camera scans the plants in its surroundings. Whenever the robot detects an irregularity in one of the plants, it will notify the user through the user of the app, where the robot will send over a picture of the plant with an issue as well as its location on the map of the garden. The user will then able to navigate in the app to view all plants that need to be taken care of in his garden. This means that not only will the user have a lawn which is well kept but also be aware of all unhealthy plants keeping the users garden in optimal condition at all times.

Maneuvering
Movement
One of the most important design decisions when creating a robot or machine with some form of mobility is deciding what mechanism the robot will use to traverse its operational environment. This decision is not always easy as many options exist which have their unique pros and cons. Therefore is is important to consider the pros and cons of all methods and then decide which method is most appropriate for a given scenario. In the following section I will explore these different methods and see which are expected to work the best in the task environment our robot will be required to function in.
Wheeled Robots
It may be no surprise that the most popular method for movement within the robot industry is still a robot with circular wheels. This is due to the fact that robots with wheels are simply much easier to design and model[18]. They do not require complex mechanism of flexing or rotating an actuator but can be fully functional by simply altering rotating a motor in one of two directions. Essentially they allow the engineer to focus on the main functionality of the robot without having to worry about the many complexities that could arise with other movement mechanisms when that is not necessary. Wheeled robots are also convenient in design as they rarely take up a lot of space in the robot. Furthermore, as stated by Zedde and Yao from the University of Wagenigen, these types of robots are most often used in industry due to their simple operation and simple design[19]. Although wheeled robots seem as a single simple category there are a few subcategories of this movement mechanism that are important to distinguish as they each have their benefits and issues they face.
Differential Drive

Differential drive focuses on independent rotation of all wheels on the robot. Essentially one could say that each wheel has its own functionality and operates independently of the other wheels present on the robot. Although rotation is independent it is important to note that all wheels on the robot work as one unit to optimize turning and movement. The robot does this by varying the relative speed of rotation of its wheels which allow the robot to move in any direction without an additional steering mechanism[21]. In order to better illustrate this idea consider the following scenario - suppose a robot wants to turn sharp left, the left wheels would become idle and the right wheel would rotate at maximum speed. As can be seen both wheels are rotating independently but are doing so to reach the same movement goal.
| Pros | Cons |
|---|---|
| Easy to design | Difficulty with straight line motion on uneven terrains |
| Cost-effective | Wheel skidding can completely mess up algorithm and confuse the robot of its location |
| Easy manoeuvrability | Sensitive to weight distribution - big issue with moving water in container |
| Robust - less prone to mechanical failures | |
| Easy control |
Omni Directional Wheels

Omni-directional wheels are a specialized type of wheel designed with rollers or casters set at angles around their circumference. This specific configuration allows a robot which has these wheels to easily move in any direction, whether this is lateral, diagonal, or rotational motion[23]. By allowing each wheel to rotate independently and move at any angle, these wheels provide great agility and precision, which makes this method ideal for applications which require navigation and precise positioning. The main difference between this method and differential drive is the fact that omni directional wheels are able to move in any direction easily and do not require turning of the whole robot when that is not necessary due to their specially designed roller on each wheel.
| Pros | Cons |
|---|---|
| Allows complex movement patterns | Complex design and implementation |
| Superior manoeuvrability in any direction | Limited load-bearing capacity |
| Efficient rotation and lateral movement | Higher manufacturing costs |
| Ideal for tight spaces and precision tasks | Reduced traction on uneven terrains |
| Enhanced agility and flexibility | Susceptible to damage in rugged environments |
Legged Robots

Over millions of year organisms have evolved in thousands of different ways, giving rise to many different methods of brain functioning, how an organisms perceives the world and what is important in our current discussion, movement. It is no coincidence that many land animals have evolved to have some form of legs to traverse their habitats, it is simply a very effective method which allows a lot of versatility and adaptability to any obstacle or problem an animal might face[25]. This is no different when discussing the use of legged robots, legs provide superior functionality to many other movement mechanisms due to the fact that they are able to rotate and operate freely in all axis. However, with great mobility comes the great cost of their very difficult design, a design with which top institutions and companies struggle with to this day[26].
| Pros | Cons |
|---|---|
| Versatility in Terrain | Complexity in Design |
| Obstacle Negotiation | Power Consumption |
| Stability on Uneven Ground | Sensitivity to Environmental Changes |
| Human-Like Interaction | Limited Speed |
| Efficiency in Locomotion | Maintenance Challenges |
Tracked Robots
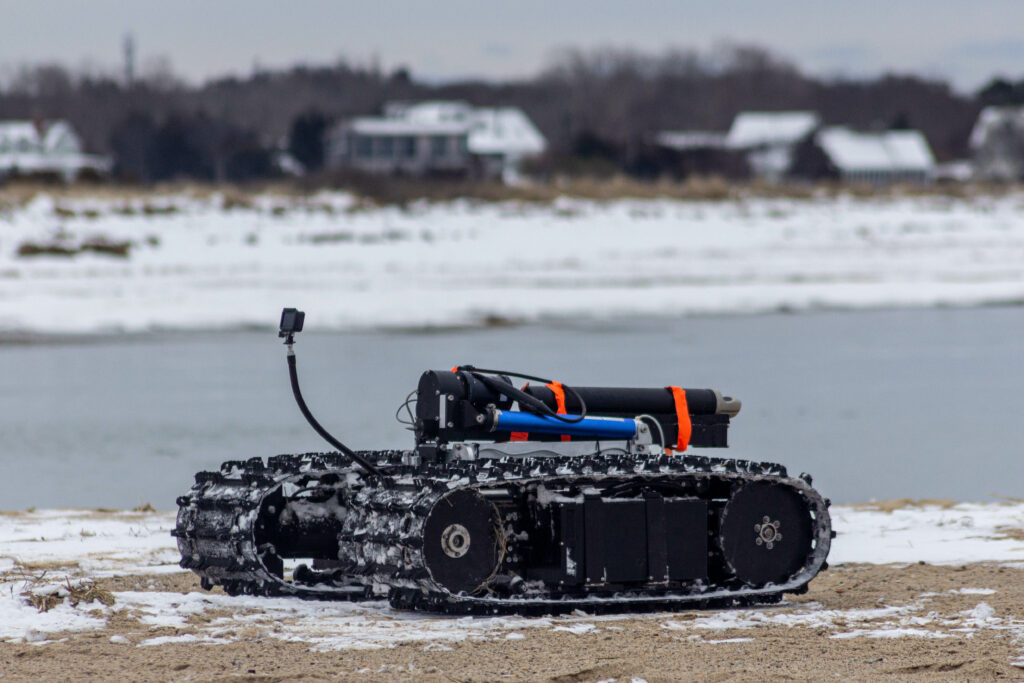
Tracked robots, which can be characterized by their continuous track systems, offer a dependable method of traversing a terrain that can be found in applications across various industries. The continuous tracks, consisting of connected links, are looped around wheels or sprockets, providing a continuous band that allows for effective and reliable movement on many different surfaces, terrains and obstacles[28]. It is therefore no surprise that their most well known usages include vehicles which operate in uneven and unpredictable, such as tanks. Since tracks are flexible it is even common that such robots can simply avoid small obstacles by driving over them without experiencing any issues. This is particularly favorable for the robot we are designing as naturally gardens are never perfectly flat surfaces often littered by many natural obstacles such as stone, dents in the surface or even possibly branches that have fallen on the ground due to rough wind.
| Pros of Tracked Robots | Cons of Tracked Robots |
|---|---|
| Superior Stability | Complex Mechanical Design |
| Effective Traction | Limited Manoeuvrability |
| Versatility in Terrain | Terrain Alteration |
| High Payload Capacity | Increased Power Consumption |
| Efficient Over Obstacles | |
| Consistent Speed |
Hovering/Flying Robots

Hovering/Flying robots provide, without a doubt, the most unique way of movement from the previously listed. This method unlocks a whole new wide range of possibilities as the robot no longer has to consider on-ground obstacles; whether that is rocks or uneven terrain. The robot is able to view and monitor a very large terrain from one position due to its ability to position itself at a high altitude and quickly detect major problems in a very large area. This method also unlocks the possibility of the robot to optimize its movement distance as it is able to move from point A to point B directly in a straight line saving energy and time. However, as is the case with any solution, flying/hovering has its major problems. It is by far the most expensive method, as flying apparatus is far more costly and high maintenance than any other solution. This makes this unreliable and likely a method far out of the technological needs and requirements of our gardening robot. Furthermore, its operation is best in large open fields which perfectly suits the large farms of the agriculture industry, however, this is not the aim of the robot we are designing. Most private gardens are of a small size, meaning its main strength could not be used. Additionally, it is likely that a robot which has aerial abilities would find difficulty in maneuvering through the tight spaces of a private garden and would have to avoid many low hanging branches or pushes ultimately making its operation unsafe.
| Pros | Cons |
|---|---|
| Versatile Aerial Mobility | Limited Payload Capacity |
| Rapid Deployment | Limited Endurance |
| Remote Sensing | Susceptibility to Weather |
| Reduced Ground Impact | Regulatory Restrictions |
| Dynamic Surveillance | Security and Privacy Concerns |
| Efficient Data Collection | Initial Cost and Maintenance |
Sensors are a fundamental component of any robot that is required to interact with its environment, as they aim to replicate our sensory organs which allow us to perceive and better understand the environment around us[29]. However, unlike with living organisms, engineers are given the choice to decide what exact sensors their robot needs and must be careful with this decision in order to pick the sufficient options to be able to allow the robot to have its full functionality without picking any redundant options that will make the robot unnecessarily expensive. This decision is often based on researching and considering all possible sensors that are available on the market which are related to the problem the engineer is trying to solve and selecting the one which fulfils the requirements of the robot most accurately[30]. In this section we will specifically be looking into sensors which will aid our robot in traversing our environment, a garden. This means that we must consider the fact that the sensors we select must be able to work in environments where the lighting level is constantly changing as well as possible mis inputs due to high winds and/or uneven terrain. Additionally, it is important to note that unlike the discussion in the previous section, one type of sensor/system is rarely sufficient to fulfil the requirements and most robots must implement some form of sensor fusion in order to operate appropriately and this is no different in our robot[31].
LIDAR sensors
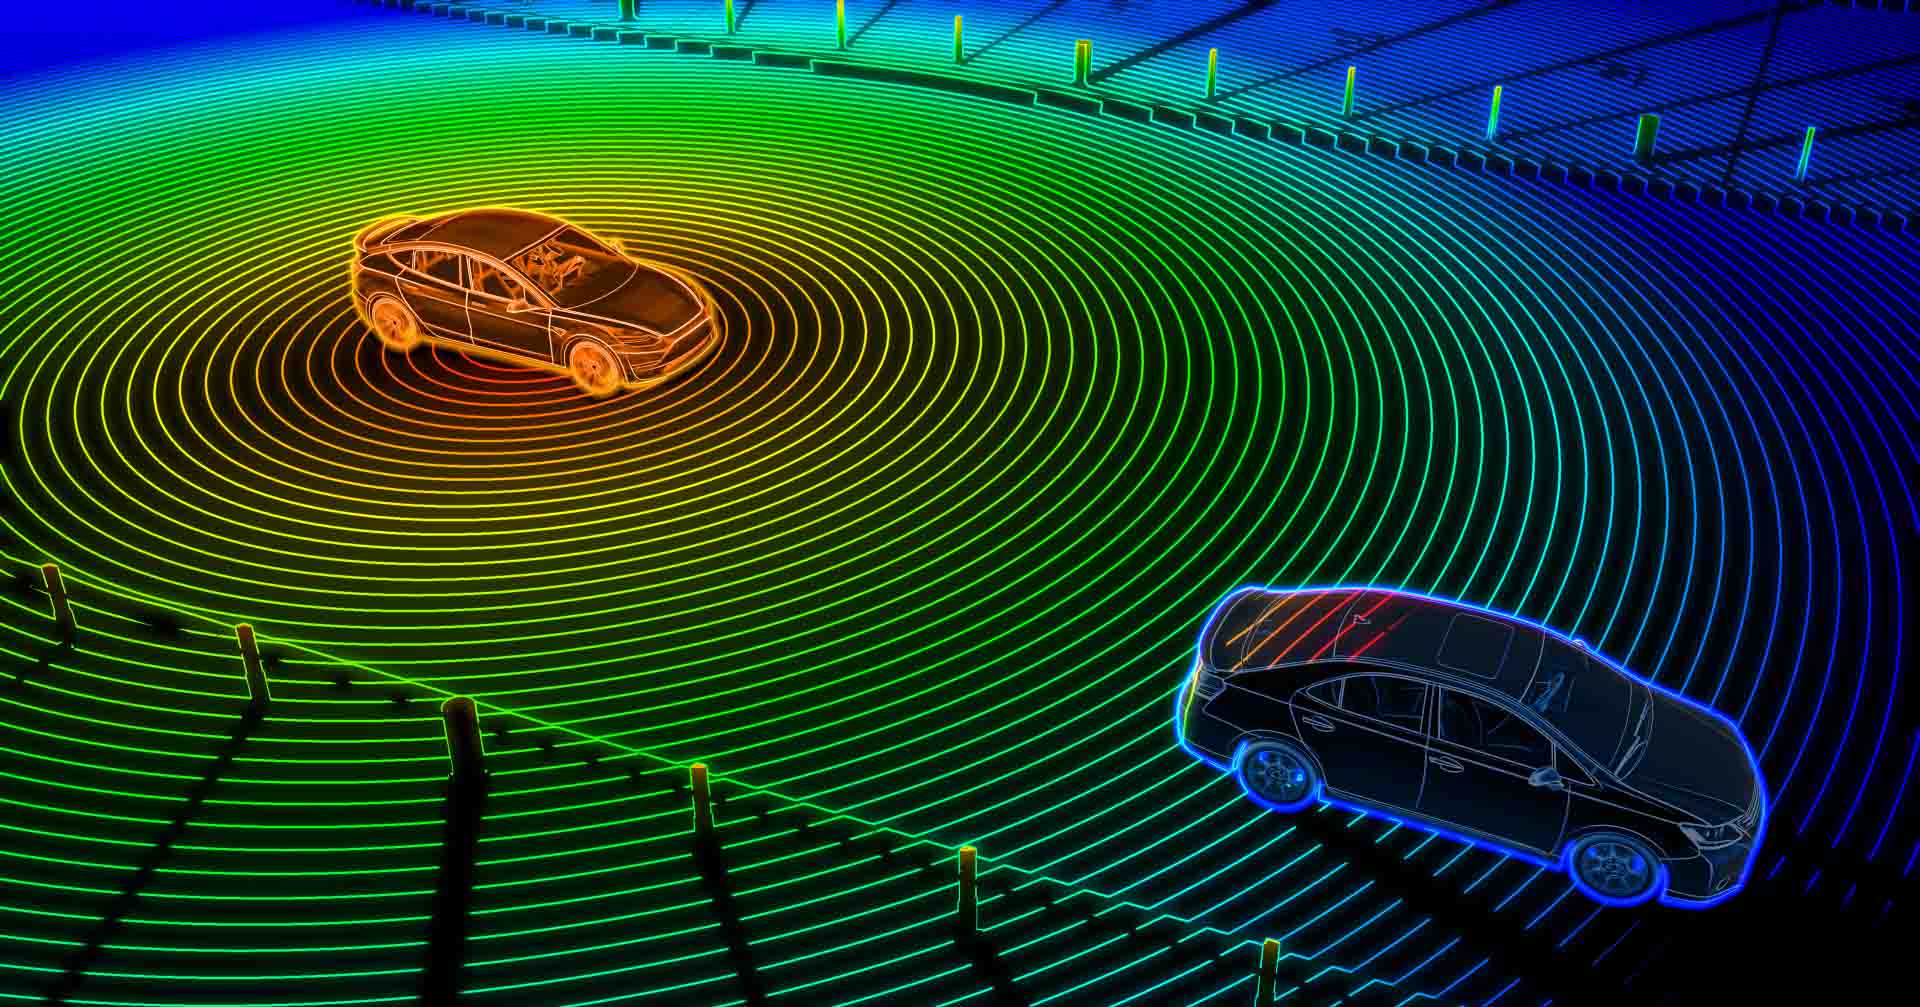
LIDAR stands for Light Detection and Ranging. These types of sensors allow robots which utilize them to effectively navigate the environment they are placed in as they provide the robot with object perception, object identification and collision avoidance[32]. These sensors function through sending lasers into the environment and then calculating how long it takes the signals they send to return back to the receiver to determine the distance to the nearest objects and their shapes. As can be seen, LIDAR’s provide robots with a vast amount of crucial information and even allow them to see the world in a 3D perspective. This means that not only are robots able to see their closest object, but whenever faced with an obstacle they can instantaneously derive possible methods of avoidance and to traverse around it[33].
LIDAR’s are often the preferred option by engineers in robots that operate outdoors as they are minimally influenced by weather conditions[34]. Often sensors rely on visual imaging or sound sensors which both get heavily disturbed in more difficult weather conditions, whether that is rain on a camera lens or the sound of rain disturbing sound sensors, this is not the case with LIDAR's as their laser technology does not malfunction in these scenarios. However, an issue that our robot is likely to face when utilizing a LIDAR sensor is that of sunlight contamination[35]. Sunlight contamination is the effect the sun has on generating noise in the sensor’s data during the daytime and therefore possibly introducing errors within it. Since our robot needs to work optimally during the daytime it is crucial that this is considered. However, the LIDAR possesses many additionally positive aspects that would be truly beneficial to our robot such as the ability to function in complete darkness and immediate data retrieval. This would allow the users of our robot to turn on the robot before they go to sleep at night and wake up to a complete report of their garden status. Furthermore, these features are necessary for the robot as they would allow it to work in a dynamic and constantly changing environment, which is of high importance to as our robot is to operate in a garden. The outdoors can never be a fully controlled environment and that has to be considered into the design of the robot.
As it can be seen, the LIDAR sensor has many excellent features that our robot will likely require, therefore it is a very important candidate when making our next design decisions.
Boundary Wire

A boundary wire is likely the most cost efficient and commonly implemented technique in state-of-the-art garden robots that are on the private consumer market today. It is not a complicated technology but still a very effective one when it comes to robot navigation. A boundary wire in the garden acts as a virtual barrier that the robot cannot cross, similar to a geo-cage in drone operation[36]. In order to begin utilizing it, the robot user must first lay out the wire on the boundaries of their garden and then dig them approximately 10 cm below the ground's surface, so that the wire is safe from any external factors. This is a tedious task for the user but has to only be completed once and the robot is now fully operational and will never leave the boundaries set by the user. It is important for the user to take their time in the first setup as any change they will want to make will require digging up many meters of wire and once again putting it in the ground after relocation.
The boundary wire communicates with the robot by emitting a low voltage, around 24V, signal which is picked up by a sensor on the robot[37]. This means that when the robot detects the signal it knows that the wire is underneath it and it should not to continue moving in its direction. As is displayed above, the boundary wire is a very simple technology, which with a slight amount of effort of the user can perform the basic navigability tasks. However, its functionality is fairly limited, it cannot detect any objects within the area of its operation and therefore avoid them meaning that its environment has to be maintained and clear throughout its operation.
GPS/GNSS
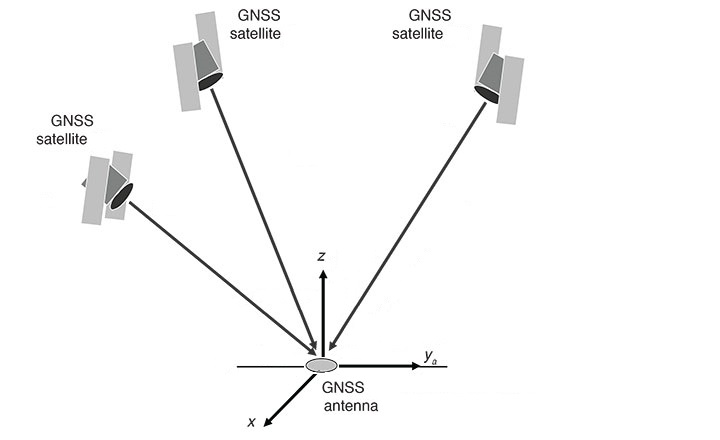
GPS/GNSS are groups of satellites deployed in space that allow robots and devices to receive signals from them, which aid them in positioning. Over the past few years these systems have gotten extremely accurate and can position devices to the nearest meter[38]. This happens through a process called triangulation, where multiple satellites calculate their distance to a device and establish its location[39]. The usage of this sensor in our robot is very encouraging as it has been proven to be effective in the large scale gardening industry for many years, more specifically the precision farming domain[40]. An important distinction to note is that of GPS and GNSS. Although GPS is likely the term many are more familiar with from navigation applications they have used in the past, it is really just a subpart of GNSS which represents all Constellation Satellite Systems and GPS is simply one of them. If it is equipped with a sensor that can communicate with satellites and fetch its location at all times, our robot will be able to precisely ping the location it has found sick plants or any plants that need care and send that information to the users device. Once again promising to be a very key component in our robot design.
Bump Sensors

Bump sensors, commonly referred to as collision or impact sensors, are sensors designed to detect physical contact or force a robot could encounter while traversing its environment[41]. These sensors can be seen being utilized across various industries in robotics in order to increase the safety and allow for greater automation of the robots they are integrated into. Additionally, these devices are crucial in robotics and many different types of vehicles as they allow the robot to replicate the human ability of touch and have a tactile interface with the environment.
In order to have this feature, bump sensors are typically composed of accelerometers, devices that are able to detect and measure a change in acceleration forces, or simply a switch which gets pressed as soon as the robot applies pressure on it from factors in its environment[42]. In its many applications the contact the robot experiences is with larger objects so the sensor must not be extremely sensitive. This could not be the case in our gardening robot as the robot would have to consider smaller and more fragile objects requiring the sensor to have a much higher sensitivity. Bump sensors are most commonly used to make sure a robot does not drive into and collide with large objects, it allows the robot to detect that a change of direction in its motion must occur before continuing its operation. Although in many industries bump sensors are a last resort form of defense against the robot breaking or destroying important elements in our environment, in the robot we are designing it is a lot less of an issue if the robot were to detect an object through this sensor[43]. The robot would have to signal contact that it has collided with an object and change its direction of motion without further applications. However, this should still be unlikely to happen as in our robot the LIDAR sensor should have detected the problem beforehand and dealt with it, nevertheless technology is not always reliable and having a backup system ensures the robot experiences fewer errors in its operation especially with the possibility of faults of the LIDAR due to sun contamination.
Ultrasonic sensors
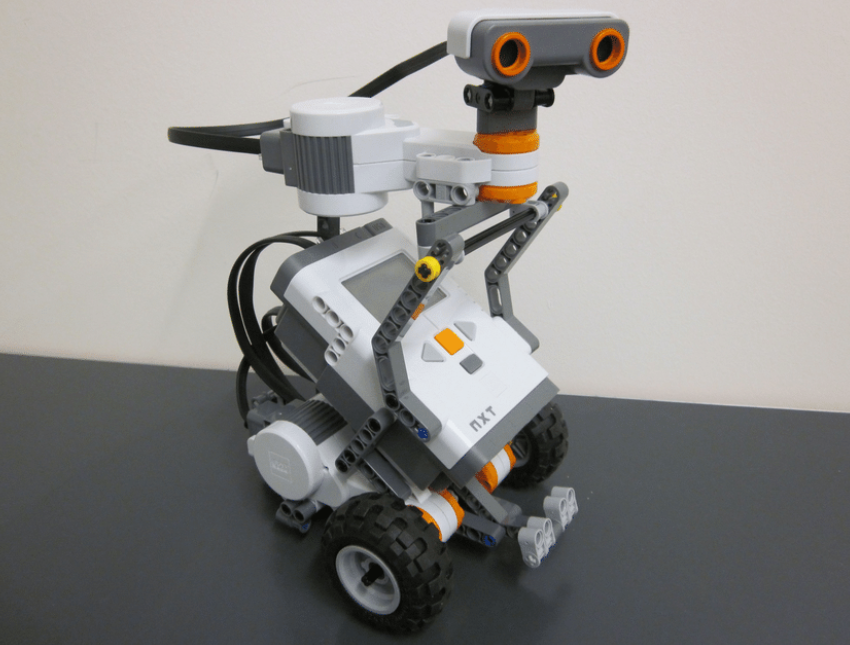
Ultrasonic sensors, or put in more simple terms, sound sensors, are another type of sensor which allows a robot to measure distances between objects in its environment and its current position. These sensors also find widespread applications in robotics whether that is liquid level detection, wire break detection or even counting the number of people in an area. Their strength is that it allows robot that have them to replicate human depth perception in a method similar to that of a dolphin[44].
Ultrasonic sensors function by emitting high-frequency sound waves through its transmitters and measuring the time it takes for the waves to bounce back and be received by its receivers. This data allows the robot to calculate the distance to the object, enabling precise navigation and obstacle detection. Although this once again is similar to the function of a LIDAR sensor, it allows the robot to work in a frequently changing environment without the use of state-of-the-art and expensive technology. One thing that must be considered in the usage of this sensor is that it tends to perform worse when attempting to detect softer materials which our team will have to take into account and make sure the sensor is able to detect plants it is approaching[45].
In our gardening robot, ultrasonic sensors could once again play an important role in supplementing the functionality of more advanced sensors like the LIDAR. Through its simple and reliable solution, ultrasonic sensors provide essential functionality, improving the robot's operational reliability in a very wide range of gardens it could encounter in its deployment.
Gyroscopes

Gyroscopes are essential components in the field of robotics that help in providing stability and precise orientation control in a wide range of industrial areas. These devices use the principles of angular momentum to constantly maintain the same reference direction, in order to not change its current orientation[46]. This allows robots to improve their stability and therefore enhance their operational abilities.
In order to perform their functionality, gyroscopes consist of a spinning mass, mounted on a set of gimbals. When the orientation of the gyroscope changes, its mechanism of conserving angular momentum means that it will apply counteracting force essentially keeping it in the same orientation. This feature is very important in the field of robotics as it allows the robot to know its current angle with regards to the ground and when that gets too large the gyroscope helps the robot to not flip over or fall during its operation.
Since thousands of relevant sensors exist, we can only discuss the most important ones. Sensors such as lift sensors, incline sensors and camera systems can also be included in the robot for navigation purposes, however in the design of our robot they are either too complex or unnecessary.
RTK sensor
RTK, or Real-Time Kinematic, is a really advanced positioning technology that allows for positioning of devices that is extremely precise.[47] This precision being able to only have an error of 0.025m.[48] Therefore it is no surprise that this technology can be seen in various applications such as in agriculture and construction.[49] At its core, an RTK system utilizes a combination of GPS (Global Positioning System) satellites and ground-based reference stations which aid in positioning a robot. Unlike traditional GPS systems that offer accuracy within several meters, RTK improves this precision significantly, making it very necessary for tasks that require precision such as our plant identification robot which needs to be able to send the location of an unhealthy plant to the user with centimeter precision.
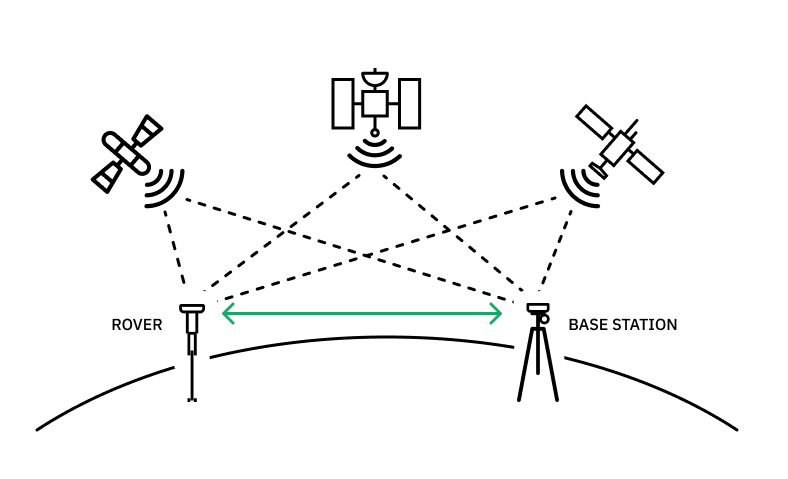
The key component of an RTK system is the RTK receiver, which is installed within the robot itself. This receiver communicates with GPS satellites to determine its position, but what makes this system unique from all others is its ability to also receive corrections from nearby reference stations.[51] These reference stations are able to precisely measure their own positions and then broadcast correction signals to the RTK receiver that is mounted on the robot. Essentially, this means that the robot knows its slightly inaccurate location obtained from just the GPS signal but due to the fact that it also receives a signal from a reference station it can correct its GPS reading by comparing them with the ones received from the reference station allowing the robot to achieve centimeter-level accuracy.
Although at first the idea may seem complex, the main idea of the operation of an RTK system is called carrier phase measurement. Unlike regular GPS systems, which rely on pseudorange measurements to determine the position of its user, RTK receivers use carrier phase measurements.[52] This process involves measuring the phase of the GPS carrier signal, allowing for highly accurate positioning. However, carrier phase measurements alone are subject to errors due to atmospheric conditions and other factors.[53] This is where the corrections from the reference stations come into play, enabling the RTK receiver to mitigate these errors and achieve centimeter-level accuracy in real-time.
To make communication between the reference stations and the RTK receiver possible, methods such as radio links, cellular networks, or satellite-based communication systems are needed.[54] Regardless of the communication method used, the goal is to ensure that the RTK receiver receives timely and accurate correction data to correct its current position.
As can be seen this technology solves a major issue our robot was facing that was kindly pointed out to us by one of our tutors, dr. Torta. This issue being the fact that the robot can not simply use the GPS to send the location of the plant to the user as its accuracy is of a couple meters. This would mean that if the user were to have multiple plants within a 2-3 meter radius, even if provided with an image of the plant the user would have a difficult time finding the plant that is unhealthy.
Mapping
Introduction
Mapping will be one of the most important features of our robot as it will be the very first thing the robot performs after being taken out of its box by the user and will rely on the quality of this process for the rest of its operation. Mapping is the idea of letting the robot familiarize itself with its operational environment by traversing it freely without performing any of its regular operations and simply analyzing where the boundaries of the environment are and how it is roughly shaped. This allows the robot to gain the required knowledge so that during its normal operation throughout its lifecycle it is aware of its positioning in the garden, areas it has visited in the current job and areas it still must visit. Essentially it turns the robot from a simple-reflex-agent to a robot which has knowledge stored in its database and can access it to make better informed decisions for more efficient operation. Mapping can be done both in 3D and in 2D depending on the needs of the robot and user. Initially, we considered 3D mapping in this project, enabling the robot to also memorize plant locations in the garden for easier access in the future, however since plants grow very rapidly this environment would change quickly and the mapping process would have had to be repeated on a daily basis, a very inefficient process. Now that the decision was made to implement 2D mapping, similar to that of the Roomba vacuum cleaning robots, the purpose of the map would be to learn the dimensions and shape of the garden. It may come at no surprise but as is the case in most design problems, there is rarely one solution and that is no different in the case of mapping. Nonetheless, the most optimal method for our robot is using the already existing method developed by Husqvarna AIM (Automower Intelligent Mapping) technology.
Husqvarna AIM technology[55]
Husqvarna Automower's intelligent mapping system operates through taking advantage of multiple cutting-edge technologies, allowing gardeners to maintain their gardens even easier than they previously could. At the core of its functionality the technology uses a combination of GPS, onboard sensors, and intelligent algorithms. The process begins when the robot is first taken out of its packaging and turned on. The robot straight away begins exploring the garden by first moving randomly through it as it initially has no information to reference. As discussed in the course Rational Agents we could say that the robots knowledge base is initially empty. However, as the robot is exploring, simultaneously, GPS technology aids in mapping the layout of the lawn, providing precise coordinates to guide the robot's movements. Through GPS, the robot establishes a blueprint of the terrain similar to that of the well known and loved Roomba, enabling it to navigate efficiently and cover every patch of grass.
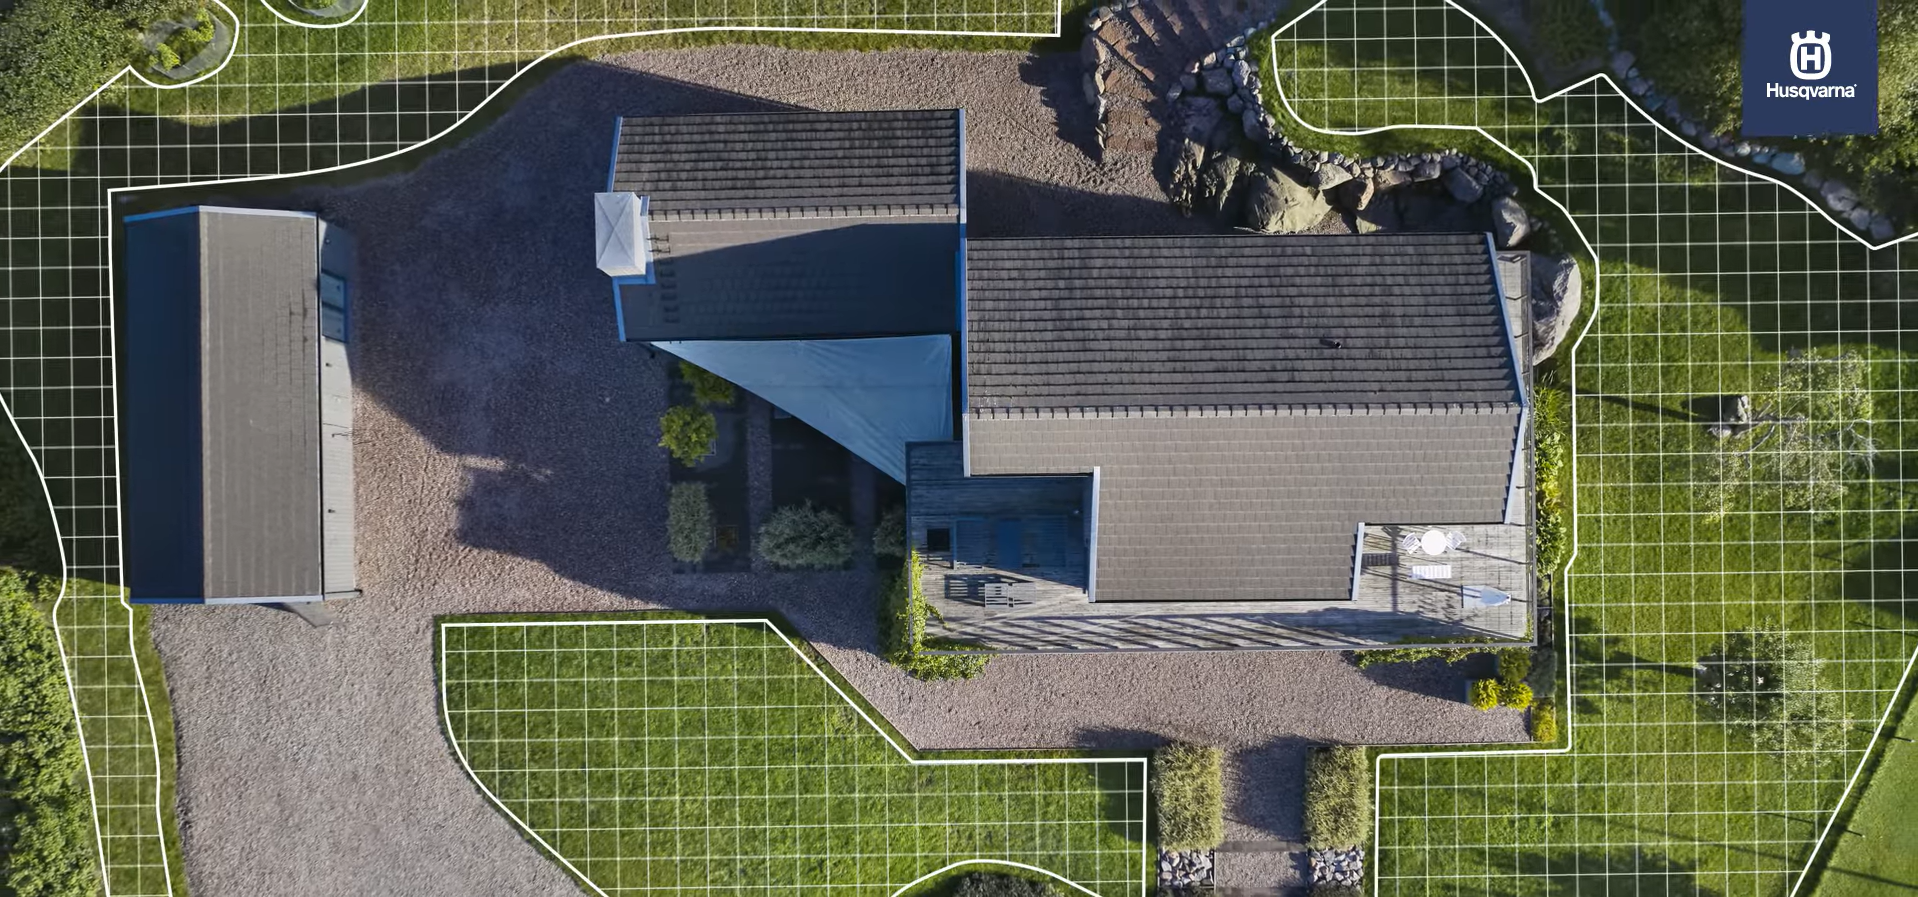
Once the GPS mapping is complete, the robot that has this technology is able to traverse the garden with great precision. Although mapping is very reliable, it is important that the robot is equipped with onboard sensors, including collision sensors and object detection technology, so the robot can detect obstacles in its path and adjust its movement. This ensures that no matter what the safety of the robot will be maintained and other objects such as plants in the vicinity will not be harmed. Moreover, the intelligent mapping system enables the robot to adapt to changes in terrain and navigate complex landscapes effortlessly. This means that even if the robot is faced with slopes, tight corners, or irregularly shaped lawns, the AIM technology’s algorithms can find the best way the robot shall proceed at all points.
Furthermore, Husqvarna Automower's intelligent mapping system incorporates features that enhance user experience and customization. Users can designate specific areas within the lawn for prioritized mowing or exclude certain zones altogether. This level of customization allows for tailored lawn care according to individual preferences and requirements. Additionally, the robot’s connectivity features enable remote control and monitoring via smartphone applications, providing users with real-time updates on mowing progress and allowing them to adjust settings as needed. Although not really relevant with our project, the robot using this technology may connect to many smart home devices such as the Google Home or Amazon Alexa.
Another feature of Husqvarna Automower's intelligent mapping system is its ability to customize the robots mowing schedules based on current weather conditions, and energy efficiency. Although this seems almost impossible, the robot can do this by analyzing data gathered from its onboard sensors and weather forecasts that it can connect to. This approach to lawn maintenance saves a vast amount of time and effort for users but also a lot of electricity which does not have to be used when the robot decides it is unnecessary.
In conclusion, we can confidently say that Husqvarna Automower's intelligent mapping system is truly a groundbreaking advancement in robotic lawn care technology. Through utilization of the GPS and RTK sensors, and intelligent algorithms, the robot which utilizes this technology is able to successfully and efficiently navigate any garden it is utilized in. This is crucial for our plant identification robot as it will allow us to not worry about the navigation of the robot and we can be ensured that the robot's navigation will be efficient and let the robot visit every location in the garden without a problem allowing it to detect all sick plants that need care.
Hardware
Our goal for this project is to have a finished design of our robot concept, that is, a design that can be given to a manufacturer to finalise and easily begin production. In order to do this, we need to have a more concrete understanding of our robot’s capabilities and features. Therefore, we thought it was necessary to research the most important hardware components of our robot, the lawn mowing mechanism and the camera, as they are main selling points of our robot concept. For the lawn mowing mechanism, we'll need to determine the cutting style (rotary, reel, etc.), based on their strengths and weaknesses, and how their goals align with our robot. Additionally, we should consider features like adjustable cutting height and the collection of grass. For the camera, we'll need to choose between existing camera models based on the resolution, field of view, and processing power required to achieve our desired functionalities. By defining these aspects in detail, we can ensure both mechanisms are optimised for efficient lawn mowing and reliable obstacle detection, ultimately creating a great product for our target market.
Lawn Mowing Mechanism
Rotary Lawn Mowers

Rotary lawn mowers are the most common lawn mowers. They have 1 or 2 steel blades spinning at around 3000 rpm horizontally near the surface(1). Because the blades cut a specific height of grass, grass that is not sitting straight up won’t be cut well, and thus they sometimes don’t cut short grass evenly (2). Rotary lawn mowers usually have a cover over the blades, ensuring the safety of any people or animals that get close to the lawn mower, as well as ensuring that the grass doesn’t fly everywhere, potentially staining the user’s clothes (1). These types of lawn mowers usually have internal combustion engines, however many are powered using electricity, through either a cord, or a rechargeable battery such as lithium-ion batteries (1).
| Pros | Cons |
|---|---|
| Compact | Not the best at cutting low grass |
| Simple | Noisy |
Reel Lawn Mowers

The reel lawn mower is a type of lawn mower that is most commonly manual, that is, the user walks it around and it has no engine to spin the blades(1). Specifically, as the reel lawn mower is moved along the grass, the central axis of the cylinder rotates, causing the blades to rotate with it(1). This type of lawn mower is great for cutting low grass, as the blades “create an updraft that makes the grass stand up so it can be cut”(1). However, it is not great at cutting tall or moist grass, as its blades can get stuck and not cut properly(2). Manual reel lawn mowers tend to be much cheaper than rotary lawn mowers, however, motorized ones can be just as expensive(2).
| Pros | Cons |
|---|---|
| Great at cutting low grass evenly | Not the best at cutting high grass |
| Doesn’t make any noise | Mechanism is very separate from engine, can be more bulky |
| Bad with damp grass |
Cameras
Terms and Definitions
- Horizontal/Vertical Field of View: Field of View (FOV) refers to the area that a camera can capture. Field of view can be broken down into two components, horizontal FOV, which refers to the width of the scene that can be captured, and the vertical FOV, which defines the height of the scene. This is important to consider, as our robot needs to cover all of its surroundings to ensure that all plants are detected and disease detection is consistent.
- Global Shutter: With this type of shutter, the camera sensor shuts off the exposure to light to all pixels simultaneously, essentially creating a ‘screen capture’ effect. This implies that camera motion is not an issue to take a picture with high quality, as the camera doesn’t get the chance to move before the shutters are closed. However, as all pixels are captured at the same time, this means that more memory is required to store the information from the pixels, and thus cameras with global shutters tend to be more expensive.
- Rolling Shutter: Rolling shutters, as opposed to global shutters, shut the exposure to light off row by row, which makes the camera need less memory, as it only needs to store 1 row of pixels at a time, so they are cheaper and thus more common. However, if the camera is moving while the picture is being taken, this will lead to distortion of the image, as the information captured from each row of pixels is obtained at different time intervals.
- Maximum Exposure Time: This refers to the maximum amount of time that the camera’s image sensor is exposed to light while capturing an image. In layman’s terms, it refers to how long the camera’s shutters can be open in a continuous duration.
- Sensor Resolution: Measured in megapixels (MP), sensor resolution refers to the total number of pixels on the camera sensor. Higher resolution translates to sharper images with finer details, potentially allowing for more precise plant (disease) identification. However, it needs more processing power and more storage space for captured images from the robot, as each pixel is extra information that needs to be processed and stored.
- Frame rate: When referring to video capture, frame rate refers to the number of still images (frames) a camera can capture in one second. Higher frame rates are essential for smooth, high-quality video, especially for capturing fast-moving objects or the robot's own movement for plant detection and disease identification.
Camera Modules
The choice between the cameras is a difficult one, as each camera has its upsides and requires a unique strategy to be implemented. Therefore, while comparing the cameras, we will also compare the different strategies in our camera, that is considering all specifications defined above.
Raspberry Pi Cameras
Raspberry Pi cameras are very popular and affordable cameras specifically designed for the Raspberry Pi single-board computer. They are generally also quite light, which increases the versatility of their usage, and allows us to put more on our robot without putting too much weight on the robot. Out of all of the models, we considered the following: Module 3 and Module 3 Wide which cost 25€ and 35€ respectively. As can be inferred from the Module 3 Wide, its field of view is larger than the Module 3, having a horizontal FOV of 102 degrees compared to the 66 degrees of the Module 3. Both use rolling shutters, so both cameras will struggle detecting plants if the robot is moving very quickly or in bumpy territory. However, both can record video at about 30fps, and having a maximum exposure time of 110 seconds, recording is a viable option. Moreover, both have an image sensor resolution of 11.9MP, which is very high quality and enough for our usage.
ArduCamOV2643
The ArduCam OV2643 are cheap cameras specifically designed for arduino boards, standing at 20-30€. They have a horizontal field of view of 60 degrees, quite a lot less than the previous RPi cameras. It also uses rolling shutters, and hence usage with the robot will be limited, just like the RPi cameras. Moreover, the camera’s sensory resolution is 2MP.
Insta360 One X2
The Insta360 One X2 is a high end camera capable of 360 degree vision, meaning that only one of these cameras would be needed to cover the entirety of the robot’s surroundings. As mentioned before though, it is expensive, standing at around 315€, which is over 10 times more expensive than previous cameras. Moreover, it uses rolling shutters, which may lead us to think that it might struggle like the previous cameras in plant identification. However, with a resolution of 18MP, this camera has been designed to be used for video recordings with a lot of motion, which means that it can be used for our robot’s plant identification feature.
Interview With Grass-Trimming Robot Owner

Introduction
In order to confirm our decisions and ask for clarifications and recommendations on features that our user group truly desires we will perform an interview. The interview will be completed with the owner of two different private gardens in Poland. The interviewee also owns two grass trimming robots, one produced by Bosch and the other by Gardena which he utilizes in both gardens. We believe his expertise and hands on experiences with similar state-of-the-art robots will allow us to solidify our requirements and improve on our product as a whole. The interview will be performed in Polish as the interviewee is not fluent in English and will be translated into English on the wiki. One garden can be seen in the image on the right. The interviewee has one robot which cuts the triangle shaped part of the garden on the left which has "islands" of various flowers and bushes and the other robot cuts the rest of the garden (the right side). Before conducting the interview, the interviewee was handed an informed consent form to make him aware of how the interview will be conducted and how the results from it will be used, after analysis of the document the interviewee agreed to proceeding with the interview. A screenshot of the cover page of the document can be seen to the right and it can accessed fully through the following link: Interview Consent Form. The interview was performed on a video-call on Whatsapp due to the fact that the circumstances did not allow any group members to travel to Poland for the project to conduct it in person.

Questions Asked and Answers Provided
Below is the rough transcription of the interview translated into English. Each question has a number besides it and the answer that follows to it is preceded by an indented bullet point.
- What is the current navigation system your robot uses?
- My current robot navigates by randomly walking around the garden within the limits I set by cables that I dug into the ground that came with the robot. This means that the robot is able to move freely however when it reaches a boundary cable it stops and turns around making sure it does not go past it.
- What issues do you see with it that you would like improved?
- I mean the obvious thing would be I guess if its less random it might take a quicker time to finish cutting the grass but honestly I do not really see an issue in that as it does not affect my time as I do not have to monitor the robot anyway. Furthermore it would be nice to have the robot connected to some application as right now everything has to be setup from the robots interface.
- What is the way in which you would currently charge your robot and how would you like to charge and store the plant identification robot?
- Currently my robot has a charging station to which it returns to charge after it has completed cutting grass, if something similar could be made for the plant identification robot I would be very satisfied.
- Would you like the robot to map out your garden before its first usage to set its boundaries or would you like that to be done by the boundary wires your current robot uses?
- I feel my case is a bit special as I have already done the work of digging the boundary cables into the ground so I would not have to do anything again so it would really not matter to me if the plant identification robot would use the same system. However as I understand, this product is also likely for new customers and if I was a new customer I feel like the mapping feature would be better as I would not have to set up the whole boundary cable system which was tiring and time consuming for me.
- Would you like the robot to map out your garden in order to pinpoint problems in your garden and display them on your phone or would you just like to receive the GPS coordinate of the issue and why?
- I feel like seeing the map of my garden on the app will always make my life simpler however, if I simply get the GPS location which then i can paste into google maps or some application and see its location that would also be more than fine. As long as I know where the sick plant is I will be happy with it.
- Are there any problems with movement that your current robots are facing with regards to using wheels? (getting stuck somewhere etc)
- Generally I would say no, there are times however where the robot has to go over a brick path running through my garden and sometimes it struggles to get up on the ledge, however eventually it always manages to find a more even place to cross and it crosses it.
- Are there any hardware features that you believe would benefit your current robot?
- I wouldn't say there is anything that the robot is missing in its core functionality, however I recently installed solar panels on my house and they help me save on electricity so maybe if the robot also had some small solar panel it would use less electricity as well but besides that I am not sure.
- How satisfied are you with the precision and uniformity of grass cutting achieved by the robot's mowing mechanism?
- I am very satisfied, although I remember the store employee telling me that it evenly cuts the grass even with random movement. I did not believe him but I can truly say I guess over the time it operates it manages to cut the grass everywhere within its area.
- Have you noticed any issues or areas for improvement regarding the battery performance or power management features?
- Not really, my robot works in a way that it operates until the battery drains and it returns to its charging station to charge. Once its done charging it resumes its operation so I do not really see any issues with its battery and especially since it works the whole day I don’t see any problems with it charging and returning to work.
- How well has the automated grass cutting robot endured exposure to various weather conditions, such as rain, heat, or cold?
- I cannot run the robot in the rain and it really is not recommended either, so when it starts raining I just tell the robot to got back to its station. Regarding heat and cold, ive not seen any issues, obviously it hasn't had any significant running in cold temperatures as I don't use it during the winter as there is snow and no need for grass cutting.
- Have you observed any signs of wear or deterioration related to weather exposure on the robot's components or construction?
- No not at all the robot is still in a very good condition after some years now. I have seen that you can buy some replaceable parts if something breaks but I have not had the need to.
- What plant species do you currently own?
- Too many to name if I’m being honest, and also I'm not sure if I could name what a lot of them are (chuckle) but many flowers, bushes and trees.
- Have you always gravitated towards these species, or did you grow different species in the past?
- When we first bought the house with my wife around 2004 we just had a gardener and some friends/family help us decided how to decorate the garden with plants and when plants die, the gardener who comes each spring helps us decide whether to replace it with something new or the same one again.
- What health problems do your plants typically encounter?
- Probably the most important issues are drying out during the summer as I often forget how much water each plant needs when the temperature is high, at some point a few years ago I also had some bug outbreak which spread which forced me to dig up many flowers.
- Is there anything that you find confusing about the design of modern apps, and, if so, what?
- Obviously I am getting quite old and not so good with new technology so what I love about apps that I use is that they have their main features on the home page and are easily accessible, I have a hard time finding things if I have to navigate through many pages to find it.
Conclusion
In the end, we were very pleased with the input that our interviewee provided and we are very thankful for his time and thought that was put into answering each question. The interviewee also displayed a lot of interest in the project and insisted that we get back to him with the progress we made at the project's conclusion. Furthermore, the most important thing that the interview provided us with is clarification of a lot of points of discussion we had and he paved a clear direction that the project should head towards. The interview allowed us to solidify many of the main features and although not all requests, such as the solar panels on the robot, can be completed we have been given a lot of information that we can work with and continue developing now knowing that we have backing from a potential user. Although in this section is not fitting to discuss how the interview will contribute to the final design of the robot, all changes and decisions that were made that can be traced back to this interview will be discussed in the Final Design section of this wiki.
Survey
Having done all the necessary research on existing technologies that could be implemented by our robot, we wanted to narrow down all possible functionalities into the few necessary ones that would be preferred by possible users. To that end, we conducted a survey amongst peers, family and through open group chats, allowing user-led information to guide us into designing our robot, and especially the app that controls it. We asked 11 multiple choice/multiple answer questions to the users, 6 questions about the User Interface of the app, e.g menus, buttons and tubs, and 3 about functionalities of our robot, e.g operation of robot and locating plants. We got a total of 39 responses, most of which were family members who had lawns, however some were friends and colleagues who did not necessarily own a garden. While they may not be the most accurate representation of our potential users, their perspective and opinions are still valuable, as they offer fresh perspectives on the usability and appeal of our robot and its app beyond the traditional gardening demographic. Additionally, their input allows us to anticipate and address the needs of users who may not have prior gardening experience but are interested in adopting technologies that facilitate plant care and maintenance. Therefore, incorporating their perspectives enables us to create a more inclusive and user-friendly product that caters to a wider audience.
Survey Results
As stated before, we used the following survey results to make some design choices with regard to our app and our robot. For all questions in the survey, if the question was a multiple choice (Pie chart), the option with the highest percentage was chosen for our design. However, if it was a multiple answer question (Bar chart), then we included all options that had at least a 66% (⅔) rate of being chosen by our users. This is because if a sufficiently large number of possible users want this feature, we should include it to ensure that our users are satisfied.
User Interface
The following questions are there to finalize the UI design of our app. We wanted to ask our users what would be most helpful for them, in terms of notifications, home screen, and button placements. For example, in the first question we queried further what functionality they would like to see on the home screen, as the home screen should have the most important functionality, to make the app straightforward and easy to use.
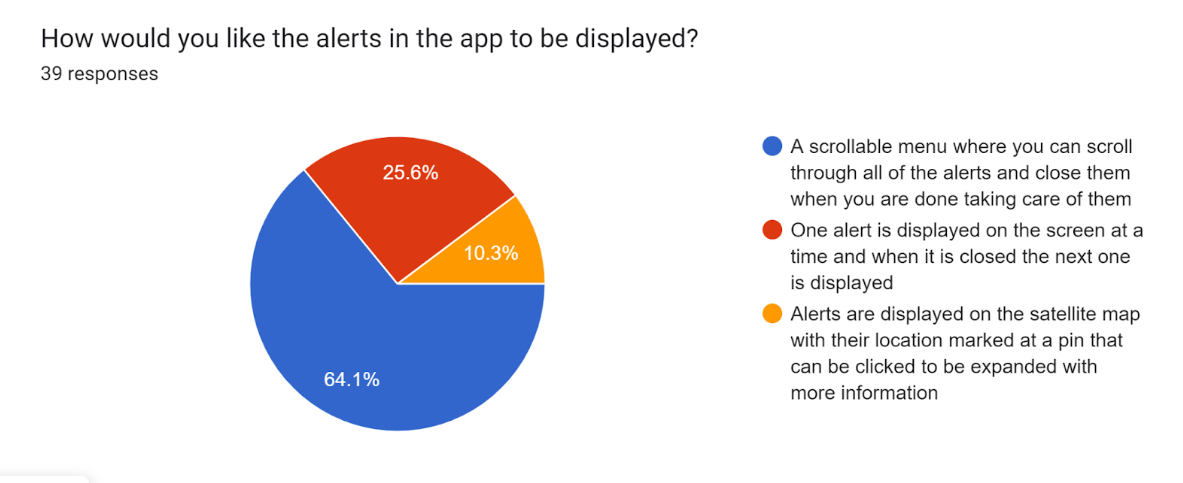
- We asked the following question because we weren't sure how to display alerts on our app, as a scrollable menu might be more overwhelming, but might also tell users exactly how many notifications they have. From the results of our survey, a scrollable menu was chosen, as it had the highest popularity. Moreover, even though only 10.3% chose the satellite alerts, we decided to add a fluctuating light on the map to let people where the plants was.
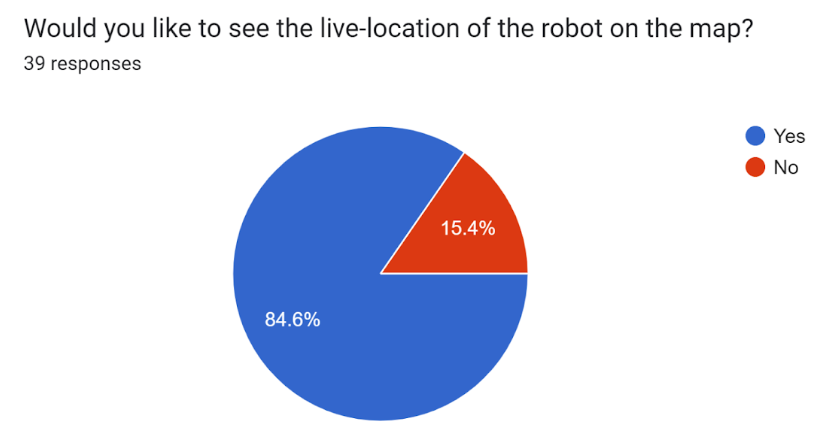
- We weren't sure whether the live location of the robot was necessary, as it might make the map more crowded and distract the user from the main goal of our app, which is the detection of plant diseases. However, as the users told us that they preferred to have the live location, we included the live version of the NetLogo environment on the app as well, to showcase the robot's location and their progression in cutting the grass.
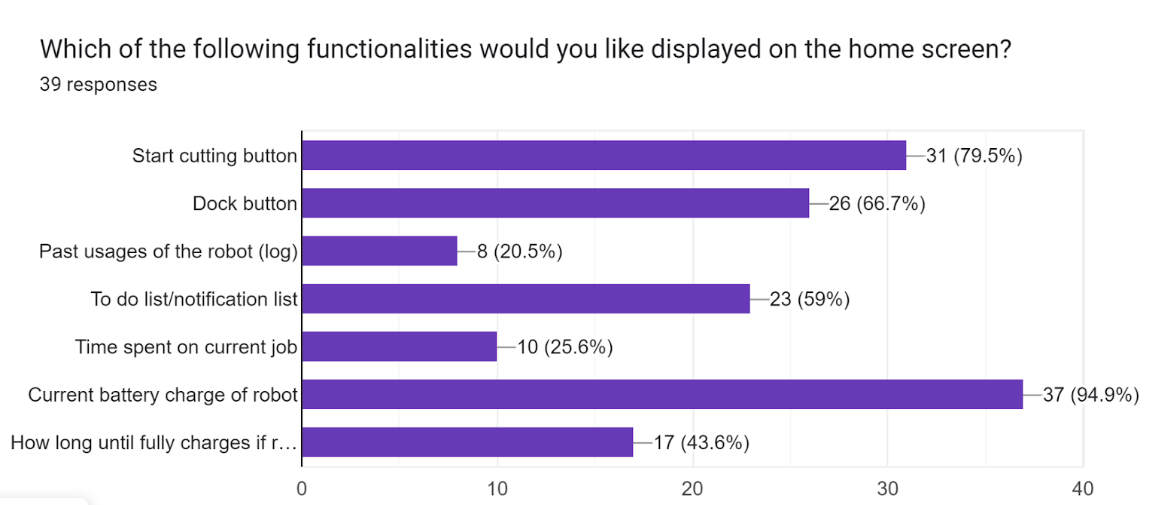
- The app's home screen is where the most important functionalities should be, which is why we asked our users to choose between 7. In the end, The start cutting button, dock button and current battery charge of the robot were added to the home screen, as the majority of those surveyed chose them. Unfortunately, considering these 3 buttons, we weren't able to add a to do list, as it would take too much space and would make the home screen crowded.
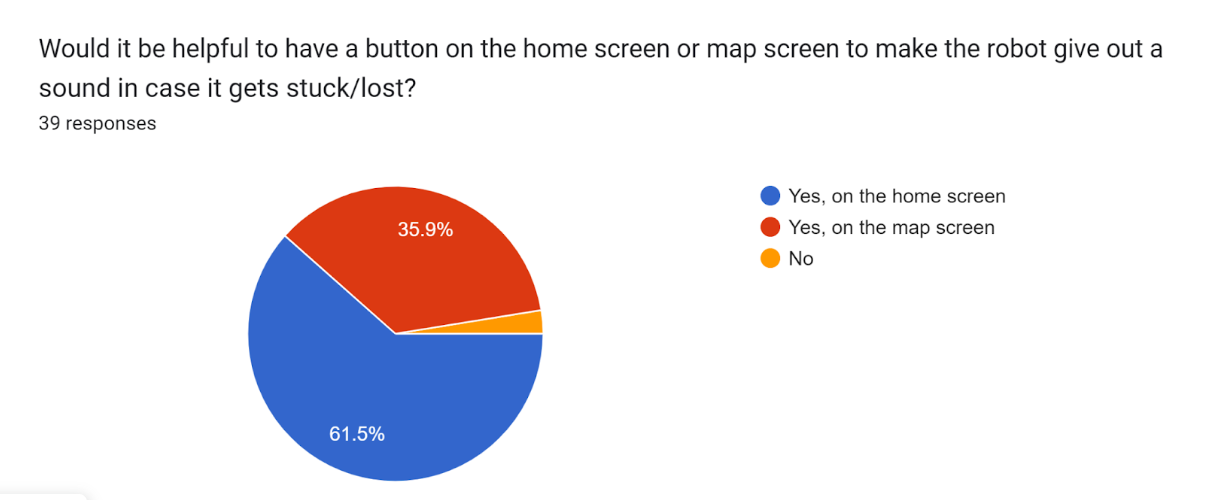
- We were not sure whether a button was needed to give out a sound in case the robot was lost, as our robot was going to be big enough to be visible, and we didn't want an unnecessary button on the home screen or the map screen. However, the reached consensus was that the button was very much necessary, and that users preferred it on the home screen, so that is what we chose.
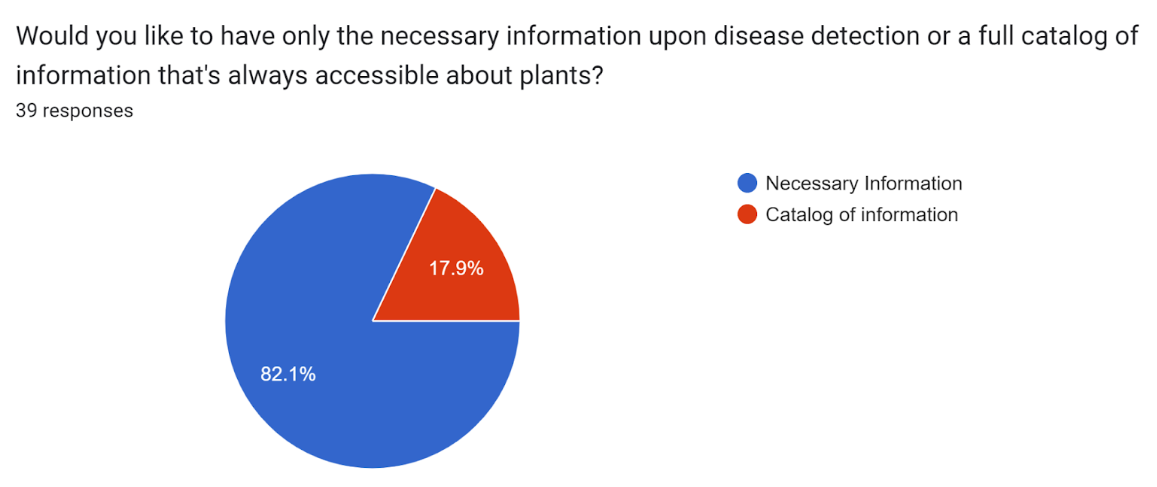
- Our goal for our robot and app is to make gardening easier for our users by automating the most tedious part of gardening. Moreover, we were also targetting inexperienced users who might not know much about how to take care of plants, and so we wanted to ask them how much information they actually wanted. Unsurprisingly, most only wanted the necessary information upon disease detection.
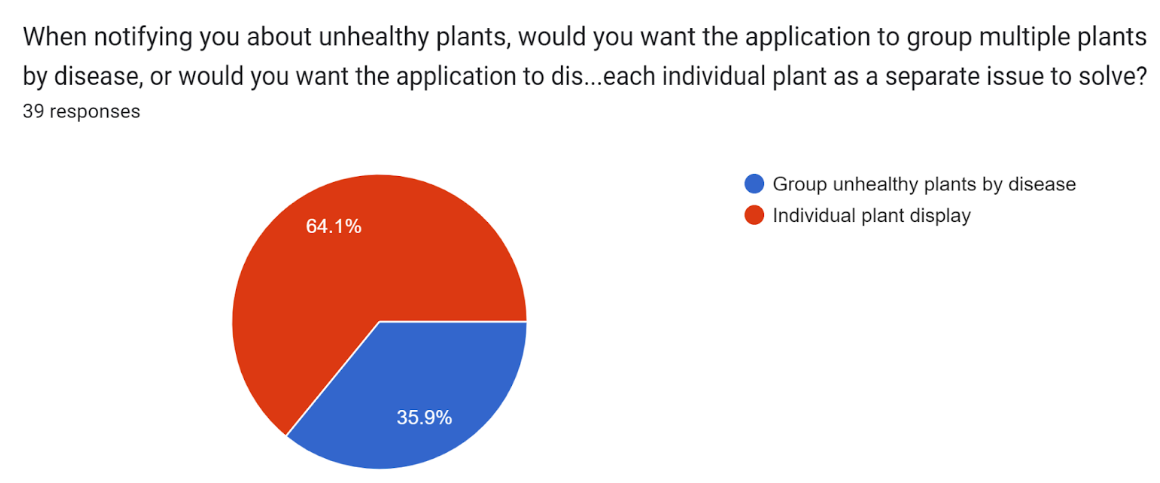
- The grouping of unhealthy plants came up during one of the meetings with the tutors, which lead us to think of the different ways of how users might want the user to get notifications and see plants on the map. Grouping plants by disease might help the user treat all the plants with the same disease at the same time, but it also might be very inefficient, as the user would have to treat 1 illness at a time, passing by ill plants that would not be treated in that round. The alternative was to just notify the user for each plant, which allowed the user to choose which plants they wanted to treat first, and turned out to be the preferred choice.
Functionality of Robot
The following questions ask further about the functionality of the robot. We wanted to ask further about not only how automated they would want the robot to be, but also give us insight and anticipate difficulties that the users might have while interacting with the robot. For example, it occurred to us that users might have a hard time finding an identified plant using just the GPS location, so we gave them extra options like images and paint drops to help them locate the plant.
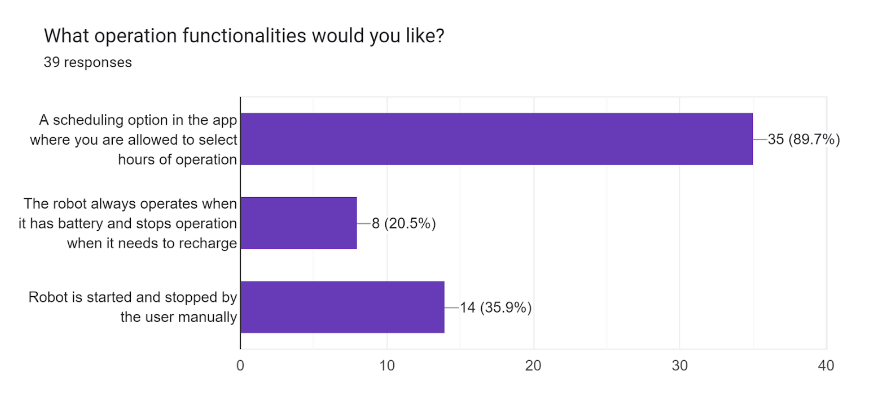
- The functionalities of the robot itself could have been included in the question about functionalities in the home page, however we want to know specifically how automated the users wanted the robot to be. Effectively, the possible answers are semi-automated, automated and manual, in that order. Unsurprisingly, people preferred the semi automated version, however we were surprised at the fact that only 36% of people wanted to be able to start and stop manually, considering that in question 1, people wanted a start and dock button. However, this is probably the case because people didn't want the start and stop exclusively, and wanted to specify how important scheduling was for them.
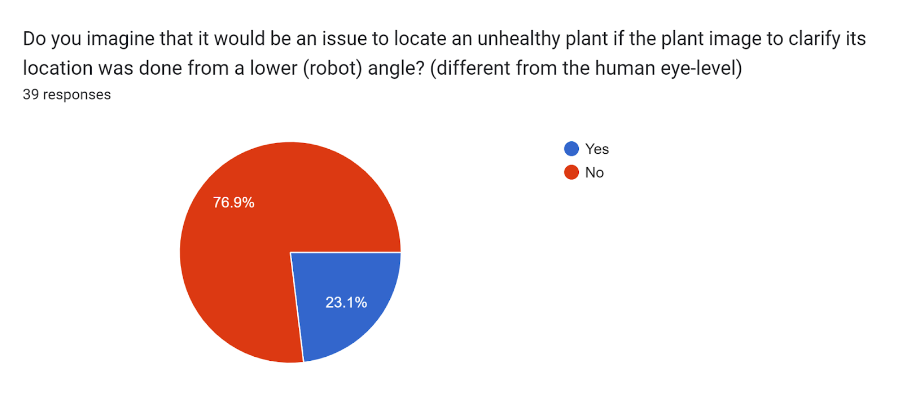
- Another problem that came up in the meetings with the tutors is the location of unhealthy plants, as the camera angle would be quite a lot lower than the human eye angle, and therefore humans might have difficulties locating plants by using a gps and an image. However, we were confirmed the fact that this was not an issue, having shown them an example of an image from the view of the robot.
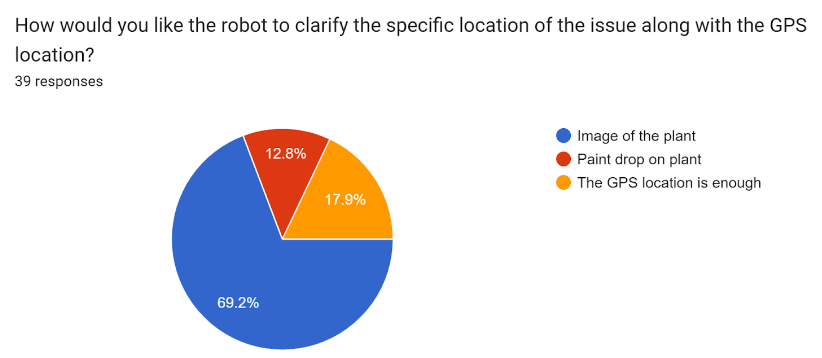
- Finally, to ensure that users were able to find marked plants, we asked them of different ways that might help them locate this plant along with the GPS. As acknlowedged by the previous question, an image of the plant, regardless of the angle, would be useful for the user to locate the unhealthy plant. Very few people only wanted the GPS, which is probably because there can be multiple plants nearby that may not have the same disease, and identifying based exclusively on location might have been tough.
Conclusion
This survey was very helpful to clarify some doubts we had about the UI and functionalities. There are infinite possibilities as to what to include in the UI, so having the user preferences was very helpful to reach a final design of the app. Moreover, some features require extra effort from us, so choosing the necessary features and excluding the unnecessary features was very useful, not only to ensure that the user only has what they prefer, but also to ensure that our time is not wasted. For example, we weren’t sure what functionalities to display on the home screen, and after the survey, we were able to choose the 3 most important functionalities, such that a user sees them immediately after opening the app. There were also some worries about the functionality of our robot, such as the user having difficulty finding the diseased plants. This is because our robot would take pictures from a different angle than humans, which might impede them from finding the plant matching the picture, even if they have a GPS location. However, we were reassured by the survey results, which stated that it wasn’t a big issue. We do have to take into consideration the fact that the user is answering a hypothetical, but the positive response from users tells us that having this feature would not be a turnoff to any potential customers.
NetLogo Simulation
Introduction
Our NetLogo deliverable aims to simulate and display how the functioning of the robot will look visually as well as how the robot will communicate and interact with the app. The simulation will display the robot throughout the process of a regular operation, traversing the mapped garden, trimming grass and scanning for plants which are sick. In the simulation when a robot detects a sick plant it will drive up as close as possible to its location and send the coordinates of the sick plant to the application. Currently, this is also done for healthy plants, in order to not limit the possible features of the robot at this prototype stage. For example, in the future it could be possible for manufacturers and designers to want to incorporate the locations of healthy plants into their robots in some way, so we want to make that a possibility from the start. After detection, the application will then be able to receive this information and display it graphically for the user to observe, access and analyze.
Creating the Environment
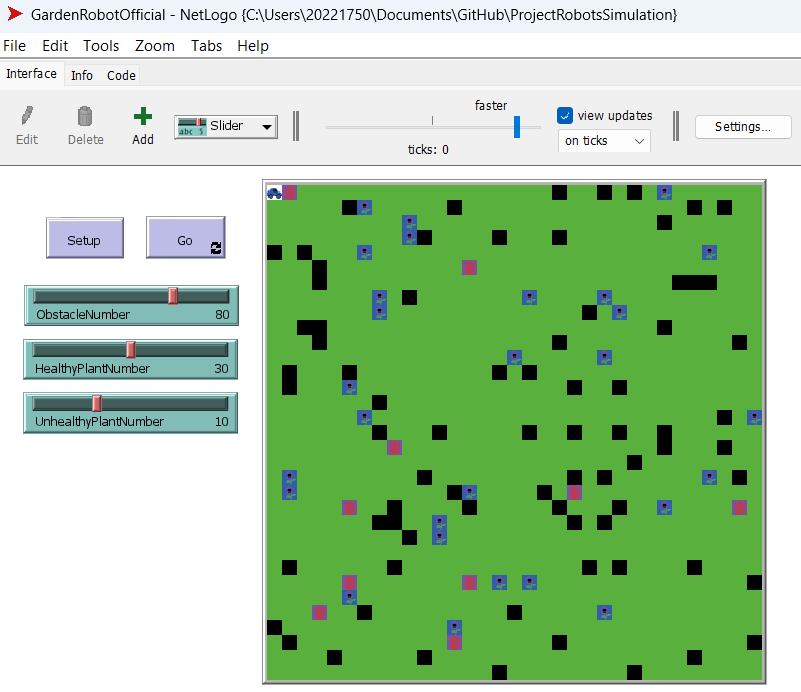
The first step in making the simulation was at first to create its environment, essentially the locations the robot will be able to traverse through. It was important for the environment to include certain important features which if not implemented would make the simulation lose its true functionality. However, before getting into the core of the environment as is the case for all NetLogo simulation we had to decide the size of the grid of the simulation and where to place the Setup and Go buttons. After some experimenting, and taking into consideration the time it would take to demo the simulation we decided that the size of the environment should be a 16 by 16 grid. Furthermore, we decided to place both the Setup and Go buttons in an easy accessible location on the top left of the screen.
Moving onto the actual patches and how they were designed it is evident that firstly the environment must include the robot's charging station which will be the location where the robot will begin its operation every time the simulation is initialized and run. In the simulation, the charging station was picked to be represented by a white patch. Furthermore, it was important to make the garden realistic. This meant that the environment had to include some form of obstacles or areas that the robot could not drive across as can be seen in real life gardens by rocks, tree roots, sheds and any other large obstacles. Therefore, obstacles were added into the simulation as black patches. Additionally, the environment had to include some standard or default patch of grass on which the robot can move freely and not have any responsibilities or tasks. As is the case in real gardens most patches in the simulation were of this specific kind and were represented by light green patches. Finally, possibly the most important patches in the simulation were patches which contained the actual plants in the garden. These patches were separated into two kinds; healthy plants and unhealthy plants. Healthy plants were represented by patches with a purple background and unhealthy plants were represented by patches with a red background. Although in the initial version of the simulation these patches did not include any icons, I decided that it would be easier to understand and view if the patches also included icons. Therefore, adding onto simply the background color, healthy plants had an icon of a flower on them and unhealthy plants had an icon of a weed on them. In the first version of the simulation the number of each patches was hard-coded meaning the user of the simulation could not change their value. However to increase the interactivity of the simulation I added sliders that can allow the user to customize the number of each type of patch, this obviously does not include the charging patch as there cannot be more than one. All sliders are placed below the previously mentioned Setup and Go buttons.
Creating the robot
The creation of the robot and its algorithm was by far the most challenging step in creating the simulation. Unlike the environment and its patches, the robot performs an action at each time unit which in NetLogo is a tick. In NetLogo the robot was made using an item called a turtle. Turtles are able to move around the environment and interact with objects making them far more complex than patches and suitable to represent our robot.
Initially we believed the most optimal way to design our robot was to make it have random movement which included boundary wires. This meant that at each tick, the robot had to pick a random direction and move 1 step in that direction. Although this algorithm seemed quite simple to design as it required the robot to pick one of 4 options non-deterministically, I quickly found out that many problems were present that I initially had not considered. Firstly, it was not possible for the robot to walk over an obstacle, which we previously defined to be a black patch, this meant that when making the non-deterministic choice of direction the robot had to consider the fact that a black patch could be present one step away from it. When that problem was fixed, the robot also had to be aware of the boundaries of the simulation, which essentially are the boundaries of our garden. Although NetLogo does allow the robot to wrap around boundaries meaning that if it exits through the right side of the environment it just reappears on the very left side we felt this was not appropriate as it was unrealistic in comparison to the real world. In reality it is trivial that doing that is impossible so in order for the simulation to reflect reality that was not an option. In order to deal with this issue I had to make the robot treat the boundaries of the simulation as if they were a black obstacle patch which proved to be more difficult than expected, however in the end it was completed.
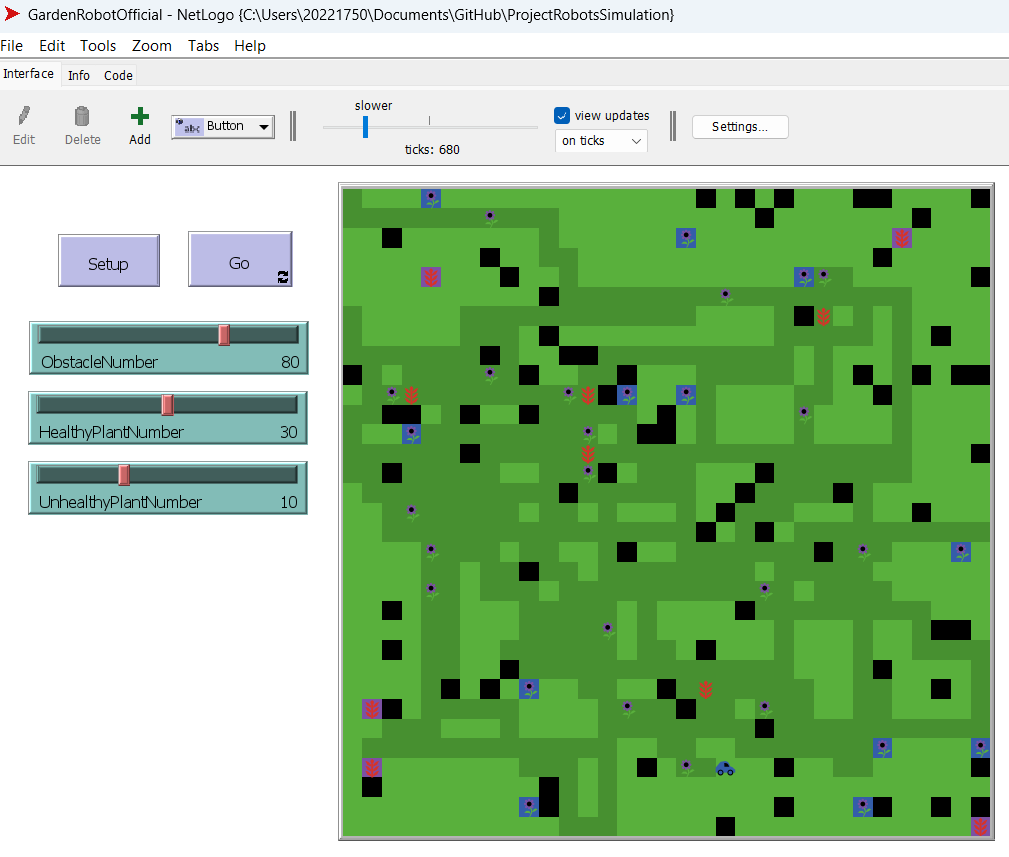
After the interview, we learned that random movement without mapping and through the use of only boundary wires was not really desired by the users so we had to change our approach in the real prototype and therefore in the simulation as well. What we truly wanted to incorporate was the guarantee that the robot visits every spot in the garden to make sure that every plant that was unhealthy could be visited by the robot. In the simulation this meant that the robot must visit every patch which is not an obstacle patch. Although previously it was impossible to assume that the robot knew its entire environment during its operation, as it had no mapping features so it could only see the patches directly next to it, now we are able to make that assumption due to the decision to implement Husqvarna AIM technology into our robot. Knowledge of the environment made our robot much more complex and for the lack of a better word, “smarter”. This meant that the robot could now plan its actions in advance and not have to always respond only to the current situation it is in advancing it past simply being a simple reflex-agent. These new possibilities brought along a wide range of programming challenges. Firstly, I now had to make two lists to track the robots progress throughout its operation. The first list was made to track patches the robot has already visited, the second list was made to track patches the robot is yet to visit. This meant that when the robot visited a new patch, meaning it was on it, it would add it to the already visited patch list while also removing it from the yet to visit list. Although at first we wanted to simply make the robot follow a snake pattern and visit each patch in a very organized manner after doing some research we found this to be nonoptimal with regards to grass cutting. Commercial state of the art grass cutting robots often move randomly to make sure grass is evenly cut as when traveling in the same direction constantly the robot unavoidably pushes down the grass, flattening it out and making it impossible to reach by the blades. Some form of nonuniform movement prevents this and ensures all grass is cut evenly. We wanted our robot to maintain this and therefore the simulation had to as well. Therefore we decided that at the start of the operation the robot randomly selects a patch from the list of patches it is yet to visit. It then proceeds by taking the shortest possible path to that patch until it reaches it. It is obvious that on its way to what we call the target patch at this point in time, the robot passes over other patches. All these patches that the robot steps on that are not in the visited patches list are added there and removed from the yet to be visited list. After reaching the target patch the robot selects another patch from the yet to be visited list which now no longer includes the previous target patch as well as all the patches the robot visited on its way to it. This process continues until the yet to be visited list is empty. When the robot realizes the yet to be visited list is empty it completes its operation. The robot then waits for a new operation to be initialized to begin the process once again.
An interesting component of the robot operation is the algorithm which it uses to calculate the shortest path to the target patch it has selected. We felt that the best possible algorithm for our robot was Dijkstra’s algorithm which finds the shortest path to a node in a weighted graph. Although in our case all steps had essentially a weight of 1, as any step our robot could take was equivalent in distance, the algorithm still proved to be very useful and allowed the robot to operate efficiently.
Plant Detection
Now that I was confident the robot could visit each patch at least once, I knew that it would be in the vicinity of each plant in the garden at least once. This meant that it was possible for the robot to realistically detect all plants in the garden and the issues associated with them. The problem became how this can be done. After some research and analysis, we decided that the best way to do so would be to allow the robot to detect all plants that are within 1 patch of its current position. This meant that in order for the robot to detect the plant, it would have to be right next to it which is realistic as to what it would have to be in real life. Along with simply the fact that our robot had to detect the plant, we also made it a requirement for the robot to be able to send the location of it to the user. Therefore, in the simulation when the robot detected a plant it also made sure to save its location as well as if it is healthy or not, the latter being done by checking the color of the patch which is sufficient for the purposes of the simulation. However a problem this created was the fact that if a robot passed in the vicinity of the same plant twice, which is a likely occurrence it would send two of the same notification. This obviously was not desirable as we did not want the user to get multiple notifications of the same problem. In the simulation I fixed this issue by having to once again create two lists. A list of already seen healthy plants and a list of already seen unhealthy plants. Now, when the robot detected a healthy or unhealthy plant before sending the notification to the application it first checked if this plant had already been detected and only sent it if it wasn't. Plants which were detected for the first time were then later added to the appropriate list of their type after the notification was sent. In conclusion, since we previously made sure that each patch of the garden is visited we can now also conclude that most definitely each plant in the garden will be detected.
Communication with the application
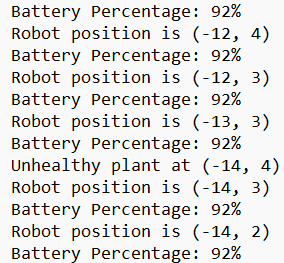
As I mentioned in the introduction of this section, one of the main goals of the simulation was to demonstrate the dynamic operation of the application. Essentially the user could view the simulation as if watching a real robot move around a garden and see how information would be communicated to them in the app. Communication between two softwares of this type is difficult to complete but it was a task we wanted to take on. After many hours of research we found that the most optimal way to communicate between an application and NetLogo would have to be a .txt file. The NetLogo simulation would print information into the .txt file and the application would parse it and read it. Since communication between software like this is often costly it was important to send only the most important information. Firstly, since from our survey we found out that users wanted the map of their garden in the application, on setup the simulation first printed for each patch its coordinate and RGB values for its color to the .txt file. During the running of the simulation there were 3 important elements that we had to send over to the app. Firstly, as requested by users in our survey each tick (time unit in NetLogo as defined previously) the simulation had to send the current battery percentage of the robot as well as its current location. Additionally, the most important part of the simulation had to be sent over which was the coordinates of any plant that was detected. This was done through the fact that as soon as the robot detected a plant it printed out its coordinates and status (healthy or unhealthy) to the .txt file. With these methods in place the communication between the simulation and app was effective and allowed the demo of the app’s dynamic operation to be depicted. The user was now able to see the robot operating in the simulation and in real time receive notifications and updates in the app. If printing to the .txt file and how it exactly works still seems slightly confusing the demo video in an upcoming section will clear everything up.
UX (User Experience) changes
In order to make it easier for the user to follow along with the execution of the simulation, we decided to change the color of the patches the robot visits from a light green color which it is originally to a darker green color. This means that the user can now more easily see which patches the robot has already visited and which patches it is yet to visit at any point in the simulation.
Demo Video
The link to the demo video is the following: Demo Video
As this video is the same video that was used for the final presentation, it is not narrated and I will therefore explain what is happening. Firstly, when the Setup button is pressed we can see that the coordinates and RGB values of each patch are printed to the .txt file. When all patches are printed at the bottom “Start of Operation” is printed indicating that all patches have been printed successfully. After returning to the simulation itself the Go button is pressed and the robot leaves its charging station and begins its operation. As mentioned in the section above we can see that visited patches turn a darker green color. As the simulation continues running we see every patch being visited until all patches become visited. The video then returns to the .txt file to see what has been printed throughout the simulation. We can see that each tick the battery percentage of the robot was printed as well as its current location at that point in time. We see that both all unhealthy plants and healthy plants are printed along with their locations. Lastly, we can see that with time passing in the simulation the robot’s battery has gone down. The .txt that was on show throughout the video is the only part of the simulation the application gets to view and where it gets all its information to display to the user so the information it presents is crucial.
Conclusion
In the end we are quite happy with the result of the simulation and we believe it fulfills all the tasks it was made to complete. Future manufacturers and users can see in what way our robot would navigate a garden through how its navigation algorithm works in reality. They can also view how the dynamic operation of the application works and see the connection of our robot passing an unhealthy plant in the simulation and that appearing as a notification in the app. The same can be said about the live location of the robot and its live battery percentage, the app can now reflect what is happening in a simulation in real-time exactly how it would when the real robot would operate in a real garden. Lastly, we added the feature of also reporting on healthy plants in the simulation although this is not used by the application and not required by our robot. However as mentioned previously we want manufacturers and users to have more features to work with that are already implemented and make it up to them if they somehow want to incorporate it into a robot they make based on our design.
The simulation was uploaded created while using GitHub and the GitHub Repository can be accessed here: GitHub Repository
UI Design Guiding Principles
When designing an application, the user is the most important factor. The simplest of ways to taking the general user into account in the design process is by considering psychological principles that can affect the ways users experience the app and its functionalities. Thus, we will continue by outlining important factors based on psychological finding and how they translate in terms of UI design.
1. Patterns of perception[59][60]
The principles of Gestalt outline how people tend to organize the results of their perception. Knowing the ways the average user perceives the content of a screen can be used to design a UI that results in an easier navigation of the app and a more visually appealing interface.
These laws identify the following :
· Symmetry is seen as more organized.
· The mind has the tendency to fill in incomplete information or objects. This is more important to logos but it can be taken into account when shapes are used in design.
· Simple designs are good. Simplicity aids in faster understanding of information.
· Elements can be grouped toghether by having a visual connection (same color, same shape, move in the same direction, close position) or a similar arrangement of the elements that creates continuity. People tend to group elements that appear to be creating a line, a curve or basic well recognisable shapes.
· Similar elements are better grouped when the aim is to attract the attention of the user to them.
· Each screen should have a focal point.
· Different colores can be used to define areas that are perceived as separate objects.
· Complex objects tend to be interpreted in the more simple manner.
2. Information processing
According to the study by George A. Miller, on average, people can remember 7± 2 objects at a time. It was also found that by using certain techniques to aid memorization this limit can be surpassed, but this does not nullify the effect of Miller’s study as UI design should be made as simple to interact with as possible[61]. This implies that each screen of an app should be designed to only have 7±2 elements so users have less to remember and an easier time visually navigating the screen.
When it comes to the use of text and images, the “Left-to-Right” theory points that it is more convenient for users to have the most important information on the top left side of the screen. According to certain findings, this might not be completely accurate for UI design as it was observed in a limited study that people tend to look at the center of a screen first[60]. Furthermore, people have 2 visual fields, the right field is responsible for the interpretation of images and the left for text. Putting images on the left and the text on the right would makes it easier for users to process the given information[60].
Further limitations on how people process information is tied to the limitations of the use of motor systems. Multitasking of a motor system or multitasking multiple motor systems should be avoided. Focusing on having a task of one motor system introduced at a time makes it easier for users to process the information and to have an easier time paying attention to the task. Thus, screens should not give the users multiple information of different types at the same time. The main point thus being that important text should not be put over a complex image used as background[60].
3. Use of Colors
Colors can be used to improve the visual appeal of an app. The only issue is that the color selection is a complex subject. Color schemes can be chosen based on the context they are to be used, different color theories and the desired effect on the user. Nevertheless, it is important that colors are used consistently across the app, and they are not overused[59]. Regarding accessibility, the limited color perception of color-blind people should be considered when choosing contracting colors to highlight different elements[59]. It should also be noted that bright and vivid colors, or a mix of bright and dark colors can tire the eye muscles. This should be avoided to make the app easier to use for longer periods of time[60].
4. Feedback
Feedback is quite important for users to feel that their actions have an effect[62]. It can also affect the ease with which users can remember how to use an app. Feedback should be immediate, consistent, clear, concise and it should fit the context of their actions[59].
5. Navigation and guiding users
It can be important to make it clear to users how they should begin interacting with an interface. To make it clear it would be useful to make the starting element stand out. This can be done either through a different color, size, hue, shape, orientation etc[62]. Guiding the user can further be done through a visual hierarchy. This can be created by assigning visual priority to elements by making them stand out compared to the other elements. It would mean the higher priority an element should have the more it should stand out. This would guide the eyes of users in the way the UI designer considers the screen should be navigated, giving a logical order of tasks that the users would subconsciously tend to follow.
Important elements should be made to stand out in general due to the phenomenon of inattentional blindness. The Invisible Gorilla Experiment by Simons and Chabris in 1999 showed that people will miss unexpected elements when they are focused on a different task[63].
Another aspect that helps in navigation an interface Is that the user should be able to find a logical consistency in it. The responses to user actions should be consistent and any changes from whatever monotony was created should be predictable. The responses should also be reflective of the content of the interface[62].
A further important aspect that can ease navigation for users is providing them with a clear reversal or exit option. Such options give a sense of confidence to users and make navigating the app less stressful once they know that they can opt out if they make a mistake or change their mind about an action[62].
6. Efficiency
Hick’s law states that the more options available the longer it takes to decide. In term of UI design, this implies that menus and navigations systems should be simplified, either there should be a focus on a few items or elements should be labeled well and similar elements should be grouped together. Another way to decrease options would be to create a visual hierarchy[59].
Fitts Law is based around the connection between target size and distance, and the times it takes to reach a target. When it comes to UI, the law implied that bigger buttons are in general faster to use and better suited for the most frequently used elements. The law can also reinforce that the steps of a tasks are best contained on the same screen to make navigation more efficient[59].
Application Development
Application Features
The application is designed with a Home Screen that features a map of the garden. This map is dynamically updated in real-time with data from the NetLogo model, providing users with a visual representation of the garden's current state. The Home Screen also includes three interactive buttons: "Start cutting", "Dock", and "Ring". The "Start cutting" button interfaces with the NetLogo model to initiate the grass cutting process. The "Dock" button commands the mower to return to its docking station, while the "Ring" button activates the robot's alarm, aiding users in locating the device within the garden.
The Notifications Screen serves as a hub for all notifications from the NetLogo model, specifically those related to detected plant diseases. Each notification can be expanded to reveal more information, including the disease name, the date and time of detection, possible treatments, and an "Open Map" button. This button, when clicked, redirects users to the map screen and highlights the location of the affected plant with a pulsing dot, providing a clear visual indicator of the plant's location.
The Settings Screen provides users with the ability to customize the robot's operation schedule. Users can set the start time, the duration of grass cutting, and the specific days of the week for operation. Additionally, the Settings Screen features a clock widget that utilizes native Android components, enhancing the overall user experience by creating a sense of deep integration with the Android operating system.
Implementation Details
The application is developed using **Android Studio** and leverages Google's Chrome Trusted Web Activities (TWA) framework. The user interface is designed using HTML/CSS (as opposed to Android Studio fragments), while the application logic is implemented in TypeScript. This combination provides the native Android app experience and performance offered by Trusted Web Activities, while also benefiting from the simplicity in design and deployment that JavaScript and CSS are known for.
The backend server is implemented in JavaScript, chosen for its close ties to the frontend of the app and its similarity to TypeScript. This makes it easier to maintain and develop the app due to the use of similar technologies.
A Python script is used to relay updates from the NetLogo model to the server. Python was chosen for its strengths in file I/O operations and its ease of writing and maintenance. It is also widely used in the scientific community, making it likely that anyone running the NetLogo simulation on their device will also have Python installed.
For real-time communication between the app and the server, WebSockets are used. Data transfer is facilitated through JSON encoding.
NetLogo Integration
As described in the **Simulation** section, the NetLogo model writes to a file every time an update occurs. A Python script which was developed as part of the app, watches this file for changes. When such a change occurs, the script parses the text into separate "update frames", which are more efficient to work with later than raw lines of text. the script then sends these "update frames" to the server, which in turn forwards the update information to all currently connected client apps. Lastly, the server includes an internal database of the data received, so that it can be accessed by the app at any time in case the app is opened after the simulation has already started - in that case, the app will receive the most recent data from the server without having to wait for the next update from the NetLogo model.
Implementation Decision: Separate Server from NetLogo Integration Script
The decision to separate the server from the NetLogo integration script was made for several reasons. While combining the two could have made it easier to get a minimum viable product working early, separating them provides more modularity. This allows for easier maintenance as both the server and the NetLogo script can be changed independently. Furthermore, the NetLogo script can be run on a different device than the server, which is much more similar to how a real-world system would be implemented: the NetLogo model represents the robot, the communication script runs on the base station, the server is in the cloud, and the app is on the user's phone.
Demo Video
The link to the demo video is the following: Demo Video The video used for the final presentation and as such is not narrated; hence, I will include a brief explanation of what is taking place. Initially, the application opens to the Home Screen, where the main UI component is the map of the NetLogo simulation. The “Start cutting” button is then pressed, causing the robot (depicted as a blue circle in the top left corner) to start moving. While the simulation is running, some of the other features of the app are shown. This includes the (currently empty) Notifications Screen, and the Settings Screen where the robot’s scheduling settings can be changed. After this, the view returns to the Home Screen, where the robot has already detected a few healthy and unhealthy plants (colored with green/red circles, respectively). These new detections are now displayed in the Notifications Screen, and clicking on each of them reveals the details for that detection. Finally, the “Open map” button on the detection screen is clicked, which brings the user back to the Home Screen and highlights that specific detection by causing the corresponding dot to start blinking. The movement of the robot is then terminated by pressing “Dock”.
The application was developed using GitHub, and the GitHub Repository can be accessed here: GitHub Repository
UI App Design
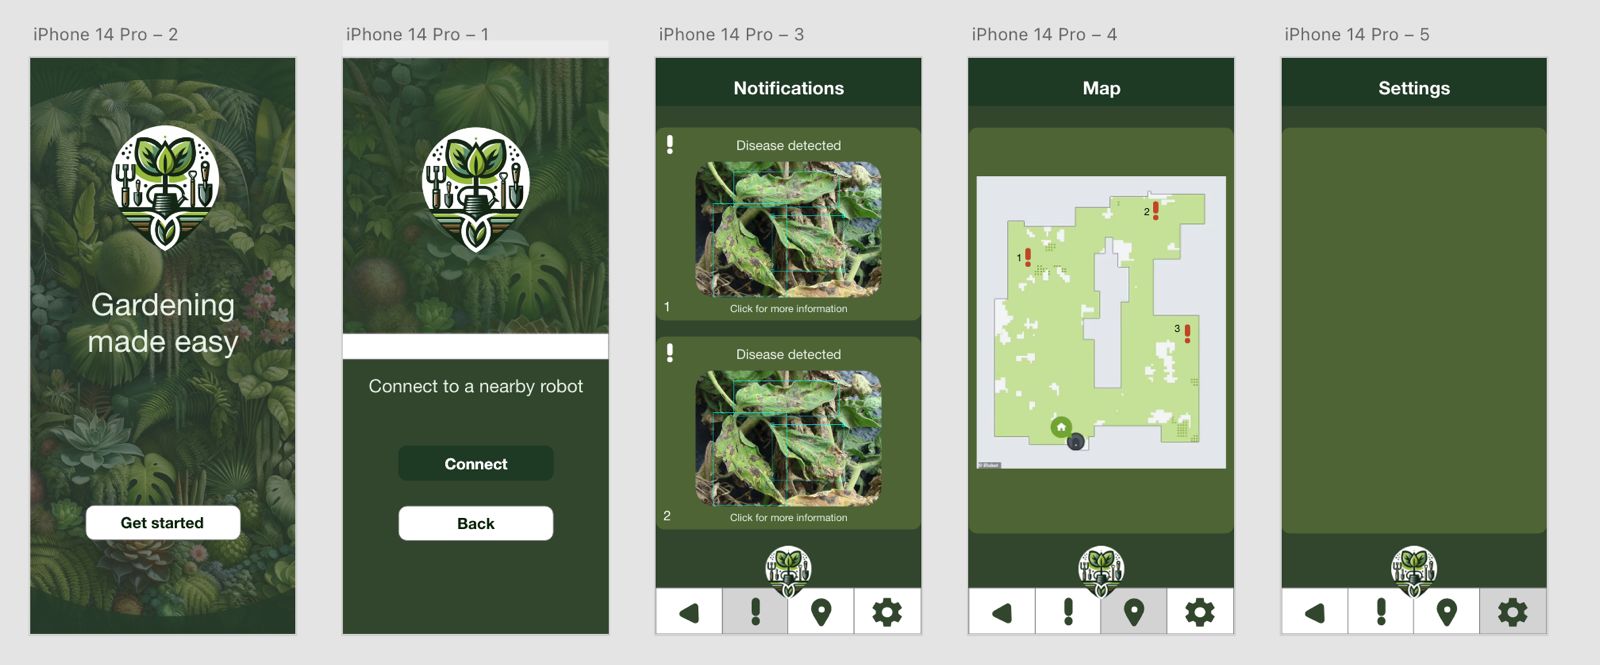
The UI app design started as an early prototype based on research on similar purpose apps like RoboRock, iHome Robot (indoor cleaning robots), Einhell Connect (grass cutting robot) and the state of art apps for plant recognition that were presented above.
To differentiate the product from its competitors, the design focuses on the products stand out feature through its color scheme and visual motifs and logo. The app's opening screen presents a plant background and the logo is meant to gently push users to associate the product with gardening and plant care. This purpose of the app's design is reinforced through the color scheme consisting of Timberwolf, White, Cal Poly green, Dark Green, Dark Moss Green, Tea Green. The decision on this dark and cool color scheme was supported by color theory and psychology research. The use of the different shades of green in the color scheme are meant to create an association between the product and a sense of calm and nature, but also growth and energy.
The final design implementation is the following:
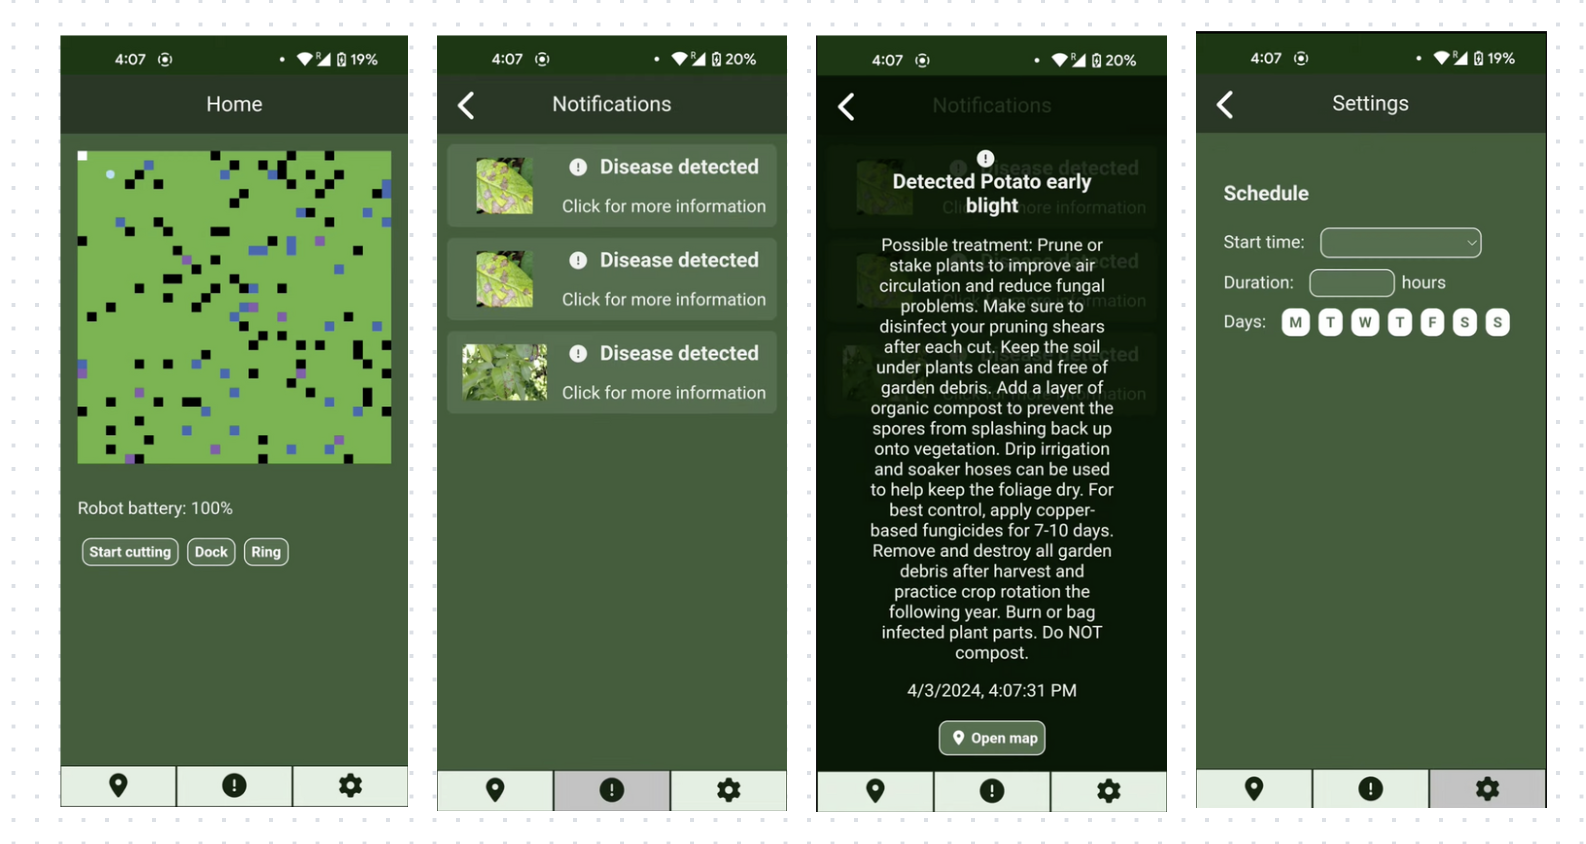
In the process of creating the interactive app prototype design changes were made for a multitude of reasons.
- The notification screen was modified to align with the research on information processing as outlined in UI Design Guiding Principles. Thus, individual notifications were minimised so more fit on the screen at once and the text and images were moved so that images are on the left and text on the right. This is intended to make it easier for users to process the information.
- A scheduling screen was added to fulfil the consumer desires as indicated in the survey.
- Buttons for Start, Dock and Ring were added to the Map screen as they were unintentionally omitted from the initial design. The Ring functionality was added to reflect the consumer desires as seen in the survey. The purpose of this functionality is to aid users to find the robot in the garden.
- The color scheme was slightly modified to reflect the research on the use of colours as outlined in UI Design Guiding Principles. The shades of green were modified to be more cohesive and to have a slightly cooler tone than originally. Furthermore, the use of white in the bottom navigation bar was replaced with light green tinted color as high color contrast that was present beforehand between the white and dark green can tire the eyes easily. The slight color change in the bottom bar resolves the biggest contributor of the color contrast, thus making the app easier to use for longer periods.
Identifying plant Diseases
Diseases to identify.
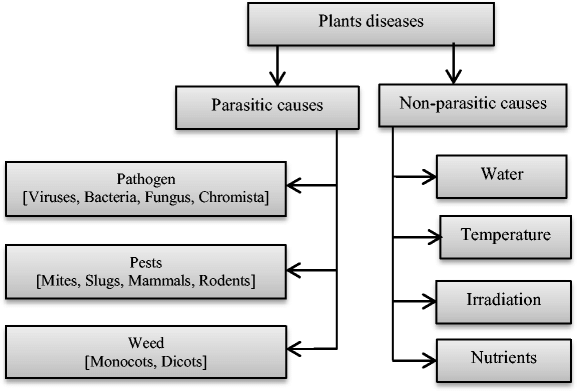
There is no doubt that taking care of plants can get overwhelming, especially because sometimes people do not know the actions that they should take in order to properly assist these plants. However, all the plants are different, and some are overly sensitive while others require heavy care. It gets extremely messy and confusing for the novice gardener. The plant’s disease by fungus, virus, bacteria, and other factors also affect the plants. The have disease symptoms such as spots, dead tissue, fungus like fuzzy spores, bumps, bulges, irregular coloration on the fruits . There are different types of plant pathogens, including bacteria, fungi, nematodes, viruses, and phytoplasmas, and they can spread through different methods such as contact, wind, water, and insects. It is important to identify the specific pathogen causing a disease in order to implement effective management strategies. In order to manage these diseases, the gardener must be equipped with appropriate knowledge and tools. This includes understanding the life cycle of the disease, identifying the signs early, and applying the correct treatments promptly. Regular inspection and proper sanitation practices can also help prevent the spread of these diseases. Plants can also be susceptible to various pests that can contribute to their deterioration. Common pests include aphids, slugs, snails, caterpillars and beetles. These pests can cause significant damage by eating the leaves, stems, or roots of the plant, or by introducing diseases. Aphids, for instance, are known to spread plant viruses. Some pests, like certain types of beetles, can also damage the plant by boring into its wood. The most common pests include Aphids, Thrips, Spider mites, Leaf miners, Scale, Whiteflies, Earwigs and Cutworms. A gardener would also have to be cautious about weeds that grow among their plants and feed on precious resources. So how could we detect and remedy these problems?
Artificial Intelligence recognising diseases.
Hyperspectral imaging
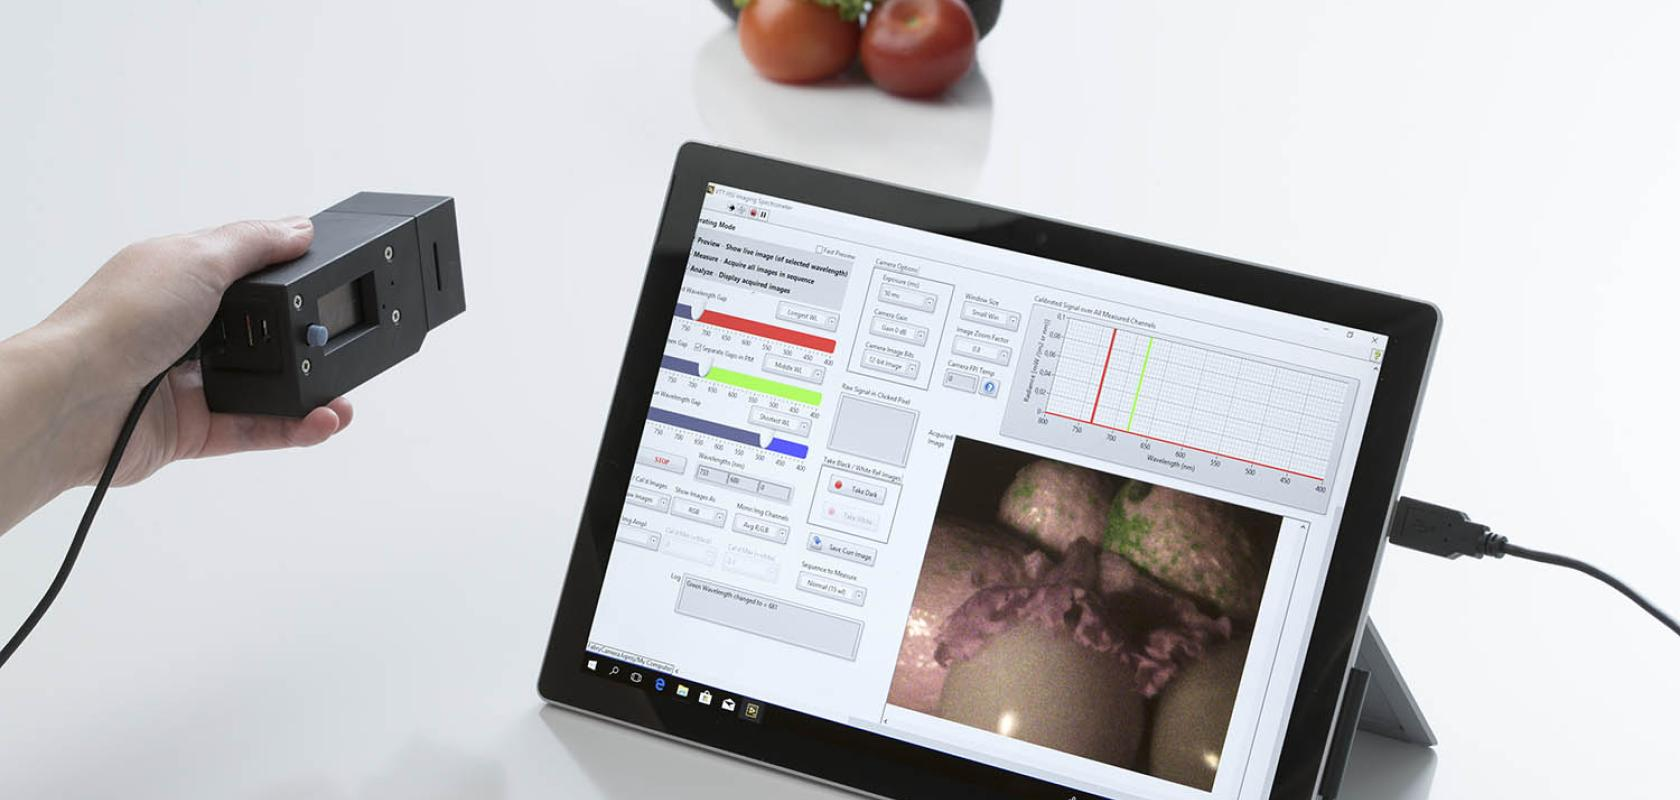
Hyperspectral imaging offers more precise colour and material identification. It delivers significantly more information for every pixel, surpassing the capabilities of a conventional camera. Therefore, it is commonly used in agriculture, identifying several plant diseases before they start showing serious signs of trouble. This technology is used heavily to monitor the health and condition of crops in agriculture[64], but could we bring it to the average gardener? . Hyperspectral imaging is more reliable, but also more expensive. Currently, a hyperspectral imaging camera costs from thousands to tens of thousands of dollars. However, the technology seems to be replicable at a lower price. VTT Technical Research Centre of Finland has managed to achieve this technology for only 150 dollars [65]. The potential to develop affordable hyperspectral imaging technology for everyday gardening presents an exciting opportunity. This could revolutionise domestic plant care, allowing individuals to detect diseases early and improve their plant's health. However, further research and development are required to make this technology widely accessible and user-friendly.
Methods of identification and detection.
In recent years, the field of plant recognition has made significant strides away from the need for manual approaches carried out by human experts, as they are too laborious, time-consuming, and context dependent (it is possible, after all, for a task to require time-sensitive plant recognition and for no expert to be available in the area), and towards automated methods, driven by the analysis of leaf images. Emerging technologies are being used, to resounding success, to streamline the plant-recognition process by leveraging shape and color features extracted from these images. Through the application of advanced classification algorithms such as k-Nearest Neighbor, Support Vector Machines (SVM), Naïve Bayes, and Random Forest, researchers have achieved remarkable success rates, with reported accuracies reaching as high as 96%. Of these, SVMs are particularly noteworthy for their proficiency at identifying diseased tomato and cucumber leaves, showing the potential of these technologies in plant pathology and disease management.
To address the issues posed by complex image backgrounds, segmentation techniques are used to isolate the leaves, allowing for more accurate feature extraction and, subsequently, classification, for which the Moving Center Hypersphere (MCH) approach is used.
Five fundamental features are extracted: the longest distance between any two points on a leaf border, the length of the main vein, the widest distance of a leaf, the leaf area, and the leaf perimeter. Based on these features, twelve additional features are constructed by means of some mathematical operations: smoothness of a leaf image, aspect ratio, form factor (the difference between a leaf and a circle), rectangularity, narrow factor, ratio of perimeter to longest distance, ratio of perimeter to the sum of the main vein length and widest distance, and five structural features obtained by applying morphological opening on grayscale image.
The classification algorithms employed after feature extraction has been completed are:
• Support Vector Machines: this method takes the shape of a case in a two-dimensional space with linearly separable data points, but it can also handle a higher dimensional space and data points that are not linearly separable.
• K-Nearest Neighbor classifies unknown samples according to their nearest neighbors. For classifying an unknown sample, k closest training samples are determined. The most frequent class among these k neighbors is chosen as the class of this sample.
• Naïve Bayes classifiers are statistical models capable of predicting the probability than an unknown sample belongs to a specific class. As their name suggests, they are based on Bayes’ theorem.
• Random Forest aggregates the predictions of multiple classification tree, where each tree in the forest is grown using bootstrat samples. At prediction, classification results are taken from each tree and that means trees in the forest use their votes to the target class. The class which has the most votes is selected by the forest.
For testing each of these classification algorithms, the researchers used two sampling approaches. In the first method, a random sampling approach was employed, where they used 80% of the images for training and the remaining 20% for testing. In the second method, they partitioned the dataset into 10 equal sized subsamples, of which one subsample is used for testing while the remaining 9 subsamples are used as training data. This process is repeated 10 times with a different subsample each time, and then the final result is the average across all 10 runs.
Plant identification accuracy is at its highest when both shape and color features are assessed side by side. However, leaf colors change with the seasons, which may reduce the accuracy of classification attempts. Consequently, textural features should be incorporated into future classification technologies such that the algorithms will be able to recognize leaves independently of seasonal changes.
Tensorflow/Keras Disease identification Model
Introduction
Our trained disease identification model deliverable aims to demonstrate how the robot would be able to detect certain plant diseases and how accurately it would be able to do so. Considering all the methods of identification that we researched, using a TensorFlow model proved to be not only the most cost-effective one for our robot, but also the most accessible, documented and extendable option. Hence, we focused on delivering a model that can distinguish between healthy plants and certain diseases of plants present in the chosen training dataset. The dataset that we have picked is the public PlantVillage Dataset (https://www.tensorflow.org/datasets/catalog/plant_village) that has 54,305 images of both healthy and diseased leaves of different plants that can be often found in a home garden. The images cover 14 species of crops, including: apple, blueberry, cherry, grape, orange, peach, pepper, potato, raspberry, soy, squash, strawberry and tomato. It contains images of 17 basic diseases, 4 bacterial diseases, 2 diseases caused by mold (oomycete), 2 viral diseases and 1 disease caused by a mite. 12 crop species also have healthy leaf images that are not visibly affected by disease. The labels of the dataset look as follows:
'Apple___Apple_scab' 'Apple___Black_rot', 'Apple___Cedar_apple_rust', 'Apple___healthy', 'Blueberry___healthy', 'Cherry_(including_sour)___Powdery_mildew', 'Cherry_(including_sour)___healthy', 'Corn_(maize)___Cercospora_leaf_spot Gray_leaf_spot', 'Corn_(maize)___Common_rust_', 'Corn_(maize)___Northern_Leaf_Blight', 'Corn_(maize)___healthy', 'Grape___Black_rot', 'Grape___Esca_(Black_Measles)', 'Grape___Leaf_blight_(Isariopsis_Leaf_Spot)', 'Grape___healthy', 'Orange___Haunglongbing_(Citrus_greening)', 'Peach___Bacterial_spot', 'Peach___healthy', 'Pepper,_bell___Bacterial_spot', 'Pepper,_bell___healthy', 'Potato___Early_blight', 'Potato___Late_blight', 'Potato___healthy', 'Raspberry___healthy', 'Soybean___healthy', 'Squash___Powdery_mildew', 'Strawberry___Leaf_scorch', 'Strawberry___healthy', 'Tomato___Bacterial_spot', 'Tomato___Early_blight', 'Tomato___Late_blight', 'Tomato___Leaf_Mold', 'Tomato___Septoria_leaf_spot', 'Tomato___Spider_mites Two-spotted_spider_mite', 'Tomato___Target_Spot', 'Tomato___Tomato_Yellow_Leaf_Curl_Virus', 'Tomato___Tomato_mosaic_virus', 'Tomato___healthy'
The labelling is done using json files and every image is associated with one label (as each image contains one leaf of a specific plant).
Training
We decided to train this model with Keras, the high-level API of the TensorFlow platform. We split the dataset of 54,305 images into train and test folders, using the 80/20 method. Therefore: 80% of the images from the dataset were used to train the model and the other 20% were used for testing. We used the TensorFlow2 inception v3 module for training with a batch size of 64, input size being (299, 299). The model was trained in 5 epochs and after the completion of the training process, plant diseases were detected with a 91% reported accuracy.

Testing
The model was then tested on random images of the dataset, as can be seen in the following videos: Video 1 , Video 2. In these recordings, we're able to see that every time the button is pressed, a different set of images appear and the model takes a guess for each of them displaying how confident it is in the answer. Each image is labeled with the model's best guess and in these videos we compared the resulting (predicted) label to the actual label. Most of the plants were identified correctly, although it is also visible that some mistakes are done when the disease of the plant is not as apparent or the ways in which the disease manifests itself on the plant are very similar. In the image below though, you can see that the model is 99.8% confident that it is detecting a Isariopsis leaf spot, which is precisely the label of the source.

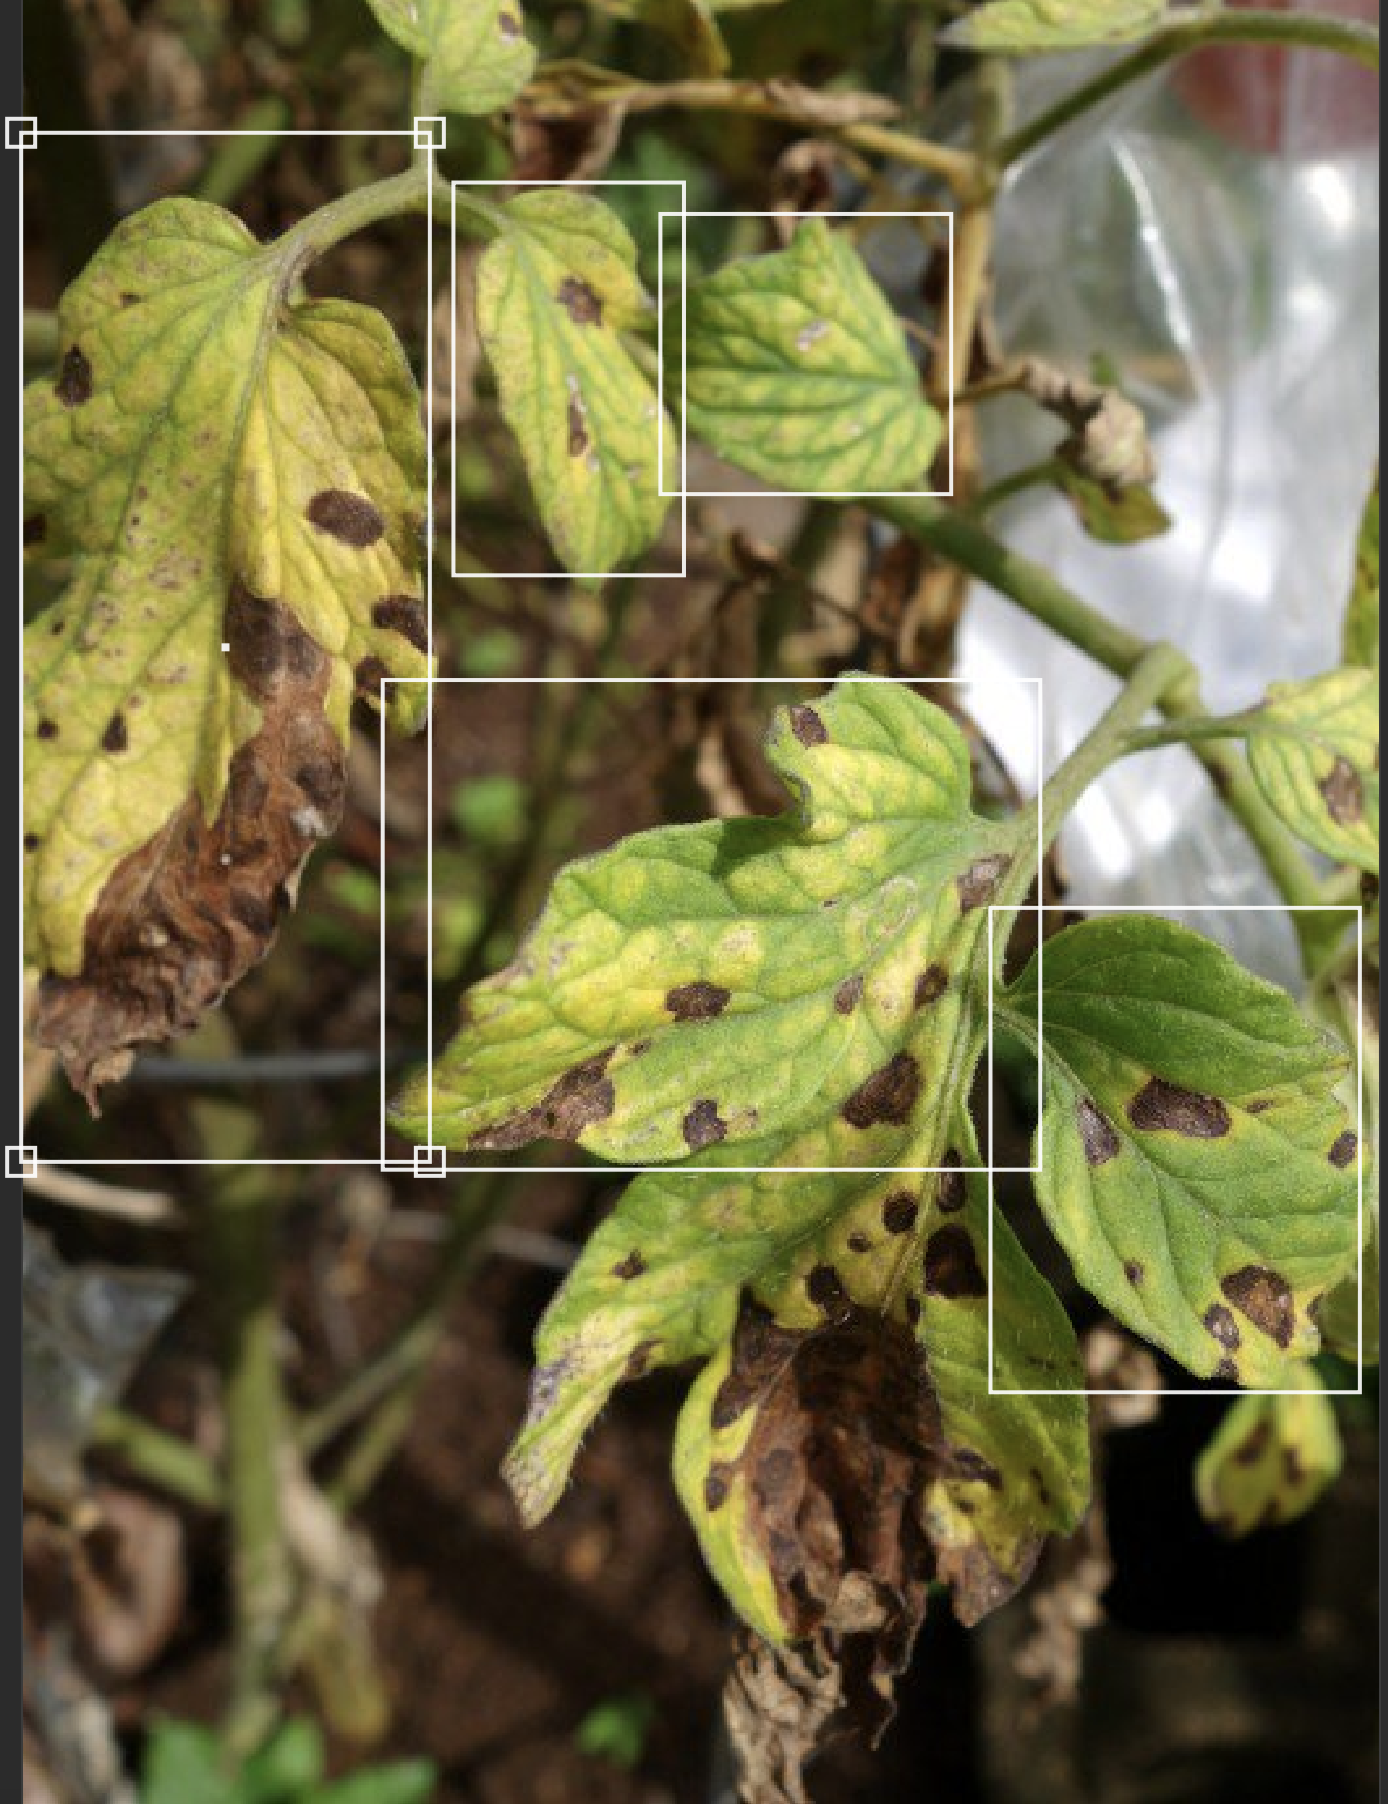
Expanding the model
In order to expand this model in the future and import it in our disease identification robot, a different labelling model would be better suited. Instead of labelling the photos in json format and each image representing one leaf, xml labelling should be used on photos with multiple leaves, using labelling software such as RectLabel (https://rectlabel.com). This would allow the robot to identify multiple leaves simultaneously and draw rectangles around the affected area upon detection, notifying the user about the concrete part of the garden. Furthermore, the dataset can be expanded such that more plant diseases could be recognised by adding and labelling more types of diseases, pests or viral infections.
This model was trained for about 3 hours and the dataset consists of isolated leaves of plants. However, this is unrealistic for the environment that we would like to apply this model to. Therefore, testing on images of plants in a garden or on a field, this being an environment that is much closer to the one that robot is going to find itself in. Moreover, the time of the training is also relevant. We were able to get decent results when it comes to identifying the type of disease on this dataset of isolated leaves, however, in order to make our robot as accurate as possible, photos of more complex settings should be used and the training time should be significantly extended, to ensure the reliability of our product.
By doing so, our robot's detection and reporting of plant diseases would be more efficient and therefore, would be saving the user more time, which is one of our main missions.
Final Design
Based on the research that the team has done, we identified the best options and the best technology for the robot that the team will use.
Sensors and mapping technology
In order to accurately map its environment, the robot will employ state of the art technology much like Husqvarna’s Automower Intelligent Mapping technology. Upon activation, the robot will begin moving randomly through the garden while GPS technology aids it in mapping the layout of the environment, establishing a blueprint of the terrain and allowing the robot to navigate efficiently.On top of being able to map its environment, the robot is equipped with collision sensors and object detection technology, allowing it to detect obstacles in its path as well as avoid causing harm to nearby plants. These sensors, combined with the intelligent mapping system, allow the robot to navigate complex environments and adapt to changes in terrain, such as slopes, tight corners, or irregularly shaped lawns.
Additionally, the robot will be equipped with LIDAR (Light Detection and Ranging) sensors. These sensors work by sending lasers into the environment and calculating their return time, allowing the robot to determine the distance to the nearest object as well as its outline. The presence of LIDAR sensors will allow the robot to work in a dynamic and constantly changing environment by reacting to changes in the garden’s layout as well as obstacles that may have appeared since its initial mapping of the garden. LIDAR sensors are preferable to visual or sound sensors due to their resilience in adverse weather conditions: visual imaging, for example, is sensitive to the presence of rain droplets or dust on the camera lens, and sound sensors can be disturbed by the sound of rain.
Because the GPS technology within the intelligent mapping system can only offer precision within a couple of meters, the robot will need an additional RTK sensor. RTK (Real-Time Kinematic) technology allows for the precise positioning of devices by utilizing a combination of GPS satellites and ground-based reference stations which aid in positioning the robot. These stations can measure their own position and then broadcast correction signals to an RTK receiver installed within the robot, allowing for centimeter-level accuracy crucial to tasks that demand meticulous precision, such as those carried out by our plant disease identification robot.
Finally, the robot will make use of a gyroscope. Operating on the principles of angular momentum, gyroscopes maintain a consistent reference direction. With a spinning mass mounted on gimbals, they prevent the robot from flipping over or falling while conducting its activities. While various other sensors like lift and incline sensors exist, the presence of a gyroscope is essential due to providing stability of movement and precise orientation control.

Robot movement
Our robot will have two high-traction wheels in the back side, to ensure that the robot will perform well on slippery surfaces such as rained-on grass. Differential drive will be used to ensure the flexibility in movement of the robot. The robot has an additional wheel in the front, for flexibility and stability while moving. This way, the robot will be able to take turns faster, to spin in place, and to reach multiple parts of the garden.
Plant disease Identification
Our robot will use a pre-trained Tensorflow model that will recognise plant diseases and pests and report back to the application. The decisions about how to notify the user have been made based on our conducted user survey.
Design process

In order to create a product that satisfies our users’ needs to the best of our abilities, we made sure to gather data directly from our target group. This was done in the form of a user survey, given to various relatives, friends, and acquaintances, and which had 39 participants in total, as well as a user interview. In the latter, we interviewed the owner of two different private gardens in Poland, who, additionally, is in possession of two grass trimming robots, which he makes use of in both gardens. Due to his familiarity with our problem statement as well as with similar state-of-the-art robots, the interviewee proved to be a valuable resource, and his answers guided much of our design process. For instance, our decision to charge the robot by means of a charging station was motivated in equal parts by the interview results and by research into charging mechanisms employed by similar robots that are currently available on the market, such as the Husqvarna Automower, Robomow RS, Worx Landroid, and Honda Miimo series, all of which come equipped with docking stations for automatic recharging. Similarly, the grass cutting robots employed by the interviewee made use of charging stations, which the interviewee was satisfied with, as the charging process was entirely automatic, with the robot returning to the charging station by itself once it had completed its tasks or once its battery dropped below a certain percentage, requiring no intervention on the part of its user.

The popularity of charging stations over alternative charging mechanisms, both among users and manufacturers, can be explained by the variety of advantages they offer over other charging methods. For example, in comparison to solar charging, docking stations offer a constant and reliable charging solution regardless of weather conditions or sunlight availability, and are compatible with most grass cutting robots, whereas solar charging may require specific robot models with built-in solar panels. And in comparison to wired charging, docking stations provide automation, allowing robots to recharge themselves without the need for manual intervention, flexibility in terms of placement and installation compared to wired charging, which requires access to electrical outlets, and increased user safety compared to exposed wires or electrical outlets.
Similarly, our decision to couple the robot with a mobile phone app was made in light of the interviewee’s insights, as well as an overview of existing automated gardening robots and plant disease detection systems. Currently, on the market there are only mobile phone applications that diagnose plant diseases based on photos manually taken by the user, as well as grass cutting robots that do not come equipped with an app and require the user to interface with them directly. Thus, there is currently a lack of products combining the two technologies. This lack was voiced by our interviewee as well, who, when asked if there was anything he would improve about his current grass-cutting robots, noted that he would like it if they were connected to some application, as he currently has to set up everything himself from the robot’s interface.
Additionally, at first we wanted to design our robot such that it would make use of random movement with the help of boundary wires, but we quickly ran into multiple problems, as described in the section on the NetLogo Simulation. After conducting our interview, we learned that this movement pattern was not desired by our target group, the interviewee noting that having to manually set up the boundary wire system by digging the cables into the ground across the entire perimeter of his garden was both time consuming and exhausting. In the end, we decided to have the robot map the garden before its first usage by having it traverse the environment freely without performing any of its regular operations and simply analyzing the boundaries of the environment and its rough shape. This was done with the help of Husqvarna Automower’s intelligent mapping system, which is described in greater depth in the subsection “Mapping” of the section titled “Maneuvering”.
The interview proved to be helpful not just in guiding the design of the physical robot, but also that of the app’s layout. While the app was designed largely based on the responses to the survey and research into UI best practices, the interview helped substantiate some of our design decisions, particularly in the design of the Home Screen, which features a map of the garden along with the robot’s current position within the garden, and the 3 features of the robot that the user is bound to interact with most frequently: starting the robot, docking the robot, and activating the robot’s alarm, such that it can be more easily found within the garden once it locates an unhealthy plant.
Final Presentation
On the 4th of April, 2024 we presented the results of our project to the other groups within the course and all tutors. The slides of the presentation can be found here: Presentation Link.
Reflection
In the end, we can all agree the project was quite challenging for us as a group all the way from the beginning but at its conclusion we are very satisfied with our progress and how we recovered from a slow start. Reflecting back on the process, our biggest challenge at first was selecting a topic as we wanted to select one that not only we were interested in but one that we believed would allow us to do meaningful research and at the end present interesting deliverables. Once we stepped over that hurdle each pair within the group had individual challenges to face, whether that was trying to master the NetLogo program for the simulation, understand how to properly create an application and its UI, learn how to train and test an AI classification model or setup communication between an app and simulation. Although the learning curve was steep and required multiple hours we managed to push through and complete all tasks we set out to complete. Throughout the project we also found out how important user input is when designing a product. Oftentimes we were stuck on design decisions, unsure of which path to follow and what eventually led us to making a decision was just simply asking potential users of their opinion whether that was through an interview or survey. At the end of the project most of our design choices were made by users and if that was not the case, they were backed by literature study. Furthermore, since the topic was complex it also required a lot of research as can be seen throughout our wiki page, meaning we had to maintain a lot of discipline to cite all our sources and formally present all our findings. In conclusion, we feel this project and course as a whole taught us many vital lessons. The challenges it presented caused us a lot of stress and the feeling of being lost but once we came out the other side we can confidently say we learned a lot of valuable skills including: the importance of communication with users, teamwork, effective researching and many specialized skills with regards to the app, simulation or AI model. Although throughout the project we experienced many stressful periods when we look back at the course, we can confidently say that it allowed us to come out as better individuals, team members and students at its conclusion.
Work Distribution
Maneuvering, Sensors, Mapping and Netlogo Implementation: Patryk
| Week | Task | Deliverable to meeting |
|---|---|---|
| 2 | Define Deliverables and brainstorm new idea | Completed wiki with new idea |
| 3 | Research into a new idea that is more managable, Start researching into maneuvering, specifically in a garden, Create deliverables for project, Research possible users, Research state of the art. | Wiki |
| 4 | Complete research into maneuvering in a garden, Research sensors required for a robot that has to operate in a garden, Research the functionalities of the NetLogo software, Organize interview (as well as consent form), Start mapping research | Wiki |
| 5 | Complete NetLogo simulation random moving robot, Perform Interview, Create survey questions | Wiki, NetLogo |
| 6 | Translate and summarize interview, Complete NetLogo simulation including boundary wires, Research and implement Netlogo communication with external software, Complete mapping research, Start processing survey results | Wiki, NetLogo |
| 7 | Complete NetLogo simulation which utilizes mapping technology and a knowledge based agent | Wiki, NetLogo |
| 8- | Work on and finalize presentation, Finalize NetLogo Features, Work on reporting progress and finalizing wiki | Final Presentation, Wiki, NetLogo |
State of the Art, Hardware, Survey Analysis: Raul S.
| Week | Task | Deliverable to meeting |
|---|---|---|
| 2 | Brainstorming, Literature Review into new idea. | Wiki |
| 3 | Literature Review of newer idea, Research into State of the Art, Research into target market. | Wiki |
| 4 | Complete research about State of the Art, begin research into hardware components that the robot would need. | Wiki |
| 5 | Complete research into hardware components, write questions for interview and survey, carry out survey. | Wiki |
| 6 | Analyse the Survey results, using these results to begin forming a final design. | Wiki |
| 7 | Update wiki to document our progress and results | Wiki |
| 8 | Work on and finalize presentation | Final Presentation. |
Research into AI identifying plant diseases and infestations: Briana.
| Week | Task | Deliverable to meeting |
|---|---|---|
| 2 | Research on state of the art AI. | Wiki |
| 3 | Research on plant diseases and infestations | Wiki |
| 4 | Research on best ways to detect diseases and infestations (where to point the camera, what other sensors to use) | Wiki |
| 5 | Research on AI state recognition (healthy/unhealthy) | Wiki |
| 6 | Research on limitations of AI when it comes to recognising different states of a plant (healthy/unhealthy) | Wiki |
| 7 | Conducting interviews with AI specialist + specifying what kind of AI training method can be used for our project. | Wiki |
| 8 | Work on and finalize presentation. | Presentation |
Research into AI identifying plant diseases and infestations: Rareş.
| Week | Task | Deliverable to meeting |
|---|---|---|
| 2 | Research on state of the art AI. | Wiki |
| 3 | Research on plant diseases and infestations | Wiki |
| 4 | Research on best ways to detect diseases and infestations (where to point the camera, what other sensors to use) | Wiki |
| 5 | Research on AI state recognition (healthy/unhealthy) | Wiki |
| 6 | Research on limitations of AI when it comes to recognising different states of a plant (healthy/unhealthy) | Wiki |
| 7 | Conducting interviews with AI specialist. | Wiki |
| 8 | Work on and finalize presentation | Presentation |
Interactive UI design and implementation: Raul H.
| Week | Task | Deliverable to meeting |
|---|---|---|
| 2 | Literature Review and State of the Art | Wiki |
| 3 | Write interview questions in order to find out what requirements users expect from the application, and research the Android application development process in Android Studio. | Wiki |
| 4 | Based on the interviews, compile a list of the requirements and create UI designs based on these requirements. | Wiki |
| 5 | Start implementing the UI designs into a functional application in Android Studio. | Completed demo application |
| 6 | Finish implementing the UI designs into a functional application in Android Studio. | Completed demo application |
| 7 | Final changes to the app. | Completed demo application |
| 8 | Work on and finalize presentation |
Interactive UI design and implementation: Ania
| Week | Task | Deliverable to meeting |
|---|---|---|
| 2 | Literature Review and State of the Art of Garden Robots and Plant Recognition Software | Wiki |
| 3 | Write interview questions in order to find out what requirements users expect from the application, start creating UI design based on current concept ideas. | Wiki |
| 4 | Research into UI Design principles and into state of the art of similar applications. | Wiki |
| 5 | Start implementing the UI designs into a functional application in Android Studio. | Completed demo application |
| 6 | Finish implementing the UI designs into a functional application in Android Studio. | Completed demo application |
| 7 | Testing and final changes to UI design. | Completed demo application |
| 8 | Work on and finalize presentation |
Individual effort
| Break-down of hours | Total Hours Spent | ||
|---|---|---|---|
| Week 1 | Patryk Stefanski | Attended kick-off (2h), Research into subject idea (6h), Meet with group to discuss ideas (2h), Reading Literature (2h), Updating wiki (1h) | 13 |
| Raul Sanchez Flores | Attended kick-off (2h) Meet with group to discuss ideas (2h), Reading Literature (3h), Writing Literature Review (2h) | 9 | |
| Briana Isaila | Attended kick-off (2h), Meet with group to discuss ideas (2h), Research state of the art (2h), Look into different ideas (2h) | 8 | |
| Raul Hernandez Lopez | |||
| Ilie Rareş Alexandru | Meet with the group to discuss ideas (2h), Reading literature (3h) | 5 | |
| Ania Barbulescu | Attended kick-off (2h), Reading Literature (2h) | 4 | |
| Week 2 | Patryk Stefanski | Meeting with tutors (0.5h), Researched and found contact person who maintains Dommel (2h), Brainstorming new project ideas (3h), Group meeting Thursday (1.5h), Created list of possible deliverables (3h), Group meeting to establish tasks (4.5h), Literature review and updated various parts of wiki (4h) | 18.5 |
| Raul Sanchez Flores | Meeting with tutors (0.5h), Group meeting Thursday (1.5h) Brainstorming new project ideas (3h), Group meeting to establish tasks (4.5h), Finding literature for new idea (4h), Writing and referencing sources (1h) | 14.5 | |
| Briana Isaila | Meeting with tutors (0.5h), Group meeting Thursday (1.5h), Brainstorming new project ideas (2h), Updating wiki (2h), Group meeting to establish tasks (4.5h) | 10.5 | |
| Raul Hernandez Lopez | Meeting with tutors (0.5h), Group meeting Thursday (1.5h) | 2 | |
| Ilie Rareş Alexandru | Meeting with tutors (0.5h), Group meeting Thursday (1.5h), Brainstorming new project ideas (3h), Reading literature (2h), Writing literature review (2h), Group meeting to establish tasks (4.5h) | 13.5 | |
| Ania Barbulescu | Group meeting Friday (4h), Research Literature (2h), Updated Wiki (2h) | 8 | |
| Week 3 | Patryk Stefanski | Meeting with tutors (0.5h), Research to specify problem more concretely (3.5h), Discuss with potential users if the robot idea would be useful to them (2h), Found literature that backs up problem is necessary (1h), Group meeting Tuesday (1h), Finished Problem statement, objectives, users (2h), Research into maneuvering and reporting on findings (5h) | 15 |
| Raul Sanchez Flores | Meeting with tutors (0.5h), Research to specify problem more concretely (3.5h), Group meeting Tuesday (1h), Research into Target Users (2h), Research into State of the Art of Automated Lawnmowers (5h) Updated Problem Statement (1.5h), Writing and referencing sources (4h) | 17.5 | |
| Briana Isaila | Meeting with tutors (0.5h), Research to specify problem more concretely (3.5h), Group meeting Tuesday (1h), Finding literature and a survey on our chosen problem and analysing different views and solutions(3.5h). Research into plant disease recognition (2.5h) | 11 | |
| Raul Hernandez Lopez | |||
| Ilie Rareş Alexandru | Meeting with tutors (0.5h), Group meeting Tuesday (1h), Research into plant and plant disease detection identification (7h) | 8.5 | |
| Ania Barbulescu | Meeting with tutors (0.5h), Group meeting Tuesday (1h), Research into UI design principles (7h), Writting and referencing sources (2h) | 8.5 | |
| Week 4 | Patryk Stefanski | Meeting with group (1.5h), Research into maneuvering and fixing parts of wiki (6h), Describing robot operation on wiki (1h), Research into sensors and updating wiki (6h), Research into NetLogo writing files and environment setup (2.5h), Prepare and organize interview (3h), Research mapping and watch videos about it (3h), Created References in APA (0.5h) | 23.5 |
| Raul Sanchez Flores | Meeting with group (1.5h), Research into State of the Art of Ai plant disease detection apps (6h), Research into State of the Art of robots in agriculture (5h), Research into lawnmowing mechanisms (5h) | 17.5 | |
| Briana Isaila | Meeting with group (1h), Research into state of the art plant health recognition AI + technology used (4h), Updated the problem statement and the objectives of our project (2h), Prototype UI for application design (3h), Research into imaging methods for accurate plant detection (4h) | 14 | |
| Raul Hernandez Lopez | |||
| Ilie Rareş Alexandru | Meeting with group (1.5h), Research into common plant diseases and symptoms (3h), Research into state-of-the-art plant disease detection AI (4h), Research into imaging methods for accurate plant detection (3h) | 11.5 | |
| Ania Barbulescu | Meeting with group (1.5h), Research into state of the art of similar applications (4h), Studying and looking into Android Studio environment (4h) | 9.5 | |
| Week 5 | Patryk Stefanski | Meeting with tutors (0.5h), Meeting with group (1.5h), Work on and setup NetLogo for a random moving robot (4h), Write interview questions (2h), Setup Git Repo and add files (1h), Research into interviewee's robots before interview (2h), Research into plants in interviewee's garden (2h), Create Informed Consent Form (2h), Conduct Interview with grass cutting robot user (1.5h), Work on survey questions with group (4h) | 20.5 |
| Raul Sanchez Flores | Meeting with tutors (0.5h), Meeting with group (1.5h), Research into Cameras (5h), Research into existing Camera modules for our robot to use (3h), Research into target users to write questions for interview and survey (5h), Carry out survey (1h), Writing and referencing sources for previous missed sections(5h) | 21 | |
| Briana Isaila | Meeting with tutors (0.5h), Meeting with group (1.5h), Research into plant disease identification (6h), Work on survey questions with group (4h), Research into AI models (6h) | 18 | |
| Raul Hernandez Lopez | |||
| Ilie Rareş Alexandru | Meeting with tutors (0.5h), Meeting with group (1.5h), Research and brainstorming for survey questions (3h), Research into TensorFlow Object Detection (2h) | 7 | |
| Ania Barbulescu | Meeting with tutors (0.5h), Meeting with group (1.5h), Research and Brainstorming for survey questions (5h), Continue learning to use Android Studio and how to make an app (3h) | 10 | |
| Week 6 | Patryk Stefanski | Meeting with tutors (0.5h), Translate the interview (4h), Summarize the interview (2h), Research and initial implementation of simulation of robot which moves using boundary wires (3h), Research about how to allow NetLogo to communicate with a web-based app (2h), Implement communication of initial environment of simulation (2h), Research into mapping methods that can be used as suggested by interview (4h), Anonymize data of survey (1h) | 18.5 |
| Raul Sanchez Flores | Research into existing Camera modules (5h), Analyse the survey results (5h), Review state of the art and making it look neat (2h), Writing and referencing sources (2h) | 14 | |
| Briana Isaila | Meeting with tutors (0.5h), Meeting with group (1.5h), Working towards the finalised version of the robot (3h), Creating the drawings of the robot (2h), Research into TensorFlow and Keras (5h), Updating the wiki (3h), starting tensorflow model (2h) | 17 | |
| Raul Hernandez Lopez | |||
| Ilie Rareş Alexandru | Meeting with tutors (0.5), Research into TensorFlow Object Detection (1h), Research into RTK sensors (1h) | 2.5 | |
| Ania Barbulescu | Meeting with tutors (0.5h), Research into color theory and color themes (3h) | 3.5 | |
| Week 7 | Patryk Stefanski | Meeting with tutors (0.5h), Meeting to work on robot design decisions, app and simulation (4h), Implementation of simulation until completion including algorithm, different actors, communication and random environment generation (13h) | 17.5 |
| Raul Sanchez Flores | Meeting with tutors (0.5h), Meeting to work on robot design decisions, app and simulation (4h) | 4.5 | |
| Briana Isaila | Meeting with tutors (0.5h), Meeting to work on robot design decisions, app and simulation (4h), Working on the TensorFlow model (6.5h), Updating the wiki (3h) | 14 | |
| Raul Hernandez Lopez | |||
| Ilie Rareş Alexandru | Meeting with tutors (0.5h), Research into RTK sensors (3h) | 3.5 | |
| Ania Barbulescu | Meeting with tutors (0.5h), Work on app implementation and design (3h) | 3.5 | |
| Week 8 | Patryk Stefanski | Attended Presentation (2h), Meeting to work on presentation (3h), Meeting to practice presentation (1.5h), Finish multiple visual features in NetLogo simulation (4h), Correct last minute communication issues with app and simulation (2h), Add additional features to applications such as plant descriptions (2h), Present progress to interviewee and take picture of garden with his consent (2h), Record videos to display in presentation (1h) | 17.5 |
| Raul Sanchez Flores | Attended Presentation (2h), Meeting to work on presentation (3h), Meeting to practice presentation (1.5h), | 6.5 | |
| Briana Isaila | Attended Presentation (2h), Meeting to work on presentation (3h), Meeting to practice presentation (1.5h), Finalised and trained the tensorflow model (7h), Record videos to display in presentation (1h), Updating the wiki on the final design (2h) | 16.5 | |
| Raul Hernandez Lopez | Attended Presentation (2h), Meeting to work on presentation (3h), Meeting to practice presentation (1.5h) | ||
| Ilie Rareş Alexandru | Attended Presentation (2h), Meeting to work on presentation (2h), Meeting to practice presentation (1.5h) | 5.5 | |
| Ania Barbulescu | Attended Presentation (2h), Meeting to work on presentation (2h), Practice Presentation (1.5h), Last minute changes to UI app design (3h) | 8.5 | |
| Week 9 | Patryk Stefanski | Work on polishing up the interview section of the wiki (2h), Format wiki sections (0.5h), NetLogo last minute quality of life updates (1h), Mapping section of the wiki (2h), Sensor part updates (1h), NetLogo simulation explanation and wiki (5h) | 11.5 |
| Raul Sanchez Flores | Work on polishing State of Art, Hardware and Survey Analysis (5h), Include references for all images and some other sources (2h) | 7h | |
| Briana Isaila | Working on the final version of the wiki (5h), Uploading videos and finishing up the tensorflow model section(2h), Updating the deliverables and doing the peer review (2h) | 9h | |
| Raul Hernandez Lopez | |||
| Ilie Rareş Alexandru | Polish final design section (5.5h), Format wiki sections (0.5h) | 6 | |
| Ania Barbulescu | Format wiki sections (2h), Polish literature section (3h), UI design changes and decision making documentation (4h) | 9 |
References
- ↑ A College Class Asks: Why Don’t People Garden? (n.d.). Www.growertalks.com. https://www.growertalks.com/Article/?articleid=20101
- ↑ GrowerTalks: A college class asks: Why don’t people garden? (n.d.). https://www.growertalks.com/Article/?articleid=20101
- ↑ Benefits of gardening. (n.d.). https://schultesgreenhouse.com/Benefits.html
- ↑ Rus, D. (n.d.). A Decade of Transformation in Robotics | OpenMind. OpenMind. https://www.bbvaopenmind.com/en/articles/a-decade-of-transformation-in-robotics/.
- ↑ Cheng, C., Fu, J., Su, H., & Ren, L. (2023). Recent Advancements in Agriculture Robots: Benefits and Challenges. Machines, 11(1), 48. https://doi.org/10.3390/machines11010048
- ↑ Robotics - TrimBot2020 - Mapix technologies. (2020, March 30). Mapix Technologies. https://www.mapix.com/case-studies/trimbot/
- ↑ Toolstop. (n.d.). EcoFlow Blade Robotic Lawnmower | ToolsTop. https://www.toolstop.co.uk/ecoflow-blade-robotic-lawn-sweeping-lawnmower/
- ↑ PCMag. (2021, August 25). GreenWorks Pro Optimow 50H Robotic Lawn Mower Review. PCMAG. https://www.pcmag.com/reviews/greenworks-pro-optimow-50h-robotic-lawn-mower
- ↑ Nieuwe Husqvarna automower 435X AWD. (2019, March 11). Munsterman BV. https://www.munstermanbv.nl/actueel/1619-nieuwe-husqvarna-automower-435x-awd-met-ai
- ↑ Leafsnap - Plant Identifier App, top mobile app for plant identification. (n.d.). LeafSnap - Plant Identification. https://leafsnap.app/
- ↑ Plant Medic - PlantMD - apps on Google Play. (n.d.). https://play.google.com/store/apps/details?id=com.plant_md.plant_md&hl=kr
- ↑ Agrio. (2023, November 27). Agrio | Protect your crops. https://agrio.app/
- ↑ Tortuga AgTech. (n.d.). Tortuga AgTech. https://www.tortugaagtech.com/
- ↑ Westlake, T. (2023, October 11). Extended Partnership between The Summer Berry Company and Tortuga Agtech, a robotics harvesting company. The Summer Berry Company. https://summerberry.co.uk/news/extended-partnership-between-the-summer-berry-company-and-tortuga-agtech-a-robotics-harvesting-company/
- ↑ Robot uses machine learning to harvest lettuce. (2019, July 8). University of Cambridge. https://www.cam.ac.uk/research/news/robot-uses-machine-learning-to-harvest-lettuce
- ↑ Robot uses machine learning to harvest lettuce | Agritech Future. (2021, July 1). Agritech Future. https://www.agritechfuture.com/robotics-automation/robot-uses-machine-learning-to-harvest-lettuce/
- ↑ MacArthur, A. (2023, December 5). 6 Vegetable Garden Planner Apps Compared. Food Gardening Network. https://foodgardening.mequoda.com/daily/garden-design/vegetable-garden-planner-apps/
- ↑ Robot Platform | Knowledge | Wheeled Robots. (n.d.). https://www.robotplatform.com/knowledge/Classification_of_Robots/legged_robots.html.
- ↑ Zedde, R., & Yao, L. (2022). Field robots for plant phenotyping. In Burleigh Dodds Science Publishing Limited & A. Walter (Eds.), Advances in plant phenotyping for more sustainable crop production. https://doi.org/10.19103/AS.2022.0102.08
- ↑ Elsayed, M. (2017, June). Differential Drive wheeled Mobile Robot. ResearchGate. https://www.researchgate.net/figure/Differential-Drive-wheeled-Mobile-Robot-reference-frame-is-symbolized-as_fig1_317612157
- ↑ Wheeled mobile robotics : from fundamentals towards autonomous systems | WorldCat.org. (2017). https://search.worldcat.org/title/971588275
- ↑ Omni wheel. (2020, March 8). Wikipedia. https://en.wikipedia.org/wiki/Omni_wheel
- ↑ Admin, G. (2023, August 10). What is Omni Wheel and How Does it Work? - GTFRobots | Online Robot Wheels Shop. GTFRobots | Online Robot Wheels Shop. https://gtfrobots.com/what-is-omni-wheel/
- ↑ Four-legged robot that efficiently handles challenging terrain - Robohub. (n.d.). Robohub.org. https://robohub.org/four-legged-robot-that-efficiently-handles-challenging-terrain/
- ↑ How fins became limbs. (2024, February 20). Scientific American. https://www.scientificamerican.com/article/how-fins-became-limbs/.
- ↑ Zhu, Q., Song, R., Wu, J., Masaki, Y., & Yu, Z. (2022). Advances in legged robots control, perception and learning. IET Cyber-Systems and Robotics, 4(4), 265–267. https://doi.org/10.1049/csy2.12075
- ↑ Amphibious Tracked Vehicles | Autonomous Military Robots & Crawlers (defenseadvancement.com)
- ↑ Robot Platform | Knowledge | Tracked Robots. (n.d.). Www.robotplatform.com. Retrieved March 9, 2024, from https://www.robotplatform.com/knowledge/Classification_of_Robots/tracked_robots.html
- ↑ Ayodele, A. (2023, January 16). Types of Sensors in Robotics. Wevolver. https://www.wevolver.com/article/sensors-in-robotics-the-common-types
- ↑ Shieh, J., Huber, J. E., Fleck, N. A., & Ashby, M. F. (2001). The selection of sensors. Progress in Materials Science, 46(3-4), 461–504. https://doi.org/10.1016/s0079-6425(00)00011-6
- ↑ Gupta, S., & Snigdh, I. (2022). Multi-sensor fusion in autonomous heavy vehicles. In Elsevier eBooks (pp. 375–389). https://doi.org/10.1016/b978-0-323-90592-3.00021-5
- ↑ LiDAR sensors for robotic Systems | Mapix Technologies. (2022, December 23). Mapix Technologies. https://www.mapix.com/lidar-applications/lidar-robotics/.
- ↑ Shan, J., & Toth, C. K. (2018). Topographic Laser Ranging and Scanning. CRC Press.
- ↑ Hutsol, T., Kutyrev, A., Kiktev, N., & Biliuk, M. (2023). Robotic Technologies in Horticulture: Analysis and Implementation Prospects. Inżynieria Rolnicza, 27(1), 113–133. https://doi.org/10.2478/agriceng-2023-0009
- ↑ Optica Publishing Group. (n.d.). https://opg.optica.org/oe/fulltext.cfm?uri=oe-24-12-12949&id=344314
- ↑ ScaleFlyt Geocaging: safe and secure long-range drone operations. (n.d.). Thales Group. https://www.thalesgroup.com/en/markets/aerospace/drone-solutions/scaleflyt-geocaging-safe-and-secure-long-range-drone-operations
- ↑ Boundary wire vs. Grass sensors for robotic mowers | Robomow. (n.d.). Robomow. https://www.robomow.com/blog/detail/boundary-wire-vs-grass-sensors-for-robotic-mowers
- ↑ RTK in detail. (n.d.). ArduSimple. Retrieved March 9, 2024, from https://www.ardusimple.com/rtk-explained/#:~:text=Introduction%20to%20centimeter%20level%20GPS%2FGNSS&text=Under%20perfect%20conditions%2C%20the%20best
- ↑ GNSS - FIRST-TF. (2015, June 4). https://first-tf.com/general-public-schools/how-it-works/gps/
- ↑ C3pmow. (2023, October 24). 12 Robot Mowers without a Perimeter Wire | The Robot Mower. The Robot Mower. https://therobotmower.co.uk/2021/12/02/robot-mowers-without-a-perimeter-wire/
- ↑ Products | Joy-IT. (n.d.). Joy-It.net. https://joy-it.net/en/products/SEN-BUMP01
- ↑ Sensors - Accelerometers | Farnell Nederland. (2023). Farnell.com. https://nl.farnell.com/sensor-accelerometer-motion-technology
- ↑ Mukherjee, D., Saha, A., Pankajkumar Mendapara, Wu, D., & Q.M. Jonathan Wu. (2009). A cost effective probabilistic approach to localization and mapping. https://doi.org/10.1109/eit.2009.5189643
- ↑ How do dolphins communicate? (2022, August 8). Ponce Inlet Watersports. https://ponceinletwatersports.com/how-do-dolphins-communicate/.
- ↑ MaxBotix. (2019, September 11). Ultrasonic Sensors: Advantages and Limitations. MaxBotix. https://maxbotix.com/blogs/blog/advantages-limitations-ultrasonic-sensors
- ↑ Brain, M., & Bowie, D. (2023, September 7). How the Gyroscope Works. HowStuffWorks. https://science.howstuffworks.com/gyroscope.htm
- ↑ RTK GPS: Understanding Real-Time Kinematic GPS Technology. (2023, January 14). Global GPS Systems. https://globalgpssystems.com/gnss/rtk-gps-understanding-real-time-kinematic-gps-technology/
- ↑ NEO-M8P u-blox M8 high precision GNSS modules Data sheet . (n.d.). Retrieved January 5, 2023, from https://content.u-blox.com/sites/default/files/NEO-M8P_DataSheet_UBX-15016656.pdf
- ↑ RTK Applications: Precision Agriculture. (n.d.). ArduSimple. Retrieved April 10, 2024, from https://www.ardusimple.com/precision-agriculture/
- ↑ Nathan, A. (2023, December 14). How to Build Your Own RTK Base Station (& Is It Worth It?) [2024]. Point One Navigation. https://pointonenav.com/news/is-build-your-own-rtk-really-worth-it/
- ↑ How RTK works | Reach RS/RS+. (n.d.). Docs.emlid.com. https://docs.emlid.com/reachrs/rtk-quickstart/rtk-introduction/
- ↑ Carrier Phase - an overview | ScienceDirect Topics. (n.d.). Www.sciencedirect.com. https://www.sciencedirect.com/topics/engineering/carrier-phase#:~:text=The%20carrier%20phase%20measures%20the
- ↑ Liu, H., Yang, L., & Li, L. (2021). Analyzing the Impact of Climate Factors on GNSS-Derived Displacements by Combining the Extended Helmert Transformation and XGboost Machine Learning Algorithm. Journal of Sensors, 2021, e9926442. https://doi.org/10.1155/2021/9926442
- ↑ Rizos, C. (2003). Reference station network based RTK systems-concepts and progress. ResearchGate. https://www.researchgate.net/publication/225442957_Reference_station_network_based_RTK_systems-concepts_and_progress
- ↑ Husqvarna AIM Technology. (n.d.). Www.husqvarna.com. Retrieved April 10, 2024, from https://www.husqvarna.com/nl/leer-en-ontdek/husqvarnas-aim-technology/
- ↑ Automower® Intelligent Mapping Technology – Zone Control. (n.d.). Www.youtube.com. Retrieved April 10, 2024, from https://www.youtube.com/watch?v=KPvfUezE3NE
- ↑ Melksham Groundcare Machinery Ltd. (2024, April 2). ATCO Quattro 16S 41cm self propelled rotary lawnmower. More Than Mowers. https://morethanmowers.co.uk/lawnmowers/atco-quattro-16s-41cm-self-propelled-rotary-lawnmower/
- ↑ Black+Decker 304-16DB 16-Inch 4-Blade Push Reel Lawn Mower with Grass Catcher, Orange : Amazon.ca: Patio, Lawn & Garden. (n.d.). https://www.amazon.ca/Decker-304-16DB-16-Inch-4-Blade-Catcher/dp/B0BBXG5DQN
- ↑ 59.0 59.1 59.2 59.3 59.4 59.5 Anik, K., Shahriar, R., Khan, N., & Omi, K. S. I. (03 2023). Elevating Software and Web Interaction to New Heights: Applying Formal HCI Principles for Maximum Usability. doi:10.13140/RG.2.2.14304.76803/1
- ↑ 60.0 60.1 60.2 60.3 60.4 Yee, C., Ling, C., Yee, W., & Zainon, W. M. N. (01 2012). GUI design based on cognitive psychology: Theoretical, empirical and practical approaches. 2, 836–841.
- ↑ Miller, G. (04 1994). The Magical Number Seven, Plus or Minus Two: Some Limits on Out Capacity for Processing Information. Psychological Review, 101, 343–352. doi:10.1037/0033-295X.101.2.343
- ↑ 62.0 62.1 62.2 62.3 Blair-Early, A., & Zender, M. (2008). User Interface Design Principles for Interaction Design. Design Issues, 24(3), 85–107. http://www.jstor.org/stable/25224185
- ↑ Drew, T., Võ, M., & Wolfe, J. (07 2013). The Invisible Gorilla Strikes Again Sustained Inattentional Blindness in Expert Observers. Psychological Science, 24. doi:10.1177/0956797613479386
- ↑ Nguyen, C., Sagan, V., Maimaitiyiming, M., Maimaitijiang, M., Bhadra, S., & Kwasniewski, M. T. (2021). Early detection of plant viral disease using hyperspectral imaging and deep learning. Sensors, 21(3), 742. https://doi.org/10.3390/s21030742
- ↑ Hyperspectral sensor hardware built for $150 | Imaging and Machine Vision Europe. (n.d.). https://www.imveurope.com/news/hyperspectral-sensor-hardware-built-150