Embedded Motion Control 2013 Group 8
Group members
| Name: | Student id: | Email: |
| Robert Berkvens | s106255 | r.j.m.berkvens@student.tue.nl |
| Jorie Teunissen | s102861 | j.a.m.teunissen@student.tue.nl |
| Martin Tetteroo | s081356 | m.tetteroo@student.tue.nl |
| Rob Verhaart | s080654 | r.a.verhaart@student.tue.nl |
Tutor
| Name: | Email: |
| Rob Janssen | r.j.m.janssen@.tue.nl |
Final Strategy
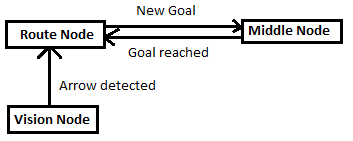
In the implemented strategy we work with three nodes, the routeNode, visionNode and the middleNode. The communication is shown in the picture below.
Vision node
The vision node is responsible for the detecting arrows on the walls. If an arrow is detected, a message will be send to the routeNode. The visionNode runs on a rate of 1Hz. Faster processing of the images isn't usefull.
Route node
This node keeps track of the route history (made choices and how corridors looked like) and calculates depending on the current corridor new goals. To view the corridor, the node is listening to the laserdata topic. Everytime a goal has been calculated it is send to the Middle node. If the middle node reached a goal, a message is send to the route node and a new goal will be calculated and send to the middle node. If the vision node detected an arrow, this overrules the current goals and an update will be send to the middle node. The vision node will be ignored after an arrow has been detected until a next goal has been reached.
Middle node
This mode is responsible for driving in the middle of the corridor and executing the goals choosen by the Route node. To be able to drive through the corridors this nodes listens to the laser topic. If goal has been reached, the nodes sends a goal reached message to the route node and waits for another goal.
Algorithms
Route Node
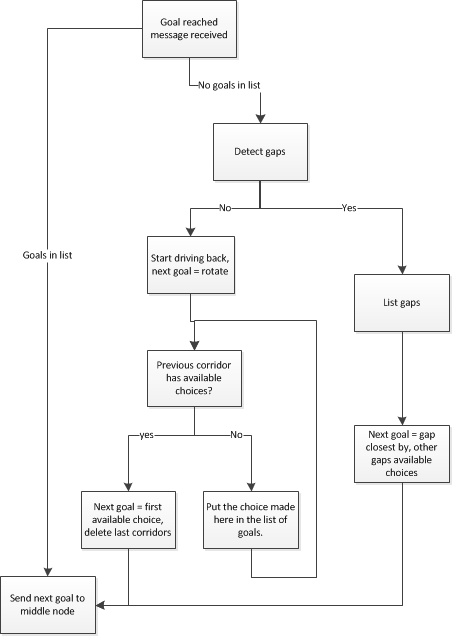
The basic idea of how the route node solves the mazes, is shown in the graph below. How everything works exactly will be explained extensively overhere.
Exploring the corridor
The routenode starts with calling the gap detection function, so it knows how the current corridor looks like. This function returns a vector with the x distance, y distance and the index in the original laser array for each gap. The routenode first of all sorts all the gaps, so the gap with the smallest distance is first and the greatest distance is the last gap (according to the i-indexes). This list of gaps is saved as a list of direction, so gaps on the left are only saved as LEFT and on the right as RIGHT. If 2 gaps are close together (ie the i values differ less than 25), the gap on the left is saved first and is saved as LEFT_AT_CROSSING.
Creating a plan
To be able to prevent pico to drive into a corridor twice, the route node remembers how corridors looked like. Every time a measurement is done, the corridor is saved in a struct that looks like this: struct Corridors { int choiceMade; std::vector<int> availableChoices; }; So the choice made in that corridor (always the gap closest by) is saved and all the available other corridors (gaps) are saved. The list of available choices is the ordered list of gaps, so the gap closest by is the first available choice. The choice made is saved in the goals vector. If a corridor has been explored and gaps are found, the goal vector only contains one goal. At this stage, the goal will be send to the middle node. Every time a new corridor is being explored, the struct Corridors will be added to a vector of corridors, called route (vector<Corridors> Route).
Driving back
If there aren’t any gaps detected in the corridor, this corridor probably has a dead end. If this is the case, pico has to drive back. Therefore, the first new goal added to the list of goals will be ‘Rotate’. After this, there are plenty of different situation and different actions. The basic idea is that the previous corridor (listed in the Route vector) is checked for available choices. If this corridor contains an available choice (so an unexplored corridor), this corridor will become our next target. If the previous corridor doesn’t have any gaps available, the next corridor in the list of Route will be checked. Using these list, all the corridors will be checked and listed, so Pico will never drive into a corridor twice.
To be able to drive back, a few different situation are defined:
- Driving back with available choices in the previous corridor. In this situation, the next goal will be the same as the choice made (so if we turned left, we are going left to go further in the previous corridor).
- Driving back without available choices in the previous corridor. In this situation the next goal will be the inverted action of the choice made. So if we turned left at this crossing, we have to turn right now to drive back that corridor.
- Driving back when the last choice made was going left at a crossing. In this situation, the next goal has to be going straight to drive into the corridor across. In this situation it is also important that corridors that were discovered on the left of the this crossing are deleted from the Route list. If we don’t do this, Pico will not be able to drive back after the crossroad.
- Driving back after the last choice made was going straight at a crossing. In this situation, Pico has to turn right if there are other available choices in the previous corridor. If this is not the case, Pico has to turn left to drive back in that corridor.
- If Pico is driving back in a corridor and it needs to pass a corridor, the next goal should be Go Straight.
Communication with the Middle node
The route Node communicates with the middle node. When a goal has been reached, the Route node receives a message from the middle node. If the list of goals doesn’t contain any goals, this is an unexplored corridor and the exploring of the corridor will be done as described above. When a new goal has been established, this goal will be send to the Middle node. If the list of goals still contains a goal, we are driving back and the next goal will be send to the Middle node immediately.
Communication with the Vision Node
The vision node is trying to detect arrows on the background. Whenever an arrow has been detected, a message is sent to the Route node with the direction of the arrow. If the route node receives this message, the whole route history will be deleted and the next goal will be the direction of the arrow. The route history can be deleted, because we are now sure in what direction we need to go (so we are never going to drive back this part of the maze). Since the vision message always sends a message when an arrow is detected (so it keeps on sending a message about the same arrow), the vision node will be ignored until the next goal has been reached.
Middle Node
Gap Detection
Input: Laser_vector[1081] output: gap location [vector x; vector y; vector i]
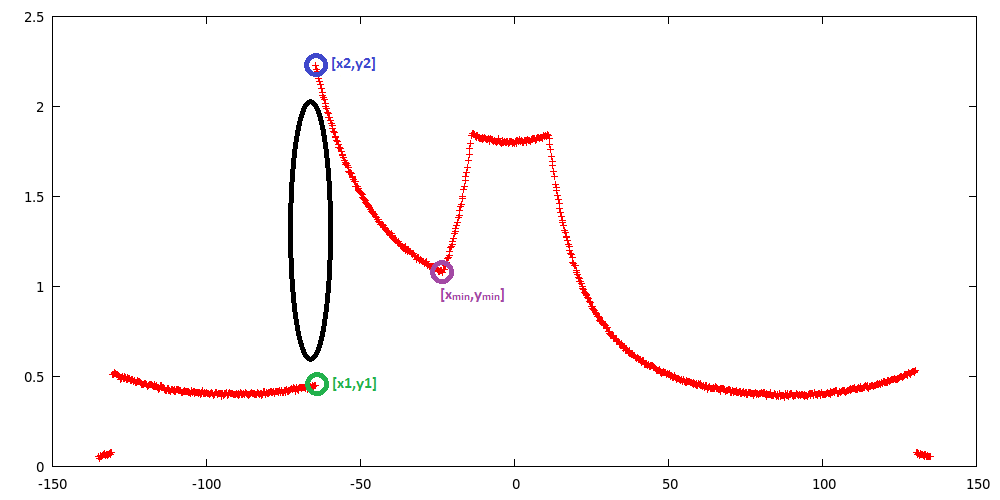
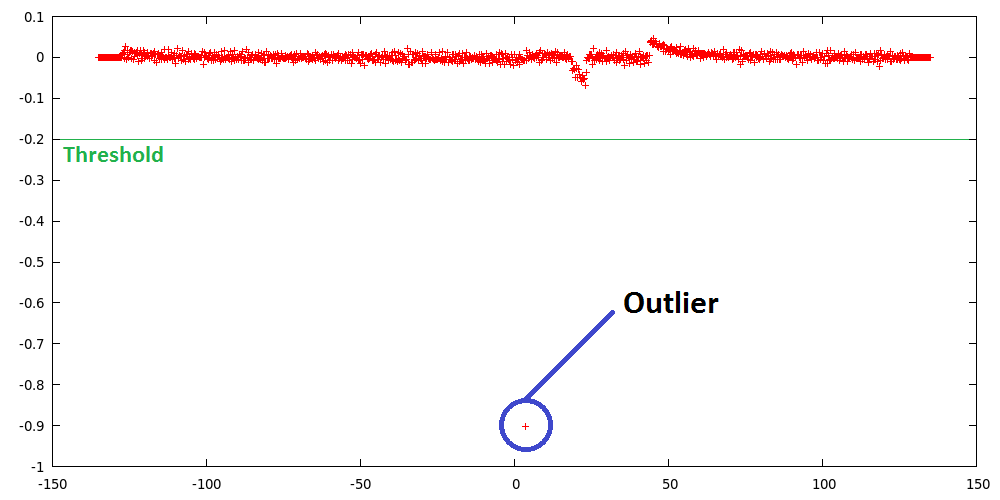
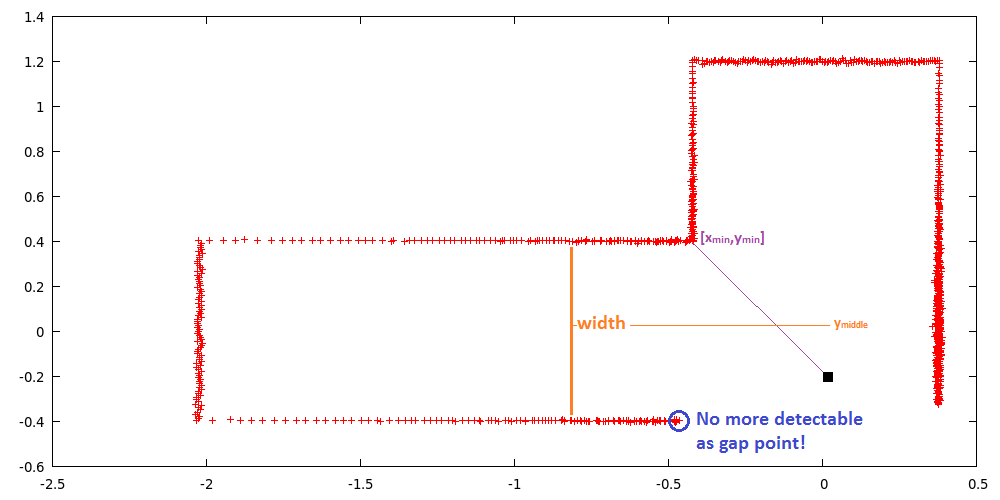
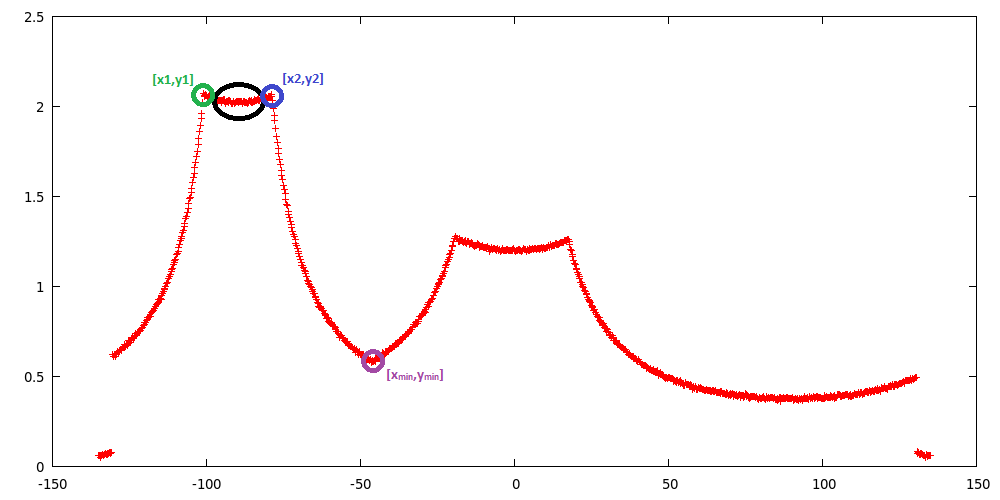
A gap is detected by thresholding the derivative of the laser ranges, this derivative is defined as the difference of laser range [i] and [i-1]. If this difference is larger than the threshold, laser range [i] is labeled as a gap corner. The function then starts calculating the position of these laser reflection points relative to its own position (polar to cartesian). Next it needs to calculate the gap size, therefore it needs a second gap corner. This second gap corner is defined as the index number of the lowest (local minima) laser range value after the gap point untill 0 degree (which is i = 540). The algorithm now transfers the laser values to cartesian coordinates and starts calculating the size (ym-y1) and middle (ym-y2)/2 of the gap. Eventually the output is a vector of corner points and corner (laser) index values.
Middle driving functionality
Basics
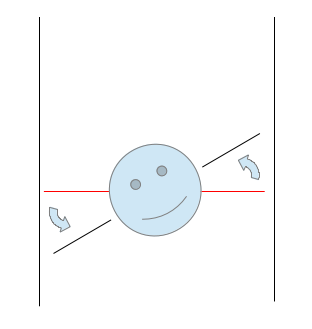
Pico needs to drive in the middle of the corridor. This is done by first making sure that Pico drives parrallel to the wall and secondly having the left wall be at the same distance as the right one. Driving parallel to walls is done by searching for the shortest distance to both walls. The laser index of the shortest laser is compared to tbe index of the laser located at 90 degrees. The difference in index can be used to calculate the angle needed to compensate. Since the laserscan outputs 270 degrees measurements in 1081 indeces, the angle difference for each index is: 270/1081=0.2497 degrees.
Getting to the middle of the corner is simply done by checking if the distance to the left wall is close to the right wall. If this is not the case, an additional angle is applied to the previously calculated parallel driving angle. Pico’s input should be in radians so the angle needs to be converted.
For example:
The closest laser on the left side is 850, the index for 90 degrees is 900. Let’s say Pico is not in the middle of the corridor, so an additional angle is applied. The step by step calculation becomes the following:
Index:[math]\displaystyle{ 850-900=-50 }[/math]
Degrees:[math]\displaystyle{ -50*0.2497=-12.488 }[/math]
Radians:[math]\displaystyle{ -12.488*(\pi/180)=-0.218 }[/math]
Corrected:[math]\displaystyle{ -0.218-0.1=-0.318 }[/math]
Controller
The calculated angle is used as input to a feedback controller. The controller uses a proportional and differential gain. These gains are determined by experiments. A proportional only controller proved too sensitive to walls not being aligned perfectly. A small differential gain can help smooth these sudden changes. When this controller is applied, Pico drives in the corridor very nicely.
States
To be able to do handle situations Pico uses different functions depending on the environment and directions from the RouteNode. Checking the environment is done by analyzing the gap data. Depending on the location of gaps it is able to determine what situation Pico is in.. Depending on the situation certain actions are executed like driving to the center of the gap, or turning.
Align to center Gap
Input: Laser_vector[1081] , Gap width [int width] output: Bool atCenterGap
While aligning to the center of a gap, the laser ranges change. When PICO is past the first corner point of a gap, the jump in laser range values (outlier in derivative) is not there anymore. Which means the aligning procedure must base his decisions on other parameters. First of all PICO drives to the edge (0-10 cm) of the gap, at which the gap will not be visible anymore. This is done by looking at the gap y_vector coming from the gapdetection algorithm, if this value is below 0.1 PICO will stop. Then the function gaphandle takes over, which lets PICO drive to the center of the gap. This is done by scanning for the minimum laser range value in the range of (-65 to 0 degree for left gap | 0 to 65 degree for right gap). This minima is basically the same as for the gapdetection algorithm, except for the laser index range. Again this laser value is transferred to cartesian coordinates, which makes it possible to determine the distance to the second gap point. If this value is bigger then ymiddle, PICO will drive through. If this value is lower then ymiddle, PICO will stop and the boolean atCenterGap will be set true.
Turning
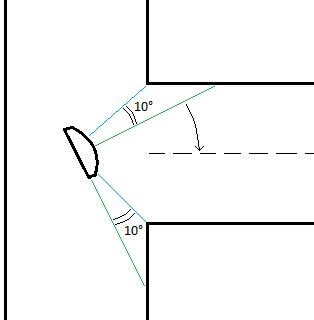
A separate function for turning was designed, that could cope with different turn situations. At every decision point, the turn function is called upon and a decision is made between left, right, straight or rotate (turn 180 degrees). the turn will then be completed, depending on the observations that PICO makes in the situation it's in. In general there are two different situations that have to be approached differently. Firstly, there is a corner at the end of a corridor. for this situation, PICO can only observe one corner point an dis surrounded by walls. Secondly, a turn has to be made in a corridor intersection, such that PICO can take different routes. In this situation there are 2 corner points that can be detected by PICO.
Gap in the corridor
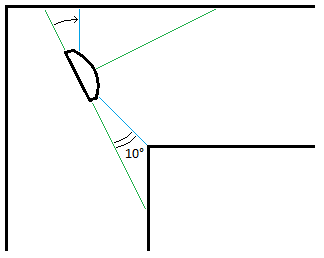
In the turn situation, where the robot can choose between going straight forward and turn right and/or left, PICO will turn depending on the corner points it sees. A turn will be handled in two stages, a rough turn and a secondly a correction stage. Say PICO will turn right, then the turn function will start with an initial speed and turn in the right direction. It will turn until a certain laser point sees a minimum and stop when this is the case. Corner points can be identified as being minima in the laser data that is gathered. Whenever a pre chosen laser point identifies such a minimum, then PICO 'knows' that it has reached a certain angle towards the gap it tries to enter.
After the rough turn has been completed, the correcting ca begin. PICO scans for two minima (the two corner points) and once they're found, it corrects towards the center of those points. for this correcting stage it uses a smaller turning speed, to correct properly. If PICO reaches the center of the two minima by 0.5 degrees (the width of 2 laser points), then the turn is fully completed.
Corner
For a corner at the end of a corridor, the turn will be approached a bit differently, since PICO can only observe one corner point (minimum). An initial turn will yet again be started and PICO will turn until a certain laser point has reached the minimum. Then the correction stage will not correct towards the corner point, but parallel to the wall on the opposite side of the turning direction. PICO will turn towards the minimum on that particular wall, which is the closest point between PICO and the wall. If the laser point at 90 or -90 degrees has reached this minimum by 0,5 degrees, then the turn is completed.
180 degrees rotation
Another aspect of the turn function is the 180 degrees rotation. Whenever a corridor has been entered, that has a dead end, then the turn function will be called upon and it will start rotating. The rotate will be fulfilled in two steps (two quarter turns). A initial turn (to the left) will be published and PICO starts turning, until the laser point a 0 degrees sees a minimum (i.e. the wall to its left). Then the turn will continue, until the right laser point at 90 degrees sees a minimum again. then the rotation is completed and PICO is turned.
Algorithm Evaluation (MiddleNode)
VisionNode
The VisionNode performs several processing steps on the camera image, before it starts detecting the arrow. The image processing steps are as follows:
- Take 'region of interest' from camera image
The region defined is a rectangle of [ x=170 , y=140 , width=300 , height=340 ].
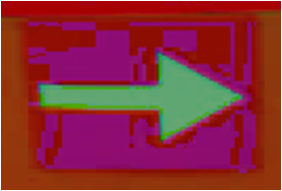
- Transform image from rgb (red-green-blue) into hsv (hue-saturation-value)
- Threshold the hsv image, to filter out 'red' pixels
The threshold values are defined as [ Hue(150-200) , Saturation(200-300), Value(100-200) ].
Since the algorithm is pretty robust, it is better to detect a 'good' red area then noise reduction.
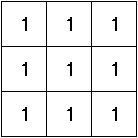
- Blur image by using a 2D filter (close gaps)
A unity kernel is used as 2D filter, which takes a 3x3 neighborhoud into account and therefore closes 'smaller' gaps which open the contour.
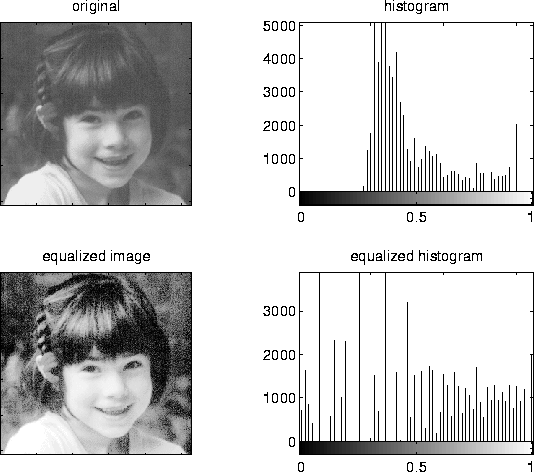
- Sharpen image by histogram equalization
Histogram equalization is used to sharpen the image and smoothen the edges.
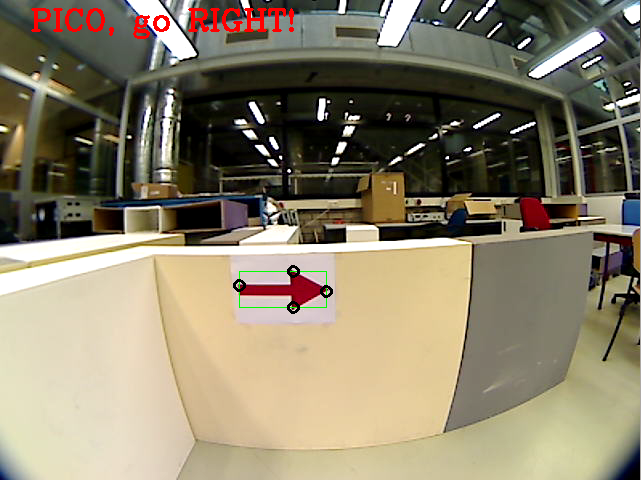
The camera image is now processed, such that the contrast is high enough to start arrow detection. The arrow detection performs the following steps:
- Find biggest (area) contour
Which is done by calculating the pixels inside each contour.
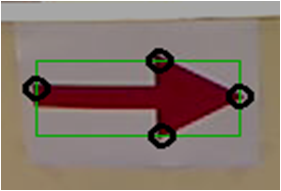
- Find extreme values (north,south,east,west)
Which is done by looking at the [xmin,xmax,ymin,ymax] values of the contour pixel coordinates.
- Determine if (area) contour is arrow
Here it looks if the north-south y-distance is larger then 10 pixels and if the east-west x-distance is larger then 50 pixels, then it would probably be an arrow
- Determine arrow direction
If the east extreme value is closer to the north&south extreme values, then the arrow points right. If the west extreme value is closer to the north&south extreme values, then te arrow points left.
- Publish arrow direction
The VisionNode eventually publishes a '1' for arrow direction LEFT and a '2' for arrow direction right, this then is handled by the MiddleNode.
A video of the algorithm in action, can be found here.
Algorithm evaluation (VisionNode)
The algorithm works very good and robuust for the challenge circumstances, however in a more challenging environment it would most probably fail. This is mainly due to determine if contour (area) is arrow criteria, where two conditions are checked. This means that large 'red' areas could be recognized as arrow. It is therefore recommended to use template matching in more challenging environments.
First Strategy (not implemented)
The described method below was the strategy we wanted to implement in the first weeks. While programming and rethinking the whole project, we decedied to radically change our strategy. Modules:
- Route calculation node
- Corridor detection
- Relative location in corridor
- map
- route calculation
- motor controller
- Drive node
- Arrow node
- Drive controller node
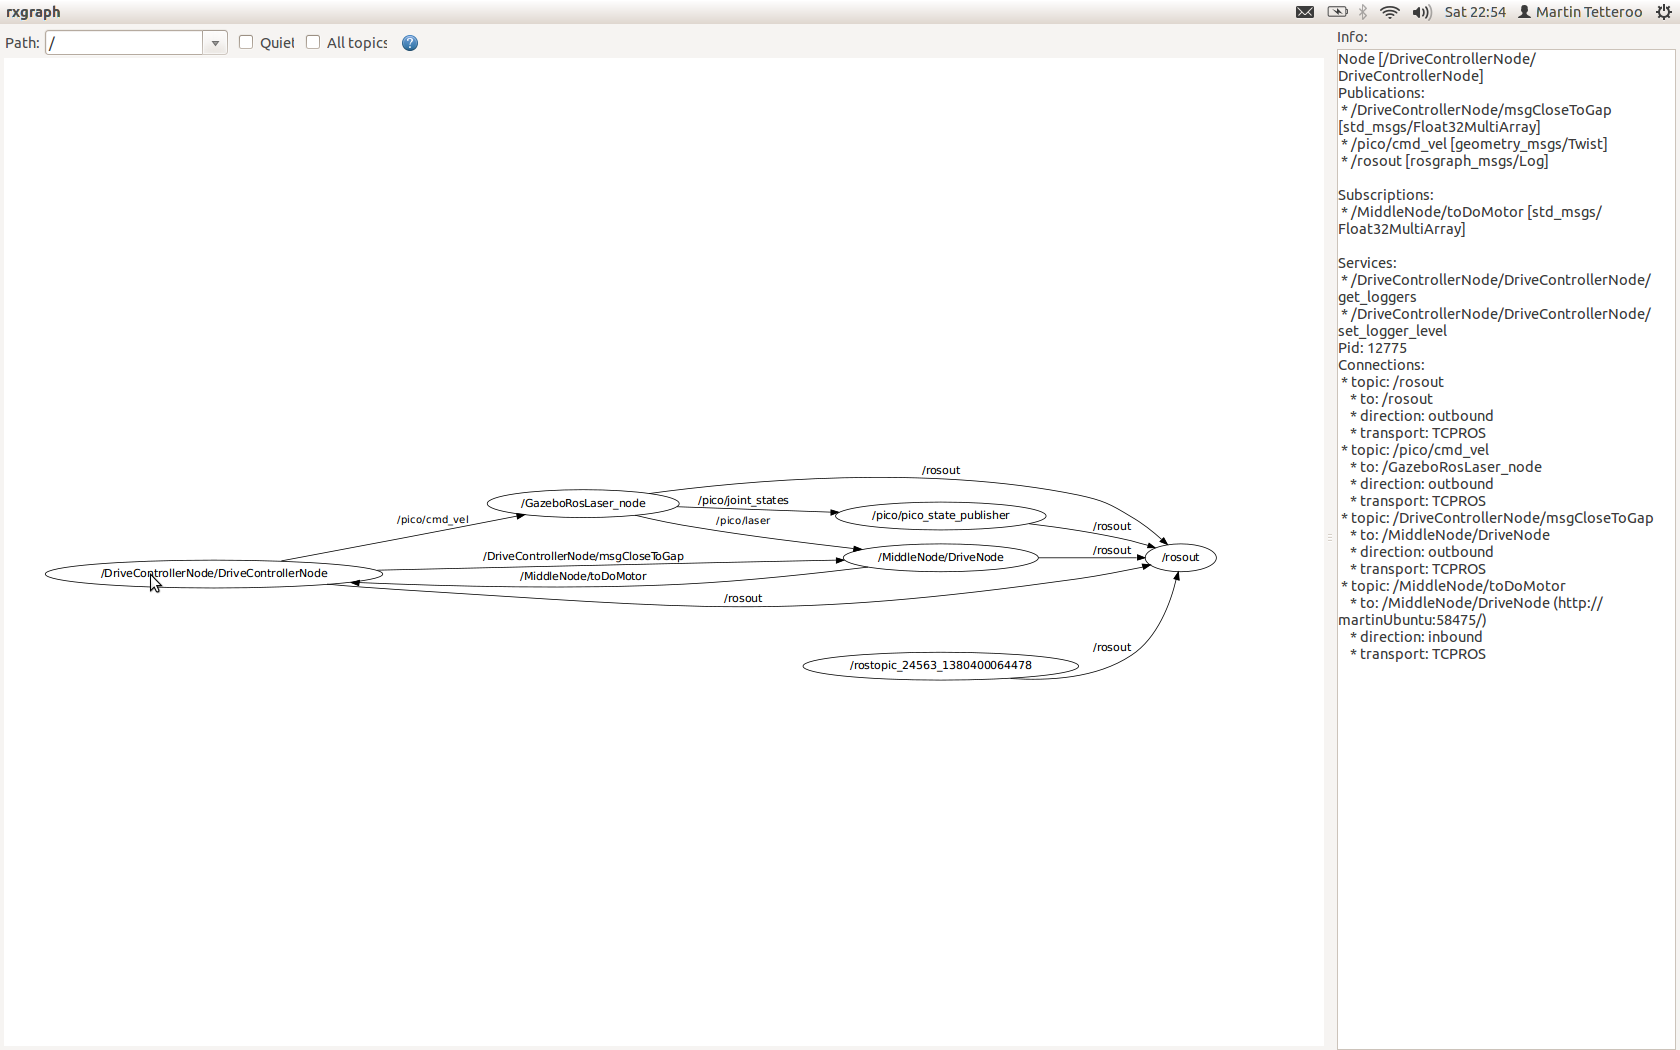
A diagram of the node communication File:Node communication.pdf
MainNode
The goal of this node is to solve the maze. It keeps track of the previous movements of the robot and calculates the route to solve the maze. The following modules are defined on this node.
Output message to drive_controller: MessageRoute[float DistanceToDrive, int toDoMotor], where todomotor is turnRight, Turnleft or DriveStraight
Corridor detection
This function detects all the walls. The walls are outputted as line segments in x,y coordinates.
Input: Laser_vector[1081] output: Vector[Lines], with corners[float x_gap; float y_gap; int i_gap; float x_corner; float y_corner; int i_corner]
Relative location
This function calculates the distance from the wall on the left and on the right and the angle of the robot towards these walls.
Input: Laser_vector[1081], Vector[Lines] Output: Location_rel[ float Dist_left; float dist_right, float Theta]
If the shortest distance to a wall is not the laser data directly right or left, pico is not parallel to the wall. The angle can be calculated by taking the difference of the shortest laser angle and 90 degrees.
Map
Using the results of the previous modules this module will update the current map. The location of the robot and the walls/corners/deadends will be drawn in the map. The starting point of the map (0,0) is the start point of the robot. So every time the map from this point will be calculated. As an improvement a particle filter might be needed to draw a better map.
Input: Vector[Lines], Location_rel Output: Location_abs[ float x, float y, float theta] Global: Map[vector[Lines], locations_visited[x,y]]
Route Calculation
This module calculates the route to the next goal. If the goal is in a different corridor and multiple small steps are needed to drive to this goal, a reachable setpoint is calculated and the goal is saved.
Input: Location_abs, location_rel, Map Output: Location_goal[float x, float y], Location_setpoint[float x, float y] Global: Location_goal[float x, float y]
Motor Instruction
This module translates the calculated route and the current location to a message to the motor. The motor commands are turnLeft, turnRight, driveStraight. The module outputs a message to the drive controller node
Input: Location_setpoint[float x, float y], location_rel[float x, float y] Output: float distanceToDrive, int toDoMotor (left, right, driveStraight are defined as integers)
MiddleNode
This node makes sure that pico keeps on driving in the middle of a corridor, so it is not crashing into one of the walls. The node can receive an input message from the Drive Controller Node about the distance to a gap in the walls. If Pico is close to a gap, the function is not trying to drive in the middle of the corridor, but parrallel to the wall without the gap. The node outputs messages to the Drive Controller Node with the information about how to remain in the middle of the corridor. This node updates faster than the Route Calculation Node.
Input messages From Drive controller node: messageCloseToGap[bool closeToGapLeft, bool closeToGapRight] Output messages messageDriveNode[float angle]
Since standard ROS messages do not include a boolean, it is easier to use the std_msgs::Float32MultiArray.
pseude Code
if(middleDrive)
- Drive in the middle of the corridor (if not close to a gap)
elseif(parrallelLeft
- If a gap is on the right side of Pico, start driving parrallel to the left wall. The location of a gap is send by the Drive Controller Node using messageCloseToGap
elseif(parallelRight)
- Same as left, but now the gap is on the left.
elseif(turnLeft)
- If in the middle of a gap, start making the turn to the left or right
elseif(turnRight)
- Same as above, but now turn right
VisionNode
This node is optional, if we have enough time we will try to implement this node. This nodes uses the camera information to detect arrows. If an arrow with a direction is detected, a message will be sent to the drive controller node were to drive to.
Output Messages MessageArrow[bool turnLeft]
DriveControllerNode
This node is the node which decides which commands are send to the motor. This function is on it's own node, because it has to listen to the calculated route and to the middledrive. The calulcation of the route calulcation is needed less frequent than the middledrive check. If
Input messages: MessageRoute[float DistanceToDrive, int toDoMotor], messageDriveNode[int toDoMotor], MessageArrow[bool turnLeft]. Output Messages messageCloseToGap[bool closeToGapLeft, bool closeToGapRight]
Results
Corridor Competition
We failed to succeed the corridor comptetition. We were given two opportunities to detect a hole and drive though it. However, the first attempt the safety overruled the state machine that was build, and the robot got stuck. the second attempt the robot didn't turn far enough and Pico was unable to correct the angle correctly, after which it again got stuck in the safety mode.
First Attempt
When the robot was started, the MiddleDrive function worked properly and Pico started of nicely. Whenever the robot drove towards a wall, the MiddleDrive corrected for it and made sure that the robot drives straight forward. However, when the robot approached the corner whithin 0.5 meter range, it seemed like the robot corrected to drive exactly to the middle of the hole. Since your workspace is rather small and SafeDrive defines a space of 40 cm around every angle of the robot, the robot approached the was too close and the SafeDrve overruled the normal behavior of the robot. So the robot tried to correct for the hole, but instead drove too close too the wall and got stuck in the SafeDrive mode.
Second Attempt
The second attempt the robot started of nicely again, driving straigt forward. When the robot approached the hole on the left within the range of 0.5 meters, it slowed down. Pico corrected a bit to the right, but stopped nicely in the middle of the hole. However, when the turn was started, it seemed to approach a wall again, such that the SafeDrive took over again. We confirmed that the turn was never completed and the robot got stuck agan in its safety mode.
Conclusion
Unfortunately, we didn't succeed the corridor competition, but we learned from our mistakes and know how to approach the problem correctly. Next time we'll have to make sure to reserve more time with the robot to learn its behavior in practical situations. All in all, we have to make sure that the safety doesn't overrule the normal behavior of the robot too soon.
Maze Competition
During the maze competition we didn't succeed to solve the maze. The first attempt got stuck at the first crossing and during the second attempt pico didn't even move. So basically we have been programming 7 weeks to be able to move the robot about 1 meter. The good news is that we know why we failed the maze competition and we have simulation to prove that our algorithm should be able to solve mazes.
First attempt
During the first attempt pico failed, because the crossing wasn't seen as a crossing. This is caused because the crossing was too close by to detect the crossing correctly. If pico would have seen this crossing correct, it should have turned left first, then turned around (because it saw a dead end), then go straight and turned again en finally it should have turned right to further explore the corridor. In reality pico started with turning right, which indicates that the crossing wasn't detected as a crossing both simply as 2 different gaps, not in front of each other.
With a relatively simple adjustment to the code, this problem can be solved. To detect if two gaps are across each other, the index values of both gaps in the laser array are compared. If the absolute value of these indexes is less than 25, the gaps are marked as across each other and the crossing is detected correctly. For crossings far away this value of 25 is indeed a good value, but if the crossing is rather close by (which was the case in the maze competition), 25 seems to be a bit too low. So the problem can be solved by comparing the indexes of gaps close by with a value higher than 25 and comparing the gaps close by with 25.
Second attempt
During the second attempt pico didn't even move and no messages were send over the ros topics. This indicates that something went wrong in our begin phase. During testing a week before the maze competition we had a similar situation, but we thought we solved this problem.
Normally we start our program with a route calculation on the route node and this node sends a message with a goal to the middle node. We noticed that this can go wrong when the route node was trying to send this message when the middle node wasn't completely initialised yet. In that situation the message got lost and both nodes kept on waiting for a response. We asked Yannick about this problem, but he also thought it was strange that this happened within ROS. Our solution was to put the route node in a sleep of 2 seconds, so the other nodes are able to fully initialise. Did seemed to work, but during the maze competition the initialisation phase apparently was slower than normal, so our program failed.
There are several ways to prevent this failure, for example put the route node in sleep even longer. But of course this is a very ugly solution. Another solution (which we thought we already implemented, but apparently we made a mistake in this code), is to initialize the middle node in a state 'waiting for input'. As long as the middle node is in this state, let it send a message to the route node, so the route node knows the message didn't reach it's goal and it needs to be send again.
Evaluation
Overall the project went very well, however the challenge results are a bit disappointing. Looking back at our project, we may conclude that the chosen architecture probably was too ambitious for the time given. At first we decided not to design a wall follower with extended features, which would be a lot easier. Instead we decided to design a Route Calculation algorithm, which calculates set-points according to its environment. This algorithm would (in our opinion) be able to faster solve more complex mazes than a wall follower, for example disjoint mazes in which not all walls are connected. In theory, based on simulation results (test_maze | challenge_maze), our algorithm works pretty good and robust [except for exiting a maze...]. However in the challenges several 'real world' phenomena come in which our algorithm cannot handle for the moment.
Properties that make our algorithm 'unique':
- No wall-follower
- Autonomous route calculation in seperate node
- Gap/Turn handling based on laser range values
Properties to improve:
- More testing, to cope with 'real world' phenomena
As said in the lecture of Mr. Bruyninckx, our algorithm contains several 'magic' numbers which make the functionality less flexible, adaptive and robuust. These 'magic' numbers work in the simulation, but could not work on PICO. Therefore more testing is needed, to tune these 'magic' numbers more precise.
- Make use of odometery
At the moment our algorithm makes no use of the available odometery, which means that a lot of available information is not used. The odometery could be usefull for determine PICO's absolute position in the maze, since now it only knows its relative position. It could also be usefull as feedback for gap- and turn-handling, which now is based on laser information but in combination with odometery could be improved.
- Determine if contour (area) is an arrow
At the moment our algorithm checks two conditions which relate to the extreme values, which means large rectangular objects can also be labelled as arrow. For the corridor and final challenge environment the algorithm works fine, however in more challenging environments it will probably fail. A nice improvement would be to add template matching, do determine whether a contour (area) is an arrow.
