Viotar/Hardware Design
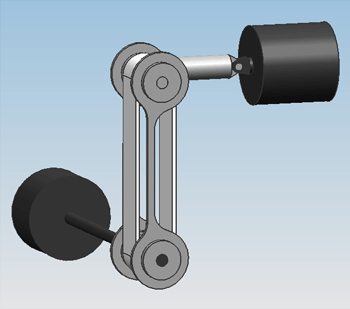
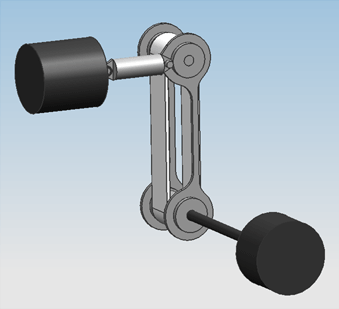
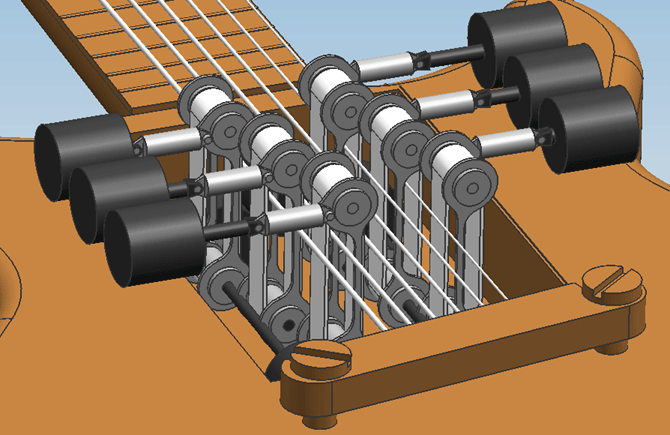
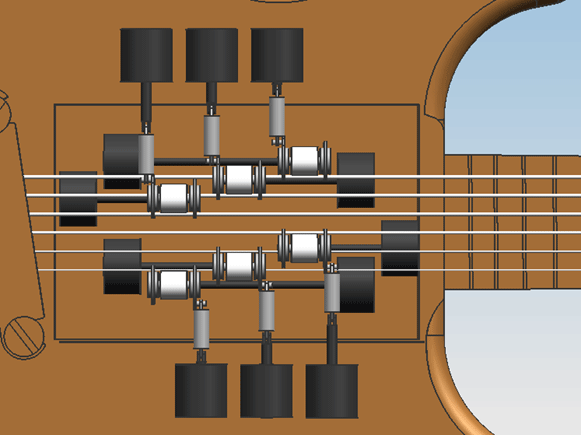
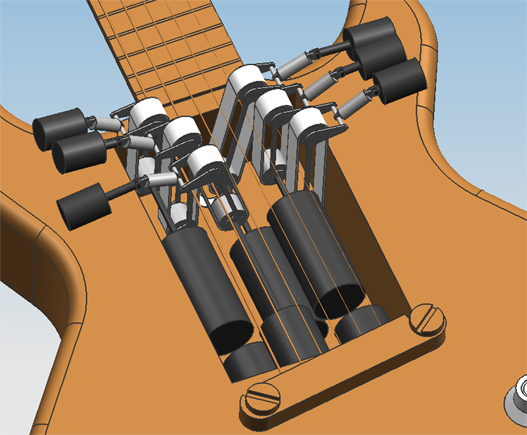
Hardware designDesign 0.1The first concept of a design was based on having the motors directly drive the bowing belts, to reduce noise coming from moving mechanicals. Because the engines can't move, and the belts have to be moved onto and off the string, the belts will rotate as a rigid body around the driveshaft. Frames that hold the belts so they behave like a rigid body are solely mounted on the driveshaft, with suitable bearings to prevent friction. On friday the 5th of november, the first attempt at a design was finished. Only geometric constraints were taken into account, meaning the size of the engines and actuators were solely adjusted to the amount of space that was available in the guitar.
As can be seen, there is a spring suspension between the linear actuator and the belt frame. This is put here, because in this stage we don't know whether we'll need this or not, so we just assumed that we do, because we can always remove them from the design.
Design 0.2From reviewing design 0.1 with the group, the following points of improvement were determined:
These improvements have been worked into design 0.2.
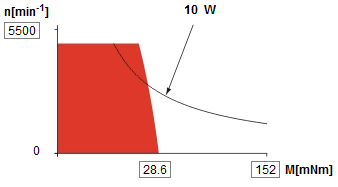
Design 0.3 to 0.6Estimation of the required motor powerThe needed motor power is calculated using [math]\displaystyle{ P=M_{T}\cdot\Omega }[/math]. For this, the total load [math]\displaystyle{ M_{T} }[/math] and the angular speed [math]\displaystyle{ \Omega }[/math] have to be calculated. The total motor load consists of the load coming from the friction of the bowing belt with the string [math]\displaystyle{ M_{bt} }[/math] and the friction of the bearing supporting the wheel that drives the belt, [math]\displaystyle{ M_{br} }[/math]. [math]\displaystyle{ M_{bt} }[/math] is calculated by [math]\displaystyle{ M_{w}=R\cdot F_{w,bt}=R\cdot F_{n}\cdot\mu_{w,bt} }[/math], with [math]\displaystyle{ F_{n}=F_{b} }[/math] the normal force between the bowing belt and the string. This bow force has a maximum of [math]\displaystyle{ 4 N }[/math]. The value of [math]\displaystyle{ \mu_{w,bt} }[/math] is estimated at a rather high [math]\displaystyle{ 0.7 }[/math]. The radius [math]\displaystyle{ R }[/math] at which the belt runs around the shafts is taken to be [math]\displaystyle{ 7.5 mm }[/math], on the actual design it will be smaller than this. This yields [math]\displaystyle{ M_{bt}=21.0 mNm }[/math]. [math]\displaystyle{ M_{br} }[/math] is calculated assuming cylindrical roller bearings will be used. For cylindrical roller bearings [math]\displaystyle{ M_{br}=F\mu_{w,br}d/2 }[/math], with [math]\displaystyle{ mu_{w,br}=0.002 }[/math] the friction coëfficient for cylindrical roller bearings, [math]\displaystyle{ F }[/math] the lateral force on between the bearing and the shaft which is estimated at [math]\displaystyle{ 30 N }[/math], and [math]\displaystyle{ d }[/math] the shaft diameter, which is about [math]\displaystyle{ 4 mm }[/math] for a bearing with a outer diameter of [math]\displaystyle{ 11 mm }[/math]. This yields [math]\displaystyle{ M_{br}=0.12 mNm }[/math]. The angular speed of the motor shaft [math]\displaystyle{ \Omega }[/math] is determined to be [math]\displaystyle{ \Omega=v_b/R=2546 rpm }[/math], with bow speed [math]\displaystyle{ v_b }[/math] the maximum occuring value, and [math]\displaystyle{ R }[/math] the radius at which the belt runs. Now combining the findings for [math]\displaystyle{ M_{bt} }[/math] and [math]\displaystyle{ M_{br} }[/math], the total motor load [math]\displaystyle{ M_{T} }[/math] is estimated at [math]\displaystyle{ 21.12 mNm }[/math]. The power then becomes: [math]\displaystyle{ P=5.63 W }[/math]. Picking a motorAfter looking at the catalogi of various manufacturers, we picked a motor from Maxon, article number 118747, that was fit for the job. Specifications are given in the figure below.
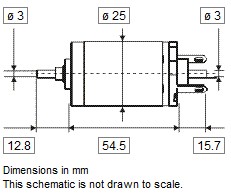
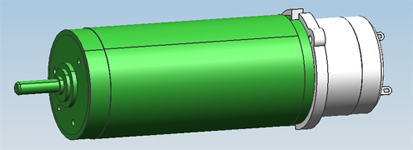
The motor has just the right operating range. This motor should be able to continuously handle the calculated load of 21.12 mNm at 2542 rpm. The dimensions are great, the motor has a very small diameter of 25mm, which is the most critical dimension for the design for being able to fit six motors. A suitable encoder is offered by Maxon to fit the motor (article number 118909). It is fitted onto the back of the motor. CAD files of both the motor and the encoder are on the Maxon site, a picture of them is shown below.
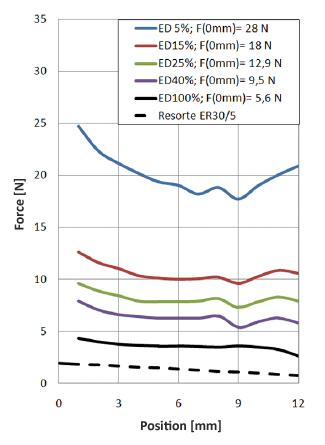
Picking a linear motion actuatorSix actuators are needed in order to push the revolving bowing belt onto the string. These actuators have to be able to push the belts against the string with a force of 4 N. We also want the Viotar to be able to play 16 notes per second, so the actuator has to be able to move out and retract fast, as well as adjusting its position to obtimise the bow force. This rules out screw- or wormwheel type actuators because of their lack of speed at which they can complete their stroke, and makes linear solenoids a good alternative. It is important to find an actuator that is small enough to fit into the viotar. After some research a linear solenoid was found, made by NAFSA, of type ERC 35/C (page on NAFSA site). This actuator is not too big can deliver just enough force on a stroke that is big enough, as the figure below, a plot of the excitable force of the solenoid versus the position of the moving part shows.
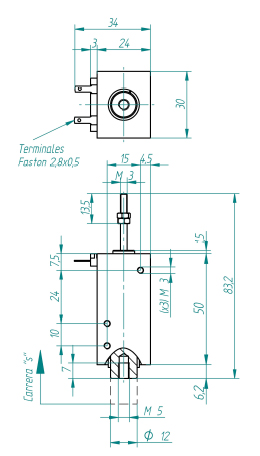
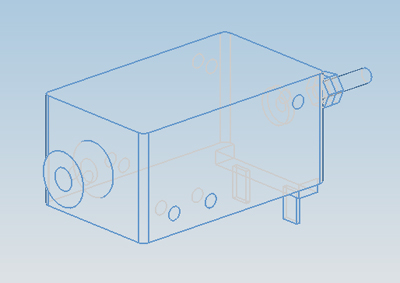
There's one problem: at the end of the stroke, the biggest force is needed, because at this point the belt is pushed against the string the hardest. Turning the solenoid around solves this problem. As the NAFSA site says, it is a push/pull actuator, and since inverting a magnetic field doesn't change its intensity, we assume that the forces shown in the figure also hold when the actuator is reversed. Finally, the solenoids dimensions:
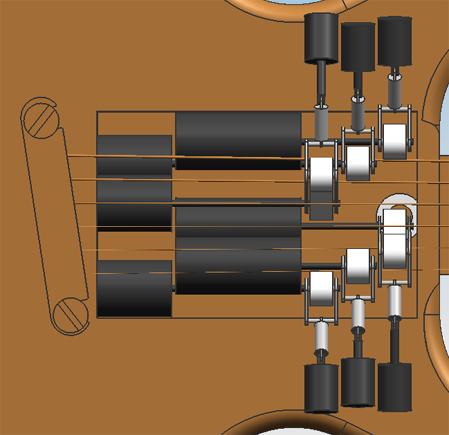
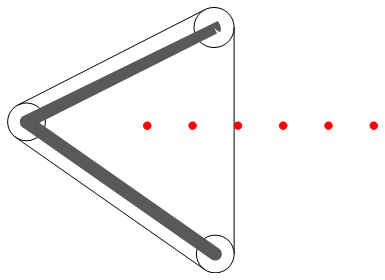
Special attention has gone into having the stroke exactly at the right place in the design, meaning that it is able to take the bowing belts completely off the strings, and on the other hand push them far enough into the string to create a 4 N bow force. Space between stringsAs the previous designs had parts running in between the strings, an examination on the feasability of this is necessary. The situation is sketched in the figure below.
The figure clearly shows that having the non-bowing side of the belt run back upwards between the strings is no option whatsover, because the non-bowing side will run into another string (the middle string in the picture). If this isn't possible, it certainly isn't possible to fit a frame in between the strings. Therefore, this configuration is dropped and a new one is adopted: we let the frame that holds the bowing belt run around the outermost strings, and with a third pulley, let the bowing belt run this way too. This configuration is sketched in the figure below.
Design of the clawsThe claws were designed in a number of steps:
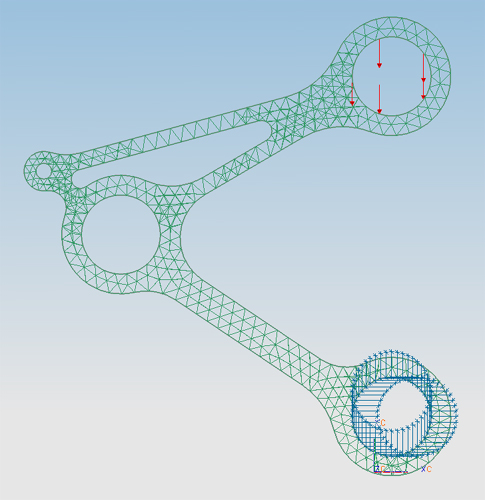
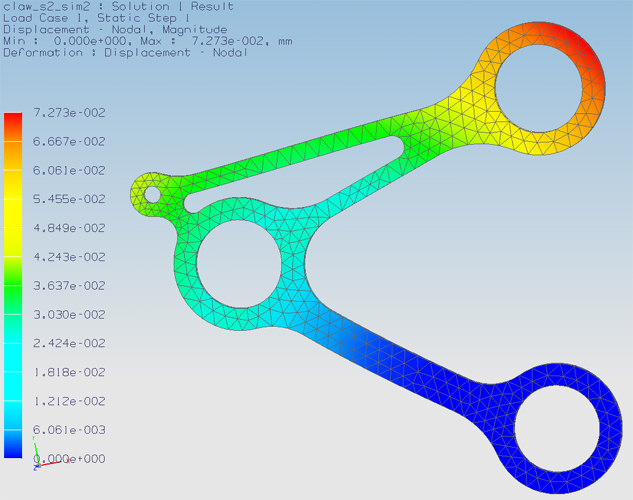
By fitting exactly, we mean that one pair of claws forming a sandwich should excite 4 N of force on the bowing belt, so it sits tightly around the pullies, and will be stiff enough when pressed against the string. This means one claw part will have to excite a force of 2 N. We made the claws a little too big. To be precise, we placed the hole for the upper pulley shaft 0.07 mm too high. FEM analysis in NX5 predicts that it will require a force of 2 N to bend the claw back to the propper dimensions. This is shown in the figure below.
Design 0.6overwegingen over dat rechte stuk in de klauw zodat er geen moment op komt de CAD FEM berekeningen voor de stijfheid van de klauwen
uberhaupt waarom er direct drive is gekomen, helemaal boven bij design 0.2 Bowing beltshier kan William zich uitleven, het onderzoek naar hoe we bij de bandjes zijn gekomen zoals we die nu hebben moet hier. In englishhhhhh.
Right-hand user interfaceRequirementsAs the exciting of the strings is done by actuators and motors, there must be a way the player can control what these actuators and motors do. While the player has his left hand busy fretting the strings, his right hand should tell the instrument what strings to play, and how loud te play them at any given time. Below are the most important product requirements that apply to this part of the instrument.
ConceptsTwo main concepts were conceived for this right-hand user interface. Turning handgripThe right hand holds on to a handgrip that can turn around the axis that coïncides with the player's forearm. Turning the hand around this axis comes very naturally to most people and can be done very fast with little tension. Turning this handgrip around this axis controls the bowing speed. Turning the grip counterclockwise makes the bowing belts go in counterclockwise direction. The further the grip is turned away from its initial position, the more intense the note. The same goes for clockwise direction. When the grip is in neutral position, the bowing belts stand still (but stay in contact with the string, damping it). Because the required turning movement of the hand is so natural, Requirement 3 and 4 of the above list can be met. Additionally, the grip is fitted with 6 ergonomically placed buttons (like on a computer mouse, for instance), each corresponding to it's own string. Holding down a button places the bowing belt on the string, releasing it moves the bowing belt away from the string. Although the player has only 5 fingers Requirement 1 on the above list is still met, because the thumb can control 2 buttons by 'rolling' over them. Pressure sensitive keysThere are 6 pressure sensitive keys, each corresponding to a string. Holding a key down will place the bowing belt on the string, releasing a key will move the bowing belt away from the string. While the key is pressed down, the amount of pressure the user applies on the key defines the note intensity. The keys will be long (like spacebars on a laptop), so that the thumb and index-/middlefinger can alternate while tapping on them, making it possible to meet Requirement 3 and 4 in the above list. RealisationDue to lack of time and financial resources, the choice has fallen on the pressure sensitive keys concept. This may be realised in two ways.
The first option is the easiest as MIDI keyboards are already complete devices that only need to be plugged into the computer. As this project turns out to be more of a proof of concept than the building of a final product, the MIDI keyboard doesn't have to be demolished so that it has only 6 keys, and fit onto the guitar. Instead, the only thing that needs to be done is to let the keyboard communicate with SIMULINK. Searches on how to do this on the internet didn't raise any answers on this, however. Therefore, the laptop spacebar alternative is examined. It should be noted that, for this purpose the laptop key intuitively seems more fitting than the keyboard key. For instance, the laptop key can me tapped much faster while after each tap it is able to retract fully, while a keyboard key needs more time for this, which puts a limit on how fast you can play on a single string. Also, the laptop spacebar has a (for the user) more discrete "on" and "off" position, because there is some sort of treshold in it that makes it avoid the halfway-pressed-down position. This way the player has a clearer idea when the bowing belts are on and off the strings. It is not possible to order a completely working seperate spacebar. Instead, you can only buy seperately the upper part of the spacebar, the mechanisms that hold it in position and allow it to move merely up and down, and the on-off sensor. Each of our spacebars each need a mounting too, so the only solution is to buy multiple laptop keyboards and literally saw the part with the spacebar out. Placing the pressure sensors underneath the spacebars is very easy, because there is enough flat surface on the mounting under the bars to glue these on. Placing stickers on the bottom side of the spacebar can make sure the spacebar touches the pressure sensor just enough. |
