E-box
This is the project page of E-box and related projects (E-scope)
DEVELOPERS
This section contains necessary information for the developers and programmers who use E-Box in their projects.
The specifications of the input and output ports can be found here: Ebox specifications
Using the E-box on your own Linux install
It is possible to use the E-box on your own Linux installation, should you already have one. However, since much of the software is written without considering portability, mileage may vary on any particular system. This section may be used for common fixes for installing the E-box on your own Linux install.
"Undefined reference" - strict ordering
Contrary to earlier versions, in new versions of gcc the order of parameters passed on the command line does matter. When using the default makefile template for the E-box software, you will find that when building software, there will be complaints about simple functions like 'sin' and 'floor' being undefined references.
This can be fixed by changing the makefile template, present in
/usr/local/MATLAB/R20*/rtw/c/ectarget/ec_unix.tmf
Change this to the following makefile template File:Ec unix.tmf.zip. This makefile changes the order of paramters passed to gcc, which will make some basic models build without error.
E-Box Programming
The user manual for the E-box and other EtherCAT slaves can be found here: User manual
The manual for installing a realtime linux system with EtherCAT support can be found here:Install manual and Frequently Asked Questions
Images and Documentation of Signals and Control Engineering
For the courses Signals and Control Engineering, an Ubuntu-USB is used. The latest image and documentation of how to make this image, is found on WTBfiler:
News / Changes
This section contains the important changes and news to the software
- 2011/11/14 Matlab R2011b is supported from revision (218)
- 2011/08/27 Changed Timer_posix to Timer_posix_AK from revision (142)
- 2011/07/17 SVN is working again
- 2011/07/12 Beckhoff EL3104 will be supported from next revision (106)
References
[1] Jeroen de Best and Roel Merry, Real-Time Linux for Dummies, DCT2008.103 PDF
[2] Jeroen de Best and Koen Meessen, Realtime Linux, Realtime_Linux
[3] Simple Open EtherCAT Master SOEM website
STUDENTS
E\Boxes are used in some of the courses. In this section, students can find the necessary information regarding to these courses.
Common Information
The information and manuals presented in this section is used for all courses. The steps given below should be followed before conducting the experiments of 4G031-Printer Casus and 4K410-Digital Motion Control. The courses specific information is given in 4G031-Printer Casus and 4K410-Digital Motion Control sections.
Installation of Ubuntu with Wubi
'WARNING: This installation will only work on a normal installation of the Windows Operating System as it depends on the Windows Boot loader. If you use another operating system or if you are unsure please contact one of the course supervisors. If you have a Mac, Windows needs to be present or installed in order to use this tutorial. For more information, see the guide below.
Wubi is a linux installer for Windows which can install and uninstall Ubuntu in the same way as any other Windows application in a simple and safe way. Ubuntu will be installed within a file in the Windows system ebox_root.disk. This file is seen by Ubuntu as a real hard disk.
The installation of Ubuntu used for this course takes up 30 GB of free-space. Therefore, it is recommended to install Ubuntu by connecting to TU/e network via an ethernet cable. Using VPN or wireless is strongly discouraged!
The wubi-installer can be obtained from the TU/e network share: \\wtbfiler\EBox. Install by opening the executable "wubi_dd-mm-yy-time". Because the installation is quite large this will take some time, especially creating the virtual disk, so please be patient. Connected to gigabit network the installation will take approximately 15 minutes, on a 100 mbits network connection it will take about an hour.
When you have installed Ubuntu with Wubi, you can start ubuntu by rebooting your computer. A menu will appear during startup which allows you to choose whether to run Windows and Ubuntu. When you choose Ubuntu in this menu, you will go to a new bootloader called GRUB. Here you can choose which version of Ubuntu to run as well as alter the start-up commands for running Ubuntu. Unless you are having problems starting up, you should just select the default version by pressing enter. When prompted for account information use the following:
- Username: ebox
- Password: ebox123
You can change the password if desired.
Installing software for experiments
Activating Matlab
The version of Matlab installed on Ubuntu needs to be activated. To do so, start matlab from a terminal window with
- sudo su
- matlab
and follow the instructions and use the activation key linked on the campus software site. Matlab activatie
If the student activation key doesn't work, take the employee activation key
Update to the latest experiment software
The software to perform experiments is already present, but possibly outdated. To update the software and simulink models used, you have to checkout the latest stable revision from the SVN (subversion) server. This can easily be done using the svn_update script:
- Open a terminal (via the icon on the desktop)
- Type svn_update
- If you get an error mentioning "an unversioned copy of this file already exists", type: "rm *path to file and filename". For example, "rm /usr/Desktop/unversionedfile.m".
If you are experiencing any problems (bugs/errors) with the experiment software, then first make sure you have checked out and installed the latest software revision from the SVN by repeating steps Update to the latest experiment software and Compiling and installation the software. Since this update will also update the simulink templates used in the experiments, it is recommended to save any changes made to these files with a different filename and/or in a different location, preferably on your harddisk.
Compiling and installation the software
First start matlab from a terminal (if not done already):
- Open a terminal
- Type sudo su
- Type "matlab"
To obtain a fresh copy of the latest version:
- Run svn_update according to subsection Update to the latest experiment software in a terminal window.
- Change the Matlab current directory to /home/ebox/svn/trunk/src/E-box
- Run make_all_clean in matlab
- Run make_all_install in matlab, answer yes to TU/e toolboxes installation question
Preparation prior to performing experiments
Connecting the E/BOX, changing ethernet index number
Connect the power supply to the E/BOX. Use a network cable to connect your laptop to the In-port of the E/BOX. Since the index number of the Ethernet port you are using can vary for different pc's, the right number has to be set:
- Open a terminal
- Type sudo geteth (returns the right port number, only when the E/box is connected)
- Start matlab (type sudo matlab)
- Type changeeth(x) in the matlab command window where x is the port number found with geteth.
These commands set the right ethernet index number, this needs to be done each time a new software revision is checked out.
Save data
To be safe, you should save the data you obtain via experiments outside of Ubuntu. This means that it will not be deleted if Ubuntu is uninstalled. You can save it to your Windows hard disk or use a web service such as Dropbox or Box. The partition of your hard disk on which you have installed Ubuntu can be found under \host, any other partitions can be found in \media or in the places menu from the taskbar.
Now, follow the steps specific for Printer Casus course or Digital Motion Control course ! ! !
Printer Casus - 4G031
The section Performing Real-Time experiments includes an introduction to the use of the preparation and the actual execution of experiments. To use a setup, you can subscribe at the appropriate registration lists in SEL3 (1 setup per day per group).
Almost every day, for several hours assistance available in SEL3, where you can ask your questions. For questions during the experiments, please contact Bas van Schepop of your group tutor. The project coordinator is Rene van de Molengraft (![]() , tel 2998, GEM-Z -1.141).
, tel 2998, GEM-Z -1.141).
Hardware
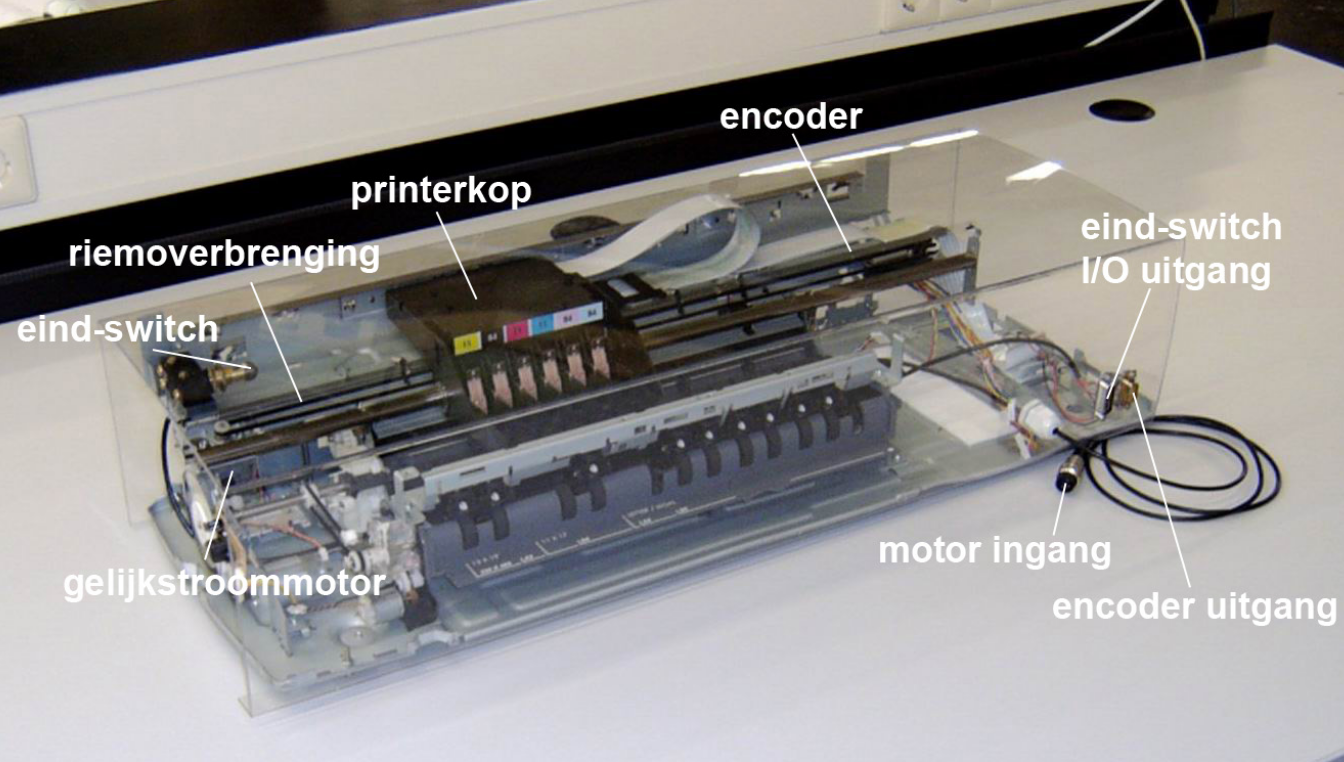
The case is a stripped A3 HP printer, see Figure 1. The required hardware for the experimental set-up is included in Table 1. You have to take your own notebook to do experiments.
Required hardware
- Notebook with E/box image installed
- Experimental HP printer setup (see Figure 1) including cables
- Amplifier including BNC cable
- E/box including ethernet cable
Table 1
The print head is driven by a DC motor using a belt transmission. The position of the print head is measured by means of a linear encoder. The optical encoder sensor is mounted in the printhead. On the left side an end-switch is mounted that is used to position the printhead initialization. Using the E/box it is possible to perform real-time experiments on the printer, i.e. measuring and sending signals in real-time. The amplifier provides the necessary current gain of the control signal transmitted from the E/box to the motor is controlled.
The cables of the hardware should be mounted as shown in Table 2 below. Furthermore, the amplifier and E/boxof supply cables must be provided. CAUTION: NEVER turn the amplifier on (ON) before a control signal is defined by the ectarget software (see #Performing Real-Time experiments). A crash of the printer may result. On some older amps is still 0 to 2.5 V instead of + / - 2.5 V. This is incorrect, all amplifiers have a range of + / - 2.5 V.
Table 2
| I/O Printer | I/O Amplifier | I/O E/box | I/O Notebook |
|---|---|---|---|
| Motor input | LOAD | ||
| Encoder output | Encoder 1 | ||
| End-switch I/O | DIGITAL I/O | ||
| +/ − 2, 5 V in | Analog out 1 | ||
| Ethernet port | Ethernet port |
Performing Real-Time experiments
The simulink template for the experiments can by typing printer01 in the matlab consolue. Make sure you save any changes to the model with another file name and/or in another location or you might lose your work when updating the svn or reinstalling Ubuntu.
External mode
The following steps are have to be followed to execute the experiment:
- Open the simulink file and press "Ctrl-B" to start building the real-time code
- If you get any errors, check to see if there is a Ref3 block present. If there is, you first need to open it and accept a trajectory before you can continue.
- Switch on the printer setup
- Open a terminal
- type sudo su
- Go to the folder where you just built the file (the file is built to the current directory of Matlab). Use cd to specify the path.
- Note: If there is a ref3 block present (yellow), you must first give it a path to follow and accept , otherwise it will throw an error.
- Type ./printer01 -w in the terminal to execute your experiment. The -w part means the realtime application will be run in external mode. If you have renamed the model, printer01 in the previous commands has to be replaced by the name of your Simulink model.
- The external mode requires you to connect the Simulink model to the real-time application and start it manually from the Simulink. This has to be done by choosing "Connect to Target" and "Start Real-time Code" from the Simulation menu respectively.
- If you get an error, especially one that mentions the "eth bind failed", go to Simulation -> Configurations Parameters -> Code generation and manually change the ID to the one you got from the command "geteth".
- The standard simulation time is 30 seconds, to change this, in Simulink go to "Simulations", "Configuration Parameters" and change the "Stop time".
- After the experiment has finished you can return to Matlab, load your data ("load printer01.mat") and perform the required actions to post-process the measurement data. Save all your commands in a Matlab m-file. Created variables have the prefix rt_
- The -w option can be omitted to let the real-time application run in stand alone mode.
Usefull tips
To get an idea of the system behavior of the open-loop system. One of more suitable input signal for the motor can be chosen, while recording the resulting output of the system.
- By applying a sinusiodal input signal (and linear system behavior) it is possible to determine a point of the Bodediagram. With several of these experimenten, a complete Bodediagram can be constructed.
- With simple input signal, e.g. constant for a short period, then zero, gives relevant information about direction of motion, amount of friction, etc.
For more information regarding system identification, the following book can be read: Feedback Control of Dynamic Systems, Franklin, Powell.
Take an extra phaselag in the open-loop into account, which has the order of magnitude of ωT, where T is the sample time in [s], equal to the Fixed step size from the simulation parameters. Futhermore, ω is the frequency in [rad/s]. Increasing the open-loop gain will eventually always result in instable behevior.
Look at Frequently Asked Questions if there are any questions. This wiki will be updated during the casus on a regular basis.
Troubleshooting
error:
Invalid setting for fixed-step size (0.001) in model 'printer01'. All sample times in your model must be an integer multiple of the fixed-step size.
The sample time period (0.00048828125) of 'printer01/Generated S-Function' is not an integer multiple of the fixed step size (0.001) specified for model.
solution:
- press Ctrl+e
- select: 'solver'
- change 'Fixed-step size (fundamental sample time):' under 'Solve options' to value "1/2048"
error:
Error(s) encountered while building model "printer01"
solution: choose a different name for the model. Using "printer01.mdl" can cause problems because the file can be shadowed by the original "printer01.mdl" in a folder higher on the Matlab path.
Digital Motion Control (DMC) - 4K410
Performing Real-Time experiments
The simulink template for the experiments can be found in the folder Templates\Specific\pato inside the E/BOX folder (see Compiling and installation the software). Make sure you save any changes to the model with another file name and/or in another location or you might lose your work when updating the svn or reinstalling Ubuntu.
External mode
The following steps are have to be followed to execute the experiment:
- Open the simulink file and press "Ctrl-B" to start building the real-time code
- If you get any errors, check to see if there is a Ref3 block present. If there is, you first need to open it and accept a trajectory before you can continue.
- Switch on the pato setup
- Open a terminal
- type sudo su
- Go to the folder where you just built the file (the file is built to the current directory of Matlab). Use cd to specify the path.
- Type ./pato01 -w in the terminal to execute your experiment. The -w part means the realtime application will be run in external mode. If you have renamed the model, pato01 in the previous commands has to be replaced by the name of your Simulink model.
- The external mode requires you to connect the Simulink model to the real-time application and start it manually from the Simulink. This has to be done by choosing "Connect to Target" and "Start Real-time Code" from the Simulation menu respectively.
- If you get an error, especially one that mentions the "eth bind failed", go to Simulation -> Configurations Parameters -> Code generation and manually change the ID to the one you got from the command "geteth"
- The standard simulation time is 30 seconds, to change this, in Simulink go to "Simulations", "Configuration Parameters" and change the "Stop time".
- After the experiment has finished you can return to Matlab, load your data ("load pato01.mat") and perform the required actions to post-process the measurement data. Save all your commands in a Matlab m-file. Created variables have the prefix -rt
- The -w option can be omitted to let the real-time application run in stand alone mode.
Qadscope
Qadscope is a program to generate outputs and read the input ports of the E/BOX, it can be seen as a digital oscilloscope and spectrum analyzer. A few guidelines:
- Qadscope can be started by typing qs in the Matlab prompt.
- Signals can be generated by the signal generator.
- Every input- and output port can be set on and off separately (make sure the right ports are enabled and disabled).
- When relations between signals, for example a FRF, are computed, the red labeled signal is the input signal and the green labeled input is the output signal.
- The framelength and sample frequency can be adjusted manually.
- When you are done using Qadscope you can just shut it down. All data is available in the Matlab workspace in a structure named "data".
- Always stop a measurement first before saving the figure.
EC_target settings
If you have made you own simulink file (without starting from the template), the function ectarget settings can be used to properly set all simulation parameters. A help file is included. Usage: ectarget settings(filename,netif,ts), with netif equal to the ethernet port number and ts equal to the desired sample time.
Frequently Asked Questions
- Ubuntu start niet
- Boot onder windows en controleer de grootte van de ebox_root.disk file. Deze moet 31.188.844.544 bytes groot zijn (zie properties/eigenschappen). Is dit niet het geval, dan kun je de ebox_root.disk handmatig kopieren van de server.
- Tijdens compilen krijg je een error of een conflict in sampling tijden (0.001 en 1/2048)
- Update en installeer de software (vanaf r355 is dit opgelost) Update to the latest software en Compiling and installation the software. Start vervolgens vanaf een nieuwe kopie van het printer01 model
- Tijdens compilen krijg ik errors met "undefined function or variable ref_part"
- Dubbelklik op het ref3 blok en klik op accept voor het builden
- svn_update werk niet
- Voer het volgende commando uit in een terminal
svn checkout https://e-box.wtb.tue.nl/svn/e-box/trunk/src/E-box/ /home/ebox/svn/trunk/src/E-box/
- In de terminal waar de executable draait komt repeterend
   Error occurred getting packet header.
   Error occurred in rt_PktServerWork.
   Disconnecting from host!


   Error occurred getting packet header.
   Error occurred in rt_PktServerWork.
   Disconnecting from host!
- te staan. Dit is een bekende Linux gerelateerde bug die meestal op te lossen is met een reboot van de pc, of door een andere pc gebruiken.
- De scope in Simulink laat alleen het laatste stuk meetdata zien
- Gebruik "To Workspace" blokken. Voor een model met naam printer_01.mdl wordt er een printer_01.mat file aangemaakt. Daarin staan de gemeten signalen, bijvoorbeeld rt_simout. De naam van het signaal simout kan je wijzigen, dubbelklik op het "To workspace" blok!
Killing a process in Linux
If your laptop or an application (like Matlab) stops reacting you can try the following to kill the process giving problems:
Method 1
- Type sudo su (superuser) to get the necessary rights.
- Type xkill, your mouse pointer will change into a cross from an arrow.
- Click on the window you want to close.
Method 2
- Open a new terminal.
- Type sudo su (superuser) to get the necessary rights.
- Type ps -aux or ps -e (get a list of all processes and ID). You can ao use the command top to get a list of the processes using the most CPU time.
- Find the ID of the process you want to kill.
- Type kill -9 <process id>
- Alternatively if you know the process name you can use the pkill command so to kill matlab use pkill matlab
How to reboot cleanly even when the keyboard/mouse are frozen
There are normally several ways to reboot cleanly using key combinations such as:
- CTRL + ALT+ F2 (get to a terminal, you can then run top/kill/pkill to discover and kill the offending process)
- CTRL + ALT + Backspace (kills the graphic session and goes to a console, all graphical applications are terminated too)
- CTRL + ALT + DEL (reboot)
- If you appear to have no control of the keyboard ALT+ SYSRQ + R can help to regain control of it.
- ALT+ SYSRQ + R-E-I-S-U-B (forces a clean reboot even when the keyboard is not responding)
The last one is in fact a sequence of commands, so to use it, hold down ALT+SYSRQ and then press the keys R-E-I-S-U-B in sequence with a couple of seconds between each of the commands.
Installing Ubuntu on a Mac
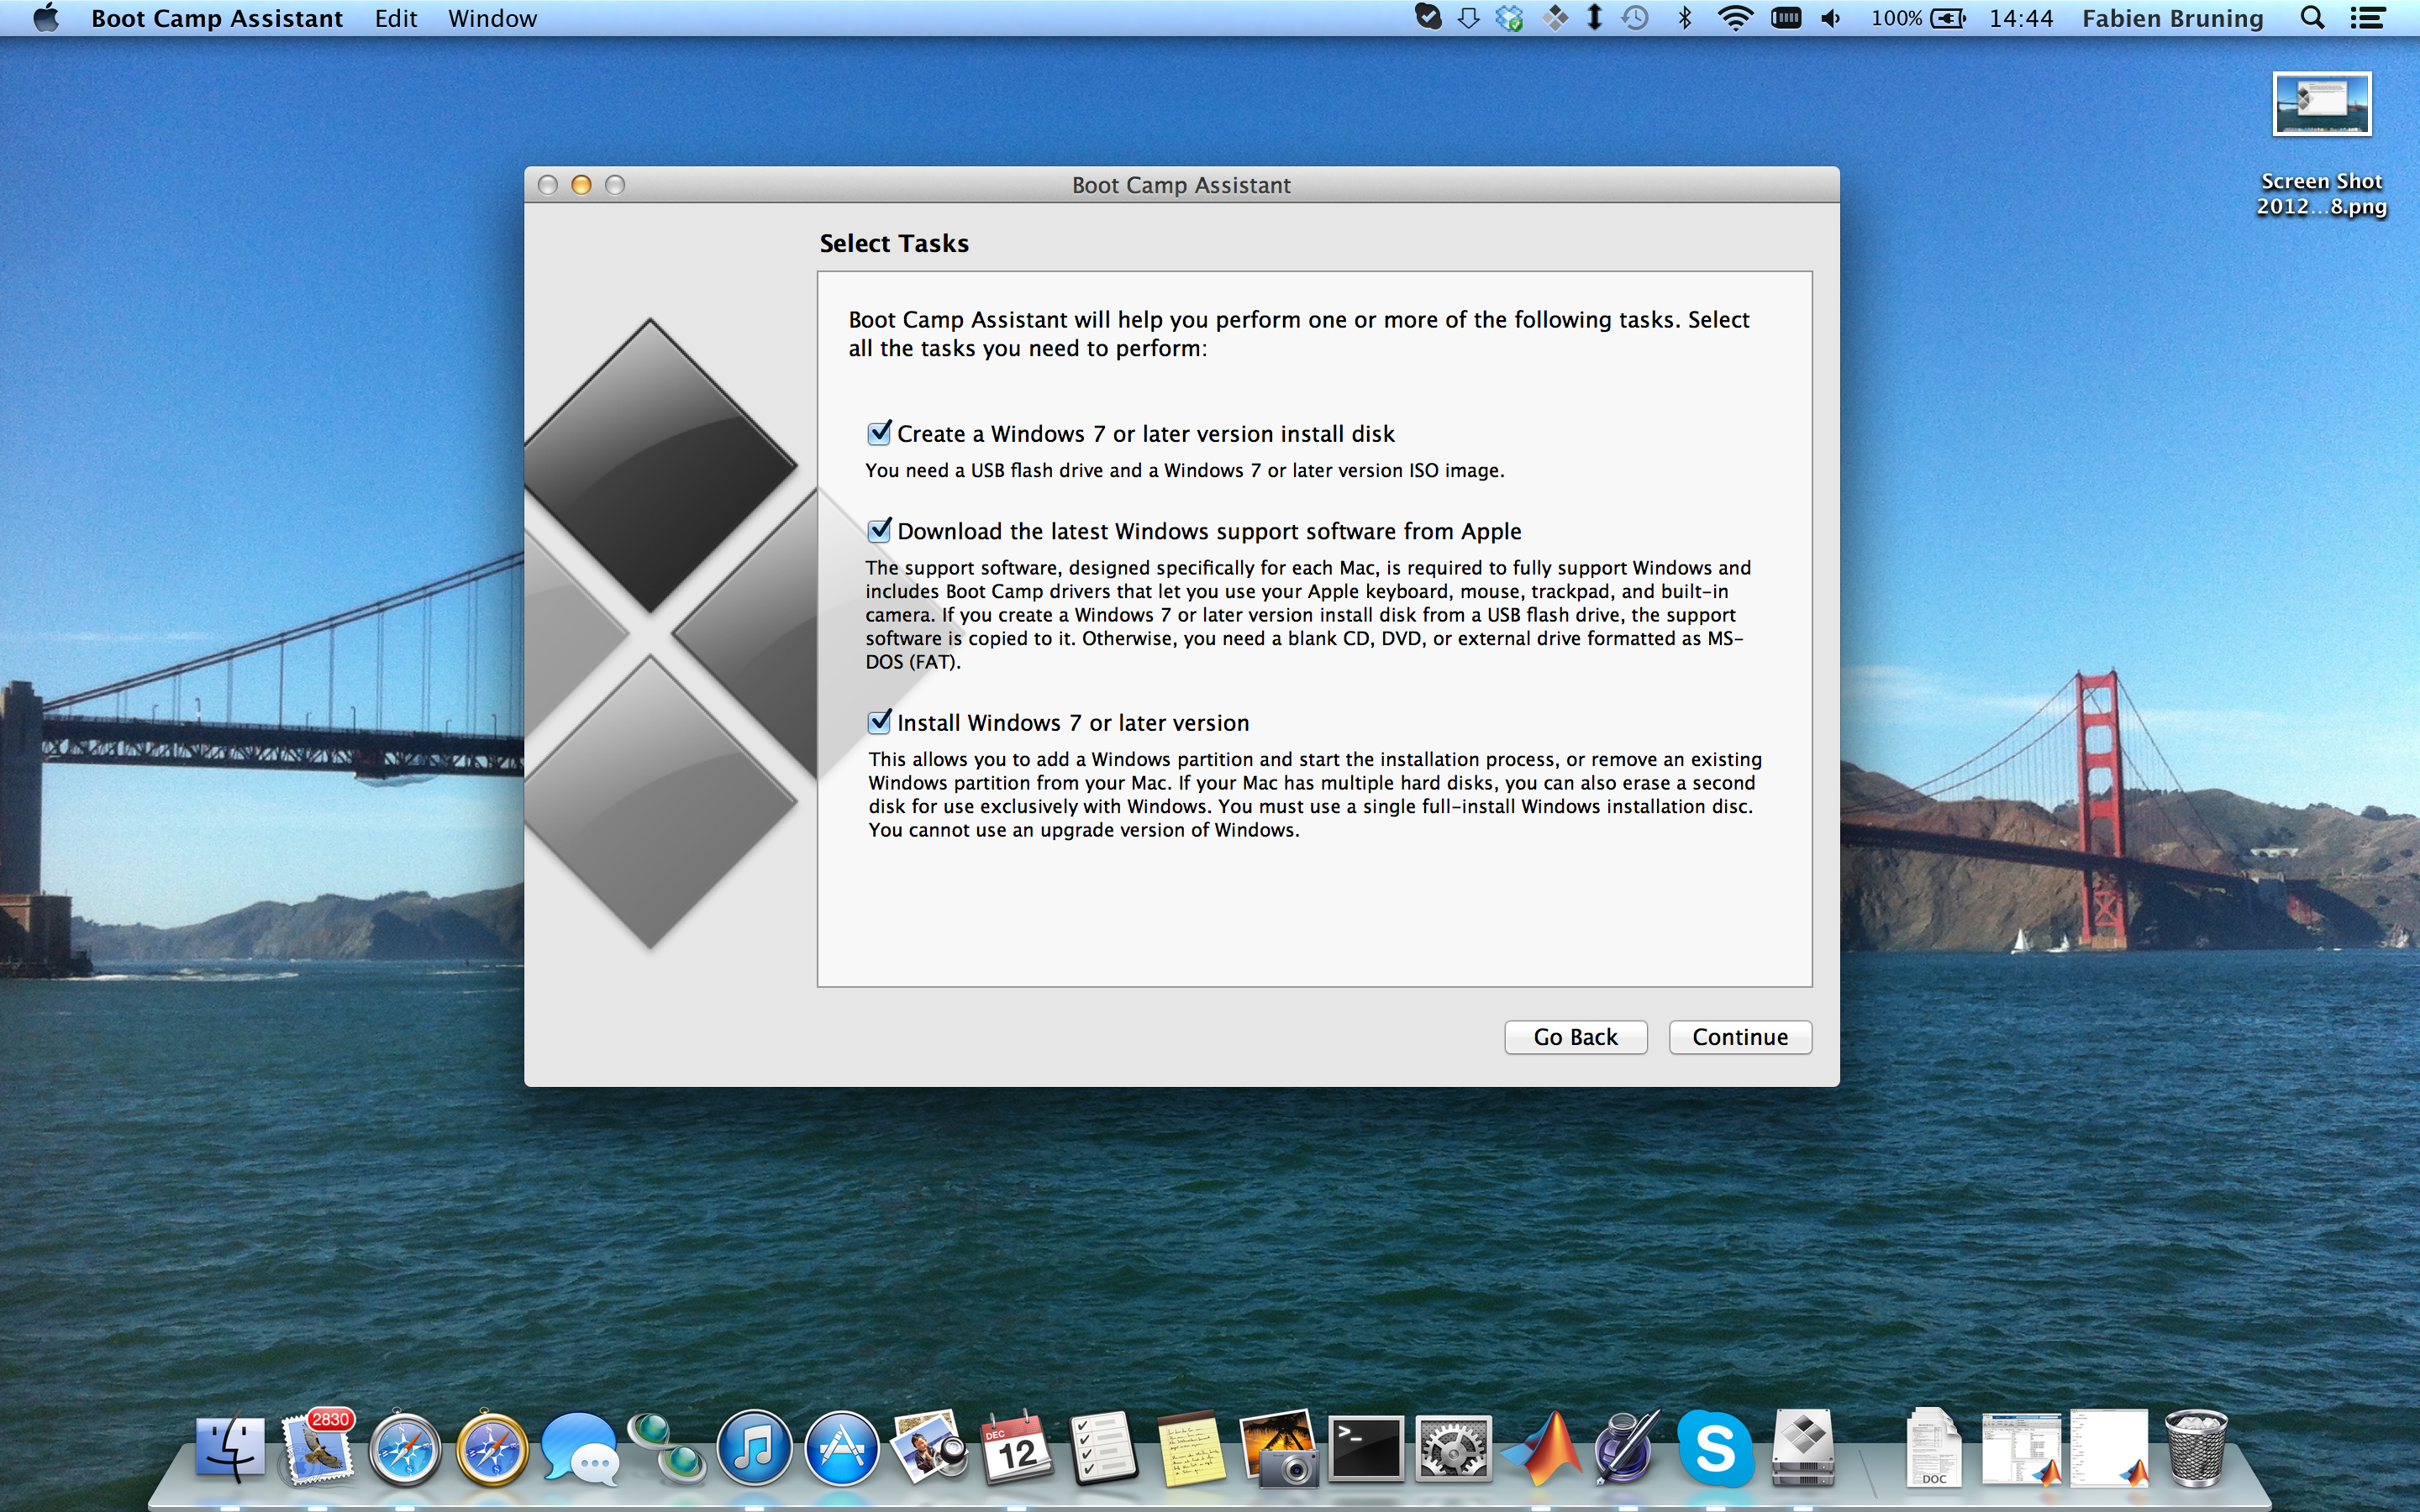
Ubuntu can be installed on a Mac in multiple ways, but the easiest way to use the Ebox image is to first install Windows, if it is not already present. You will need a Windows 7 ISO or DVD, and a usb drive of at least 4 GB. Since the Ebox installation itself is 30GB, the minimum size of your WIndows 7 installation is to be about 50GB. If you have over 4 GB of memory installed, adding twice the size of your ram to this amount will make you able to skips certain steps in Step 2.
A Microsoft Windows 7 image can be downloaded for free from Microsoft, and used up to 180 days. While not too difficult, an installation could always go wrong. Proceed at your own risk.
Step 1: Installing Windows
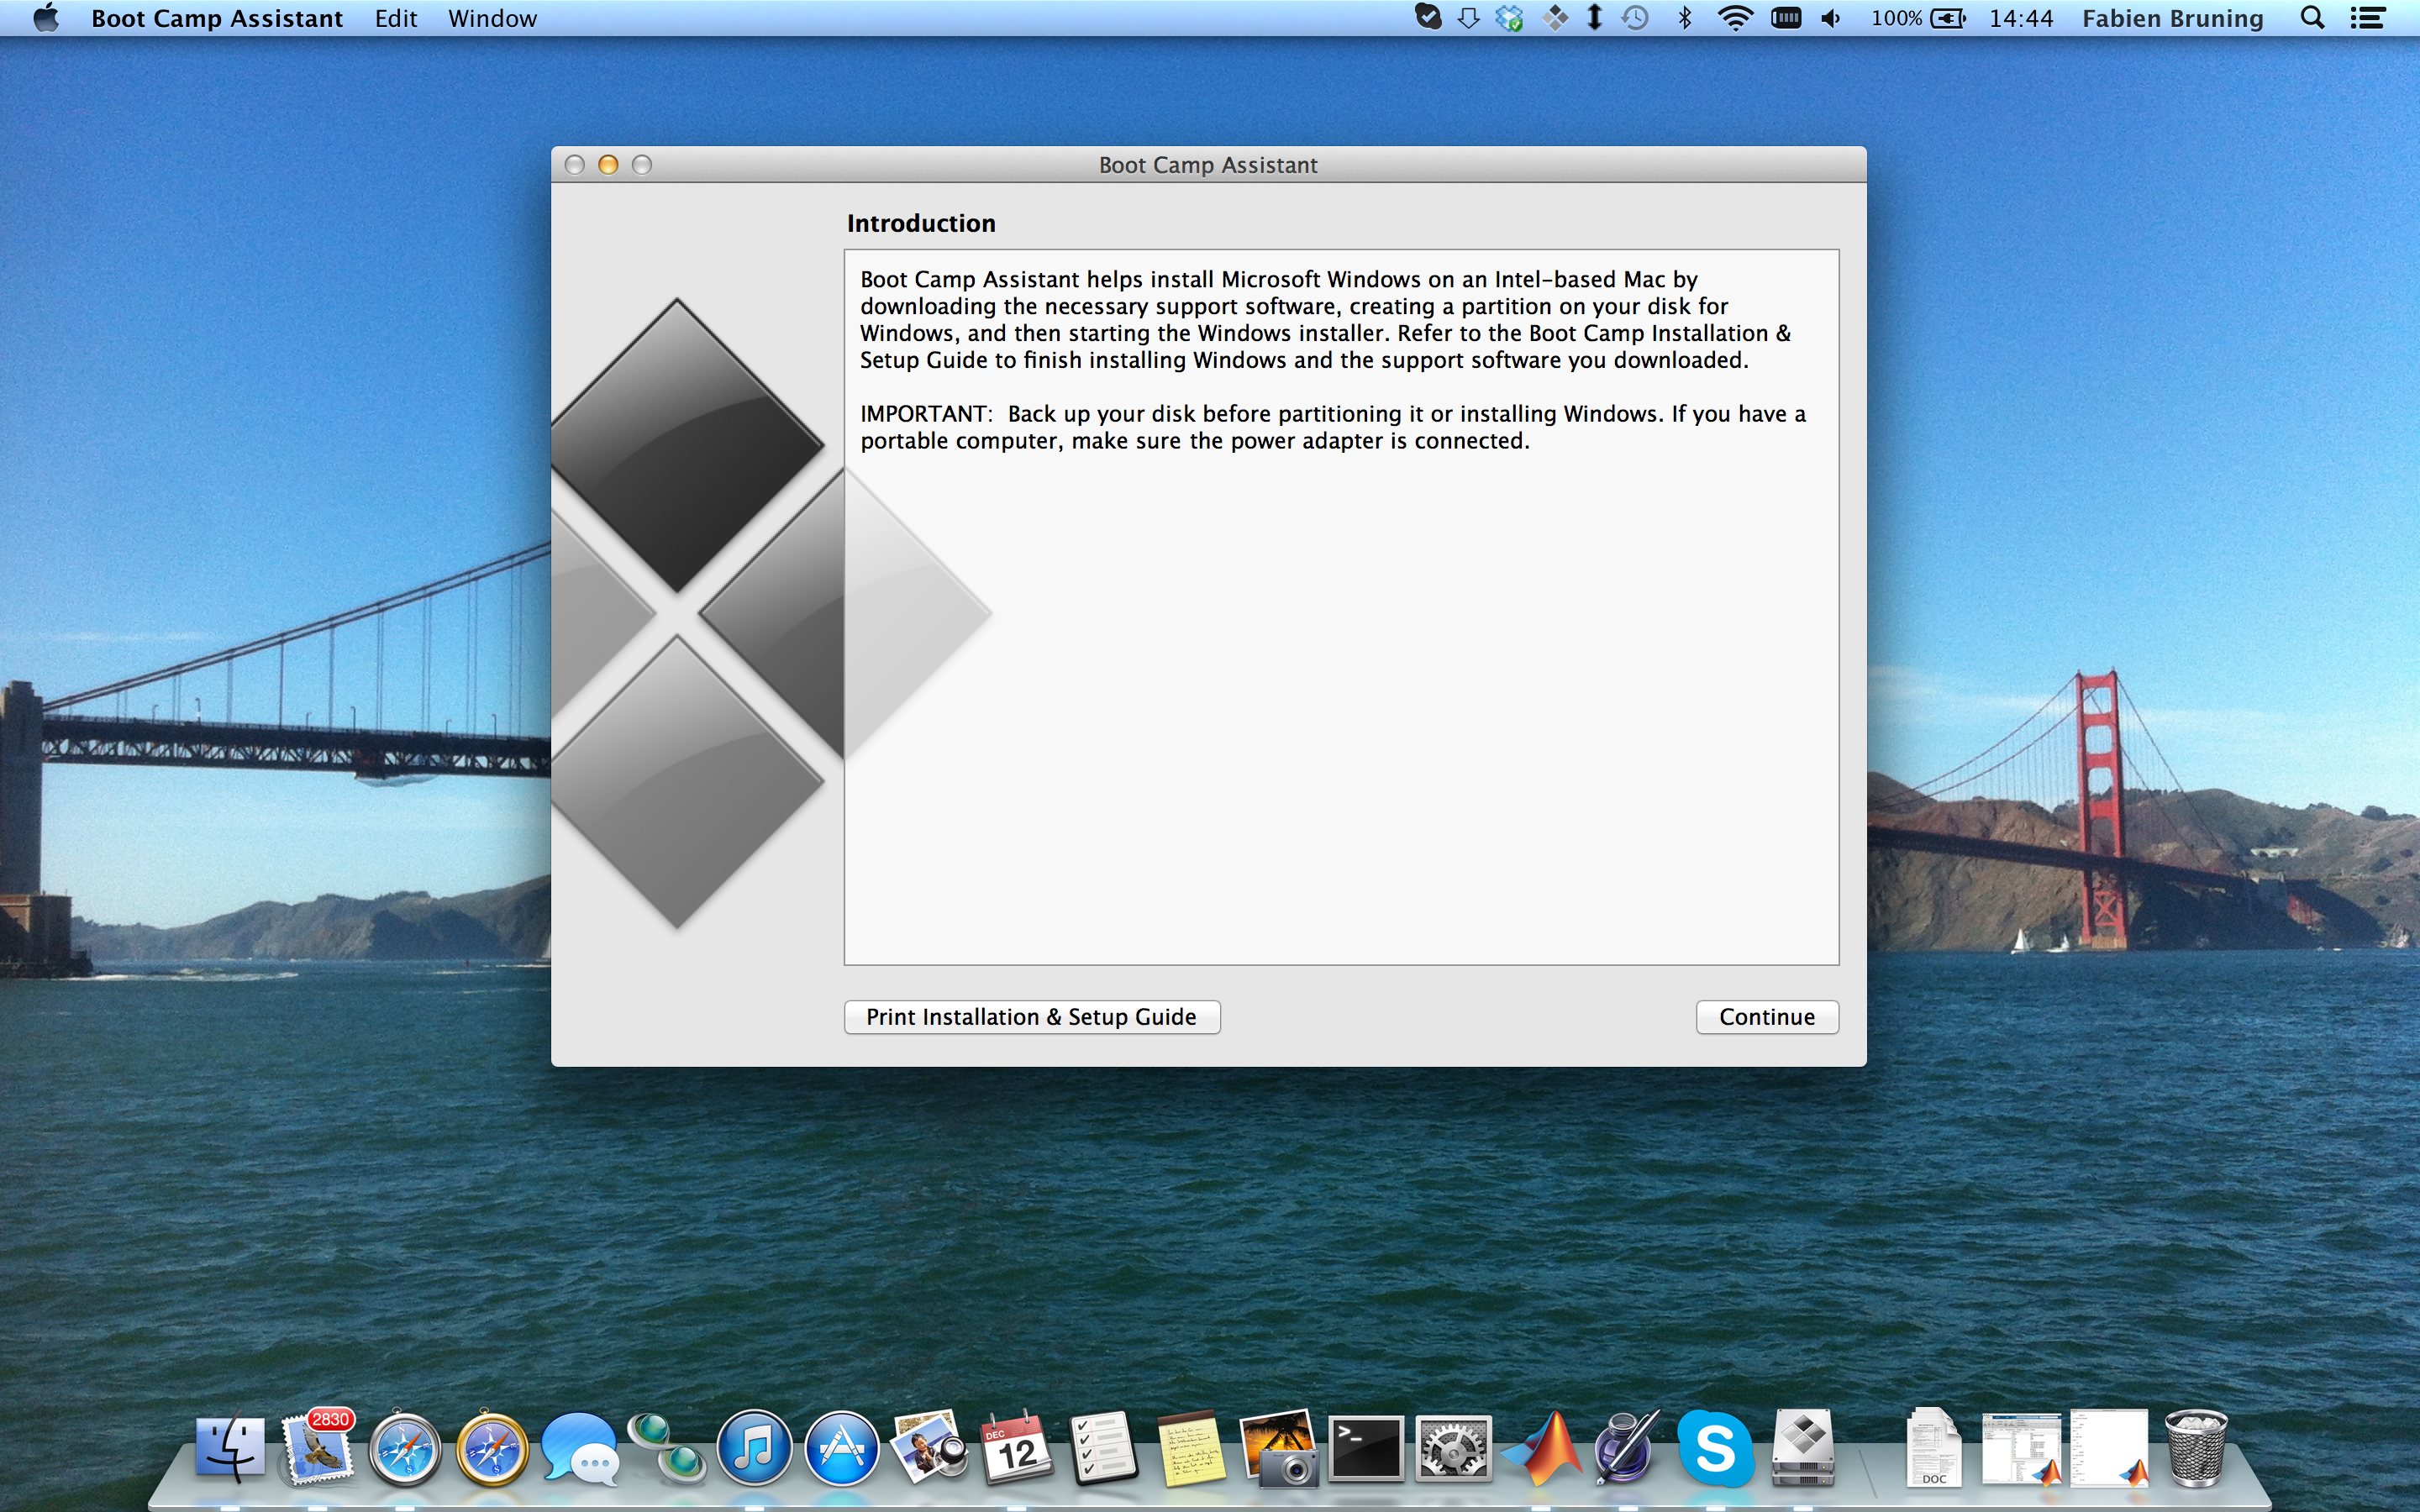
- Open the Bootcamp Assistant, found in /Applications/Utilities/.
- You will see the following screen if you own a Mac without a DVD drive. If you do own a Mac with a DVD drive, you'll first need to burn the Windows 7 image to a blank DVD. A tutorial can be found, for example, here.
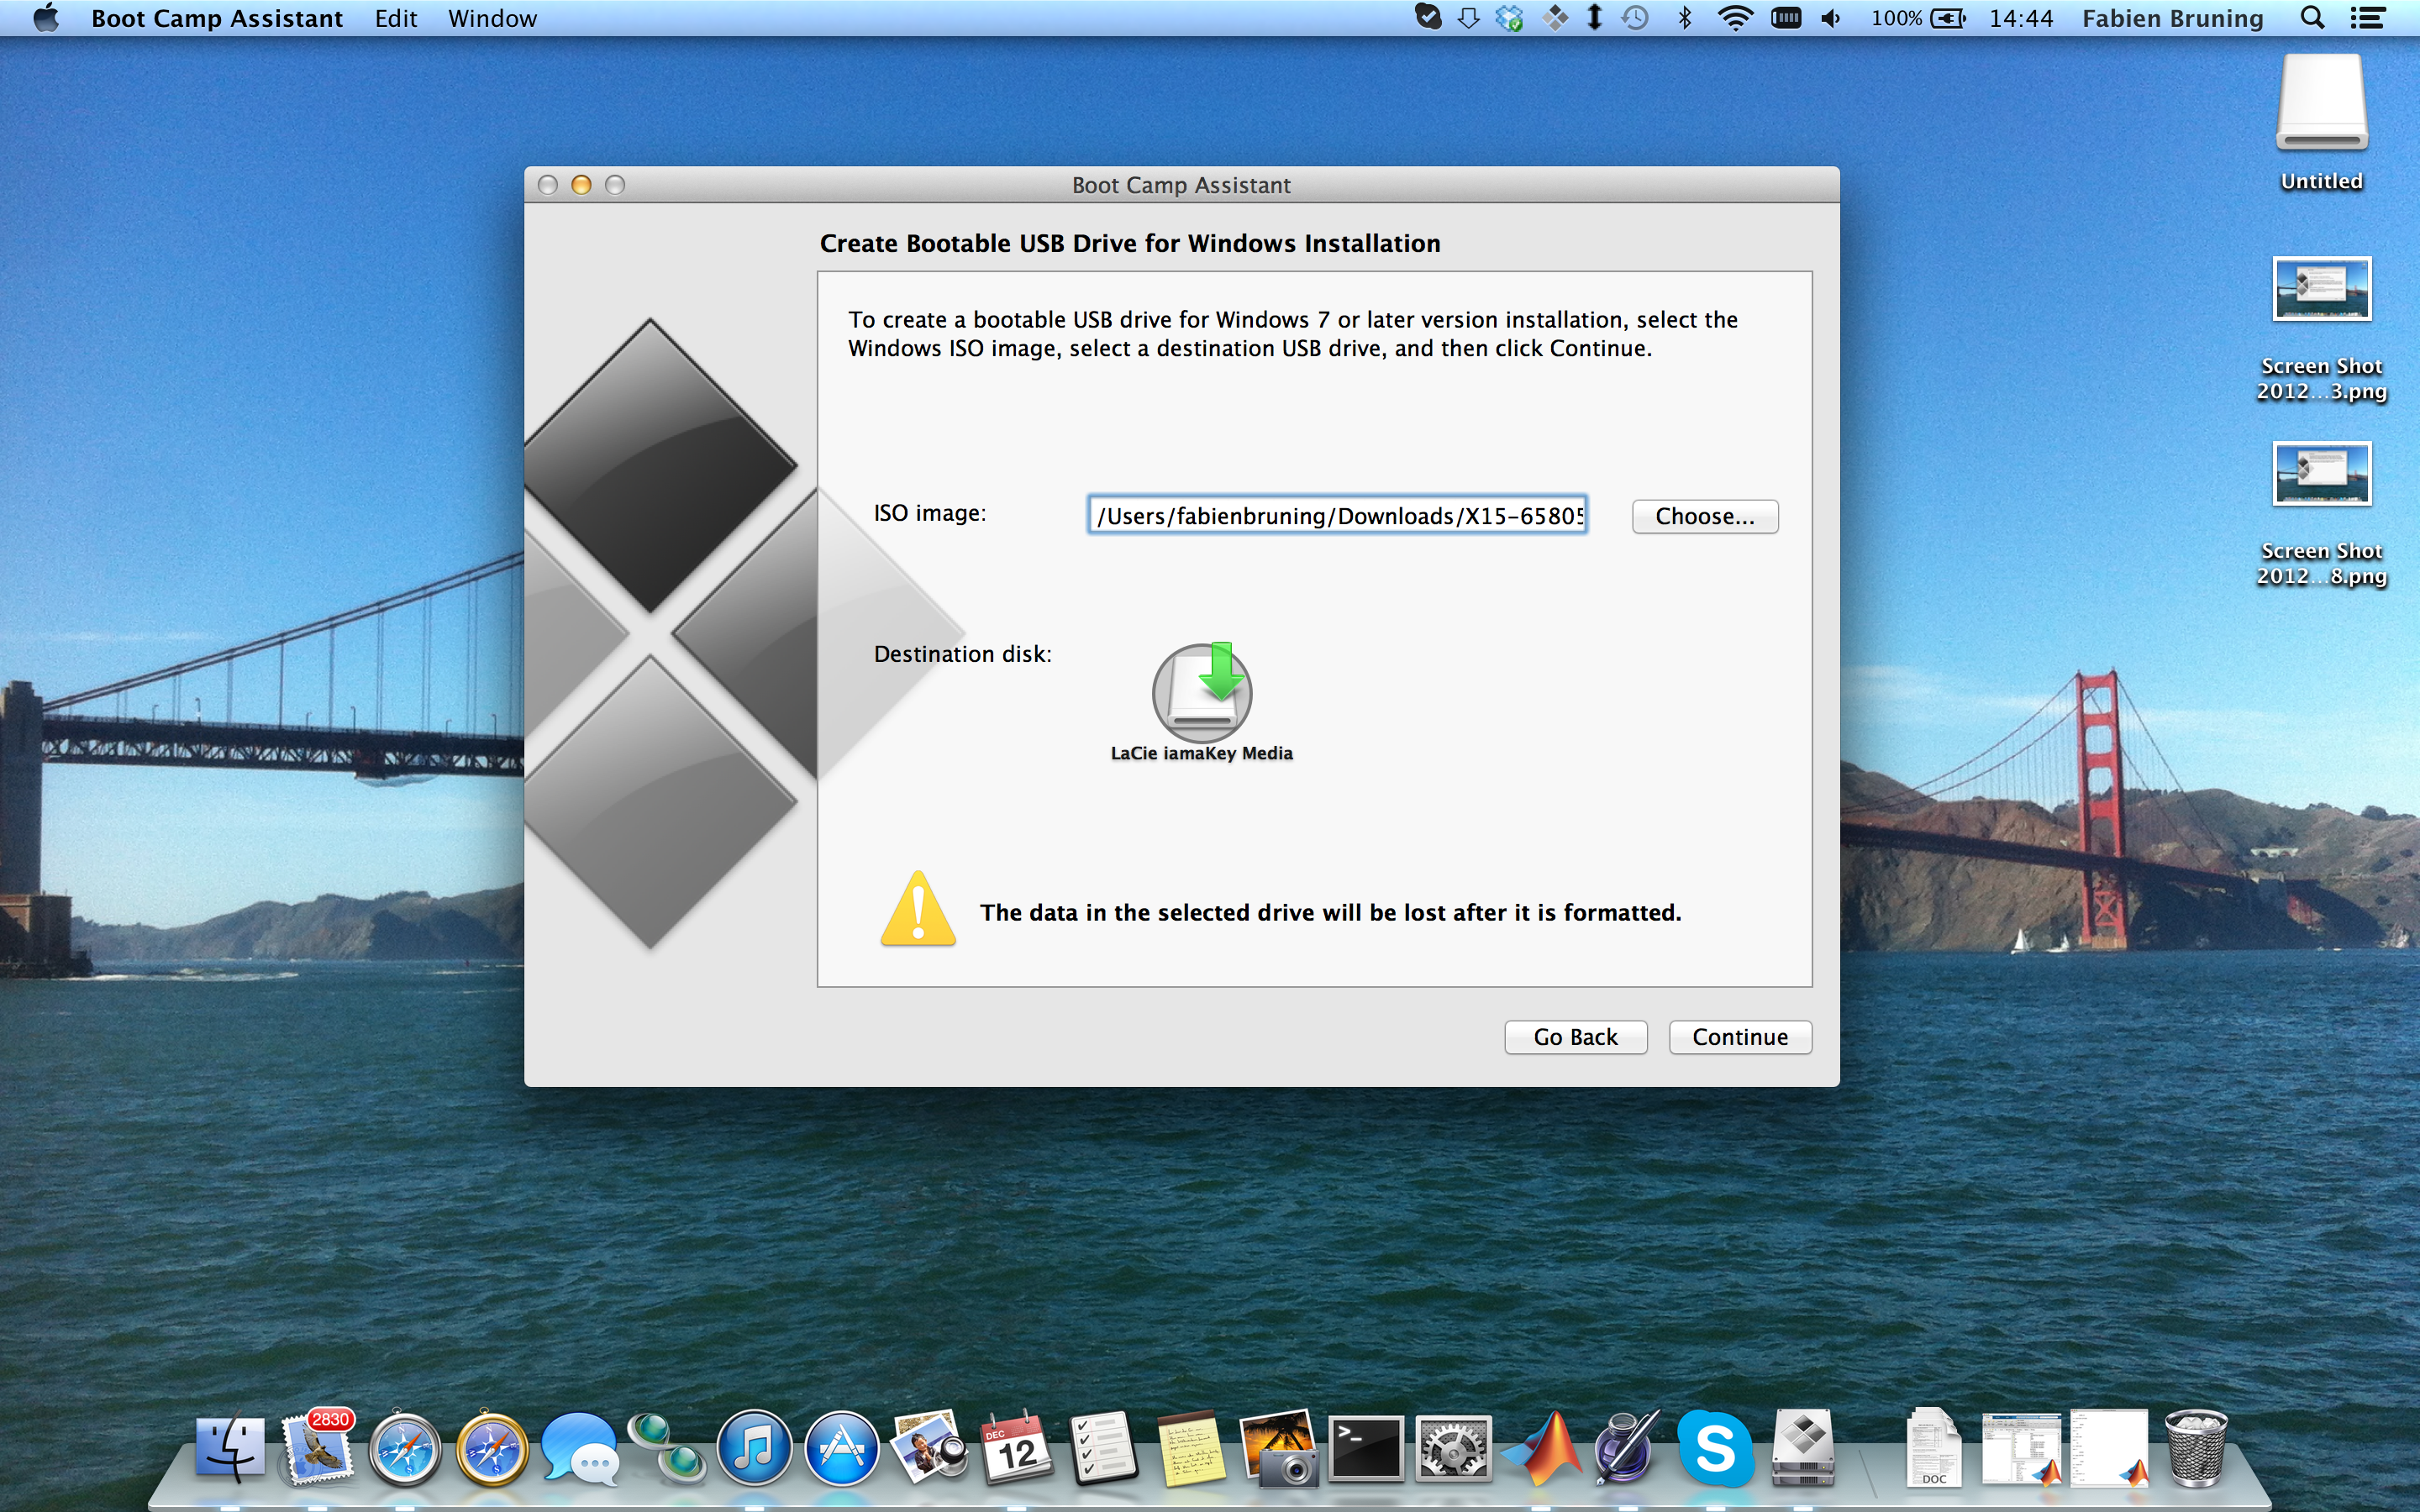
- Insert the USB stick, and click continue. You can now point the Assistant to the ISO file in the following screen. Click continue.
- When done, Bootcamp Assistant will warn you to make a backup of your Mac before you attempt to install WIndows. This is always a good precaution, but particularly due to the need to format the partition on which Windows will be installed. It is possible to select the wrong disk here, erasing all data on your Mac.
- Restart your Mac. If the Windows installation does not start automatically, hold the alt key after the grey screen you see when your Mac turns on.
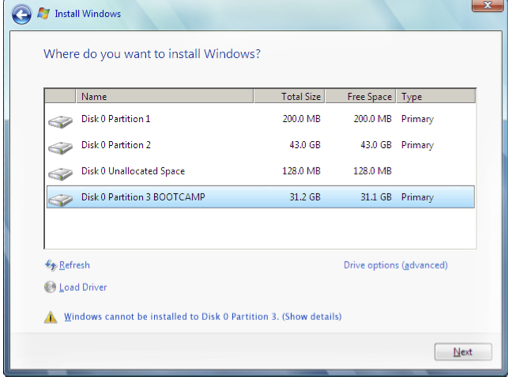
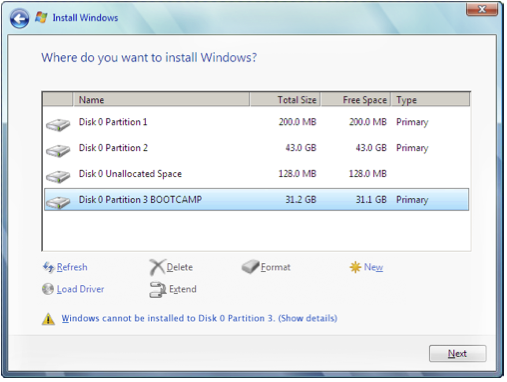
- Follow the instructions until you see the following screen.
- Make sure to select the partition marked BOOTCAMP, then hit "Drive Options (advanced)".
- In the changed screen, hit "Format".
- Proceed with the installation. Windows will restart your computer several times, and your Mac should be configured to start up to Windows automatically. If not, use the alt key option mentioned above. When WIndows is installed, find the Bootcamp tools on the USB stick and install them. This will create an icon in the Windows system tray, which can be used to make Mac the default operating system again. In order to do this, after following the rest of the steps in this tutorial, click on it and hit "Restart to Mac OS X".
Step 2: Installing Ubuntu
Follow the installation guide above to install Ubuntu, if there is not enough free space available, and your Windows disk is at least 50 GB, you can follow the following two tutorials.
- Disable your page file, which saves the size of your memory on disk.
- Disable your hibernation file, a file created when your Mac goes to sleep with Windows running. This also reduces your available filesize by the amount of memory you have, which causes considerable trouble on 16GB memory systems.
Step 3: Booting Ubuntu and installing additional drivers
If your Mac is extremely compatible with Ubuntu, you will be able to skip this step. To find out, reboot your Mac while holding the alt key, and select WIndows. You will see a screen asking you to choose either Windows or Ubuntu, now choose Ubuntu. If all goes well Ubuntu will complete it's installation and you will be greeted by a pink screen asking you to login.
When the startup sequence hangs on a Mac, the most likely reason is an incompatible video card driver, though it could be any number of reasons. In order to troubleshoot this, first try disabling the standard video card driver.
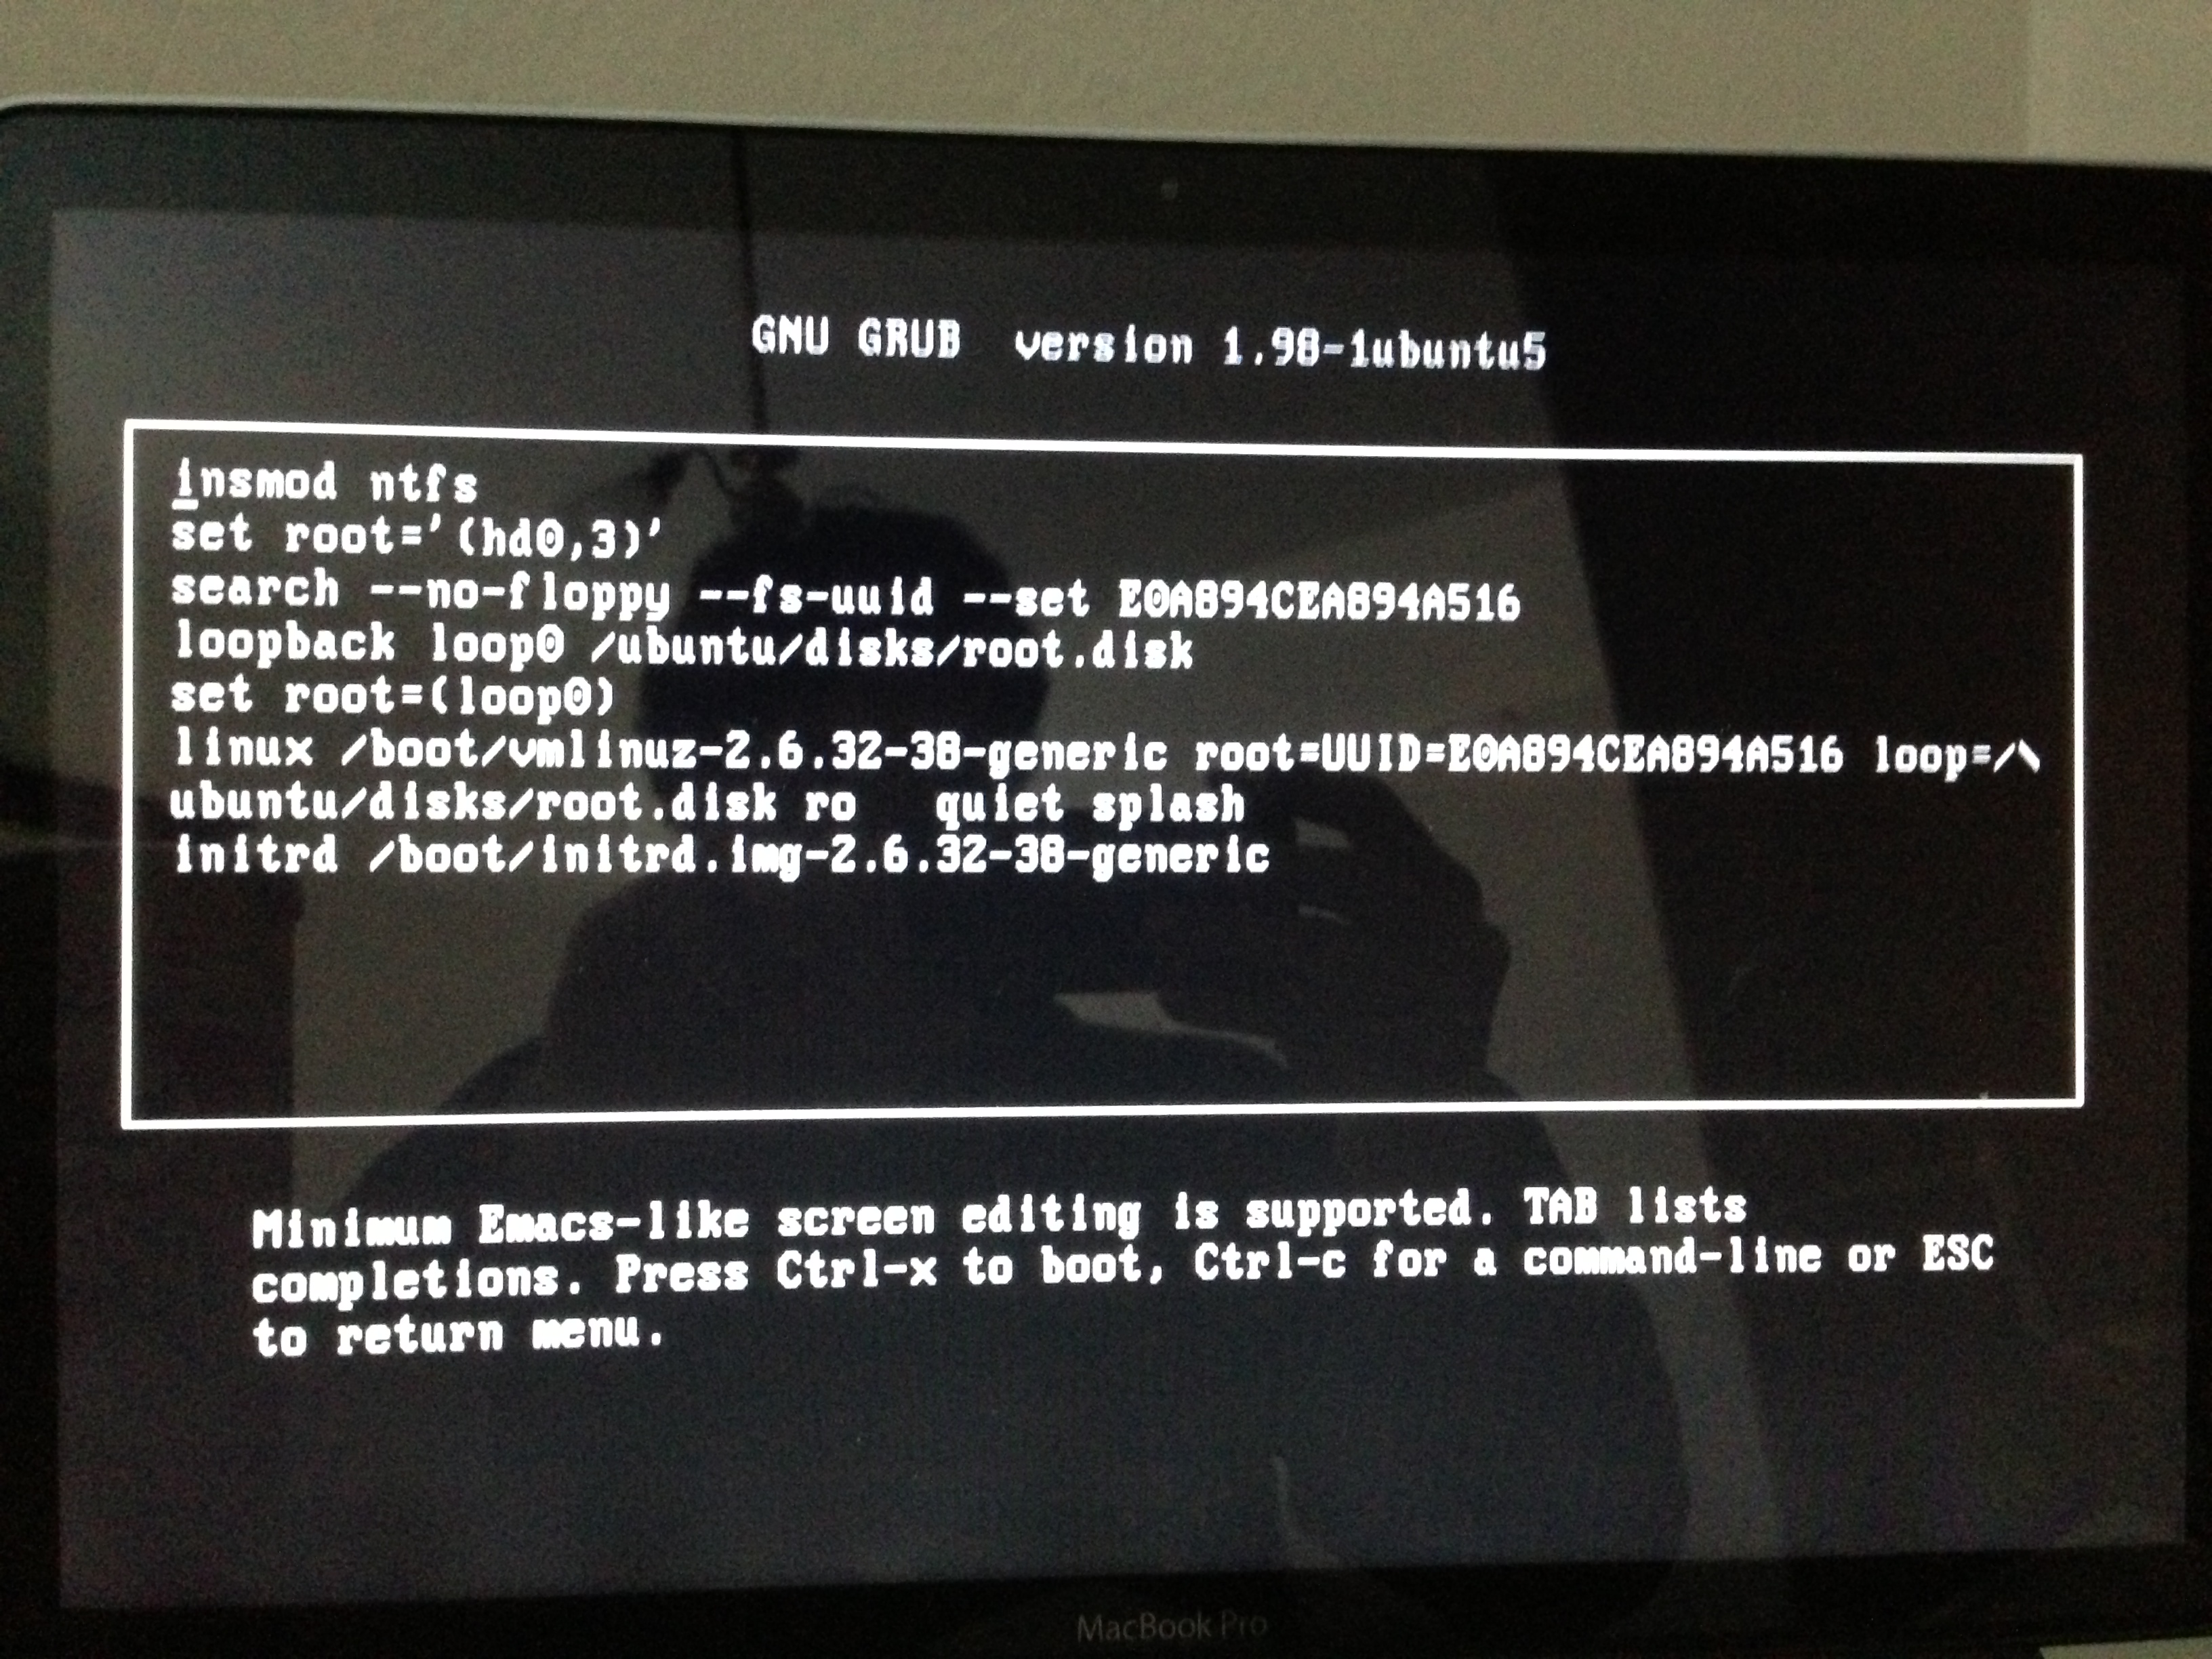
- Boot your Mac the same way again until you see a screen marked "GNU Grub version ...". Depending on how your installation went, you will see different options here including, but not limited to, several versions of Windows and Ubuntu.
- Select the top Ubuntu option (which should already be selected), and hit "e". You will see something akin to the following screen. (choice of lamp not my own)
- Find the line that says "quiet splash", and add "xforcevesa". If the line isn't present, find the end of the line before "initrd" and put it there.
- Hit "ctrl" and "x" together to boot Ubuntu. If this does not work, repeat the same steps with "acpi=off and vga=824".
Video card driver
After booting with the aforementioned commands, Ubuntu should boot with a software emulation of the graphics card. While compatible, this does not provide a responsive user interface. By installing closed source drivers, the potential of most videocards can be unlocked.
- Go to System ->Administration ->Hardware drivers. You will see a screen similar to the one below, where you can install custom drivers. Try the one at a time, so if one causes Ubuntu to not boot anymore, you will know which one is the problem.
- Choose one of the videocard drivers, preferably the most recent one, and hit install.
Wifi drivers
Most Macs come with a Broadcom wifi chip, which can also be installed via the same "Hardware Drivers" screen as the video card driver above. On some laptops this has been known to cause problems, and a different version needs to be installed via the terminal. An example is given below for the Broadcom BCM43 chip, which can be found for example on the 2008 Unibody and 2012 Retina Macbook Pro's.
- Open the Terminal (Applications -> Accessories -> Terminal).
- Copy paste "sudo apt-get install b43-fwcutter" into the prompt.
- Hit yes on all following prompts.
If this does not work, you may need to try and find additional commands on the internet. Different chips need different solutions, or yours may just work out of the box. In any case, wired ethernet usually works by default.
