Embedded Motion Control 2013: Difference between revisions
Jlunenburg (talk | contribs) No edit summary |
Jlunenburg (talk | contribs) No edit summary |
||
| Line 92: | Line 92: | ||
= FAQ = | = FAQ = | ||
[[Embedded_Motion_Control_2013/FAQ | Here]] you can find a collection of Frequently Asked Questions. Please check this page before contacting the tutors! If you find any issues or questions you had to deal with, please add them as well so your colleagues don't run into the same problems. | |||
Revision as of 11:55, 2 September 2013
Guide towards the assignment
'A-MAZE-ING JAZZ'

Introduction
This course is about software design and how to apply this in the context of autonomous robots. The accompanying assignment is about applying this knowledge to a real-life robotics task in which ROS will be the standard software framework.
Course Schedule
Lectures will be given on Mondays from 10.45 - 12.30 in Gemini-Zuid 3A12. The course schedule is as follows:
| September, 4th | Introduction | Assignment and basic computer setup |
| September, 11th | Localization | C++ and ROS Concepts |
| September, 18th | Navigation | Software design |
| September 25th | Corridor competition | |
| October, 2nd | Separation of Concerns: the 5 C's | |
| October 9th | State estimation | Whole-body motion planning and control |
| October 16th | Intelligent agents | |
| October 23th | Final competition |
Pico test schedule, maze
In order to test your software on the Pico robot, each group has one one hour time slot a week available, on either Wednesday or Thursday. You can reserve your test slot in the table below. Make sure to keep at least one hour in between you slot and the previous and next ones, since Pico needs some time to recharge in between the time slots!
| Date | Time | Group |
| Wednesday June, 13th | 09:00 - 10:00 | Group 9 |
Slides
The slides of the various lectures will be available a.s.a.p.
Goal
The goal of the assignment is to get the real-time concepts in embedded software design operational.
The concrete task that has to be solved is to let the PICO robot find his way out of a maze. The final demonstration by each participating group of 4-5 students will be performed during a contest, the winner of which is the group that exits the maze in the shortest amount of time. To prepare for this competition the following guidelines have to be considered:
- to test with PICO and to prepare for the final contest, a simulator will be made available that mimics the in and outputs to the real robot. Specifics of this simulator will be presented in the first lecture on September 4th
- the maze of the final competition will be constructed just before the competition. The maze presented in the simulator is therefore different from the real one used in the final contest.
- both on the real and simulated PICO robot, three sources of sensor information will be available to perceive the environment and to derive the state of the robot:
- laserdata provided by the forward pointing laser scanner,
- images captured by the monocular camera,
- odometry provided by the base controller
- the robot can be actuated by sending information to the base controller
- during the final contest, it is highly imperative that the PICO robot refrains from colliding with the walls in the maze. Colliding with the walls will result in severe time-penalties.
- the walls of the maze will contain several types of pointers to the exit, which can potentially help PICO to speed up execution of the task Click here for a pdf file containing the arrow we will use. We also captured PICO's camera topics in a bag file while the robot was looking at the arrow. You can play this bag file as follows:
rosbag play 2013-10-08-15-35-04.bag
The topics /pico/camera and /pico/camera_info should then become available. For example, while playing the bag file, userosrun image_view image_view image:=/pico/camera
to view the camera images.
Corridor Competition
An intermediate review will be held on May 16th, during the corridor competition. During this challenge the students have to let the robot drive through a corridor and then take the first exit. The precise location of this exit will not be given in advance. Some facts:
During the final contest, the groups are expected to give a short (5 minute) presentation about their progress and design decisions. During the corridor competition no presentation is expected.
Hardware
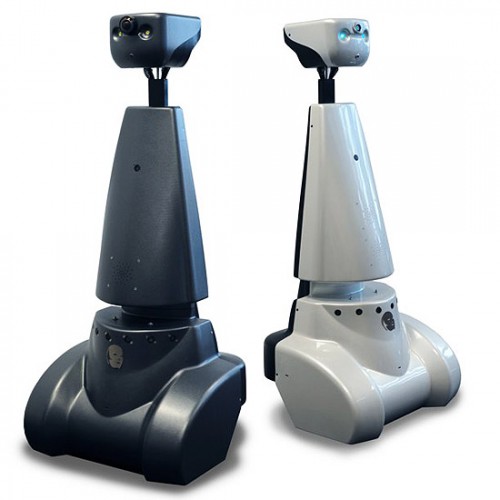
The moving Jazz robot with monocular camera and laser range finder with a working ROS interface. In addition, we provide a Jazz simulator for offline testing.
Installation
This manual describes how to the install the necessary and sufficient software to start programming the Jazz robot.
Simulator
Installation
If you followed all steps specified on the installation page , you will already have downloaded the simulator Gazebo and our specific Jazz simulator. To be able to use the Jazz simulator, you first have to compile the downloaded ROS packages:
- Open a terminal (ctrl-alt-t)
- Make sure rosdep is initialized and up to date:
sudo rosdep init
rosdep update
- Build and compile the jazz simulator and other necessary packages:
rosmake jazz_gazebo gazebo_map_spawner
Furthermore, Gazebo needs to know where to find the robot description (located in jazz_description) which includes its meshes, textures, kinematic chain, etc, and where to find the plugins for the controllers and sensors. This information can be set in the environment variables GAZEBO_PLUGIN_PATH and GAZEBO_MODEL_PATH:
- Open a terminal (ctrl-alt-t)
- Open .bashrc:
gedit ~/.bashrc
- Add the following lines:
export GAZEBO_PLUGIN_PATH=~/ros/emc/general/jazz_gazebo/lib:~/ros/emc/general/tue_gazebo_plugins/lib:$GAZEBO_PLUGIN_PATH
export GAZEBO_MODEL_PATH=~/ros/emc/general/jazz_description:$GAZEBO_MODEL_PATH
- and source your .bashrc:
source ~/.bashrc
or start a new terminal.
Starting the Simulator
- Start Gazebo:
gazebo
- Start another terminal and spawn the maze:
rosrun gazebo_map_spawner spawn_maze
- Spawn PICO:
roslaunch pico_gazebo pico.launch
Notice that the Jazz robot is spawned in the Gazebo world. The Gazebo GUI shows how the world actually is. We can also visualize how the robot perceives it through its sensors, by using the ROS tool Rviz. You can start RViz with a pre-defined config showing most of Jazz' sensors using:
rosrun jazz_visualization rviz
In fact, this simply runs the following command:
rosrun rviz rviz -d ~/ros/general/jazz_visualization/rviz/jazz.vcg
If you are running the Gazebo simulation, you will see the Jazz robot model and white dots which represent the sensor data originating from the (simulated) laser range finder. RViz allows you to visualize many more things. For example, to show the data from the camera:
- Click on the Add button in the lower left
- Select Camera and click OK. A Camera item will pop up in the Displays view on the left.
- Click in the field right next to Image Topic and click the ... button. Now you can select the camera topic (/pico/camera/image)
You will see the camera images visualized in the lower left of your screen.
Examples
Here are some examples on how to use the simulator and how to practice the corridor competition in simulation.
Jazz Driving Example
- Have a look at the file jazz_node.cpp in the src folder of the jazz_example package. You should be able to understand what the program will do.
- Build the package:
rosmake jazz_example
- Run the node (make sure the simulator is still running):
rosrun jazz_example jazz_node
Check the result in both Gazebo and RViz. - Feel free to use this example as a start for your project
Jazz Safe Driving Example
- First of all, make sure you have the latest version of the jazz_example package:
roscd jazz_example
svn up
- Take some time to have a good look at the file safe_drive.cpp in the src folder of the jazz_example package. It contains a quite elaborate explanation of what is going on in the code, which will hopefully clarify quite some things.
- Build the package:
rosmake jazz_example
- Run the node (make sure the simulator is still running):
rosrun jazz_example safe_drive
Check the result in both Gazebo and RViz. - Feel free to use this example as a start for your project
Troubleshoot
Gazebo does not stop gracefully upon exit or interrupt (ctrl-c)
You may get the warning:
Warning [gazebo_main.cc:59] escalating to SIGKILL on server
when stopping Gazebo. This is a known bug and has no consequences, other than that it takes a bit longer to kill Gazebo.
Getting Started
To get started, please do the following tutorials:
- C++ tutorial
- ROS tutorial Note that you have already installed and configured your ROS environment, so you can skip the first tutorial. It is advised to work in your group folder, i.e., ~/ros/group_?.
- Getting started with the Jazz simulator
- Using Jazz
FAQ
Here you can find a collection of Frequently Asked Questions. Please check this page before contacting the tutors! If you find any issues or questions you had to deal with, please add them as well so your colleagues don't run into the same problems.
