Mobile Robot Control 2024 HAL-9000: Difference between revisions
No edit summary |
|||
| Line 236: | Line 236: | ||
These videos are tests of the vector field histogram implementation in the different maps provided. It seems to behave properly, but there are still some minor bugs to be solved. | These videos are tests of the vector field histogram implementation in the different maps provided. It seems to behave properly, but there are still some minor bugs to be solved. | ||
The following link (https://youtu.be/ | The following link (https://youtu.be/VTsmuJFkQ40) shows the video on the simulation of the local navigation, as well as some real life testing. The previous explained bug happens at map 3. It shows that the robot starts shacking between two steering actions. Note that this not always happers, as in an example shown in the top videos with the additional printed map. It is very sensitive to starting positions and active fields. This is hopefully solved when the global navigation is used. In map 4, this bug does not occur. This is due to the fact that there is an extra box, which disables the option to choose between two angles. The real testing shows that the robot can navigate around a corner with some obstacles. | ||
====Answers to Questions Vector Field Histogram==== | ====Answers to Questions Vector Field Histogram==== | ||
Revision as of 16:23, 6 June 2024
Group members:
| Name | student ID |
|---|---|
| Salim Achaoui | 1502670 |
| Luis Ponce Pacheco | 2109417 |
| Nienke van Hemmen | 1459570 |
| Aniek Wigman | 1463535 |
| Max Hage | 1246704 |
| Max van der Donk | 1241769 |
Exercise 1: Non-crashing robot
For the first exercise, the goal was to ensure that the robot does not move through walls in the simulation and not crash into the walls in both the simulation and the real world. To solve this matter, there were multiple solutions. The first solution collects all of the data from the lasers and stops the robot when it reaches a wall. A second solution also uses this notion but instead of stopping the robot, the robot turns away from the wall. These solutions were then tested on the robot in real life. After testing, it became clear that, although stopping the robot was not an issue, the robot was not able to move along a wall in parallel. This issue occurred since the sensor data was taken uniformly. So on all sides, the robot would stop with the same threshold. Therefore, a third solution was made that took the orientation of the sensor data into account for the robot to move alongside a wall. The details of the solutions will now be covered in more detail.


Solution 1 (Group)
For the first solution, we utilize the laser data that the robot has. This contains data as to how far a wall or object is to the robot at a certain angle. For each angle, we check whether the robot is too close to an obstacle, thus within range x. If it is, it stops moving. Else, it keeps on going forward.
Solution 2 (Salim)
For the second solution, the first solution was expanded. Instead of just stopping, the robot now rotates until no obstacle is close to the robot anymore, and it moves forward again.
Solution 3 (Group)
This solution is also an expansion of solution 1. In this expansion, the size of the robot is taken into account aswell. This solution was created after testing the robot physically. We came to the realisation that the size of the robot is not taken into account. Therefore, in the script an offset was included such that the body of the robot does not bump into the wall. using the line: scan.ranges[i] < minDist + robotWidth*abs(sin(currentAngle) we introduce an offset by adding the sinusoid of the current angle, which is approximately the circular body of the robot. Because the laser of the robot is approximately in the middle of its body, the sinusoid creates a proper offset to not bump into a wall anymore.
Questions:
- Compare the different methods to one another. What situations do these methods handle well? Is there one "Best" method?
- The best method was by far the 3rd solution. Once tested in real life you can see the caveats you can fall into when just using the simulation software. Therefore, by adding an accounting mechanism for the robots size, gives the best outcome. The best method is definitely the 3rd solution. However, there might even be improvements to it, yet since just stopping is so simple this is the best.
- On the robot-laptop open rviz. Observe the laser data. How much noise is there on the laser? What objects can be seen by the laser? Which objects cannot? How do your own legs look like to the robot.
- The amount of noise in the laser data, visually assessed, is present. In the gif below it can be seen, where the red lines, the laser data of the robot, are flashing. This means that it is changing each iteration, meaning there is noise in the data. However, the overall location of the laser data is accurate. The objects that can be seen by the laser are the walls, but also the doors. So solid, non transparent objects can be detected by the laser. There also is a blind spot behind the robot, where it cannot see anything. On top of that, transparent objects are harder for the robot to detect due to the laser going through the object. For the robot, your own legs are poles. Due to your feet being under the laser, they are not detected and thus can drive into your feet.
Video 2: Overview of the laser data's range and noise levels. The flashing of the red lines (laser data) shows noise in the sensors.
- The amount of noise in the laser data, visually assessed, is present. In the gif below it can be seen, where the red lines, the laser data of the robot, are flashing. This means that it is changing each iteration, meaning there is noise in the data. However, the overall location of the laser data is accurate. The objects that can be seen by the laser are the walls, but also the doors. So solid, non transparent objects can be detected by the laser. There also is a blind spot behind the robot, where it cannot see anything. On top of that, transparent objects are harder for the robot to detect due to the laser going through the object. For the robot, your own legs are poles. Due to your feet being under the laser, they are not detected and thus can drive into your feet.
- Take your example of don't crash and test it on the robot. Does it work like in simulation? Why? Why not? (choose the most promising version of don't crash that you have.)
- When testing dont crash, we came to know that the physical robot size is not taken into account in the simulation. In the simulation, the robot did stop as soon as it came close to a wall, but the physical does not always do this. It crashed into the walls as soon as it was not directly in front of the laser, due to the circular shape of the robot that is not taken into account. When editing the software (solution 3), it did not crash into the walls anymore.
- If necessary make changes to your code and test again. What changes did you have to make? Why? Was this something you could have found in simulation?
- We changed the code to incorporate the size of the robot using
robotWidth*abs(sin(currentAngle)and adding it to the minimal distance to the robot in solution 3. This adds a circle of the robots laser data such that the distances were approximately correct from the robots body.
- We changed the code to incorporate the size of the robot using
- Take a video of the working robot and post it on your wiki.
- see video 1.

For local navigation, 2 different solutions had to be introduced for the restaurant scenario. We have chosen for artificial potential fields and vector field histograms because these solutions seemed the most robust to us. In this paragraph the 2 solutions will be explained.
Artificial potential fields
Artificial potential fields are self-explanatory: they portray the potential fields around an object. A field can either be repulsive or attractive. The reason for being artificial is because these fields do not exist in the real world. In the real world, an object does not push the robot away or pull the robot towards it. In a simulation, however, artificial potential fields can be drawn such that a robot avoids certain objects and gravitates toward others. In this particular case, the robot is drawn towards the goal and repulsed by obstacles that are in its way. The distance between the robot and the goal or obstacle dictates the strength of the field around it. When an obstacle is close, for example, the repulsion force should be higher than the attraction force and high enough to repulse the robot away from the obstacle. This dependency on distance can be seen in the formulas for the two fields. For the implementation, the following source was used: [1]
The artificial attraction potential is dependent on an attraction constant and the distance between the robot and the goal.
[math]\displaystyle{ U_{\text{att}}(x) = \frac{1}{2} k_{\text{attr}} \rho^2 (X, X_g) }[/math]
With the following:
- [math]\displaystyle{ K }[/math]: positive scaling factor.
- [math]\displaystyle{ X }[/math]: position of the robot.
- [math]\displaystyle{ X_g }[/math]: goal of the robot.
- [math]\displaystyle{ \rho(X, X_g) = \| X_g - X \| }[/math]: distance from robot to goal.
This is used in superposition with the repulsion field created with the following formulas:
The repulsive potential field is described by:
[math]\displaystyle{ U_{\text{rep}}(X) = \begin{cases} \frac{1}{2} \eta \left( \frac{1}{\rho(X, X_0)} - \frac{1}{\rho_0} \right)^2 & \text{if } \rho(X, X_0) \leq \rho_0 \\ 0 & \text{if } \rho(X, X_0) \gt \rho_0 \end{cases} }[/math]
- [math]\displaystyle{ \eta \gt 0 }[/math]: positive scaling factor.
- [math]\displaystyle{ \rho(X, X_0) }[/math]: the minimum distance (robot and obstacles).
- [math]\displaystyle{ \rho_0 }[/math]: distance influence imposed by obstacles; its value depends on the condition of the obstacle and the goal point of the robot, and is usually less than half the distances between the obstacles or shortest length from the destination to the obstacles.
Using these formulas, the following artificial potential fields were created for all maps.

From this figure, the weakness of the artificial potential method becomes apparent: the 'local minimum' problem. This causes the robot to get stuck in places were the minimum potential does not result in a path towards the goal. There are methods to try and deal with them, but this is a fundamental problem with the technique.
For the implementation, not [math]\displaystyle{ U }[/math] is used but [math]\displaystyle{ F }[/math] to drive the robot into the direction of the potential: The attractive potential field function is described by:
[math]\displaystyle{ F_{\text{att}} = - \nabla [U_{\text{att}}(X)] = - k \rho (X, X_g) }[/math]
The repulsive force field is described by:
[math]\displaystyle{ F_{\text{rep}} = \nabla [U_{\text{rep}}(X)] }[/math]
[math]\displaystyle{ F_{\text{rep}}(X) = \begin{cases} \eta \left( \frac{1}{\rho(X, X_0)} - \frac{1}{\rho_0} \right) \frac{1}{\rho^2(X, X_0)} \hat{\rho}(X, X_0) & \text{if } \rho(X, X_0) \leq \rho_0 \\ 0 & \text{if } \rho(X, X_0) \gt \rho_0 \end{cases} }[/math]
The added problem is that the robot cannot drive in any direction at any time. Therefore we have programmed it such that it rotates towards the direction before driving it with the force amplitude calculated.
In the figures bellow it can be seen how the artificial potential field method performed on the given maps.
 |
 |
 |
 |
Answers to Questions Artificial Potential Field
- What are the advantages and disadvantages of your solutions?
Advantages:
- Simplicity in implementation and understanding.
- Effective for basic obstacle avoidance and goal seeking.
Disadvantages:
- Susceptible to local minima, where the robot can get stuck.
- Not effective in highly dynamic or complex environments.
- What are possible scenarios which can result in failures (crashes, movements in the wrong direction, ...) for each implementation?
- For example, set the target position in an obstacle and let the robot try to get to the target; what happens? The robot may get stuck or oscillate around the obstacle.
- Another example: Narrow passages can cause the robot to get stuck due to strong repulsive forces from both sides.
- How would you prevent these scenarios from happening?
Possible solutions include:
- Implementing a path planner that re-evaluates the route if the robot gets stuck.
- Using a combination of potential fields and other algorithms like A* or Dijkstra’s algorithm for global path planning.
- Introducing randomness or perturbations in the path to escape local minima.
- For the final challenge, you will have to link local and global navigation. The global planner will provide a list of (x, y) (or (x, y, θ) ) positions to visit. How could these two algorithms be combined?
The combination could be implemented as follows:
- The global planner (e.g., A* algorithm) calculates a rough path from the start to the goal.
- The local planner (artificial potential fields) is used to avoid obstacles and refine the path by guiding the robot between the waypoints provided by the global planner.
- This hybrid approach ensures that the robot follows an efficient path while dynamically avoiding unforeseen obstacles. A good thing to take into account is the balance between global and local navigation. By placing a lot of nodes in the graph of global navigation, the local planner does not have to do much. The other way around, with less nodes the local planner would dominate. In artificial potential fields, having a more influencial global planner would be wise, to steer away from (quite literally) local minima.
Vector Field Histogram

 Figure 2: Visualization of the occupation map, created from the laser data. The values shown are based on the distance from the robot. The map below is what the occupancy map is based on.
Vector Field Histograms is a method to locally navigate through a space. It uses a map matrix and a polar histogram to determine where the robot can move to get to the goal. The map matrix stores cells which say that they are either occupied or not. The value in those squares then indicate the certainty that the cell is an obstacle. This map moves with the robot as an active window, where the cells in the map matrix are constantly updated just like the polar histogram which is based on the map matrix. Using the laser data of the robot, the height of the bins of the polar is determined and it is smoothed. Finally, a valley between the curves is chosen to move towards to.
Summarizing, for vector field histograms, 2 major components had to be created. Firstly, the translation from the laser data to a map that contains the coordinates of the obstacles together with a certainty value and a polar histogram, from which a minima should be chosen as direction to continue moving. These components will be explained now. Note that the x, y and angle of the robot are kept track of globally.
Obstacle map
The obstacle map is created by defining a matrix OccupancyGridMap with the height and width of the active window. Since each run items more in the map, we clear the map at the beginning of the run. Then, we look at the laser data and compute the coordinates of the obstacle using the distance retrieved from the laser data and the angle we globally keep track of.
[math]\displaystyle{ x = \frac{\sin(\theta) \cdot laser\_data[i]}{CELL\_SIZE} }[/math]
[math]\displaystyle{ y = \frac{\cos(\theta) \cdot laser\_data[i]}{CELL\_SIZE} }[/math]
Using these coordinates, in the map, the distance of the robot to the wall is put to indicate the risk factor. This value is then normalized to be in range [1,10] . The robots size is kept into account in this distance aswell. This is done by dilating the walls in the sensor map to the robot width such that it cannot bump into the walls. The laser data map and its the map its supposed to represent are depicted in figure 2 and 3.
Polar Histogram
In order to create the polar historam, the article 'IEEE Journal of Robotics and Automation Vol 7, No 3, June 1991, pp. 278-288' is used, further refered as [1]. The polar histrogram is made, using the histrogram grid from the previous paragraph. An active window is chosen, with a certain width [math]\displaystyle{ w_d }[/math]. We assume a rectangular grid, hence a [math]\displaystyle{ w_d }[/math] x [math]\displaystyle{ w_d }[/math] grid. Also, it is assumed that the robot is exactly in the middel of this active grid. In order to make the polar histogram, the follow parameters are used:
[math]\displaystyle{ a, b }[/math], which are positive normalizing constants;
[math]\displaystyle{ c_{i,j}^* }[/math], which is the certainty value of cell [math]\displaystyle{ i, j }[/math];
[math]\displaystyle{ d_{i,j} }[/math], which is the distance from the robot to cell [math]\displaystyle{ i, j }[/math];
[math]\displaystyle{ m_{i,j} = (c_{i,j}^*)^2(a-bd_{i,j}) }[/math], which is the magnitude of the obstacle vector at cell [math]\displaystyle{ i, j }[/math];
[math]\displaystyle{ x_0, y_0 }[/math], which are the coordinates of the robot;
[math]\displaystyle{ x_i, y_i }[/math], which are the coordinates of cell [math]\displaystyle{ i, j }[/math];
[math]\displaystyle{ \beta_{i,j} = atan(y_0 - y_i / x_0 - x_i) }[/math], which is the angle between the robot and cell [math]\displaystyle{ i, j }[/math];
Secondly, a vector is made which stores NUM_BINS amount of items. The value of NUM_BINS is determined by size of angles. In other words, if the entire 360 degrees is divides into increments of 5 degrees, NUM_BINS would be 72. In this vector, the first element corresponds to 0 to 5 degrees, the second element 5 to 10 degrees, and so on. The magnitude of each cell is added to the correct index of the vector. To determine the correct index, the relation
[math]\displaystyle{ k = int(\beta_{i,j}/\alpha) }[/math]
is used. This results in a vector with higher values at the indices corresponding to obstacles in that direction. Afterwards, a smoother function is used, since the angle segregation imply some false obstacle-free directions. At last, the vector is normalized to a value of 1. An example of a polar histogram in a small corridor with an obstacle in front of the robot is shown in the figure below.
Once the polar histogram is made, it is possible to determine the optimal steering angle. To do so, multiple steps need to be done. The algorithm does this in the following sequence:
- Determine the valleys which are bellow a certain threshold. This threshold is introduced in [1], in order to avoid steering towards small corridors. A valley is a 'range' between objects. By looking at the figure below, the possible valleys are (-80, -40), (40, 80) and (100, -100) (with wrapping). Note: in the application we used 0 to 360 degrees.
- Determine the valleys which is closest to the target goal. For example, is the target angle is -60, the valley (-80, -40) would be chosen, as the target lies in this valley. If the target is 30, the valley (40, 80) is chosen, as the border of 40 is closest to this target angle.
- From the chosen valley, determine the best angle. If the targer is within the valley, return the target. If the target is not within the valley, chose an angle which is as close as possible to the target without driving into a wall. Here, a distinct in made between wide and narrow valleys. A wide valley is has a certain width of s_max. If the optimal valley exceeds this width, and the target angle is not in the valley, the new steering angle will be determined as [math]\displaystyle{ \theta = (k_n + s_max) / 2 }[/math]. Here, k_n is the border which is closest to the target. This enables the robot to drive close to walls in a wide valley. If the valley is narrow, hence not wider than s_max, the exact middle is chosen as the new steering angle [math]\displaystyle{ \theta }[/math].

Speed Control
Once the steering angle is determined, the robot should take a certain action. To do so, it looks at its own angle and the steering angle resutling from the vector field histogram algorithm. If the angle is small (less than 23 degrees), the robot can still drive forwards and also turn simultaneously. However, if the steering angle is larger than 23 degrees, the robot stops and first makes the turn. This is done in order to enable the robot to make large turns in narrow sections. The 23 degrees can be tuned to a prefered behviour. If the robot arrived at the goal within a certain distance (for example 0.2 meters), the robot has arrived and robot goes to either the next goal of stays if it has no furthur goals.
Bugs and fixeds
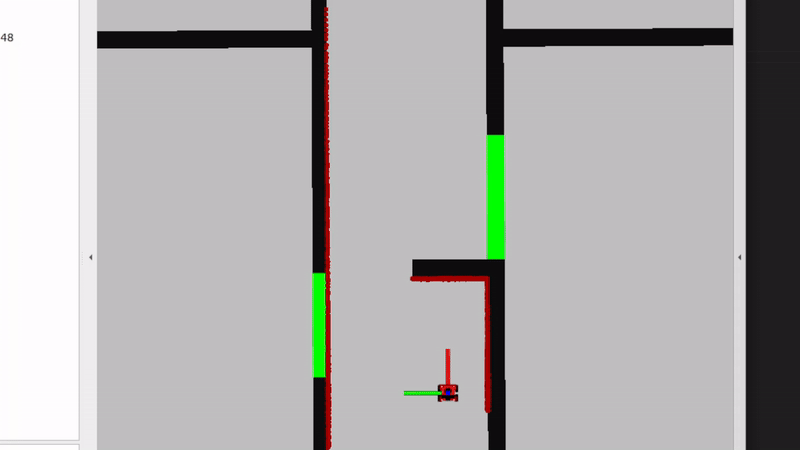
One bug in this algorithm, is that the robot start choosing between two angles rapidly. One of the causes for this, was that the robot could not detect anything in de blind laser spot (the range which the laser does not detect object). Therefor, the robot could sometimes steer towards the blank spot, see that there is a obstacle, steer back, and this goes on repeatadly. To fix this issue, a virtual obstacle is placed in the blind stop of the robot. Therefor, the robot will never choose to search for steering angle in its blind spot. If it want to steer in it blindspot, if first needs to turn and scan that spot. This solution worked well for most of the situations where te bug occured, but not all of them. There are still situations where two angles are choses rapidly after eachother. This mainly happens when the steering goal is far away and the robot very close to an object. We hope to solve this with the global planner.
Another solution for getting stuck, is shortening the horizon of the active grid. The laserfinders have very large range. The map which is made from the laser finders is 4 x 4 meters. However, if the entire map is choosen, the algorithm sometimes can get stuck, i.e. it sees no valleys. To solve this, we can tune the size of the active grid. The video which are shown are with an active grid of 1 x 1 meters. This enables less interference of walls/obsticles which are far away.
videos


These videos are tests of the vector field histogram implementation in the different maps provided. It seems to behave properly, but there are still some minor bugs to be solved.
The following link (https://youtu.be/VTsmuJFkQ40) shows the video on the simulation of the local navigation, as well as some real life testing. The previous explained bug happens at map 3. It shows that the robot starts shacking between two steering actions. Note that this not always happers, as in an example shown in the top videos with the additional printed map. It is very sensitive to starting positions and active fields. This is hopefully solved when the global navigation is used. In map 4, this bug does not occur. This is due to the fact that there is an extra box, which disables the option to choose between two angles. The real testing shows that the robot can navigate around a corner with some obstacles.
Answers to Questions Vector Field Histogram
- What are the advantages and disadvantages of your solutions?
- Advantages: Our solution is relatively robust and can usually find the route that it should take in an environment. It is intuitive as well, the polar histogram is a logical way to think of obstacles getting in a robots way.
- Disadvantages: Vector Field Histogram has a problem with narrow corridors. This is because the polar histogram can sketch it as if there is no passageway (depending on the bin size of the polar histogram). Another problem we encountered was that the robot could not choose between two valleys and kept switching between those two options.
- What are possible scenarios which can result in failures (crashes, movements in the wrong direction, ...) for each implementation?
- Narrow corridors.
- 2 paths that are equally as good will result in the robot not being able to decide between one of the passages.
- How would you prevent these scenarios from happening?
- For narrow corridors, we could introduce more bins for the polar histogram such that the map is more refined and thus can spot smaller corridors.
- Hysteresis could be introduced to fix the 2nd problem. Another implementation could be to introduce a cost function that not only takes the goal position into account but also the closest angle and the previous angle we have chosen. This way, there is another factor that can influence the choice, meaning that the chance to have an equal cost in 2 angles is smaller.
- Another (and best) option, is to solve these problems with the global planner. If the nodes are closes to eachother, the local planning will hopefully not get stuck. In addition, we'll try to implement a debugger, which detects of the robot gets stuck. If this happens, the robot will tell you its stuck and an action has to be taken (which action is explained in the global planner).
- For the final challenge, you will have to link local and global navigation. The global planner will provide a list of (x, y) (or (x, y, θ) ) positions to visit. How could these two algorithms be combined?
- For our current implementation, we can give the robot a goal position towards which it will drive. These points for the robot to drive to are the nodes provided by the A* algorithm. These coordinates will serially driven towards. Once the robot cannot find a path for an amount of time or it discovers no path towards the node, it should consult the global planner again. The global planner should remove the node from the graph and find another path with the A* algorithm again, for the robot to follow. So the local planner will drive from node to node, in order to get to the goal. As mentioned, if the local planner gets stuck on a node, a possibility is to remove that node and move to the next node, which the robot hopefully can reach. There is also a balance here to be decided on, as talked about in artificial potential fields. For this implementation, it seems that the global planner and local planner can work together with each getting 50% of the job. So, this means we can space the random nodes more in global navigation and thus rely more on the local planner. However, the local planner still needs sufficient instructions from the global planner in order to not get stuck.
For global navigation, A couple of things had to be done.
- How could finding the shortest path through the maze using the A* algorithm be made more efficient by placing the nodes differently? Sketch the small maze with the proposed nodes and the connections between them. Why would this be more efficient?
- Instead of placing nodes on each cell, it would be more efficient to place nodes only
- Would implementing PRM in a map like the maze be efficient?
- The PRM places random vertices on the map
- What would change if the map suddenly changes (e.g. the map gets updated)?
- How did you connect the local and global planner?
- Test the combination of your local and global planner for a longer period of time on the real robot. What do you see that happens in terms of the calculated position of the robot? What is a way to solve this?
- Run the A* algorithm using the gridmap (with the provided nodelist) and using the PRM. What do you observe? Comment on the advantage of using PRM in an open space.
Localization
0. Assignment introduction
0.1 Explore the code framework
- How is the code structured?
The code is divided into different files in order to have definitions and implementations separate from each other. Objects such as particles are used as seperate entities to keep track of the properties of each particle such as positions and weight.

- What is the difference between the ParticleFilter and ParticleFilterBase classes, and how are they related to each other?
The particleFilter is a higher level of abstraction compared to the ParticleFilterBase. The ParticleFilter derives functionality from the ParticleFilterBase class. This was implemented as such to be able to switch the employed method more easily.
- How are the ParticleFilter and Particle class related to each other?
The ParticleFilter uses the class particles to represent the particles as individual objects with their respective propeties such as position and weight.
- Both the ParticleFilterBase and Particle classes implement a propagation method. What is the difference between the methods?
One is on the level of a single particle and the other one propogates the complete particle set by employing the class function propogate sample.
1. Assignments for the first week
1.1 Initialize the Particle Filter
- What are the advantages/disadvantages of using the first constructor, what are the advantages/disadvantages of the second one?
One initializes the particles uniformly distributed over the map and the other normally distributed over an expected position with a certain confidence. The second one makes better use of the particles but is only possible if the initial position of the robot is known. If this is not known the particle filter would benifit from the uniformly distributed method where the particles (position hypothesis) are dispersed over the space to eventually find its position within the map.
- In which cases would we use either of them?
The gaussian method when an initial position is known. The uniformly distributed method when this is completely unknown.
- Add a screenshot of rviz to show that the code is working
1.2 Calculate the pose estimate
- Interpret the resulting filter average. What does it resemble?
By implementing the weighted mean we get the weighted average of all the particles
- Is the estimated robot pose correct? Why?
- Imagine a case in which the filter average is inadequate for determining the robot position.
- Add a screenshot of rviz to show that the code is working
1.3 Propagate the particles with odometry
- Why do we need to inject noise into the propagation when the received odometry infromation already has an unkown noise component?
Introducing different noise values to each particle in a particle filter ensures diversity and prevents degeneracy.
- What happens when we stop here, and do not incorporate a correction step?
This results in increasing error and uncertainty in the estimated state, as the particles fail to adjust based on new data, leading to less accurate predictions over time.
- Add a screenrecodring of rviz while driving to show that the code is working

2. Assignment for the second week
2.1 Correct the particles with LiDAR
- What does each of the component of the measurement model represent, and why is each necessary?
- Local Measurement Noise: Represents inherent inaccuracies in sensor readings due to factors like sensor noise. It is necessary for modeling the probability of an observation based on the prediction and assigning the probability. The following formulas found in the slides were employed to assign this probability.
The probability p_hit for a given measurement given the prediction is defined by: ; [math]\displaystyle{ p_{hit}(z_t^k | x_t, m) = \begin{cases} \eta \mathcal{N}(z_t^k; z_t^{k*}, \sigma_{hit}^2) & \text{if } 0 \leq z_t^k \leq z_{max} \ 0 & \text{otherwise} \end{cases} }[/math]
- Unexpected Obstacles: Accounts for objects not present in the map, such as temporary items or new obstructions. This is modeled via exponential distribution.
The probability p_short for a short measurement is given by: ;[math]\displaystyle{ p_{\text{short}}(z_t^k \mid x_t, m) = \begin{cases} \eta \lambda_{\text{short}} e^{-\lambda_{\text{short}} z_t^k} & \text{if } 0 \leq z_t^k \leq z_t^{k*} \\ 0 & \text{otherwise} \end{cases} }[/math] The normalizing constant \eta is calculated as: ;[math]\displaystyle{ \eta = \frac{1}{1 - e^{-\lambda_{\text{short}} z_t^{k*}}} }[/math]
- Failures (Glass, Black Obstacles): Handles the inability of sensors to detect certain materials that don't reflect signals well, like glass or dark-colored objects. Which will result in the maximum reading eventhough this is not representing the true distance.
The probability p_max for the maximum range measurement is defined as: ;[math]\displaystyle{ p_{\text{max}}(z_t^k \mid x_t, m) = \begin{cases} 1 & \text{if } z_t^k = z_{\text{max}} \\ 0 & \text{otherwise} \end{cases} }[/math]
- Random Measurements: Captures spurious data and anomalies that don't correspond to actual obstacles, likely due to sensor malfunctions or external interferences.
The probability p_rand for a random measurement is defined as: ;[math]\displaystyle{ p_{\text{rand}}(z_t^k \mid x_t, m) = \begin{cases} \frac{1}{z_{\text{max}}} & \text{if } 0 \leq z_t^k \leq z_{\text{max}} \\ 0 & \text{otherwise} \end{cases} }[/math]
All of them combined make a measurement model that models the events that could have occurred for a particular ray (laser measurement), resulting in the following formula: Taking the weighted average of these distributions yields the overall model: ;[math]\displaystyle{ p(z_t^k \mid x_t, m) = z_{\text{hit}} p_{\text{hit}}(z_t^k \mid x_t, m) + z_{\text{short}} p_{\text{short}}(z_t^k \mid x_t, m) + z_{\text{max}} p_{\text{max}}(z_t^k \mid x_t, m) + z_{\text{rand}} p_{\text{rand}}(z_t^k \mid x_t, m) }[/math]
- With each particle having N >> 1 rays, and each likelihood being ∈ [0,1] , where could you see an issue given our current implementation of the likelihood computation?
Since we assume independance we calculate the overall likelihood of the complete measurement (all combined rays) to be their product since these are values between 0 and 1 this can result in computational errors. Related to underflow, when using floating-point arithmetic, the precision of very small numbers can become unreliable.
2.2 Re-sample the particles
- 'What are the benefits and disadvantages of both the multinomial resampling and the stratified resampling?
- With each particle having N >> 1 rays, and each likelihood being ∈ [0, 1], where could you see an issue given our
- current implementation of the likelihood computation?
2.3 Test on the physical setup
- How you tuned the parameters.
- How accurate your localization is, and whether this will be sufficient for the final challenge.
- How your algorithm responds to unmodeled obstacles.
- Whether your algorithm is sufficiently fast and accurate for the final challenge.
- Include a video that shows your algorithm working on the real robot
System architecture
T.B.C
References
Answers Particle Filter.
- ↑ Matoui, F., Naceur, A. M., & Boussaid, B. (2015). Local minimum solution for the potential field method in multiple robot motion planning task. Conference Paper presented at the 2015 IEEE/ACIS 14th International Conference on Computer and Information Science (ICIS). doi:10.1109/STA.2015.7505223. Retrieved from [ResearchGate](https://www.researchgate.net/publication/307799899).