Embedded Motion Control 2018 Group 2: Difference between revisions
| Line 262: | Line 262: | ||
* Try to get the basics of C++ down really well so that you know your way around the implementation | * Try to get the basics of C++ down really well so that you know your way around the implementation | ||
* | * In the first week we were told to focus on the initial design and really work out well what we in theory wanted to achieve. While this is a good idea, it can lead to wanting to have the best, smartest solution possible to solve the challenge. This happened to our group in a sense. We set out with great plans to create something beautiful, but after numerous setbacks, were not able to achieve this, making us have to re-think our plans nearly every week. I think the key idea to take from this is: start easy and improve. Of course you could start taking bigger steps if you have more experience. However, seeing as we were all inexperienced in programming or doing something similar to this course, we should have started smaller, before thinking big. | ||
Revision as of 21:46, 11 June 2018
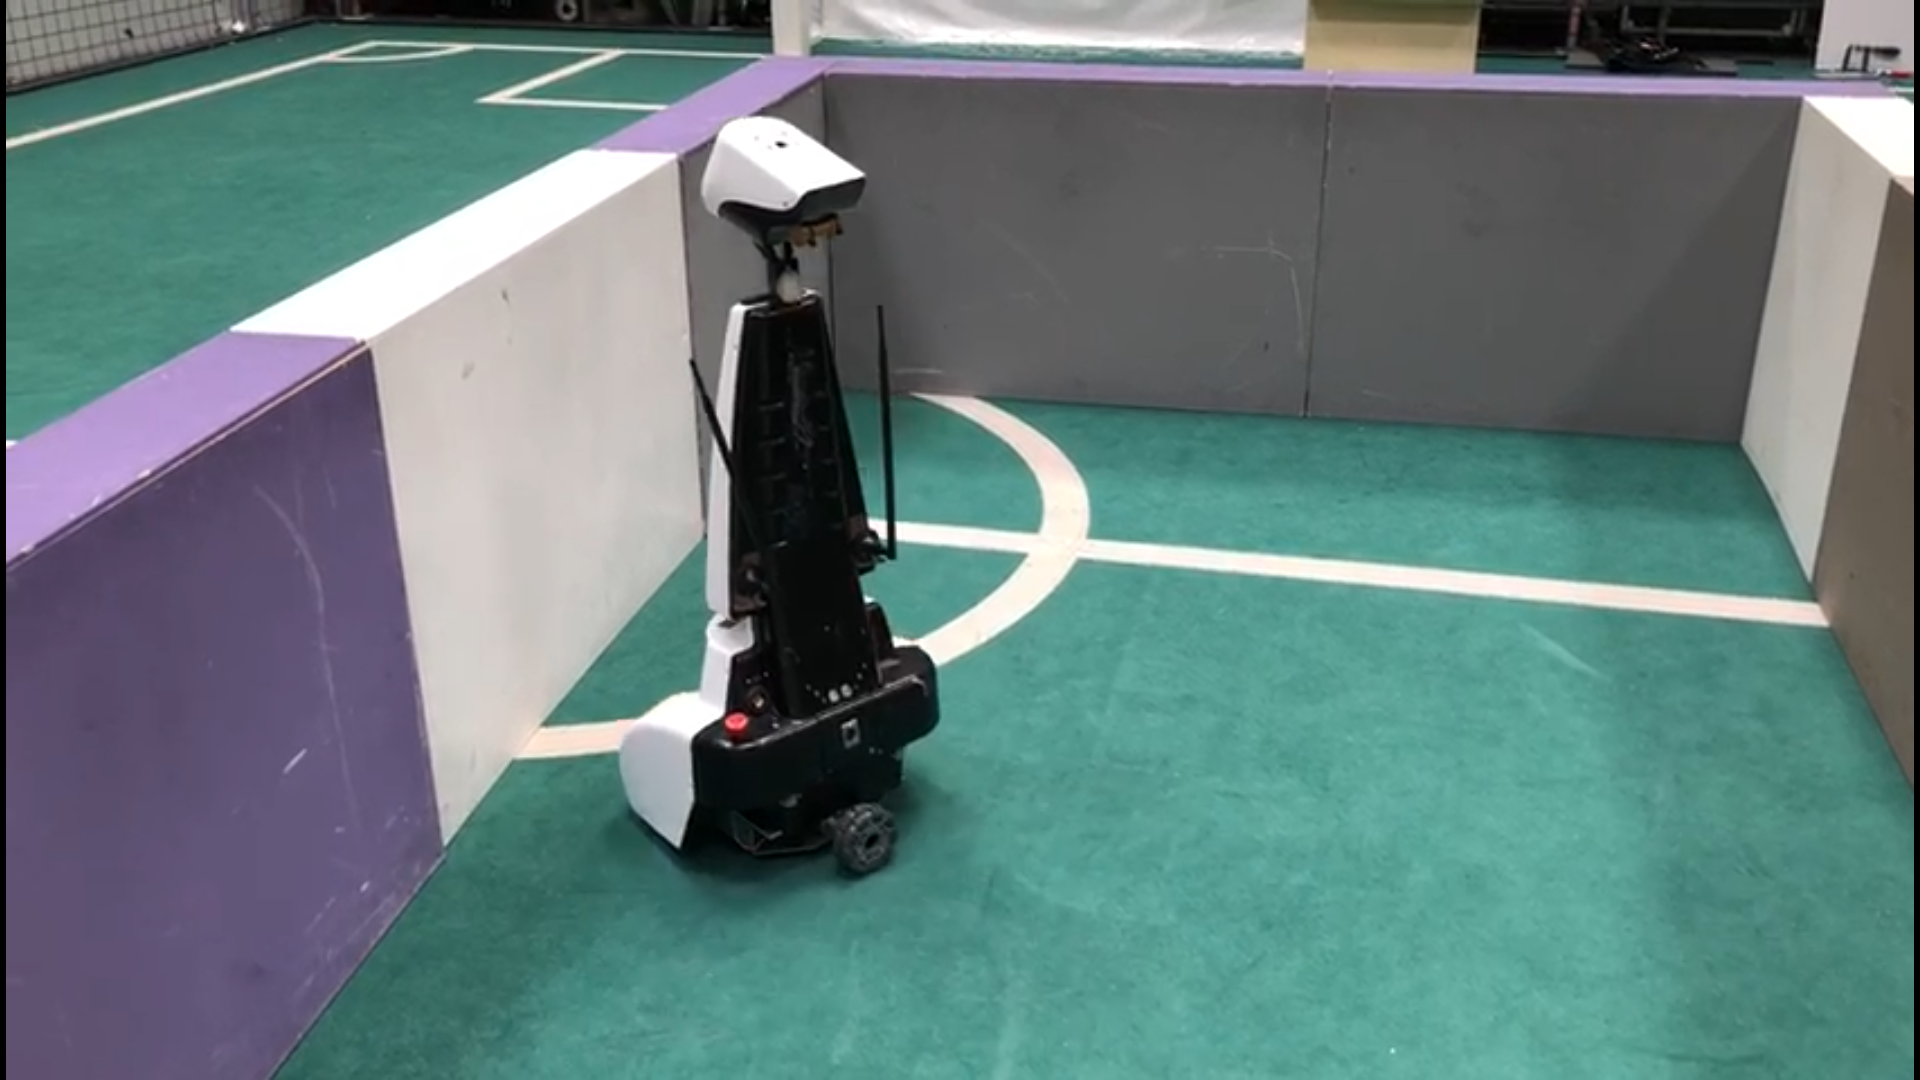
This wiki describes and explains the software that was made for and implemented on the PICO robot to complete this years Embedded Motion Control course. This year the course consists of two challenges, the escape room challenge and the hospital room challenge. Both these challenges will be discussed in more detail further down this wiki page. The robot that is used during the project is PICO. PICO has a holonomic wheelbase with which it can drive, a Laser Range Finder (LRF) from which it can gather information about the environment (blocked/free space) and the wheels are equipped with encoders to provide odometry data. Not all the software that is developed has to be tested on the robot, there is also a simulator available which provides an exact copy of PICO's functionalities. PICO itself has an on-board computer running Ubuntu 16.04. The programming language that is used during the course is C++ and Gitlab is used to store the code.
Group Members
| TU/e Number | Name | |
|---|---|---|
| 0843128 | Robbert (R.) Louwers | r.louwers@student.tue.nl |
| 1037038 | Daniël (D.J.M.) Bos | D.J.M.Bos@student.tue.nl |
| 0895324 | Lars (L.G.L.) Janssen | l.g.l.janssen@student.tue.nl |
| 1275801 | Clara () Butt | clara.butt@aiesec.net |
| 0848638 | Dorus (D.) van Dinther | d.v.dinther@student.tue.nl |
Relevant PDF Files
Initial Design
Introduction:
For the initial design, the requirements will be discussed as well as the functions and their specifications. Moreover, a list of possible components and a suiting interface is designed.
Note that this is an initial design towards the hospital competition which has overlap with the escape room competition. Some distinction will be indicated.
Requirements:
- Execute all tasks autonomously.
- Perform all tasks without bumping into a wall.
- Perform all tasks without getting stuck in a loop.
- Finish both challenges as fast as possible, but at most within 5 minutes.
- Escape room competition:
- Locate the exit and leave the room through this exit.
- Keep a minimum distance of 20 cm to the walls or any other objects.
- Final competition:
- Explore and map the hospital rooms.
- Use the map to get back to the starting position and park backwards into the wall behind it using both the map and the control effort.
- Use a map to find and stop next to the object that is placed in one of the rooms after the first
- Nice to have: Use the provided hint to be able to find the placed object directly without searching.
Functions:
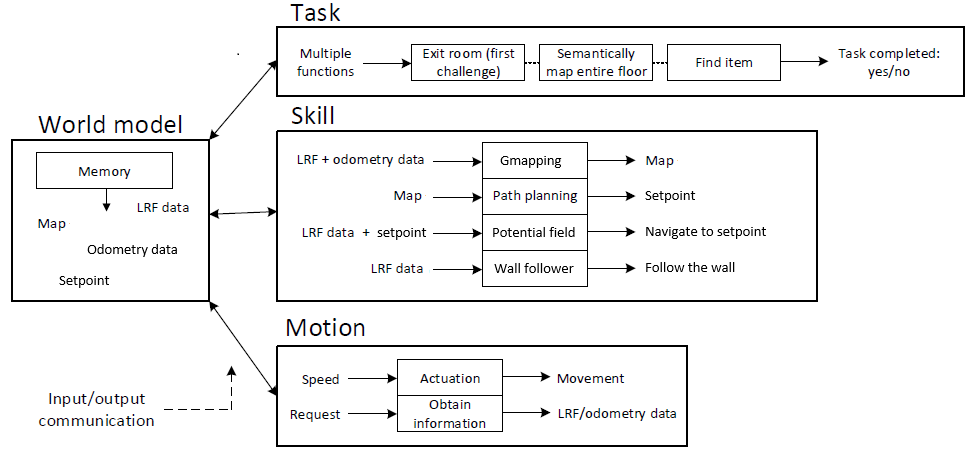
he functions that are going to be implemented are subdivided in three different types of functionality. First of all there is the lowest level functionality, which will be referred to as the motion functions. These functions will be used to interact directly with the robot. This interaction will be specified more precisely in the function overview that can be found below. The mid level functionality, which will be referred to as the skill functions. As the name mid level functionality already suggests these functions act on a more abstract level and are built to be able to perform a specific action. All the actions that will be implemented in the skill functions can also be seen in the overview below. Finally there is the high level functionality, which will be referred to as task functions. These functions are the most abstract and are structured to carry out a specific task, which consists of multiple actions.
To give a full overview: in a task function a specific order of actions will be specified in order to be able to fulfill the task. The actions that the robot can perform, and are therefore available to be called by the task functions, are specified in the skill functions. The motion functions are used in the skill functions to be able to invoke physical behavior by the robot.
- Motion functions
- Actuation: Using the actuation function PICO is given the command to drive in a specific direction or to turn in a specific direction. The input to this function is a movement vector which specifies in which direction and how far the robot should move. The output is actual robot movement according to this vector and the control effort needed for this movement.
- Obtain information: Using the obtain information function sensor readings can be requested. The input for this function is the request of a (sub)set of sensor data from a specific sensor(set), either the Laser Range Finder (LRF) or the odometry encoders.
- Skill functions
- Path planning: Using the path planning function a (set of) movement vectors is defined on the basis of the map to reach the defined goal. The input for this function is the current map and the goal that should be reached. The output of this function is a (set of) movement vectors.
- Object avoidance: Using the object avoidance function it is ensured that PICO does not hit any objects. The input for this function is the LRF sensor data and the movement vector. If the movement vector prescribes a movement that collides with an object that is detected by the LRF the movement vector is adjusted such that PICO keeps a safe distance from the object. The output of this function is therefore an (adjusted) movement vector.
- Mapping and localization: Using the mapping and localization skill a map of the environment is built up and PICO's location in this environment is determined. The input for this function is sensor information and actuation information that can be obtained from the motion functions. Using the LRF data PICO's environment can be defined in "blocked" and "free" area's, places in which obstacles are present and absent respectively. Using the odometry encoders and the control effort the location of PICO can be tracked in the environment. The output of this function is a visual map, that is expanded and updated every time this function is called.
- Semantic mapping: Using the semantic mapping function extra information is added to the basic environment map. This function has as input the basic environment map. The surface of this map will be split into different sections which can have one of two different types of identifiers assigned to them: room or hallway. Both the splitting of the sections and the identifications of the sections will be based on shape fitting. If a rectangular shape can be fitted over (a piece of) the basic map, based on the LRF, this (piece of the) map will be defined a (separate) section with the identifier room. Note that each section with the identifier room will be given a separate number to be able to distinguish the different rooms from each other. This is necessary in order to be able to use the hint that will be given for the final challenge. The output of this function is a visual semantic map that is updated every time this function is called.
- Task functions
- Exit a mapped room: This is the escape room challenge. In this task all motion skills and all skill functions, except the semantic mapping skill, will be used.
- Semantically map an entire floor and return to the beginning position: This is the first part of the final challenge. In this task all motion and skills functions will be called.
- Find an item in the semantically mapped floor, preferably using the provided hint on the position of the item: This is the second part of the final challenge. In this task again all motion skills will be used and all the skill functions except the semantic mapping skill.
Components:
To be able to execute the challenges the PICO robot, already mentioned above, will be used. The following hardware components will be utilized:
- Actuators:
- Holonomic base with three omni-wheels.
- Sensors:
- Laser range finder (LRF): To detect the distances to objects in the environment.
- Range: To be determined
- Field of view: 270 degrees
- Accuracy: To be determined
- Wheel encoders: Combined with the control effort these encoders keep track of the robots position relative to its starting point. (This has to be double checked with the position in the map, since the encoders easily accumulate errors.)
- Accuracy: To be determined
- Laser range finder (LRF): To detect the distances to objects in the environment.
- Computer
- Running Ubuntu 16.04.
Specifications:
The specifications are based on the requirements.
- The maximal transitional velocity of PICO in any direction is 0.5 [m/s].
- The maximal rotational velocity of PICO is limited to 1.2 [rad/s]
- PICO should not stand still or make no sensible movements for periods over 30 [seconds].
- Escape room competition:
- PICO has to finish the Escape Room within 5 [min].
- The width of the corridor and the openings in the walls are between 0.5 [m] and 1.5 [m].
- The shape of the room is rectangular.
- The exit is located more than 3 [m] into the corridor.
- Hospital competition:
- PICO has to finish the Hospital within 5 [min].
- The width of the corridor and the openings in the walls are between 0.5 [m] and 1.5 [m].
The first interface:
The interfaces describe the data that is communicated between the several parts of code that will be developed. The functions that are discussed in the Chapter Functions are all part of the interface, however there is one other important piece in this interface: the world model. The world model will contain the most recent (semantic) environment map with the location of PICO included in it. The motion, skill and task functions can monitor and request the information that is stored in this world model and use it to properly execute their function. A graphic showing the interface between the world model and the tasks, skills and motions is shown below.

The final interface:
While progressing through the project, a number of circumstances made us re-think the initial design choices and alter them. The main reason is that we simply lacked is the time and programming experience to implement certain features, making the choose for a less complicated programming structure. This is largely caused by running into a lot of small problems in the C++ implementation during the course, a lot of time was lost.
That is why some adjustments have been made to the interfaces. See below for the final interfaces
The world model has the most recent data of the task, skill, and motion function in memory. The communication between the functions is via the world model. The biggest changes with the first interfaces is in the skill function. For making the map gMapping is used without the semantic mapping part. The difference is that this gMapping part only cannot name and recognize rooms, doors, objects, etc. Also, it is not possible, with only gMapping, to do the path planning. The map is made while the PICO is driven with the aid of the wall tracking function. After mapping the map, the skill function ‘path planning’ will create a setpoint where the PICO has to go. The ‘potential field’ functions ensure that PICO reaches the desired setpoint.
The Escape Room Challenge
The first challenge that had to be completed was the Escape Room Challenge. In this challenge PICO had to escape from a room with a single exit.
Space Recognition
The method that was chosen to let PICO complete the Escape Room Challenge was through a wall follower. This wall follower uses three beams to check if there is free space in front, and on its sides. Figure 3 shows these beams.

The idea for this method of driving around was obtained from the Wiki page of Group 4 of Embedded Motion Control 2017.
Whenever the beam in front does not see any obstacles, PICO will drive forward. If an obstacle is seen in front, but the space to the right is free, then PICO will turn right. After making its right turn, PICO will start driving forward again. When the front and right are blocked, but the left is free, then PICO will turn left. If the front, left and right are all blocked, PICO will turn around and drive back the way it came, searching for an exit somewhere else. A video of PICO driving around using the wall follower is available by clicking the link below.
Sadly, this wall follower did not work yet at the time of the Escape Room Challenge, so PICO was not able to escape the room. However, shortly after the challenge, the wall follower did work and an improved version of it will be used in the Hospital challenge.
The Hospital Challenge
Mapping & Localization
The necessity of mapping in the hospital challenge is of two-fold. First of all, a map is necessary to be able to detect the new object that will be placed in the environment after the initial mapping round. The new object can be found by comparing the map with the current environment. The second reason a map is needed is for the navigation purposes. In the final challenge navigation through rooms and hallways is needed to be able to get to the newly placed object. To be able to perform this navigation task certain knowledge of the rooms, hallways and walls need to be stored, since this knowledge is needed for calculations that for example lead to the path planning. What information needs to be stored and in what format this information needs to depend on the task at hand. For the hospital challenge, a simple grid with "blocked" and "free" squares suffices.
However to be able to perform navigation not only information about the environment is important, the position of PICO itself is also important. There are different ways in which this localization of PICO can be done, however, not all options are equally robust or suited for the task at hand. One of the options that can be used to track the position of PICO is to use the encoders of the wheels, referred to as odometry data. Using this odometry data is however not very accurate for determining the position of the robot in the long run since the position errors, for example, caused by slip, integrate over time. To increase the accuracy of the localization of the robot often other sensor data is used in combination with this odometry data.
The mapping and the localization problem can be tackled simultaneously by a method called SLAM (Simultaneous Localization And Mapping). There are other methods that solve these problems one by one, but in robotics, SLAM is an often used and proven method. In the SLAM method, there are again different techniques to obtain the desired result. Some popular techniques include the particle filter, extended Kalman filter, and GraphSLAM. The method that is best fit to solve the SLAM problem depends on the available resources and the requirements, which again depend on the task description. Given the available resources for the hospital challenge, there are still quite a few different possible SLAM algorithms that can be implemented. Some specific research was done into Extended Kalman Filter based SLAM (EKF SLAM) and particle filter SLAM. It was found that particle filter based SLAM has some advantages over EKF based SLAM, especially in dealing with non-linearities. Furthermore particle filter based SLAM is robust to ambiguities in data association which can also be an advantage.
The Robot Operation System (ROS) that runs under the hood of the provided emc-environment provides a highly efficient Rao-Blackwellized particle filer under the name gmapping [1]. In this particle filter all particles carry an individual map of the world. The number of particles is reduced by taking into account the movement of the robot, the odometry data, and the most recent observation of the environment, the laser range data. This method results in a 2-D occupancy grid map. One specific feature of this gmapping algorithm, which is not specifically necessary for the hospital challenge but very useful for real world applications, is the loop closing feature. In loop closing the current environment is matched with previously mapped environments to track whether to mapping entity has returned to a previously visited location, possibly through an alternative rout. This feature allows for accurate mapping of loops.
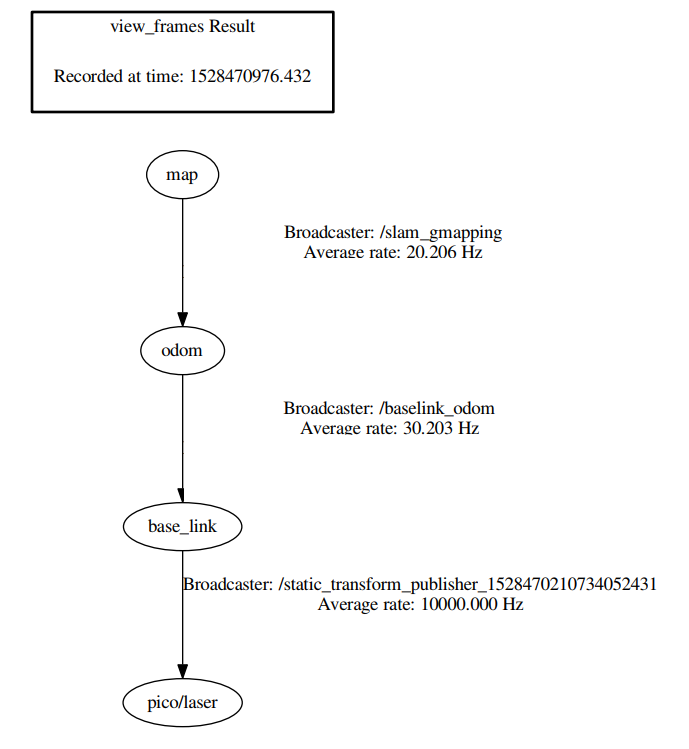
As mentioned above the input for this slam_gmapping node exists of the laser range data and the odometry data that are collected by PICO. However this is not enough to be able to create the desired floor plan with occupancy information. What more is needed are the real-time transformations between different coordinate frames. This is necessary since the obtained data, the laser data and the odometry data, are collected in different coordinate frames. So in order for the gmapping algorithm to be able to function properly two coordinate frame transforms are needed. The first transform is between the laser range finder and the base of PICO (base_link -> /pico/laser). This transform is static since the laser range finder is physically attached to base of the robot. The second transform is between the base of the robot and the initial position of the robot (odom -> base_link). This is a dynamic transform. Using these two transformations the gmapping algorithm makes another transform, namely the one from the initial position of the robot to the map. A graphical representation of this transform tree can be seen on the right side.
The above mentioned transforms were not implemented on PICO by default, so they had to be created. To make the dynamic transform between the initial position of the robot and the base of the robot the odometry data is used. This odometry data, that was read out from the corresponding rostopic using a subscriber, was transformed into the right type and broad casted to the tf topic using a tf broadcaster. The static transform between the laser range finder and the position of the robot is a lot simpler. This static transform is made using a single command that describes absolute position of the laser range finder with respect to the center of the base of PICO.
Now all components are available gmapping can called. This can again be done using a single command. In this command a lot of parameters can be set. The most important parameter is the one that defines on which rostopic gmapping can find the laser data of the robot, which is in this case /pico/laser. The other parameters that have been altered from the default value are the max_range of the laser, the map update interval, the dimensions of the map and the map resolution. All these parameters have been altered to the goal of limiting the amount of data that is transferred without losing accuracy.
Since the update time of the map can be altered the map can be visualized nearly real-time. This near real-time visualization can be performed in a program called Rviz. This program not only shows the map of the environment, but also shows PICO's position which is a very handy tool to use for testing.
All in all to run this gmapping algorithm quite a few commands have to be given in different terminals. To simplify this process a bash shell has been made that gives all of these commands at once when the shell is executed.

Wall Follower
For the first part of the Hospital Challenge, which consists of PICO driving around, mapping the floor and parking at its starting position, again a wall follower is used. This wall follower is similar to the wall follower that was planned to use during the Escape Room challenge which was explained above. However, the wall follower now also makes use of the potential field in order tomove the robot. More details on the exact workings of the potential field can be found in the next section.
Using the wallfollower instead of directly sending a speed for PICO makes movement a lot safer, in the sense that it is highly unlikely to bump into walls using the potential field algorithm. The previous version was not robust enough so that it would never hit a corner. Other than bumping protection, the potential field makes it easier to program the structure in such a way that PICO does not deviate from the wall on the right that it is following. This is done by making PICO move slightly northwest, rather than simply moving north. The potential field then ensures that it moves straight along the wall due to the repulsive forces.
The logic that is used to guide PICO around the floor is similar to the section on Space Recognition in the Escape Room Challenge. A more detailed description of the final state-machine switches is as follows:
- It first moves to the right until PICO finds a wall on its right, then switches to moving forward
- While moving forward it can either turn right or turn left. It turns left if there is a wall at the top of PICO and goes to the turn_right state if there is free space on the right.
- When turning left, it turns until it has turned approximately 90 degrees counter-clockwise, then goes back to driving forward.
- Turning right is a more complex state. Since the wallfollower is a right-hand wallfollower, it has to follow the wall on the right along right corners. In order to achieve this, PICO moves forward a bit (based on odometry data) and then turns around approximately 90 degrees clockwise and moves forward a bit again until it has found a wall on its right, after which the state switches back to moving forward.
When the location of PICO is close enough to its starting point (taken as an absolute distance in the sense of [math]\displaystyle{ \sqrt{x^2 + y^2} }[/math]), it will switch to its parking state, in which it will turn its back to the wall and slowly drive backwards.
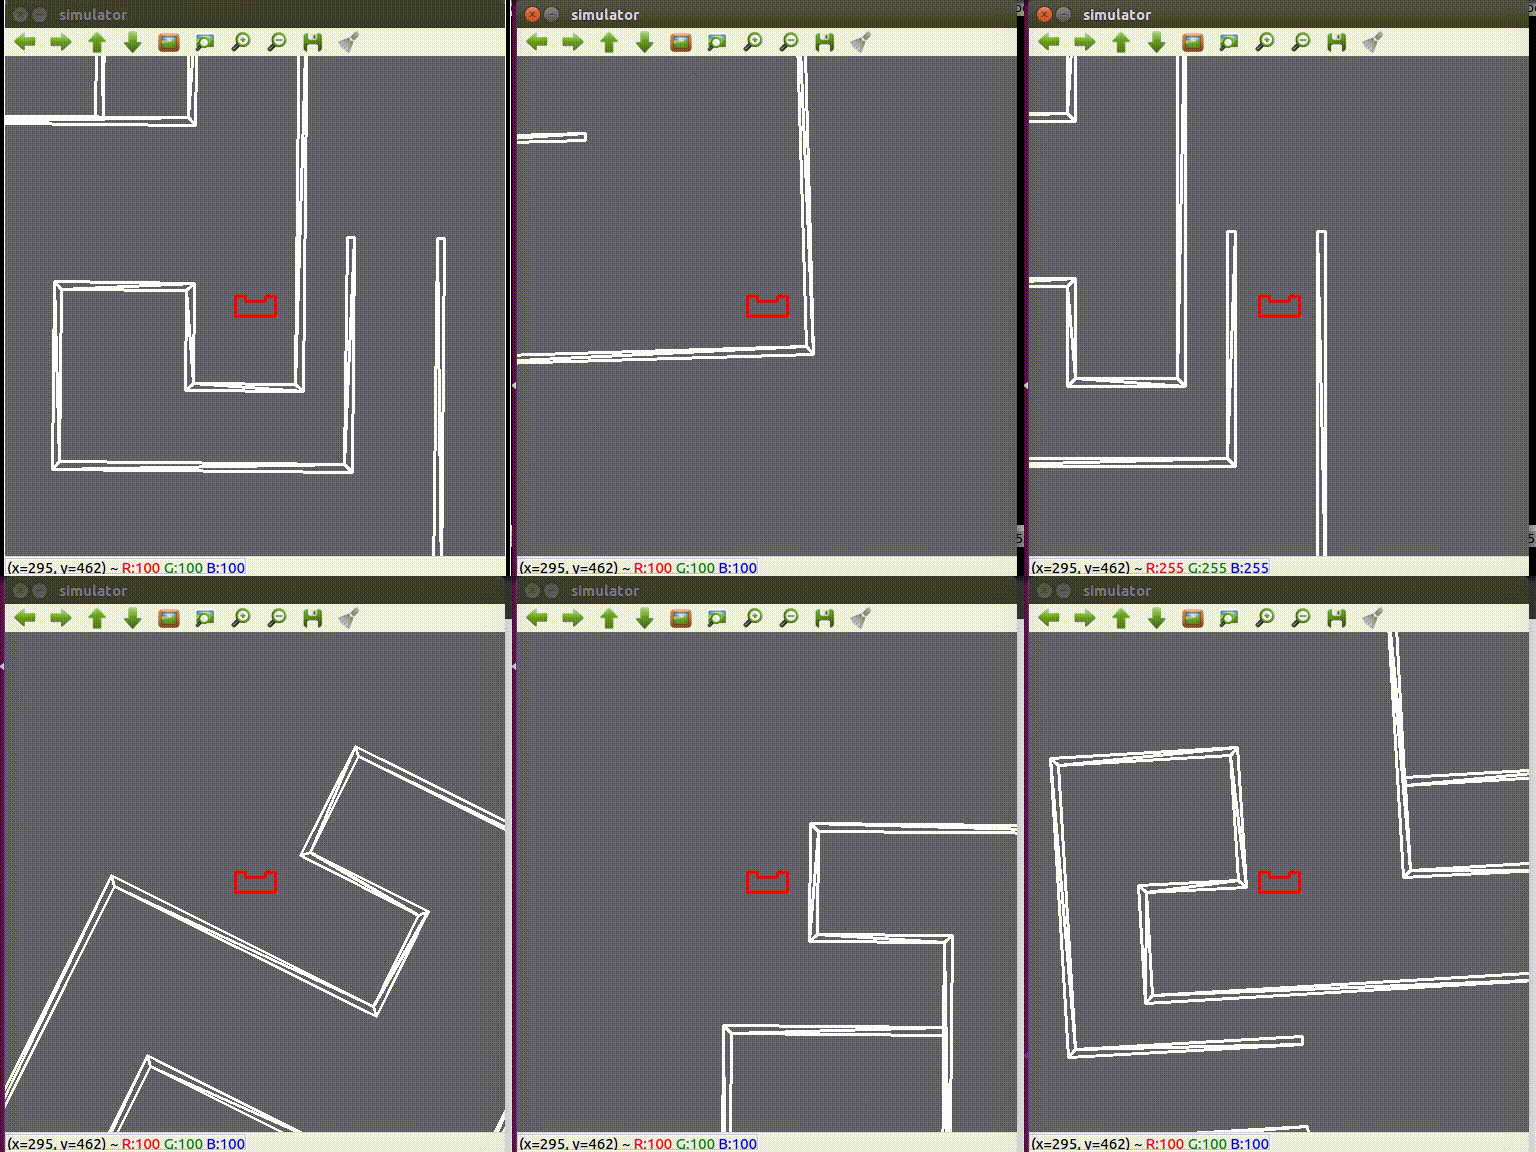
The GIF below shows the wall follower in action. In the final seconds of the GIF, the parking state is demonstrated. In this case, PICO does not drive backward into a wall but instead drives back a set distance, because there is no control effort in the simulator.
Potential Field
The potential field algorithm makes sure that PICO does not run into any walls (or anything else for that matter). As an input it requires a movement direction in which the PICO should move using the coordinate frame in Figure 4. As an output, it provides an altered speed vector which can be send to PICO. It works by balancing attractive forces in the movement direction of PICO with the repulsive forces generated when the laser detects something in a range. An interpretation of the algorithm is shown in Figure 4. The structure is based on the same structure used by Group 2 of last year.
Some of the reasons for choosing this algorithm, is that it was proven successful by previous years. Moreover, it can make the path planning algorithm a lot easier, because when using this potential field algorithm, the path planning does not have to take care of running into a wall and can simply provide a movement setpoint for PICO.
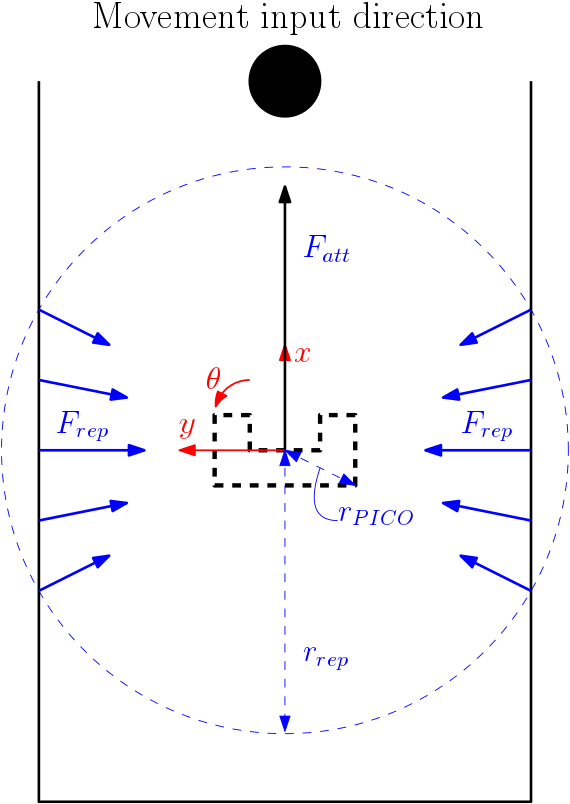
First of all, the attraction force is calculated by calculating the magnitude of the attraction force in the setpoint direction [math]\displaystyle{ (s_x, s_y) }[/math] as
[math]\displaystyle{ r_{att} = F_{good} \sqrt{s_x^2 + s_y^2} }[/math]
and then the angle [rad] at which the setpoint vector is positioned through
[math]\displaystyle{ a_{att} = \arctan \left( \frac{s_y}{s_x} \right) }[/math]
Note that the math.h package is used for certain operations in C++, including the 4-quadrant arctan function "atan2". The magnitude [math]\displaystyle{ r_{att} }[/math] and angle [math]\displaystyle{ a_{att} }[/math] form a polar coordinate frame, which is converted back to the cartesian PICO frame by
[math]\displaystyle{ F_{att} = \begin{bmatrix} F_{att,x} \\ F_{att,y} \end{bmatrix} = \begin{bmatrix} r_{att} \cos(a_{att}) \\ r_{att} \sin(a_{att}) \end{bmatrix} }[/math]
Similarly, the repulsive forces are calculated by converting the filtered laser data (distance [math]\displaystyle{ r }[/math] in [m], angle [math]\displaystyle{ \theta }[/math] in [rad]) to cartesian coordinates. The filtered laser data is the original laser data with an extra row indicating whether or not a scan entry is bigger or smaller than 0.15 (sees itself). Moreover, only data is considered within a range of 0.6 [m]. The magnitude of the repulsive forces for each angle increment of the filtered LRF data, is then calculated as follows
[math]\displaystyle{ r_{rep}(i) = \frac{-F_{bad}}{\left(\sqrt{\left( (r(i) - r_{PICO}) \cos(\theta(i)) \right)^2 + \left( (r(i) - r_{PICO}) \sin(\theta(i)) \right)^2}\right)^3} }[/math]
Note that the term [math]\displaystyle{ (r - r_{PICO} }[/math] is used instead of simply using [math]\displaystyle{ r }[/math], such that the denominator of the above equation goes to zero if PICO gets close to the walls. If the scaling with [math]\displaystyle{ r_{PICO} }[/math] had not been applied, then the magnitude would not go to infinity if PICO gets close to a wall. The extra power 3 is simply added to increase the repulsive forces faster if PICO gets close to a wall. The repulsive forces in cartesian coordinates are then calculated with
[math]\displaystyle{ F_{rep} = \begin{bmatrix} F_{rep,x} \\ F_{rep,y} \end{bmatrix} = \sum_{i} \begin{bmatrix} r_{rep}(i) \cos(\theta(i)) \\ r_{rep}(i) \sin(\theta(i)) \end{bmatrix} }[/math]
With both the repulsive forces and attraction forces, the total force can be calculated as
[math]\displaystyle{ F_{tot} = F_{att} + F_{rep} }[/math]
which is then used to determine the speed at which the robot should move as follows
[math]\displaystyle{ v_{PICO} = \begin{bmatrix} v_x \\ v_y \\ v_{\theta} \end{bmatrix} = \begin{bmatrix} F_{tot,x} \\ F_{tot,y} \\ \frac{1}{\theta_{sc}} \arctan \left( \frac{F_{tot,x}}{F_{tot,y}} \right) \end{bmatrix} }[/math]
where [math]\displaystyle{ \theta_{sc} }[/math] is a scaling constant to limit rotational speed. Moreover, the values in the speed vector are clipped such that they are bounded by the physical limits of the robot:
- [math]\displaystyle{ v_x }[/math] by [math]\displaystyle{ \pm 0.5/n }[/math] [m/s]
- [math]\displaystyle{ v_y }[/math] by [math]\displaystyle{ \pm 0.5/n }[/math] [m/s]
- [math]\displaystyle{ v_\theta }[/math] by [math]\displaystyle{ \pm 1.2/n }[/math] [rad/s]
where n is a scaling constant which can limit the speed even more during testing.
In short:
The repulsive forces go to infinity if the robot gets close to the wall and are therefore dominant in [math]\displaystyle{ F_{tot} }[/math] close to walls. If PICO is further away from the walls then the repulsive forces are negligent and the speed vector moves PICO to the movement direction of the input.
Note that this algorithm obviously cannot detect anything outside the LRF range of approximately 270 degrees. This means that if the robot moves backwards into a corner it will hit the corner and maybe also hit a wall if it drives backwards into a wall. To prevent this from happening, a fail-safe is implemented which prevents PICO from moving backwards, which works by only allowing PICO to turn if the movement vector is aimed at PICO's back area.
Path Planning
Recommendations
- Try to get the basics of C++ down really well so that you know your way around the implementation
- In the first week we were told to focus on the initial design and really work out well what we in theory wanted to achieve. While this is a good idea, it can lead to wanting to have the best, smartest solution possible to solve the challenge. This happened to our group in a sense. We set out with great plans to create something beautiful, but after numerous setbacks, were not able to achieve this, making us have to re-think our plans nearly every week. I think the key idea to take from this is: start easy and improve. Of course you could start taking bigger steps if you have more experience. However, seeing as we were all inexperienced in programming or doing something similar to this course, we should have started smaller, before thinking big.
