Embedded Motion Control 2016 Group 1/Geometry Detection: Difference between revisions
No edit summary |
No edit summary |
||
| (9 intermediate revisions by 2 users not shown) | |||
| Line 5: | Line 5: | ||
[[File:RightJunction1.jpg|thumb|center|700px|Fig.1 Types of right junction]] [[File:RightJunction2.jpg|thumb|right|200px|Fig.2 First edge]] | [[File:RightJunction1.jpg|thumb|center|700px|Fig.1 Types of right junction]] [[File:RightJunction2.jpg|thumb|right|200px|Fig.2 First edge]] | ||
If the first edge is detected, search for the second edge is initiated from the point that the first edge was found. It continues until the 0 degree of the robot that defines the bound between right & left side views. As it can be seen in all 4 possibilities of right junctions above, the second edge has a certain characteristic in terms of the range of points around it. Scan ranges keep decreasing until the edge, and keeps increasing after the edge. | If the first edge is detected, search for the second edge is initiated from the point that the first edge was found. It continues until the 0 degree of the robot that defines the bound between right & left side views. As it can be seen in all 4 possibilities of right junctions above, the second edge has a certain characteristic in terms of the range of points around it. Scan ranges keep decreasing until the edge, and keeps increasing after the edge (Fig.2). | ||
[[File:RightJunction3.jpg|thumb|right|200px|Fig.3 Second edge]] | [[File:RightJunction3.jpg|thumb|right|200px|Fig.3 Second edge]] | ||
However, solely relying on raw scan range data to detect this sequence is not reliable since the LRF data is noisy. To tackle this, we are using a running average filter of length 5 (±2 neighboring points) to register a range value to a certain scan area and searching for the aforementioned decrease-first-increase-later behavior in terms of laser scans in groups of 5 by looking at 6 scan areas at a given time. If such a sequence is detected, midpoint of the relevant area is assigned as the second edge. Again, since this structure can be encountered at different proximities during a single scan, we take the closest one into consideration. Furthermore, detection of such a structure for the second edge of 3rd and 4th cases given above among the right corner possibilities (which is not possible for 1st and 2nd cases) may fail. For this, detection of a second jump is also incorporated in the detection of the second edge in our algorithm to ensure robustness. | However, solely relying on raw scan range data to detect this sequence is not reliable since the LRF data is noisy. To tackle this, we are using a running average filter of length 5 (±2 neighboring points) to register a range value to a certain scan area and searching for the aforementioned decrease-first-increase-later behavior in terms of laser scans in groups of 5 by looking at 6 scan areas at a given time. If such a sequence is detected, midpoint of the relevant area is assigned as the second edge. Again, since this structure can be encountered at different proximities during a single scan, we take the closest one into consideration. Furthermore, detection of such a structure for the second edge of 3rd and 4th cases given above among the right corner possibilities (which is not possible for 1st and 2nd cases) may fail. For this, detection of a second jump is also incorporated in the detection of the second edge in our algorithm to ensure robustness (Fig.3). | ||
[[File:RightJunction4.jpg|thumb|left|300px|Fig.4 Measuring the gap]] | [[File:RightJunction4.jpg|thumb|left|300px|Fig.4 Measuring the gap]] | ||
Although 2 edges are found, it is not immediately interpreted this as a right junction yet. To account for the small gaps in the walls, we calculate the distance between the first edge and the second edge, by the help of the cosine theorem, since we know the angles and distances to both of the edges. This gap needs to be greater than 0.5 meters and smaller than 1.5 meters (predefined corridor specs) in order to be interpreted as a junction. Finally, considering the 10m range of the LRF, it is desired to minimize the target tracking interval of the potential field once a target is set. So the described geometry is only registered as a right junction when the absolute degree of the robot is less than 80 degrees to the first edge. Because, as soon as a valid geometry flag is activated, a target is set according to the pledge decision and target tracking starts. The value of 80 was selected since it’s sufficiently close to 90 degrees which is when the center of the robot is at the same level with the first edge and there is an adequate range until 90 degrees to prevent missing the detection of the edge in between the iterations. | Although 2 edges are found, it is not immediately interpreted this as a right junction yet. To account for the small gaps in the walls, we calculate the distance between the first edge and the second edge, by the help of the cosine theorem, since we know the angles and distances to both of the edges, as shown in Fig.4. This gap needs to be greater than 0.5 meters and smaller than 1.5 meters (predefined corridor specs) in order to be interpreted as a junction. Finally, considering the 10m range of the LRF, it is desired to minimize the target tracking interval of the potential field once a target is set. So the described geometry is only registered as a right junction when the absolute degree of the robot is less than 80 degrees to the first edge. Because, as soon as a valid geometry flag is activated, a target is set according to the pledge decision and target tracking starts. The value of 80 was selected since it’s sufficiently close to 90 degrees which is when the center of the robot is at the same level with the first edge and there is an adequate range until 90 degrees to prevent missing the detection of the edge in between the iterations. | ||
| Line 26: | Line 26: | ||
= Right Corner = | = Right Corner = | ||
To save computation time, we are searching for the corners only if a valid junction is not assigned during the scan. The initial part of right corner detection, where we need to assign a first right edge is the same as in right junction detection. The next condition is the absence of a second right edge. | To save computation time, we are searching for the corners only if a valid junction is not assigned during the scan. The initial part of right corner detection, where we need to assign a first right edge is the same as in right junction detection. The next condition is the absence of a second right edge. | ||
[[File:RightCorner1.jpg|thumb|center|500px|Fig.5 Types of right corner]] | |||
[[File:RightCorner2.jpg|thumb|right| | [[File:RightCorner2.jpg|thumb|right|200px|Fig.6 Definition of front view]] | ||
[[File:RightCorner3.jpg|thumb|right| | [[File:RightCorner3.jpg|thumb|right|200px|Fig.7 3rd type of right corner]] | ||
Then we are looking at the front view, which is defined by the average of range of in total 11 lasers centered at the 0-axis of the robot, as shown | Then we are looking at the front view , which is defined by the average of range of in total 11 lasers centered at the 0-axis of the robot, as shown in Fig.6. Front view distance needs to be greater than (0.5 +extra bit) and less than (1.5 +extra bit) in order to have a feasible opening on the right, where extra bit is defined as the x-distance of the robot to the first edge. Finally, as we did for the right junction, we only register the described geometry as a right corner when the absolute value of the robot’s angle is less than 80 degrees to the first right edge. | ||
However note that in the 3rd case among the possible right corner geometries given above, there is no first right edge to start with, which is mostly encountered when the robot is navigating in a semi-open space where the only point of reference is a wall on the left of the robot. For the sake of the pledge algorithm, we need to interpret this turn as a corner as well. To detect this type of a corner, we are searching for the increase-first-decrease-later sequence in the laser ranges on the left, in a way similar to what was explained for the second right edge detection during right junction detection. It is registered as a valid right corner once the front view is in the feasible corridor width range [0.5m, 1.5m]. | However note that in the 3rd case among the possible right corner geometries given above, there is no first right edge to start with, which is mostly encountered when the robot is navigating in a semi-open space where the only point of reference is a wall on the left of the robot. For the sake of the pledge algorithm, we need to interpret this turn as a corner as well. To detect this type of a corner, we are searching for the increase-first-decrease-later sequence in the laser ranges on the left, in a way similar to what was explained for the second right edge detection during right junction detection. It is registered as a valid right corner once the front view is in the feasible corridor width range [0.5m, 1.5m]. | ||
For the target placement of such a right corner, half the distance of the front view on the x-direction is taken. Opposite of the y-distance to the furthest point in the 90-degree wall (shown as red dot) in y-direction is taken. | For the target placement of such a right corner, half the distance of the front view on the x-direction is taken. Opposite of the y-distance to the furthest point in the 90-degree wall (shown as red dot; Fig.7) in y-direction is taken. | ||
[[File:RightCorner4.jpg|thumb|left|300px|Fig.8 Updating front view]] | |||
Lastly, considering that the robot will not always be aligned perfectly between the walls, our front view that is based on the lasers around the 0-axis of the robot will not be a reliable data to find the shortest distance to the robot in front of it. That’s why, we are updating our front view based on the orientation of the robot as it’s shown on Fig.8. | |||
= Left corner = | = Left corner = | ||
| Line 54: | Line 63: | ||
= T-Junction = | = T-Junction = | ||
[[File:T-Junction.jpg|thumb|right| | [[File:T-Junction.jpg|thumb|right|200px|Fig.10 T-Junction]] | ||
Detection of T-junction is a matter of properly combining the conditions for the right and left corner detection. If only first right and left edges are found and second right and left edges are absent, we check for a feasible front distance (including the extra bit). When front view threshold is satisfied, the geometry is registered as a T-junction when either one of the angles to the first edges is greater than 80 degrees. | Detection of T-junction is a matter of properly combining the conditions for the right and left corner detection. If only first right and left edges are found and second right and left edges are absent, we check for a feasible front distance (including the extra bit). When front view threshold is satisfied, the geometry is registered as a T-junction when either one of the angles to the first edges is greater than 80 degrees. | ||
= Dead-end = | = Dead-end = | ||
[[File:DeadEnd.jpg|thumb|right| | [[File:DeadEnd.jpg|thumb|right|200px|Fig.11 Dead-end]] | ||
Detection of the dead-end requires the detection of increase-first-decrease-later sequence in the laser ranges in both right and left sides of the robot. If both of such geometries are found, we measure the distance between those points by the cosine theorem and see if the candidate dead-end is located in a feasible corridor. The geometry is assigned as a dead-end once the front view is less than a threshold which is safe for the robot to stop and turn back. We make sure that we keep this front view threshold less than 1.3 meters which is the required proximity for the door signal to be sent. | Detection of the dead-end requires the detection of increase-first-decrease-later sequence in the laser ranges in both right and left sides of the robot. If both of such geometries are found, we measure the distance between those points by the cosine theorem and see if the candidate dead-end is located in a feasible corridor. The geometry is assigned as a dead-end once the front view is less than a threshold which is safe for the robot to stop and turn back. We make sure that we keep this front view threshold less than 1.3 meters which is the required proximity for the door signal to be sent. | ||
= Door detection = | = Door detection = | ||
[[File:DoorDetection.jpg|thumb|right|300px|Fig.12 | [[File:DoorDetection.jpg|thumb|right|300px|Fig.12 Door detection]] | ||
Apart from detecting the dead-ends, we are also checking for | Apart from detecting the dead-ends, we are also checking for doors within the walls that have adequate depth. In order to save computation time, we are only checking for such doors if a valid right or left junction has already been detected, since the door detection also requires both first and second edges, as well as remaining in the feasible corridor width range. By measuring L1,S1 and S2 it is possible to calculate the distance L2. The difference between L2 and S2 gives the D. If the depth is in the range between 0.25 m to 0.35 m, the shape is determined as a door. | ||
Latest revision as of 20:42, 17 June 2016
Right Junction
For the detection of the Straight-Right junction, presence of the first edge that is closest to the robot on the right-hand-size view is a must. This is detected if there is a jump encountered in the range of LRF scan data from scan index i to scan index i+1 and i+2. Since we know the angle w.r.t the edge that we are scanning and the possible width of the corridor ([0.5m, 1.5m]), a feasible jump threshold was defined accordingly. Noting that the 10 meter range of LRF is quite high and these jumps in scan data can occur multiple times during a single scan at different proximities, only the closest jump point which has a range less than 2 meters (sufficient distance for decision making and if necessary to start cornering) is registered as the first edge.

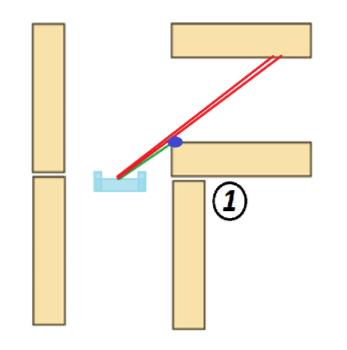
If the first edge is detected, search for the second edge is initiated from the point that the first edge was found. It continues until the 0 degree of the robot that defines the bound between right & left side views. As it can be seen in all 4 possibilities of right junctions above, the second edge has a certain characteristic in terms of the range of points around it. Scan ranges keep decreasing until the edge, and keeps increasing after the edge (Fig.2).
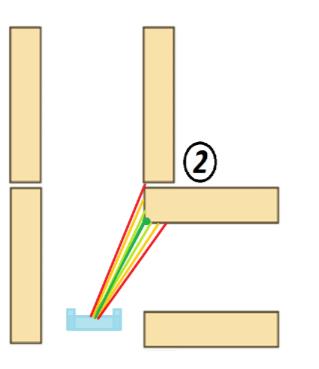
However, solely relying on raw scan range data to detect this sequence is not reliable since the LRF data is noisy. To tackle this, we are using a running average filter of length 5 (±2 neighboring points) to register a range value to a certain scan area and searching for the aforementioned decrease-first-increase-later behavior in terms of laser scans in groups of 5 by looking at 6 scan areas at a given time. If such a sequence is detected, midpoint of the relevant area is assigned as the second edge. Again, since this structure can be encountered at different proximities during a single scan, we take the closest one into consideration. Furthermore, detection of such a structure for the second edge of 3rd and 4th cases given above among the right corner possibilities (which is not possible for 1st and 2nd cases) may fail. For this, detection of a second jump is also incorporated in the detection of the second edge in our algorithm to ensure robustness (Fig.3).
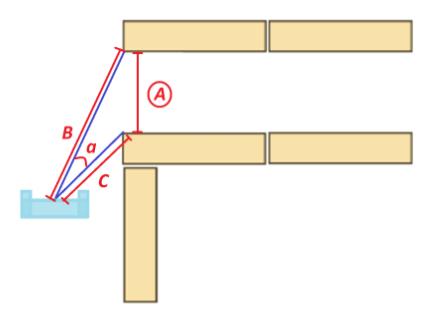
Although 2 edges are found, it is not immediately interpreted this as a right junction yet. To account for the small gaps in the walls, we calculate the distance between the first edge and the second edge, by the help of the cosine theorem, since we know the angles and distances to both of the edges, as shown in Fig.4. This gap needs to be greater than 0.5 meters and smaller than 1.5 meters (predefined corridor specs) in order to be interpreted as a junction. Finally, considering the 10m range of the LRF, it is desired to minimize the target tracking interval of the potential field once a target is set. So the described geometry is only registered as a right junction when the absolute degree of the robot is less than 80 degrees to the first edge. Because, as soon as a valid geometry flag is activated, a target is set according to the pledge decision and target tracking starts. The value of 80 was selected since it’s sufficiently close to 90 degrees which is when the center of the robot is at the same level with the first edge and there is an adequate range until 90 degrees to prevent missing the detection of the edge in between the iterations.
Left Junction
Detection of the Straight-Left junction is completely equivalent to the detection of the Straight-Right junction, including the detection of the first left edge and second left edge. Only difference is, scan is done in clockwise direction for the left-hand side of the robot starting from 90 degrees, till the 0-axis of the robot.
Right Corner
To save computation time, we are searching for the corners only if a valid junction is not assigned during the scan. The initial part of right corner detection, where we need to assign a first right edge is the same as in right junction detection. The next condition is the absence of a second right edge.

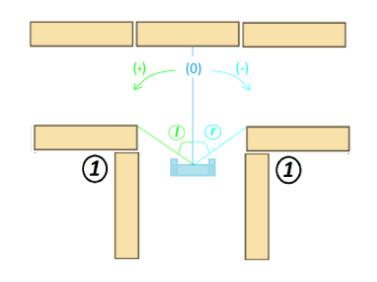
Then we are looking at the front view , which is defined by the average of range of in total 11 lasers centered at the 0-axis of the robot, as shown in Fig.6. Front view distance needs to be greater than (0.5 +extra bit) and less than (1.5 +extra bit) in order to have a feasible opening on the right, where extra bit is defined as the x-distance of the robot to the first edge. Finally, as we did for the right junction, we only register the described geometry as a right corner when the absolute value of the robot’s angle is less than 80 degrees to the first right edge.
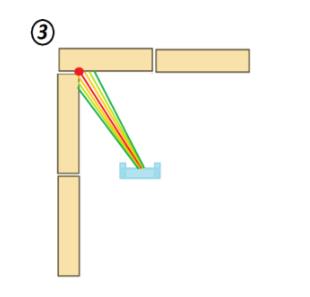
However note that in the 3rd case among the possible right corner geometries given above, there is no first right edge to start with, which is mostly encountered when the robot is navigating in a semi-open space where the only point of reference is a wall on the left of the robot. For the sake of the pledge algorithm, we need to interpret this turn as a corner as well. To detect this type of a corner, we are searching for the increase-first-decrease-later sequence in the laser ranges on the left, in a way similar to what was explained for the second right edge detection during right junction detection. It is registered as a valid right corner once the front view is in the feasible corridor width range [0.5m, 1.5m]. For the target placement of such a right corner, half the distance of the front view on the x-direction is taken. Opposite of the y-distance to the furthest point in the 90-degree wall (shown as red dot; Fig.7) in y-direction is taken.
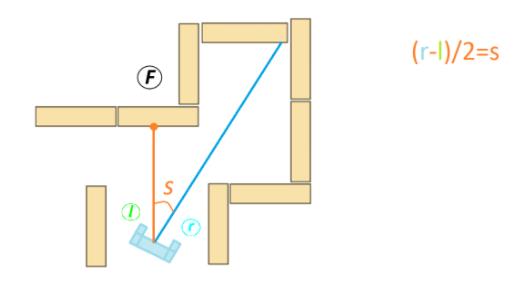
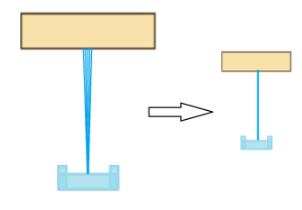
Lastly, considering that the robot will not always be aligned perfectly between the walls, our front view that is based on the lasers around the 0-axis of the robot will not be a reliable data to find the shortest distance to the robot in front of it. That’s why, we are updating our front view based on the orientation of the robot as it’s shown on Fig.8.
Left corner
Left corner detection is completely equivalent to the right corner detection, only difference being the clockwise scan direction.
4-way junction
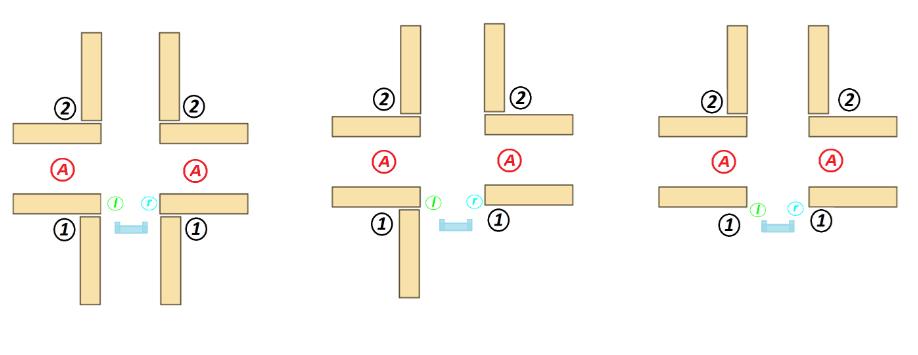
Detection of a 4-way junction is a matter of properly combining the conditions for the right and left junctions. When both first and second edges on left and right are found, we check for all 3 possible corridor widths by cosine theorem, for the feasible sizes. We register the geometry as a 4 way junction only when either one of the angles to the first edges is greater than 80 degrees (e.g. based on the orientation of the robot, it may be such that the angle to the right first edge is less than -80 but the angle to the left first edge is not greater than 80 degrees yet, which still is a suitable position for the robot to interpret the geometry as a 4-way junction).
T-Junction
Detection of T-junction is a matter of properly combining the conditions for the right and left corner detection. If only first right and left edges are found and second right and left edges are absent, we check for a feasible front distance (including the extra bit). When front view threshold is satisfied, the geometry is registered as a T-junction when either one of the angles to the first edges is greater than 80 degrees.
Dead-end
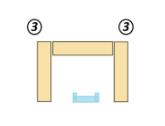
Detection of the dead-end requires the detection of increase-first-decrease-later sequence in the laser ranges in both right and left sides of the robot. If both of such geometries are found, we measure the distance between those points by the cosine theorem and see if the candidate dead-end is located in a feasible corridor. The geometry is assigned as a dead-end once the front view is less than a threshold which is safe for the robot to stop and turn back. We make sure that we keep this front view threshold less than 1.3 meters which is the required proximity for the door signal to be sent.
Door detection
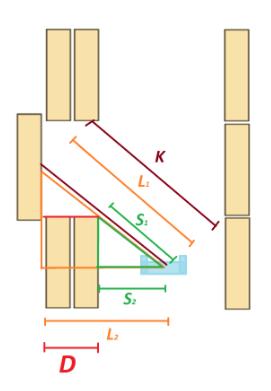
Apart from detecting the dead-ends, we are also checking for doors within the walls that have adequate depth. In order to save computation time, we are only checking for such doors if a valid right or left junction has already been detected, since the door detection also requires both first and second edges, as well as remaining in the feasible corridor width range. By measuring L1,S1 and S2 it is possible to calculate the distance L2. The difference between L2 and S2 gives the D. If the depth is in the range between 0.25 m to 0.35 m, the shape is determined as a door.