Embedded Motion Control 2012 Group 8: Difference between revisions
Jump to navigation
Jump to search
No edit summary |
|||
| (52 intermediate revisions by 3 users not shown) | |||
| Line 19: | Line 19: | ||
<tr align="center"> | <tr align="center"> | ||
<td>Ambardeep Das </td><td>[mailto:a.das@student.tue.nl Ambardeep Das]</td> | <td>Ambardeep Das </td><td>[mailto:a.das@student.tue.nl Ambardeep Das]</td> | ||
</tr> | |||
<tr align="center"> | |||
<td>Mikolaj Kabacinski </td><td>[mailto:m.j.kabacinski@student.tue.nl Mikolaj Kabacinski]</td> | |||
</tr> | </tr> | ||
</table> | </table> | ||
<br/> | <br/> | ||
==Progress == | ==Progress == | ||
| Line 43: | Line 45: | ||
*** connected to the svn server and successfully shared code | *** connected to the svn server and successfully shared code | ||
* '''Week | * '''Week 3''' | ||
** Have second meeting with tutor on Wednesday (clear some questions about the maze and corridor contest) | ** Have second meeting with tutor on Wednesday (clear some questions about the maze and corridor contest) | ||
** Redo the code based on last discussion (we came up with a new strategy for taking corners) | ** Redo the code based on last discussion (we came up with a new strategy for taking corners) | ||
** Restructure the software's framework for ease of future improvements | ** Restructure the software's framework for ease of future improvements | ||
** Try to use the messages from the camera with our arrow guiding system | ** Try to use the messages from the camera with our arrow guiding system | ||
** '''Progress week 3''' | |||
*** increased the modularity of the code | |||
*** we have a new approach to taking corners ( still issues with the transformation from the odometry (rotation), but it will be resolved in week 4) | |||
*** the robot still have some issues with taking some corners, also to be resolved in week 4 | |||
* '''Week 4''' | |||
** Have a final version of the navigational system | |||
** Start work on the arrow recognition | |||
** Prepare for next weeks presentation of chapter 10 | |||
** '''Progress''' | |||
*** we've made a demo video of the robot going through the maze : http://www.youtube.com/watch?v=2SGSvnsFX9M&feature=youtu.be | |||
*** we have an algorithm in matlab for the the arrow recognition, the code will be ported to C code and tested locally | |||
* '''Week 5''' | |||
** Held the presentation for chapter 10 | |||
** Made the code compliant with the new simulator for the corridor | |||
** tested on the robot on friday but it didn't work. On the first try, our node was sending the proper Twist messages on the topic /robot_in , they were visible with the rostopic echo robot_in , but the robot didn't move. With the rest of the attempts, the robot was not sending laser readings anymore. Because our code is waiting for a synchronisation flag to be chanced on the first arrival of a message, the execution remained stuck in an endless while because of this. We didn't find out if it was a problem with our code that made the robot non responsive or simply a problem with the communication to and from the robot. | |||
** We believe the robot will work on the real maze because : | |||
***we did a lot of testing on the simulated corridor with different orientations and starting positions | |||
****http://www.youtube.com/watch?v=vuIOMUIIfHk | |||
****http://www.youtube.com/watch?v=W-elldPgGmY | |||
****http://www.youtube.com/watch?v=VhlgFBfF5r8 | |||
*** The decision making behind is not based on any static points, so it will not be affected by a change in the laser readings or a change in the odometry readings (from simulator to robot) | |||
*** We will conduct a new test on Monday morning and it will work this time :) | |||
*** Updated the SVN to make it easy to use for testing. The previous time we experienced some problems when moving the code from one laptop to another, because we only used SVN until now only for fail safe purposes, without having a proper package there. | |||
*** The strategy used is the following: | |||
**** Wait for the first reading from the laser scan before deciding what to do | |||
**** Check if it is inside the corridor or not. If not, continue advancing towards the corridor (without hitting the walls) until you have proper readings at +95 and -95 degrees. | |||
**** Once inside the corridor, check the relative position to the walls and if not parallel to them, rotate in the required direction until parallel. | |||
**** Next go forward until you sense a turn possible and take it using our 3 step turning algorithm. | |||
* '''Week 6''' | |||
** tried the new version of the simulator -> didn't work for the first one, it showed a really strange behavior at the end of the turning cycle. With the last one + some modifications to the turning and going ahead seems to be working fine. We are still experiencing some problems with our algorithm in the simulator when starting at an angle or starting outside the maze. because of the way the simulated robot is turning, sometimes it takes a while to find the center pointing position (in strange,rare cases it even goes in a loop moving from left to right). We are now able to go through the maze. | |||
** had the first hour with the robot -> unexpected problem with turning when really close to the wall. jazz is not round and when turning , it touches the wall with its behind. We solved that (at least in the simulator) by changing how much the robot advances when taking a turn. Now it should stay farther from the walls. Because we didn't have a full hour of simulating , we only got a chance to try a couple of situations, but looks promising. | |||
** added some extra fail-safe measures to prevent the robot from going really close to the walls ( may need some tunning) | |||
** still working on the image processing. work perfect in matlab code, but node in C code ( to be investigated for one more week, afterwards switch to openCV) | |||
** experienced some strange behavior in the simulator when increasing the speed above 0.2 -> it receives messages with some kind of lag. it doesn't sense the turns imediatelly and initiates the turning procedure a bit late leading to either crashing into the wall (fail-safe disabled) or taking a long time to recover (fail-safe enabled) | |||
* '''Week 7''' | |||
** To do : | |||
*** test on the robot again and in case something unexpected happens, bag everything :) (make a video to upload on wiki) | |||
*** take a decision about the image recognition (custom method or openCV) | |||
*** star making a full and detailed description of the strategy for the wiki. | |||
* '''Week 8''' | |||
** CONGRATULATIONS to TU/e team for winning in Mexico!!!!!!!! | |||
** The testing from previous week was a success : | |||
*** First successful try : http://www.youtube.com/watch?v=cE1UBeHTDFI | |||
*** Robot with improvements going through the maze : http://www.youtube.com/watch?v=gCE-ouQsTF8 | |||
** We have decided to continue with our own image recognition plan, a custom-made algorithm with minimal openCV use. It offers greater robustness and configurability for the task at hand (arrow recognition). We have a fully working node that work both at close range and medium-high range, but with some errors when the arrow is far away and tilted a bit. ( a video example will be provided shortly after) | |||
** Finalize with the last test. Some things still need to be improved and tested : | |||
*** Dead end recovery | |||
*** Integrate the arrow into the navigation and try it in the maze. If it fails, try to fix it in the allocated time...if not, maybe drop it. | |||
*** Implement additional "method" for enforcing our always take a right strategy which at this time, has some issues when facing a T intersection and the left and right corridors are not perfectly aligned. | |||
** Prepare for the final presentation | |||
==Algorithms and software implementation== | |||
*'''Maze solving algorithms''' | |||
**'''The wall follower (also known as the left-hand rule or the right-hand rule):''' | |||
***If the maze is simply connected, that is, all its walls are connected together or to the maze’s outer boundary, then by keeping one hand in contact with one wall of the maze the player is guaranteed not to get lost and will reach a different exit if there is one; otherwise, it will return to the entrance. (Disjoint mazes can still be solved with the wall follower method, if the entrance and exit to the maze are on the outer walls of the maze. If however, the solver starts inside the maze, it might be on a section disjoint from the exit, and wall followers will continually go around their ring. The Pledge algorithm can solve this problem.) | |||
**'''Trémaux's algorithm''' | |||
***Trémaux's algorithm is an efficient method to find the way out of a maze that requires drawing lines on the floor to mark a path, and is guaranteed to work for all mazes that have well-defined passages. A path is either unvisited, marked once or marked twice. Every time a direction is chosen it is marked by drawing a line on the floor (from junction to junction). When arriving at a junction that has not been visited before (no other marks), pick a random direction (and mark the path). When arriving at a marked junction and if the current path is marked only once then turn around and walk back (and mark the path a second time). If this is not the case, pick the direction with the fewest marks (and mark it). When the robot finally reach the solution, paths marked exactly once will indicate a direct way back to the start. | |||
{| | |||
|- | |||
| [[image:maze1.png|none|thumb|Wall follower]] | |||
| [[image:maze2.png|none|thumb|Trémaux's algorithm]] | |||
|} | |||
*'''Relevant topics that can be received by the robot''' | |||
**'''laserdata''' provided by the laser scanner, will be used for wall detection; | |||
**'''images''' captured by the monocular camera, will be used for detecting arrows; | |||
**'''odometry''' provided by the base controller. | |||
{| | |||
|- | |||
| [[image:robotorientation.png|none|thumb|Robot orientation w.r.t. the laser scan data]] | |||
|} | |||
== Image processing == | |||
*The Jazz robot contains a monocular camera, which will be used to detect arrows in order to be able to find the exit of the maze faster. The camera will capture images of a RGB (red, green, blue) color system. But it is better to use HSV instead of RGB, because one color for different illuminations can be selected by angle range and saturation range. | |||
{| | |||
|- | |||
|[[File:RGB_HSV.png|500px|thumb|left|RGB to HSV]] | |||
|} | |||
*'''Algorithm''' | |||
**Taking advantage that the arrow has a saturated color, the Saturation layer of the HSV format is used as the base of the processing. The image process algorithm uses the contrast between the arrow and its background as a starting point to transform the image into a set of white shapes over a black background. Then the edges of these white shapes are found and analyzed. The analysis consists in localizing the closed contours to relate the points that form them to their centroid to get a direction criterion. The uniqueness of the algorithm is that it will work no matter the color of the arrow, as long as it is a saturated color. | |||
**First, the image it’s converted from a RGB format to a HSV format, taking the saturation layer as a base, | |||
{| | |||
|- | |||
|[[File:G08_1.png|400px|thumb|left|RGB arrow]] | |||
|[[File:G08_2.png|400px|thumb|left|Saturation layer]] | |||
|} | |||
*The histogram of this saturation layer image is determined, | |||
{| | |||
|[[File:G08_3.png|400px|thumb|left|Saturation layer histogram]] | |||
|} | |||
*Using [http://en.wikipedia.org/wiki/Otsu's_method Otsu’s method] a threshold is found to transform the grayscale image into a binary image, | |||
{| | |||
|[[File:G08_4.png|400px|thumb|left|Binarized image]] | |||
|} | |||
*Then a simple edge algorithm is used. The edge image is mapped to find closed contours for which their centroid is calculated, | |||
{| | |||
|[[File:G08_5.png|400px|thumb|left|Edges image]] | |||
|} | |||
*Based on the ratio between width and height of the region where the closed contour is, the different zones can be discriminated to avoid the further processing of all the closed contours. The distance from the centroid to each point of the contour is calculated resulting in the next curve, | |||
{| | |||
|[[File:G08_6.png|400px|thumb|left|Arrow's characteristic curve]] | |||
|} | |||
*The derivative and second derivative of this curve are calculated to extract the characteristics that define a arrow and its direction. From the first derivative the maximums and minimums are determined. An arrow will have two minimums and two or three maximums. | |||
{| | |||
|[[File:G08_7.png|400px|thumb|left|First derivative of the arrow's characteristic curve]] | |||
|} | |||
*The second derivative of the arrow's curve will have an absolute minimum at the arrow's tip because of the sudden change in the derivative at this point, comparing the location of this point with the length of the length of the arrow's curve vector the arrow's direction can be defined. | |||
{| | |||
|[[File:G08_8.png|400px|thumb|left|Second derivative of the arrow's characteristic curve]] | |||
|} | |||
*For the above example the absolute minimum location is higher than the length divided by two defining the left direction, if the minimum would be located lower than the mentioned threshold the direction would be the right direction. | |||
* An example for this situation is shown below, | |||
{| | |||
|- | |||
|[[File:G08_9.png|400px|thumb|left|Edges image]] | |||
|[[File:G08_10.png|200px|thumb|left|Arrow's characteristic curve]] | |||
|[[File:G08_11.png|200px|thumb|left|First derivative of the arrow's characteristic curve]] | |||
|[[File:G08_12.png|200px|thumb|left|Second derivative of the arrow's characteristic curve]] | |||
|} | |||
*The arrow recognition won't work correctly if the arrow is very tilted or if the arrow its pointing UP or DOWN. | |||
*The functionality of the algorithm implemented in ROS can be seen in this [http://www.youtube.com/watch?v=5wvWCsb-JIs&feature=plcp VIDEO]. | |||
== Strategy description == | |||
The strategy will be described here as it is visible by looking through the code, step by step. | |||
[[File:AnglesUntitled.png|500px|thumb|left|Angles used ]] | |||
* After subscribing to the topics, before the robot starts moving it waits for "synchronization", meaning that it is waiting for the first readings from odometry and laser before deciding what to do. This step is necessary because in the simulation , it started moving before knowing were it is leading to wall crashing or endless loops (if turning was needed as a first step) | |||
* The robot presumes that it is not properly positioned and goes into a function called "position me". Using the laser readings for distances corresponding to 95 and - 95 degrees, it checks if there readings are smaller than 0.2 or bigger than 9 then it starts going forwards until the initial condition is no longer true. In other words, it senses if it inside the maze or not. This was developed for the simulator where readings from when not inside the maze are other really small (smaller than 0.2) or really big (9 and something). Although not in the maze, it is presumed that at least the robot is facing towards the entrance. While moving, the robot is not supposed to crash into walls, constantly checking if the reading for 45 and -45 degrees are above a defined threshold. If not, initiate a small rotation in the direction where the +/- 45 degrees is bigger. After it has proper reading for both 95 and -95 (fully inside the maze) the next step is to rotate in order to position himself such that by going forward to remain parallel to the walls. In other words, the laser beam corresponding to 0 degrees (front) will be as parallel as possible to the walls. This is done by using measurements from 45,90, -45, and -90 degrees. The direction of rotation is computed by comparing readings from 90 with 95 and -90 with -95. At the end of this execution, the robot will be inside the maze and "parallel" to the walls. At the end of this, corridor size is measured as the sum distances from 90 and -90. This value will not change, as it it presumed that all the corridors have the same size, also no new corridor measurements done before the turn. | |||
* From this point on the strategy is : go forward , without hitting the walls, until you sense a change in readings in 90 and -90 degrees.(this strategy could result in false readings if the robot is tilted when moving through the corridor. By using the 45 degrees readings, we make sure that the robot is never tilted more than a couple of degrees, thus making sure that when the 90 readings detect a corners, it is in the close proximity. In addition to this, we also use the 45 degrees to check if there are any other options when a corner is detected) | |||
* The maze solving strategy is : if possible take a right, if not go forward, else take a left. This strategy provides a simple way of solving mazes. Although there are multiple strategies out there, in the end it is all a matter of probabilities (without knowing the map of the maze before hand). This strategy has only one weak point (that will not be present in the final competition) that is when the robot starts directly near an "island". This will cause the robot to go in circles around it, depending on the initial relative position of the robot to the island. This problem is acknowledged, but will not be treated further because it is not needed to finish the maze. | |||
* When the robot senses a change in the 90 and -90 readings, it knows that he has to take a turn. Although not present in the simulator, in real life there is an issue when only referring to these measurements because there is a high chance that the corners for left and right will not be properly aligned. This might make the robot take a left for instance when a right is possible, thus making unable to go through to the exit. The improved strategy, when detecting a left, also uses the 45 degrees right to check if also there is a reading bigger than the corridor size and if it exists , wait until the right turn is available. | |||
* An addition, when faced with a junction, the highest decisional priority will come to the arrow recognition. When it finds a left or a right, it checks if there is also a front wall and analyzes if there is an arrow there and its orientation. If an arrow is found, it will override the always take a right strategy. A better use of the camera would be to scan ahead and see if there is an arrow at a far wall. If the robot senses a left/right there, there is no point to take any other turn until it gets to that point. This option will not be discussed/used further because of the low resolution of the camera. With the current implementation, it only takes into consideration the camera readings only when displayed on a wall close to a junction point. | |||
* After the decision of taking a left or a right, the execution enters one of the two turning functions. A turn is divided into 3 parts: | |||
** entering the junction -> by using odometry data, the robot keeps track of the distance starting from the point it first sensed the turn, going in front for 0.2* corridor size. It goes this less into the corner, because of the way the robot turn using its back wheels. it is not turning exactly on its axis and if this aspect is not taken into consideration, it will lead to hitting the wall with its back. After each use of the distance measuring variable (based on X,Y coordinates) , the value is reset because it proves reliable only for small bursts/distances. Measuring the distance on a long distance gives a lot of errors, due to the odometry. | |||
** rotating -> the rotating also uses the odometry, but must undergo a quaternion transformation in order to make the angles more user friendly. Even after applying the quaternion, the yaw angle shows strange behavior going from 0 to 180 to -180 to 0 again. This leads to a series of cases based on the initial yaw of the rotation. | |||
** leaving the junction -> after successfully rotating, the robot goes in front (without hitting the walls) for a distance equal to the corridor size. | |||
* Although the algorithm used doesn't measure the next corridor size, the small distance from the first step of turning in combination with our rule of staying away from walls, make it able to enter even smaller corridors. | |||
* A possible issue might arise when dealing with sensing the exit. If the corridor is alongside a corridor, without knowing the actual shape of the exit (corner wise) or having an arrow to point (in case it is at a junction) , it is difficult to implement in real life. In the simulator this would be easy, checking for really small or big readings. | |||
* The flow chart bellow illustrates the general strategy used | |||
[[File:flow.png|500px|thumb|center|Flow chart ]] | |||
==Architecture== | |||
[[File:Inputsoutputs.png|500px|thumb|left|Arhitecture]] | |||
* Simple implementation: | |||
** only one node (three inputs, one output). This was done in order to avoid unwanted additional communication in the case of multiple nodes. Also, because we are not dealing with high computations or distributed execution (each node on another computer) there is no need for a second node. | |||
** The code is made modular by use of callbackfunctions and user defined functions. | |||
** Subscribing to topics is used using queues of size 1. this way we avoid processing previous readings, which are no longer of use (in case processing one message takes more than the the message's periods) | |||
** We only use one message source at a time, thus leaving out the need to synchronize messages from different sources based on time stamps | |||
** The computations are done inside the callbackfunctions, relevant data is stored in global variables. There number is limited so the overhead on the memory is not considerable. | |||
** We use three callback function (imageCallback, chatterCallback, chatterCallback2) and 4 user defined functions (position_me, turn_left, turn_right, turn_back) | |||
*** imageCallback -> does the image processing and stores the result in a global integer (dir) which can be 0, 1 (left direction available), or 2 (right direction available). | |||
*** chatterCallback -> here we get the data from the distance array, saving in global variables the readings for +/95, +/-45, +/-95,center (0 degrees, forward reading), corridor size. | |||
*** chatterCallback2 -> keeps track of the distance using odometry (x,y,z positions), calculates the change of position, de-quaternizes the odometry messages for the yaw reading and stores it in a global variable. The variables computed here are mainly used in the the turning process (going ahead and turning) | |||
Latest revision as of 21:15, 1 July 2012
Group 8
Tutor: Sjoerd van den Dries
| Member | |
|---|---|
| Alexandru Dinu | Alexandru Dinu |
| Thomas Theunisse | Thomas Theunisse |
| Alejandro Morales | Alejandro Morales |
| Ambardeep Das | Ambardeep Das |
| Mikolaj Kabacinski | Mikolaj Kabacinski |
Progress
- Week 1
- Installed Ubuntu + ROS + Eclipse
- Working on the tutorials...
- Week 2
- Finished with the tutorials
- Try to find a solution for rviz crashing on one of the computers
- Have the first meeting with the tutor
- Discuss the possible strategies for resolving the maze
- Make a list of the names and structures of relevant topics that can be received from the simulated robot
- Try to practice a bit with subscribing to certain topics from the simulated robot and publish messages to make him navigate around the maze
- Progress
- resolved the issue with rviz
- did testing on the robot and we are now able to make him move, take turns, measure the distance in front of him and take decisions based on that
- made a node that subscribes to the scan topic and publish on /cmd_vel topic
- starting testing code to include the odometry information in our strategy
- started thinking about the image recognition of the arrows
- connected to the svn server and successfully shared code
- Week 3
- Have second meeting with tutor on Wednesday (clear some questions about the maze and corridor contest)
- Redo the code based on last discussion (we came up with a new strategy for taking corners)
- Restructure the software's framework for ease of future improvements
- Try to use the messages from the camera with our arrow guiding system
- Progress week 3
- increased the modularity of the code
- we have a new approach to taking corners ( still issues with the transformation from the odometry (rotation), but it will be resolved in week 4)
- the robot still have some issues with taking some corners, also to be resolved in week 4
- Week 4
- Have a final version of the navigational system
- Start work on the arrow recognition
- Prepare for next weeks presentation of chapter 10
- Progress
- we've made a demo video of the robot going through the maze : http://www.youtube.com/watch?v=2SGSvnsFX9M&feature=youtu.be
- we have an algorithm in matlab for the the arrow recognition, the code will be ported to C code and tested locally
- Week 5
- Held the presentation for chapter 10
- Made the code compliant with the new simulator for the corridor
- tested on the robot on friday but it didn't work. On the first try, our node was sending the proper Twist messages on the topic /robot_in , they were visible with the rostopic echo robot_in , but the robot didn't move. With the rest of the attempts, the robot was not sending laser readings anymore. Because our code is waiting for a synchronisation flag to be chanced on the first arrival of a message, the execution remained stuck in an endless while because of this. We didn't find out if it was a problem with our code that made the robot non responsive or simply a problem with the communication to and from the robot.
- We believe the robot will work on the real maze because :
- we did a lot of testing on the simulated corridor with different orientations and starting positions
- The decision making behind is not based on any static points, so it will not be affected by a change in the laser readings or a change in the odometry readings (from simulator to robot)
- We will conduct a new test on Monday morning and it will work this time :)
- Updated the SVN to make it easy to use for testing. The previous time we experienced some problems when moving the code from one laptop to another, because we only used SVN until now only for fail safe purposes, without having a proper package there.
- The strategy used is the following:
- Wait for the first reading from the laser scan before deciding what to do
- Check if it is inside the corridor or not. If not, continue advancing towards the corridor (without hitting the walls) until you have proper readings at +95 and -95 degrees.
- Once inside the corridor, check the relative position to the walls and if not parallel to them, rotate in the required direction until parallel.
- Next go forward until you sense a turn possible and take it using our 3 step turning algorithm.
- Week 6
- tried the new version of the simulator -> didn't work for the first one, it showed a really strange behavior at the end of the turning cycle. With the last one + some modifications to the turning and going ahead seems to be working fine. We are still experiencing some problems with our algorithm in the simulator when starting at an angle or starting outside the maze. because of the way the simulated robot is turning, sometimes it takes a while to find the center pointing position (in strange,rare cases it even goes in a loop moving from left to right). We are now able to go through the maze.
- had the first hour with the robot -> unexpected problem with turning when really close to the wall. jazz is not round and when turning , it touches the wall with its behind. We solved that (at least in the simulator) by changing how much the robot advances when taking a turn. Now it should stay farther from the walls. Because we didn't have a full hour of simulating , we only got a chance to try a couple of situations, but looks promising.
- added some extra fail-safe measures to prevent the robot from going really close to the walls ( may need some tunning)
- still working on the image processing. work perfect in matlab code, but node in C code ( to be investigated for one more week, afterwards switch to openCV)
- experienced some strange behavior in the simulator when increasing the speed above 0.2 -> it receives messages with some kind of lag. it doesn't sense the turns imediatelly and initiates the turning procedure a bit late leading to either crashing into the wall (fail-safe disabled) or taking a long time to recover (fail-safe enabled)
- Week 7
- To do :
- test on the robot again and in case something unexpected happens, bag everything :) (make a video to upload on wiki)
- take a decision about the image recognition (custom method or openCV)
- star making a full and detailed description of the strategy for the wiki.
- To do :
- Week 8
- CONGRATULATIONS to TU/e team for winning in Mexico!!!!!!!!
- The testing from previous week was a success :
- First successful try : http://www.youtube.com/watch?v=cE1UBeHTDFI
- Robot with improvements going through the maze : http://www.youtube.com/watch?v=gCE-ouQsTF8
- We have decided to continue with our own image recognition plan, a custom-made algorithm with minimal openCV use. It offers greater robustness and configurability for the task at hand (arrow recognition). We have a fully working node that work both at close range and medium-high range, but with some errors when the arrow is far away and tilted a bit. ( a video example will be provided shortly after)
- Finalize with the last test. Some things still need to be improved and tested :
- Dead end recovery
- Integrate the arrow into the navigation and try it in the maze. If it fails, try to fix it in the allocated time...if not, maybe drop it.
- Implement additional "method" for enforcing our always take a right strategy which at this time, has some issues when facing a T intersection and the left and right corridors are not perfectly aligned.
- Prepare for the final presentation
Algorithms and software implementation
- Maze solving algorithms
- The wall follower (also known as the left-hand rule or the right-hand rule):
- If the maze is simply connected, that is, all its walls are connected together or to the maze’s outer boundary, then by keeping one hand in contact with one wall of the maze the player is guaranteed not to get lost and will reach a different exit if there is one; otherwise, it will return to the entrance. (Disjoint mazes can still be solved with the wall follower method, if the entrance and exit to the maze are on the outer walls of the maze. If however, the solver starts inside the maze, it might be on a section disjoint from the exit, and wall followers will continually go around their ring. The Pledge algorithm can solve this problem.)
- Trémaux's algorithm
- Trémaux's algorithm is an efficient method to find the way out of a maze that requires drawing lines on the floor to mark a path, and is guaranteed to work for all mazes that have well-defined passages. A path is either unvisited, marked once or marked twice. Every time a direction is chosen it is marked by drawing a line on the floor (from junction to junction). When arriving at a junction that has not been visited before (no other marks), pick a random direction (and mark the path). When arriving at a marked junction and if the current path is marked only once then turn around and walk back (and mark the path a second time). If this is not the case, pick the direction with the fewest marks (and mark it). When the robot finally reach the solution, paths marked exactly once will indicate a direct way back to the start.
- The wall follower (also known as the left-hand rule or the right-hand rule):
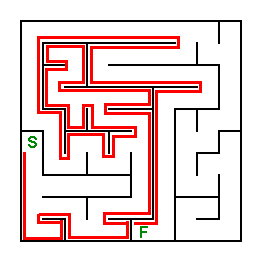 |
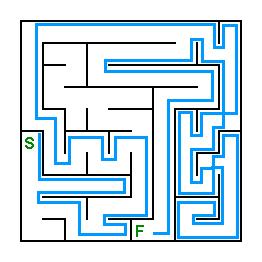 |
- Relevant topics that can be received by the robot
- laserdata provided by the laser scanner, will be used for wall detection;
- images captured by the monocular camera, will be used for detecting arrows;
- odometry provided by the base controller.
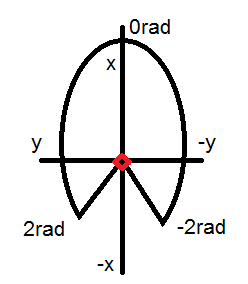 |
Image processing
- The Jazz robot contains a monocular camera, which will be used to detect arrows in order to be able to find the exit of the maze faster. The camera will capture images of a RGB (red, green, blue) color system. But it is better to use HSV instead of RGB, because one color for different illuminations can be selected by angle range and saturation range.
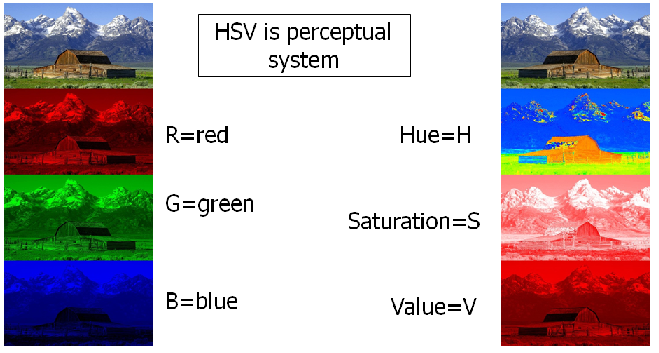 |
- Algorithm
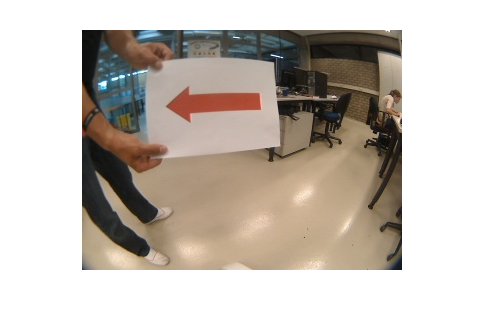
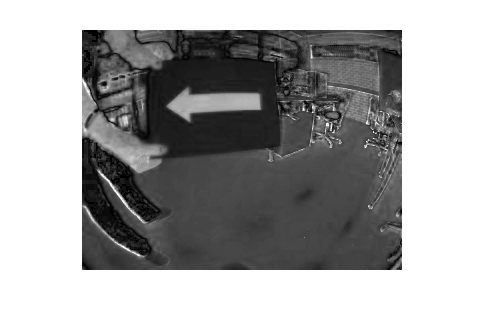
- Taking advantage that the arrow has a saturated color, the Saturation layer of the HSV format is used as the base of the processing. The image process algorithm uses the contrast between the arrow and its background as a starting point to transform the image into a set of white shapes over a black background. Then the edges of these white shapes are found and analyzed. The analysis consists in localizing the closed contours to relate the points that form them to their centroid to get a direction criterion. The uniqueness of the algorithm is that it will work no matter the color of the arrow, as long as it is a saturated color.
- First, the image it’s converted from a RGB format to a HSV format, taking the saturation layer as a base,
 |
 |
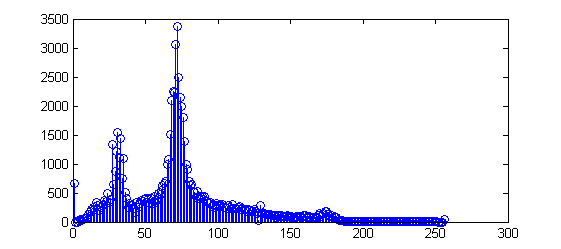
- The histogram of this saturation layer image is determined,
 |
- Using Otsu’s method a threshold is found to transform the grayscale image into a binary image,
 |
- Then a simple edge algorithm is used. The edge image is mapped to find closed contours for which their centroid is calculated,
 |
- Based on the ratio between width and height of the region where the closed contour is, the different zones can be discriminated to avoid the further processing of all the closed contours. The distance from the centroid to each point of the contour is calculated resulting in the next curve,
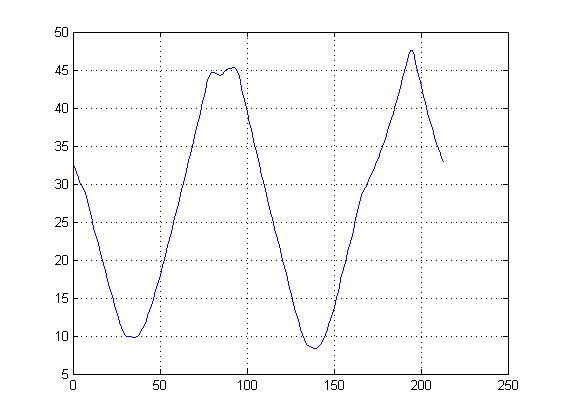 |
- The derivative and second derivative of this curve are calculated to extract the characteristics that define a arrow and its direction. From the first derivative the maximums and minimums are determined. An arrow will have two minimums and two or three maximums.
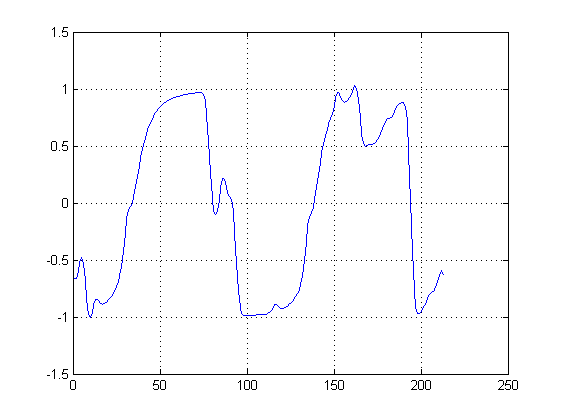 |
- The second derivative of the arrow's curve will have an absolute minimum at the arrow's tip because of the sudden change in the derivative at this point, comparing the location of this point with the length of the length of the arrow's curve vector the arrow's direction can be defined.
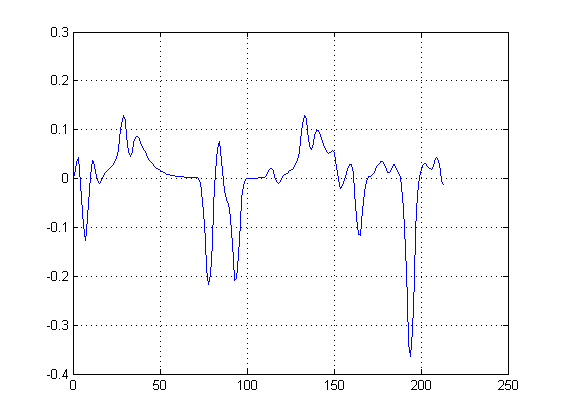 |
- For the above example the absolute minimum location is higher than the length divided by two defining the left direction, if the minimum would be located lower than the mentioned threshold the direction would be the right direction.
- An example for this situation is shown below,
 |
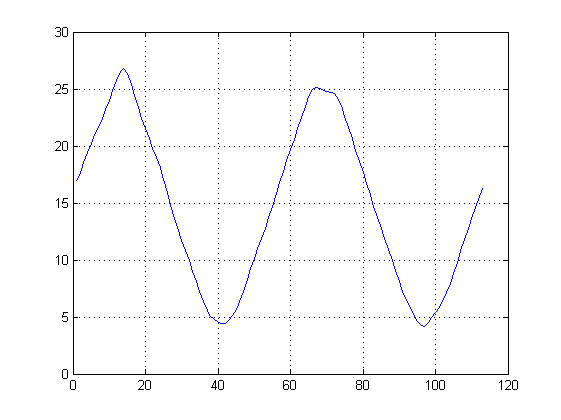 |
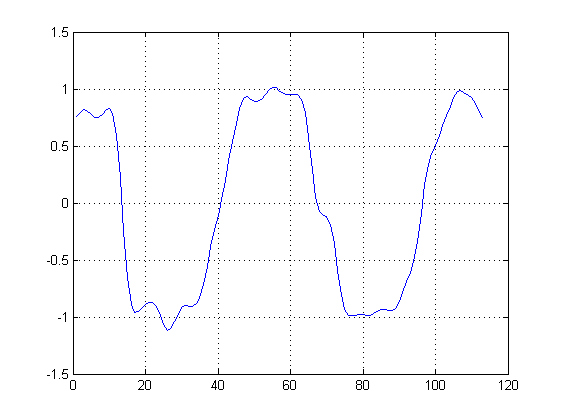 |
 |
- The arrow recognition won't work correctly if the arrow is very tilted or if the arrow its pointing UP or DOWN.
- The functionality of the algorithm implemented in ROS can be seen in this VIDEO.
Strategy description
The strategy will be described here as it is visible by looking through the code, step by step.
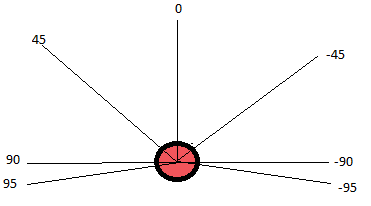
- After subscribing to the topics, before the robot starts moving it waits for "synchronization", meaning that it is waiting for the first readings from odometry and laser before deciding what to do. This step is necessary because in the simulation , it started moving before knowing were it is leading to wall crashing or endless loops (if turning was needed as a first step)
- The robot presumes that it is not properly positioned and goes into a function called "position me". Using the laser readings for distances corresponding to 95 and - 95 degrees, it checks if there readings are smaller than 0.2 or bigger than 9 then it starts going forwards until the initial condition is no longer true. In other words, it senses if it inside the maze or not. This was developed for the simulator where readings from when not inside the maze are other really small (smaller than 0.2) or really big (9 and something). Although not in the maze, it is presumed that at least the robot is facing towards the entrance. While moving, the robot is not supposed to crash into walls, constantly checking if the reading for 45 and -45 degrees are above a defined threshold. If not, initiate a small rotation in the direction where the +/- 45 degrees is bigger. After it has proper reading for both 95 and -95 (fully inside the maze) the next step is to rotate in order to position himself such that by going forward to remain parallel to the walls. In other words, the laser beam corresponding to 0 degrees (front) will be as parallel as possible to the walls. This is done by using measurements from 45,90, -45, and -90 degrees. The direction of rotation is computed by comparing readings from 90 with 95 and -90 with -95. At the end of this execution, the robot will be inside the maze and "parallel" to the walls. At the end of this, corridor size is measured as the sum distances from 90 and -90. This value will not change, as it it presumed that all the corridors have the same size, also no new corridor measurements done before the turn.
- From this point on the strategy is : go forward , without hitting the walls, until you sense a change in readings in 90 and -90 degrees.(this strategy could result in false readings if the robot is tilted when moving through the corridor. By using the 45 degrees readings, we make sure that the robot is never tilted more than a couple of degrees, thus making sure that when the 90 readings detect a corners, it is in the close proximity. In addition to this, we also use the 45 degrees to check if there are any other options when a corner is detected)
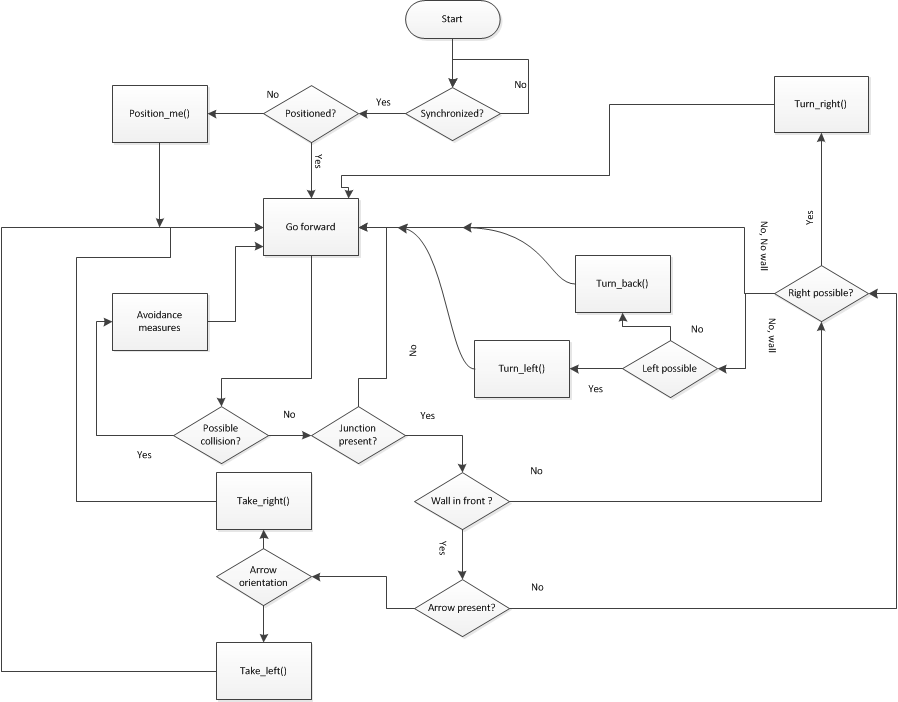
- The maze solving strategy is : if possible take a right, if not go forward, else take a left. This strategy provides a simple way of solving mazes. Although there are multiple strategies out there, in the end it is all a matter of probabilities (without knowing the map of the maze before hand). This strategy has only one weak point (that will not be present in the final competition) that is when the robot starts directly near an "island". This will cause the robot to go in circles around it, depending on the initial relative position of the robot to the island. This problem is acknowledged, but will not be treated further because it is not needed to finish the maze.
- When the robot senses a change in the 90 and -90 readings, it knows that he has to take a turn. Although not present in the simulator, in real life there is an issue when only referring to these measurements because there is a high chance that the corners for left and right will not be properly aligned. This might make the robot take a left for instance when a right is possible, thus making unable to go through to the exit. The improved strategy, when detecting a left, also uses the 45 degrees right to check if also there is a reading bigger than the corridor size and if it exists , wait until the right turn is available.
- An addition, when faced with a junction, the highest decisional priority will come to the arrow recognition. When it finds a left or a right, it checks if there is also a front wall and analyzes if there is an arrow there and its orientation. If an arrow is found, it will override the always take a right strategy. A better use of the camera would be to scan ahead and see if there is an arrow at a far wall. If the robot senses a left/right there, there is no point to take any other turn until it gets to that point. This option will not be discussed/used further because of the low resolution of the camera. With the current implementation, it only takes into consideration the camera readings only when displayed on a wall close to a junction point.
- After the decision of taking a left or a right, the execution enters one of the two turning functions. A turn is divided into 3 parts:
- entering the junction -> by using odometry data, the robot keeps track of the distance starting from the point it first sensed the turn, going in front for 0.2* corridor size. It goes this less into the corner, because of the way the robot turn using its back wheels. it is not turning exactly on its axis and if this aspect is not taken into consideration, it will lead to hitting the wall with its back. After each use of the distance measuring variable (based on X,Y coordinates) , the value is reset because it proves reliable only for small bursts/distances. Measuring the distance on a long distance gives a lot of errors, due to the odometry.
- rotating -> the rotating also uses the odometry, but must undergo a quaternion transformation in order to make the angles more user friendly. Even after applying the quaternion, the yaw angle shows strange behavior going from 0 to 180 to -180 to 0 again. This leads to a series of cases based on the initial yaw of the rotation.
- leaving the junction -> after successfully rotating, the robot goes in front (without hitting the walls) for a distance equal to the corridor size.
- Although the algorithm used doesn't measure the next corridor size, the small distance from the first step of turning in combination with our rule of staying away from walls, make it able to enter even smaller corridors.
- A possible issue might arise when dealing with sensing the exit. If the corridor is alongside a corridor, without knowing the actual shape of the exit (corner wise) or having an arrow to point (in case it is at a junction) , it is difficult to implement in real life. In the simulator this would be easy, checking for really small or big readings.
- The flow chart bellow illustrates the general strategy used
Architecture

- Simple implementation:
- only one node (three inputs, one output). This was done in order to avoid unwanted additional communication in the case of multiple nodes. Also, because we are not dealing with high computations or distributed execution (each node on another computer) there is no need for a second node.
- The code is made modular by use of callbackfunctions and user defined functions.
- Subscribing to topics is used using queues of size 1. this way we avoid processing previous readings, which are no longer of use (in case processing one message takes more than the the message's periods)
- We only use one message source at a time, thus leaving out the need to synchronize messages from different sources based on time stamps
- The computations are done inside the callbackfunctions, relevant data is stored in global variables. There number is limited so the overhead on the memory is not considerable.
- We use three callback function (imageCallback, chatterCallback, chatterCallback2) and 4 user defined functions (position_me, turn_left, turn_right, turn_back)
- imageCallback -> does the image processing and stores the result in a global integer (dir) which can be 0, 1 (left direction available), or 2 (right direction available).
- chatterCallback -> here we get the data from the distance array, saving in global variables the readings for +/95, +/-45, +/-95,center (0 degrees, forward reading), corridor size.
- chatterCallback2 -> keeps track of the distance using odometry (x,y,z positions), calculates the change of position, de-quaternizes the odometry messages for the yaw reading and stores it in a global variable. The variables computed here are mainly used in the the turning process (going ahead and turning)