Embedded Motion Control 2013 Group 3: Difference between revisions
| (91 intermediate revisions by 5 users not shown) | |||
| Line 162: | Line 162: | ||
* Finishing up the tutorials that weren't yet completed | * Finishing up the tutorials that weren't yet completed | ||
* Initial architecture design: condition and state functions. | * Initial architecture design: condition and state functions. | ||
* The main architectural idea is to keep a clear distinction between '''conditions''' and '''states'''. | |||
** '''Conditions''': In what kind of situation is pico? | |||
** '''State''': How should pico act to his current situation? | |||
'''Week 3''' <br/> | '''Week 3''' <br/> | ||
| Line 176: | Line 179: | ||
(KO) | (KO) | ||
* Created state_stop function | * Created state_stop function | ||
Testing on Pico: (All) | |||
* First time testing on Pico. Just figuring everything out. | |||
'''Week 4''' <br/> | '''Week 4''' <br/> | ||
(MA & YO) | |||
* Worked on gap handling | |||
* Tuning state_drive_parallel | |||
(KO & YI & HI) | |||
* Worked on gap detection | |||
(All) | |||
* Simulating corridor left and right | |||
Testing on Pico: (All) | |||
* After some tuning drive_parallel worked well. | |||
* After some tuning gap_detection worked well (we learned to remove the first and last 20 points that reflect on Pico). | |||
* We tuned the radius of gap_handling down. In practise we want pico to take slightly smaller corners. | |||
* We tuned down the cornering speed a bit to be very stable in every type of corridor and gap width (from about 60cm to 1m+) | |||
* We are ready for the corridor competition. | |||
'''Week 5''' <br/> | '''Week 5''' <br/> | ||
| Line 251: | Line 275: | ||
** Perhaps if we detect an arrowshape ahead, we should lower the speed of drive_parallel? Yi & Hi should judge if this may help. | ** Perhaps if we detect an arrowshape ahead, we should lower the speed of drive_parallel? Yi & Hi should judge if this may help. | ||
** Exit maze still didn't work as we designed it. Very low priority, since pico exits the maze fully which is acceptable in the challenge. With people standing around outside of the maze, the exit maze will nog work anyway. | ** Exit maze still didn't work as we designed it. Very low priority, since pico exits the maze fully which is acceptable in the challenge. With people standing around outside of the maze, the exit maze will nog work anyway. | ||
'''Week 8''' <br/> | '''Week 8''' <br/> | ||
Testing on Pico (All) | |||
* The camera worked from a bigger distance. Our camera node detected the arrows in time. | |||
* There was an error in the communication between our nodes. The bool arrow_left was not published to the topic. After a while we found out we used ros::Spin() instead of ros::SpinOnce(), which prevented communication. Unfortunately this cost us a lot of time during testing. | |||
*When this was solved Pico reacted correctly on an arrow. But the reset condition for the arrow detection was very bad (onrobust). The idea was to publish a bool from theseus to the camera node when a corner is finished. | |||
(All) | |||
* Implemented a more robust reset condition for arrow detection. When a corner is finished the arrow detection is reset. Unfortunately there was no time to test this anymore. | |||
* We decided it wasn't necessary to lower the speed if a corner is ahead, because we detect the arrows in time now. | |||
(KO) | |||
* Created and prepared the presentation. He practiced once for the group, and group gave feedback for improvement. In the end we wanted to emphasize two things in the presentations: | |||
** Clear split between conditions (information processing) and conditions (how should pico actuate). | |||
** Iterative approach of testing and tuning (and therefore seeing how each change to the code works). | |||
==PICO usefull info== | ==PICO usefull info== | ||
| Line 268: | Line 307: | ||
== Design approach == | == Design approach == | ||
Our approach for this project is to start from a very simple working example. From this starting point an iterative approach of adding, extending or improving functionality and then testing and tuning the new functionality right away. The benefit of this approach is getting instant feedback of the functionality: do the new functions work as intended, are they tuned well, and do they work together with the other parts? | Our approach for this project is to start from a very simple working example. From this starting point an iterative approach of adding, extending or improving functionality and then testing and tuning the new functionality right away. The benefit of this approach is getting instant feedback of the functionality: do the new functions work as intended, are they tuned well (both for simulation and pico), and do they work together with the other parts? | ||
[[File:design.jpg|500px]] | [[File:design.jpg|500px]] | ||
Our ambition is to create effective functionality that is challenging out our own level, yet understandable for everybody within the group, rather than trying to sound intensely intelligent with convoluted third party algorithms. Discussing the ideas before implementation and testing after implementation is key in our approach. Some of these concepts are explained in the video on this page: [http://www.ted.com/talks/tom_wujec_build_a_tower.html] | |||
== Maze solving strategy == | |||
For navigating through the maze we use a '''right wall follower''' strategy. This means that the robot will always stick to the right wall and always find it's way to the exit. As a result we get the following priorities: | |||
*1) Take right turns (if they are there). | |||
*2) Go straight. | |||
*3) Go left (we only go left if we can't go straight or to the right, this is achieved with the go_straight_priority function). | |||
But there's a few exceptions to these priorities: | |||
* If a gap is a dead end really quickly, we detect that, and skip it. | |||
* If there is an arrow to the left detected by the camera node, we prioritize left and act on it as soon as the gap to the left is detected. | |||
* | |||
== Software architecture == | |||
* We use one package named '''Theseus2''' | |||
We | * We use a '''node theseus''' (20 Hz) that subscribes to pico/laser and pico/cam_data and publishes velocities. | ||
* The main architectural idea has been to keep a clear distinction between '''conditions''' and '''states'''. | |||
** '''Conditions''': In what kind of situation is pico? | |||
** '''State''': How should pico act to his current situation? | |||
=== Theseus node === | |||
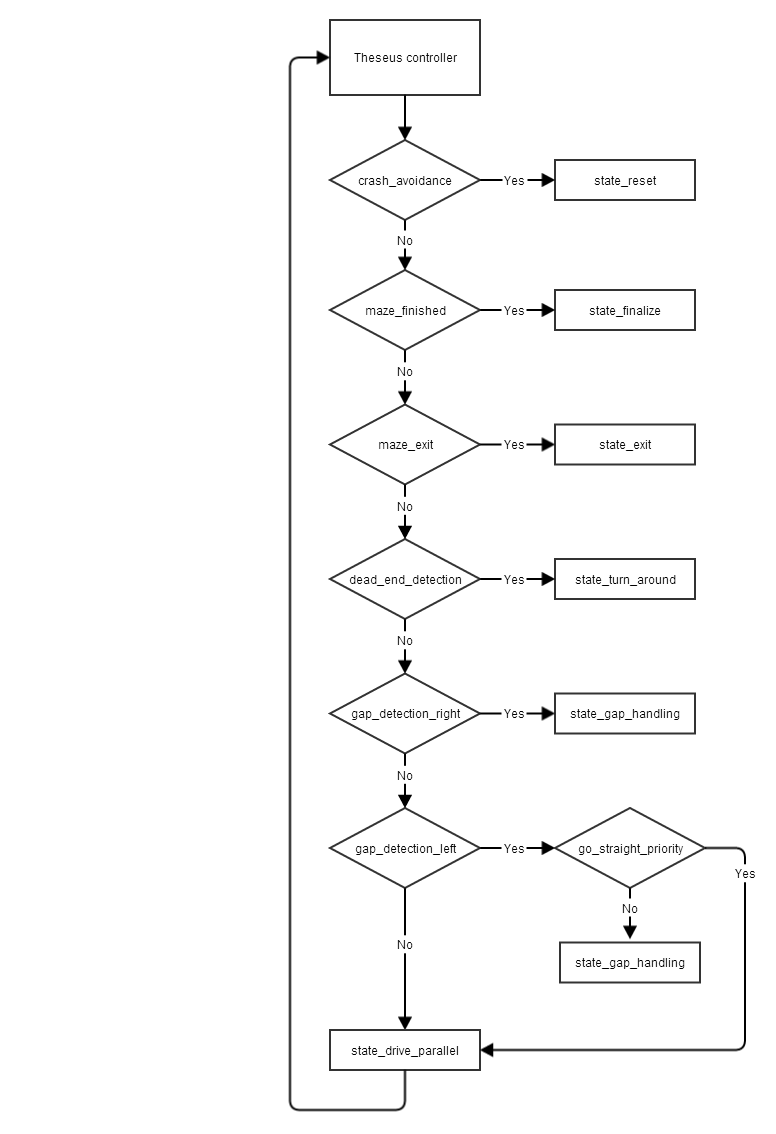
When pico/laser publishes data, theseus_controller is called. theseus_controller contains our main functionality.<br/> | |||
1) Process the laserdata for future use.<br/> | |||
2) Gather conditions (each conditions is explained elsewhere on the wiki)<br/> | |||
3) Based on the conditions a state will be chosen and executed. In some situations (f.e gap_handling) the previous state is also considered to determine the current state (Markov chain principle)<br/> | |||
4) The chosen state will set the velocities that can be published by the node.<br/> | |||
The figure below depicts the simplified architecture of the program at this point. | The figure below depicts the simplified architecture of the program at this point. | ||
| Line 310: | Line 343: | ||
[[File:Main_Flowchart.png|500px]] | [[File:Main_Flowchart.png|500px]] | ||
== | ==== General files ==== | ||
* datastructures.h: all global variables and datastructures are gathered here. | |||
* send_velocities.h: this functions is used for theseus to publish the velocities. | |||
* laser_processor.h: this function pre-processes the laserdata for future use. | |||
=== Camera node === | |||
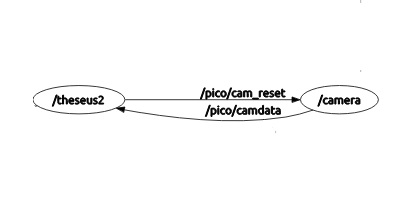
We use a second '''node camera''' that spins on 5 Hz, subscribes to pico/camera and puslishes bool arrowleft to the topic pico/cam_data. Because of our right wall follower strategy, we only publish data of left arrows. When pico/camera publishes something camera_controller is called which processes the images and when an arrow to the left is detected sets arrow_left to true. | |||
camera_controller contains our main functionality. The method of detecting arrows is explained elsewhere. | |||
==Conditions/States== | |||
== | ===Crash and reset functions=== | ||
''' | '''condition_crash_avoidance:''' <br/> | ||
Pico is not allowed to hit the walls, so there when Pico gets too close to the wall, it should stop driving. This is carried out in the next loop: | Pico is not allowed to hit the walls, so there when Pico gets too close to the wall, it should stop driving. This is carried out in the next loop: | ||
*If the shortest distance from the wall to Pico is less than | *If the shortest distance from the wall to Pico is less than 32 cm (to make sure rotating doesn't run Pico's rearside into the wall), Pico will go into state_reset. | ||
'''state_reset:''' <br/> | |||
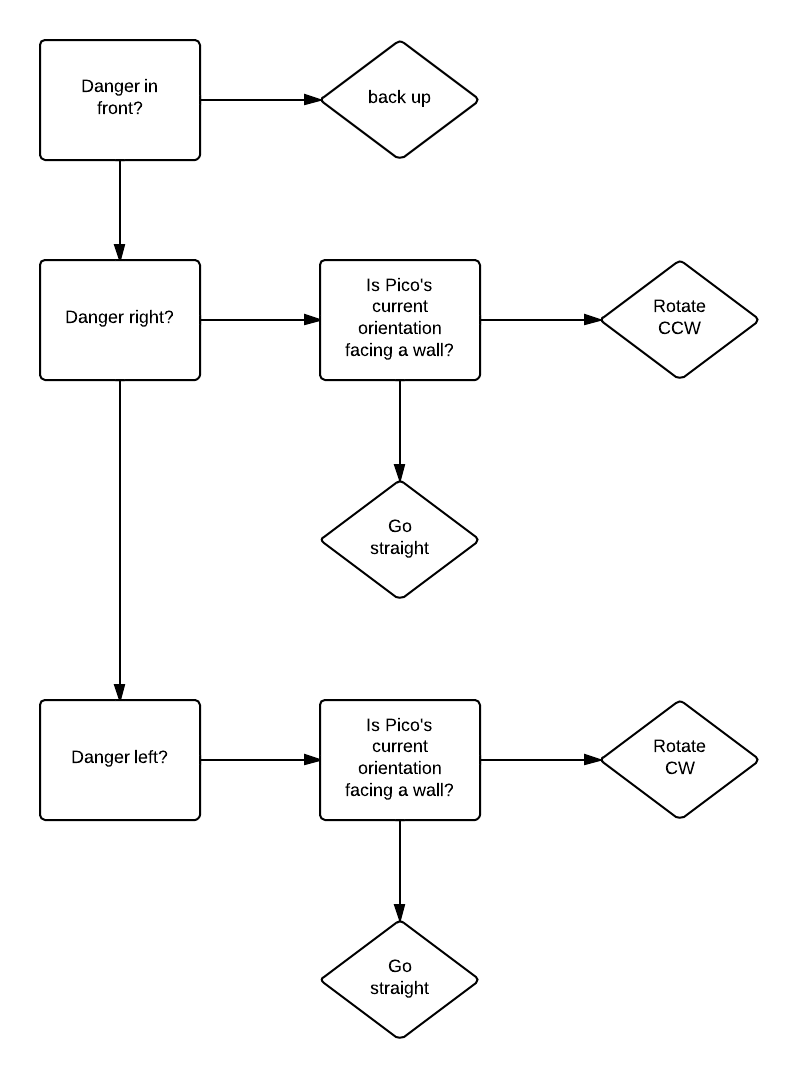
This state is being called when Pico is about to crash. After waiting approximately a second to see if the problem might have resolved itself, it will go into the loop depicted in the following picture: | |||
[[File:state_reset.png|500px]] | |||
In words: Pico scans the laser data to determine the index of the shortest distance. This index is then used to determine what the best course of action is to make sure pica can continue. If the shortest distance is to the left or right, Pico will rotate away from the wall until going forward will increase the shortest distance, such that pico will go away from the wall. If the shortest distance is in front, Pico will drive backwards until a certain threshold is met, and then continue with drive_parallel. | |||
''' | ===Maze exit funtions=== | ||
'''condition_maze_finished:''' <br/> | |||
When Pico exists the maze the condition "Finished" is reached. The following steps are carried out to check if Pico behaves in this condition: | When Pico exists the maze the condition "Finished" is reached. The following steps are carried out to check if Pico behaves in this condition: | ||
* Read out the laser data from - | * Read out the laser data from -135 to +135 degrees w.r.t the front of Pico | ||
* Check if all distances are larger than | * Check if all distances are larger than 1.5 meters. When this is the case. Maze finished! | ||
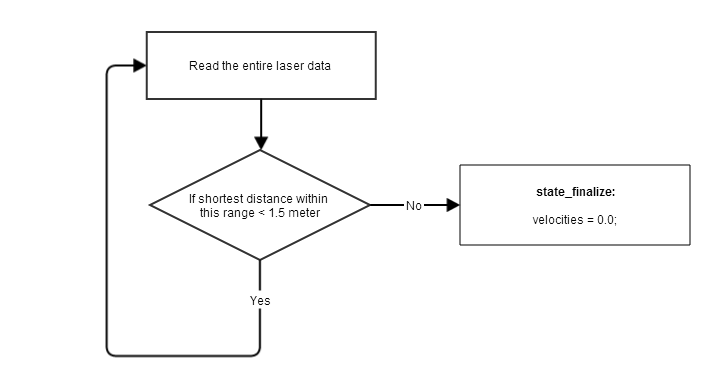
'''state_final:''' <br/> | |||
State Final is called when Pico satisfies the condition Finalize. This state will ensure that Pico will stop moving by sending 0 to the wheels for translation and rotation. | |||
[[File:Finalize.png|500px]] | |||
'''condition_maze_exit:''' <br/> | |||
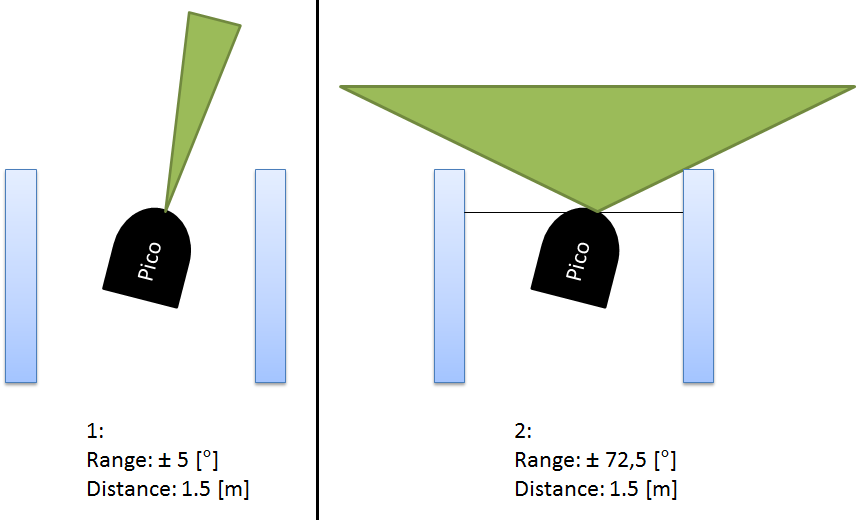
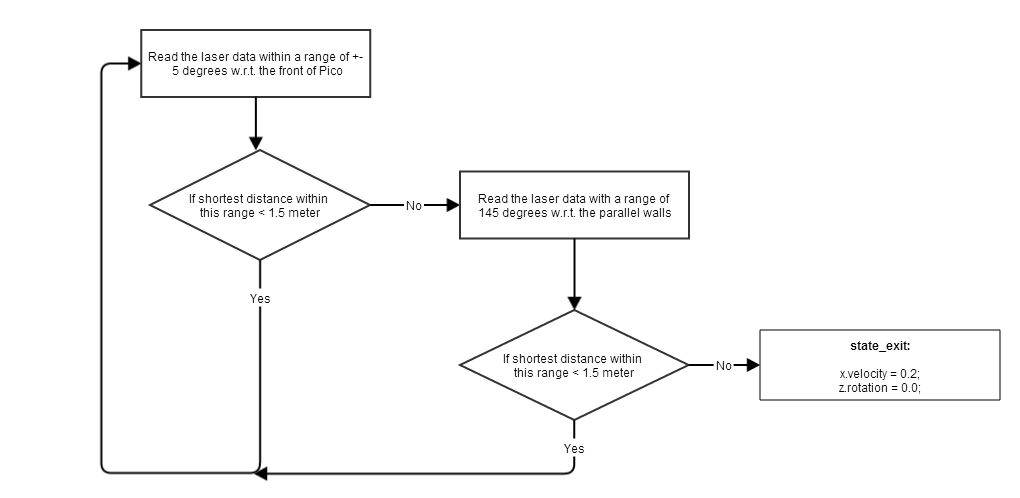
Pico is always looking for the exit of the maze. This will be done in two steps: <br/> | |||
1) Check if the shortest distance, within a range of +- 5 degrees w.r.t. the front of Pico, is larger then 1.5 meters <br/> | |||
2) Check if the shortest distance, within a range of 145 degrees w.r.t. the walls, is larger then 1.5 meters. <br/> | |||
When both steps are true, Pico is at the end of the maze a must switch to the state "exit". We use two steps just to reduce The steps are depicted in the figure below. | |||
[[File:Exit.png|500px]] | |||
''' | '''state_exit:''' <br/> | ||
This | This state ensures that Pico is driving straight out of the maze with a constant velocity. | ||
''' | [[File:Flowchart_exit.png|800px]] | ||
===Gap detection and Handling functions=== | |||
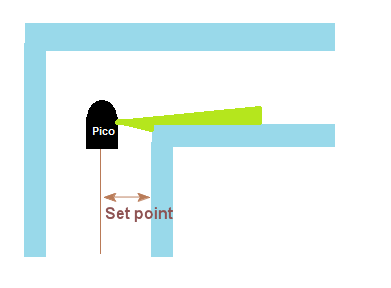
'''condition_gap_detection_right:''' <br/> | |||
During the going straight state, if there exists a gap to the rightt side, the condition "Gap detection right" is reached. The following steps are carried out to check if Pico behaves in this condition: | |||
* Pico will continue checking the laser date of right side between upper and lower index (variables) during going straight. | |||
* If the distance within the upper and lower index is larger than the product of sensitivity (variable) and set point (<math>laser.scan.ranges[i] > sensitivity * setpoint</math>), a internal counter will start to count. | |||
* As soon as the counter reaches 35 AND Boolean right_corner_finished is FALSE (this condition will be discussed later), it's for sure that there is a gap to the right side. Pico will jump to state "gap handling" and start to turn. | |||
[[File:gap_detection_right.png]] | |||
'''condition_gap_detection_left:''' <br/> | |||
This conditions is the same as gap detection right, but obviously for the left side. | |||
'''state_gap_handling:''' <br/> | |||
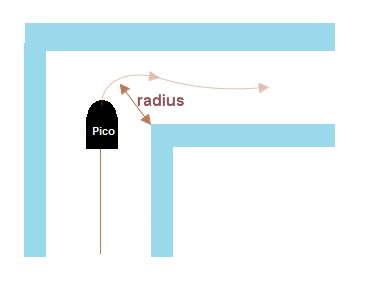
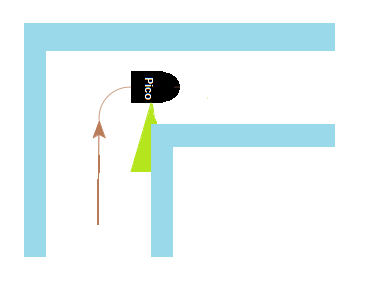
When gap handling is entered, a 90 degrees rotation to the left or right (based on the gap_detection conditions) is made. The overall shortest distance of the laser is used as a radius for the corner. The relation: x_vel = radius * z_rot is used to make a nice corner. When Pico might come close to a wall the radius will be smaller, so also the corner Pico makes will be smaller, which helps in the situation of a small gap in a wide corridor. At the same time a minimum radius is set to ensure that pico will not make the corner too small. | |||
When gap handling is entered, we consider Pico's current orientation (theta) and use this to enforce Pico to keep rotating for 90 degrees + theta. This helps to make corners a bit more flexible and ensures that pico will come out of gap_handling with a good orientation. This gives a good performance should several corners come after eachother. | |||
[[File:gap_handling.png]] | |||
'''condition_reset_corner:''' <br/> | |||
This condition is used to ensure that Pico will not turn twice at the same corner. The following steps are carried out to check if Pico behaves in this condition: | |||
* After gap_handling finished, Boolean right_corner_finished or left_corner_finished (depends on which turn Pico just takes) will be set to TRUE. | |||
* Pico will start to look at the laser range at right or left side, as soon as the distance at it's right or left side is smaller than sensitivity (which is set to 0.8 meter in practice), a counter will start to count. | |||
* When the counter reaches 30, the Boolean right_corner_finished or left_corner_finished will be set to FALSE. This means that the corner is fully finished, and Pico is now entering a new corridor. If everything goes well, this will take exactly 1.5 seconds since the spin frequency of the laser is 20 Hz. | |||
[[File:Reset corner.png]] | |||
=== Priorities and driving functions=== | |||
'''condition go_straight_priority:''' <br/> | |||
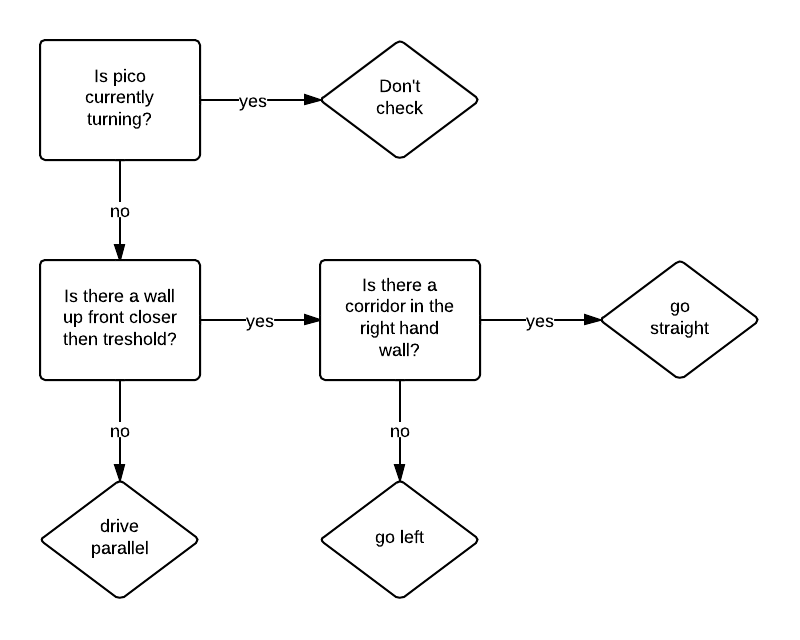
This condition is necessary because of the right wall follower strategy: when there is a gap to the left, you might want to go straight instead if there is something interesting to the front or right side. In that case go straight priority will return true. Otherwise when there's nothing ahead or to the right (only walls), go straight priority returns false and it's ok to take a left turn. | This condition is necessary because of the right wall follower strategy: when there is a gap to the left, you might want to go straight instead if there is something interesting to the front or right side. In that case go straight priority will return true. Otherwise when there's nothing ahead or to the right (only walls), go straight priority returns false and it's ok to take a left turn. | ||
'''Dead end | [[File:go_straight_prio.png|500px]] | ||
'''state_drive_parallel:''' <br/> | |||
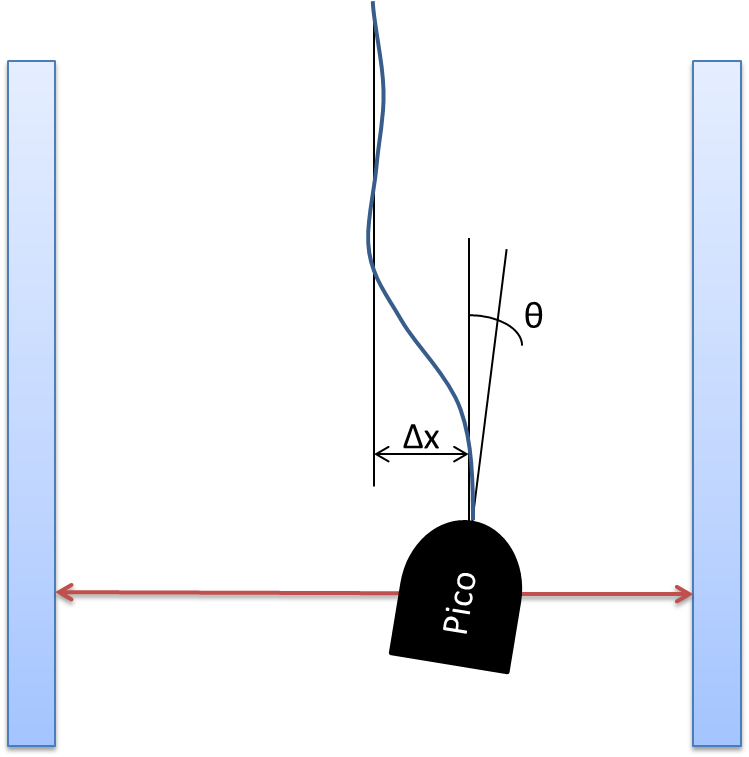
Drive parallel is the state that allows Pico to drive between two walls. In this state a '''setpoint''' is calculated as the middle of the closest point to the left and right of pico. On top of that we define the deviation from this setpoint as the '''error''' (positive error = right of setpoint), and the current rotation as '''theta''' (positive theta = CCW, parallel to wall theta = 0), both relative to closest point left and right. By feeding back the error and theta as the rotation velocity we keep Pico in the middle of corridors which has the benefit that per default it tries not to hit any obstacles. <br/> | |||
We do this by setting a constant translation velocity, and a PD controlled rotation velocity that feeds back both the error and theta (P-action) and their derivatives (D-action); | |||
'''<math>velocity.Zrot = f(error,derror, theta, dtheta) = kpe * error + kde * derror - kpt * theta - kdt * dtheta</math>''' | |||
[[File:Drive_parallel.png|300px]] | |||
===Dead end functions=== | |||
'''condition_dead_end_detection:''' <br/> | |||
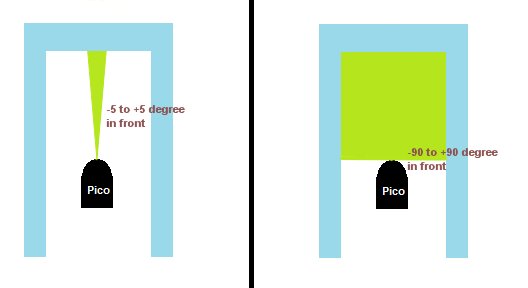
When Pico facing a dead end, the condition "Dead end" is reached. The following steps are carried out to check if Pico behaves in this condition: | When Pico facing a dead end, the condition "Dead end" is reached. The following steps are carried out to check if Pico behaves in this condition: | ||
* Check if the condition "Dead end" is active. If active, keeps Pico turning around until Pico facing backward to the dead end. | * Check if the condition "Dead end" is active. If active, keeps Pico turning around until Pico facing backward to the dead end. | ||
| Line 357: | Line 446: | ||
* Check if the distance from -5 to +5 degree are shorter than sensitivity times setpoint to see if there is a dead end in the front. When this is the case, set Boolean "dead_end_infront" to TRUE. | * Check if the distance from -5 to +5 degree are shorter than sensitivity times setpoint to see if there is a dead end in the front. When this is the case, set Boolean "dead_end_infront" to TRUE. | ||
* When "dead_end_infront" is TRUE, calculate the differences of two nearby laser distance from -90 to +90 degree with respect to the robot. | * When "dead_end_infront" is TRUE, calculate the differences of two nearby laser distance from -90 to +90 degree with respect to the robot. | ||
* When all the difference is less than 0.2 meters, Pico reaches dead end, jump to state "Turn around". | * When all the difference is less than 0.2 meters, Pico reaches dead end, jump to state "Turn around". | ||
[[File:dead_end_detection.png]] | |||
'''state_turn_around:''' <br/> | |||
Pico is switched to this state when a dead end is detected. When Pico enters this state he will make a clean rotation on the spot of 180 degrees and is kept in this state untill finished rotating. Turning Pico is done by a simple open loop function. An angular velocity is send to the wheels and for a pre-calculated number of iterations corresponding to 180 degrees. We don't use any feedback to compensate slip and friction etc. In terms of accuracy this will not be the best solution but the small error due to slip and friction will be handled by the state drive_parallel which does contain a feedback controller. | |||
===Camera node functions=== | |||
'''Arrow detection:''' <br/> | '''Arrow detection:''' <br/> | ||
At a junction there is a possibility that an arrow is located at the wall. Pico can detect this arrow by using it's camera. | At a junction there is a possibility that an arrow is located at the wall. Pico can detect this arrow by using it's camera. | ||
When Pico detects the arrow it has to determine whether the arrows | When Pico detects the arrow it has to determine whether the arrows points right or left and either turn right or left. | ||
...to | |||
Camera_controller: | |||
This function contains the code for detecting the arrow and determine whether the arrow is left (or not right). | |||
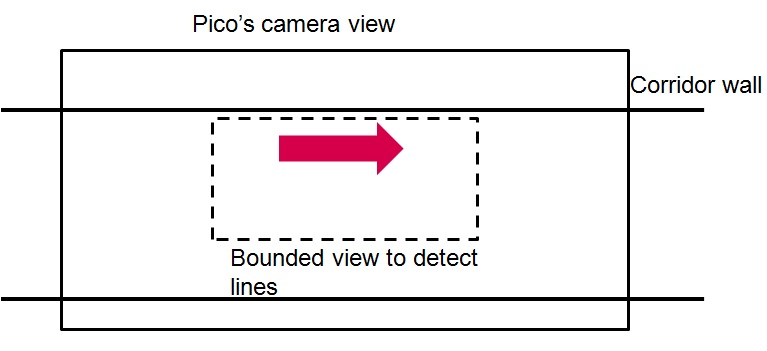
To assure that we don't detect lines or red pixels outside of the corridors of the maze we have bounded Pico's camera view. | |||
This is shown in the below picture. | |||
[[File:Bounded view.jpg]] | |||
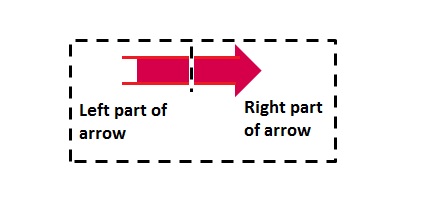
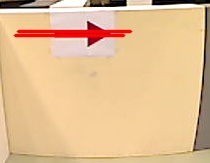
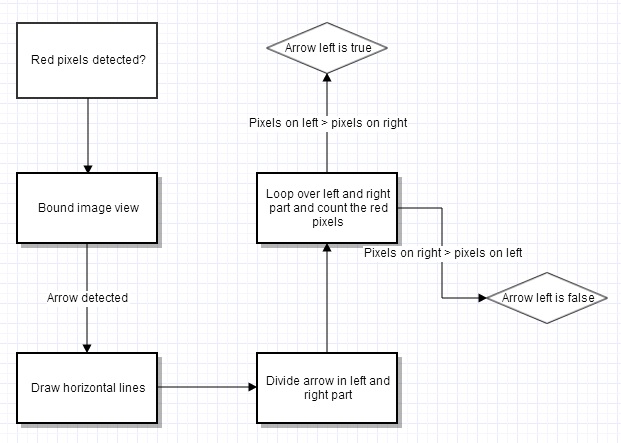
In order to detect arrows we first want to detect horizontal lines. After detecting the lines we divided the arrow in a left and a right part. | |||
To determine whether an arrow is pointed to the left or right we loop over the red pixels in the left and right part. Because of the shape of the arrow, the red pixels are not equally divided. By counting the red pixels we determine the arrow direction, and we start at the left point of the detected line. However because the camera spins 5 times per second, we get each time different amount of red pixel on the left and right side. To make the code more robuust we let the loop over the red pixels several times and if it detects an arrow to the left for example more than three times, we set the boolean arrow left to true! | |||
[[File:Arrow_parts.jpg]] [[File:Arrow_detected_lines.jpg]] | |||
Function description: | |||
- Loop over left and right part of arrow and start at left point of the detected line. | |||
- Count the red pixels. | |||
- Compare the amount of red pixels on left and right side. | |||
- If amount of red pixels on the left is greater than on the right, set the counter counter_arrow to 1. | |||
- Loop again over the two parts and keep looping till the counter count_arrow is 3 or greater than 3. | |||
- Set the boolean arrow_left true or false. | |||
[[File:overview_arrow.jpg]] | |||
After setting the boolean to true or false, the data is send to the theseus controller function. In this function, when detecting a gap, the camera_controller is called. If: | |||
- there is a gap on the right and no arrow, Pico turn right. | |||
- there is a gap on the left and no arrow, Pico turns right. | |||
- there is both a gap on the left and right and there is an arrow, the function checks if the arrow points to the left, if not turn right. If arrow_left is true, go left. | |||
- When detecting an arrow and setting the arrow_boolean to true or false, Pico makes a turn. After finishing that turn, the function resets the counter to 0 and the boolean to false. This is handled in the camera_reset function. | |||
Node: | |||
The camera function is build in a seperate node. We made a camera topic called cam_data and we subscribed the camera data to this topic. | |||
In the main function of the theseus node we published it so the camera_data can be processed in the theseus_controller function. | |||
[[File:RQT_graph.jpg]] | |||
[ | == Gazebo Simulation == | ||
Pico is able to solve the maze without the camera node in Gazebo simulation. A video is recorded and shared via YouTube here: [https://www.youtube.com/watch?v=Pp69IDLlhZ8 Gazebo Simulation] | |||
Things to note: | |||
* When going around a corner (which we call state_gap_handling), the exact number of iterations varies. We consider pico's current orientation when starting gap handling, and use it to adjust the number of iterations such that pico will exit the gap handling state parallel to the new corridor (or next corner). This helps in every corner, but in particular the top right part, with many corners in a small space. | |||
* In the "tricky part" on the left crash avoidance is triggered twice to prevent crashes, and help Pico continue his journey. | |||
* In the end, the exit_maze condition is shown, which makes pico exit the maze in a straight line, and when he is out of the maze stop. This should also work in practise, but there's always people around, so often Pico will keep going. | |||
== Corridor Competition == | == Corridor Competition == | ||
| Line 397: | Line 515: | ||
== Maze Competition == | == Maze Competition == | ||
During the maze competition we had two interesting attempts. In the end we didn't solve the maze, but got very close and were awarded 3rd place. Here is a short report. | |||
=== Attempt 1 (with camera node)=== | |||
We started the first run with camera. At the first t-junction with the arrow to the left, we detected it correctly, and Pico took a left turn. However although the counter for resetting arrow detection was reset, the bool wasn't reset. Therefore the priorities in our code werent reset, and pico continued with taking left turns first. Although we didn't hit a wall, we decided to stop, and use our time for a second attempt without camera. | |||
=== Attempt 2 (without camera)=== | |||
In attempt 2, Pico followed the right wall, and therefore went right first at the first t-junction. After rotating at the dead end Pico got close to a wall, but didn't hit it. Then we got near the exit, but Pico didn't detect the exit (right gap). Although some of us were standing near, and some of us were watching the terminal output (combined with viewing the video), we didn't understand what went wrong there. Pico detected the gap very late, and therefore got too close to the end of the gap, which caused it to go back to the entrance by following the new right wall. The only thing we can think of is that someone was standing near the exit (without trying to blame anyone, or be sore losers), so that Pico didn't detect it in time. In our gap detection approach it is critical that the exit is free. | |||
A video impression of attempt two is shared here. [http://youtu.be/vC_Tx8jjAjg Maze competition Theseus] | |||
On the positive side: | |||
* We got very close to solving the maze. | |||
* We were able to have two good attempts demonstating all parts of our functionality. | |||
* Our reset state gave a good robust performance. We never hit a wall. | |||
* In attempt 1 we demonstrated that we can detect arrows and react to them. | |||
On the negative side: | |||
* Due to the small corridors compared to what we tested, we went into crash_avoidance quite often. | |||
* Camera reset functionality didn't work as intended. We forgot one line of code. | |||
== Presentation == | == Presentation == | ||
Koen has presented the design and approach of our efforts. Because it is difficult to give a lot of detail in 5 minutes, we hope that our wiki can elaborate further on our choices. | |||
The slides are available here (in zipped format because ppt isn't allowed): [[File:EMC03.zip]] | |||
Latest revision as of 00:12, 28 October 2013
Contact info
| Vissers, Yorrick (YO) | 0619897 | y.vissers@student.tue.nl |
| Wanders, Matthijs (MA) | 0620608 | m.wanders@student.tue.nl |
| Gruntjens, Koen (KO) | 0760934 | k.g.j.gruntjens@student.tue.nl |
| Bouazzaoui, Hicham (HI) | 0831797 | h.e.bouazzaoui@student.tue.nl |
| Zhu ,Yifan (YI) | 0828010 | y.zhu@student.tue.nl |
Meeting hours
Mondays 11:00 --> 17:00
Wednesdays 8:45 --> 10:30
Thursday 9:00 --> 10.00 Testing on Pico
Meet with tutor: Mondays at 14:00
Planning
Ma 09 sept:
- Finish installation of everything
- Go through ROS (beginner) and C++ manual
Wo 11 sept:
- Finish ROS, C++ manuals
- Start thinking about function architecture
Ma 16 sept:
- Design architecture
- Functionality division
- Divide programming tasks
Do 19 sept:
- Finish "state stop" (Koen)
- Finish "drive_parallel" (Matthijs, Yorrick)
- Creating a new "maze/corridor" in Gazebo (Yifan)
- Simulate and build the total code using Gazebo (Hicham)
- Testing with robot at 13:00-14:00
Vr 20 sept:
- Finish "crash_avoidance"
- Coding "gap_detection" (Yifan)
- Coding "dead_end_detection" (Matthijs, Yorrick)
- Coding "maze_finished" (Koen, Hicham)
Ma 23 sept:
- Finish "drive_parallel"
- Putting things together
- Testing with robot at 12:00-13:00 (Failed due to network down)
Unfortunately we encountered some major problems with the Pico robot due to a failing network. We discussed the approach for the corridor competition. At this point the robot is able to drive parallel through the corridor and can look for gaps either left or right. We a gap is reached the robot will make a smooth circle through the gap. This is all tested and simulated. For the corridor competition we will not check for death ends. There isn't enough time to implement this function before Wednesday 25 September. The corresponding actions such as "turn around" won't be finished either. Without these functions we should be alble to pass the corridor competition successfully.
Di 24 sept:
- Testing with robot at 13:00-14:00
- Finding proper parameters for each condition and state
Wo 25 sept:
- Finish clean_rotation
- Finish gap_handling
- Putting things together
- Corridor Challenge
Week 5:
- Design and simulate code
- Create a structure "laser_data" which processes the data of the laser. This contains the calculation of (Ma + Yo):
- Shortest distance to the wall
- Distance to the right wall with respect to Pico
- Distance to the left wall with respect to Pico
- Edit/improve state "drive_parallel" with a feedback controller according to the angle with respect to the right wall (Ma + Yo).
- Create the condition "dead_end". When a dead end is detected switch to the state "turn_around" (Yi + Ko).
- Edit/improve the condition "gap_detect_left/right". Make this condition more robust (Yi + Ko).
- Start researching the properties of the camera of Pico (Hi).
- Create a structure "laser_data" which processes the data of the laser. This contains the calculation of (Ma + Yo):
- Testing on Pico (Listed by priorities)
1) Test robustness of the feedback controller and gap_detection
2) Tune the translational and rotational speed (faster)
3) Test detecting dead ends
4) Test strange intersections
Week 6:
- Design and simulate code
- Edit/improve state "drive_parallel" with a feedback controller according to the angle with respect to the right wall (Ma + Yo).
- Create the condition "finished". This is the condition when Pico exists the maze. Switch to state "finalize" (Yi + Ko).
- Improve the priorities list. Pico needs to make smart decisions when multiply conditions occur. Basically the priorities are listed as (Ma + Yo):
1) Turn right
2) Go straight
3) Turn left
- Continue researching the properties of the camera of Pico (Hi)
- Testing on Pico (Listed by priorities)
1) Test the state "turn_around"
2) Test the condition "finished"
3) Building a small maze containing a t-intersection and a dead end and test the priorities (Can also be done properly during simulation)
Week 7:
- Design and simulate code
- Edit/improve the state "reset". This states handles the condition when a object is detected close to Pico.
- Imaging processing. Detect arrows on the wall (Hi + Yi).
- Testing on Pico (Listed by priorities)
1) Build a maze and solve it without using camera.
2) Test camera
3) Test the improved states/conditions. See progress->week6->Testing
Week 8:
- Design and simulate code
- Finalize the code
- Implementing the camera node
- Testing on Pico (Listed by priorities)
1) Build a maze and solve it using camera.
2) Test camera
- Administrative activities
- Fill in peer assessment (Sending to v.d. Molengraft by Koen)
- Upload a video of the Gazebo demo (Yifan)
- Updating the wiki:
| Condition/Node | State | Name |
|---|---|---|
| crash_avoidance | state_reset | Yorrick & Matthijs |
| maze_finished | state_finalize | Koen |
| maze_exit | state_exit | Koen |
| dead_end_detection | state_turn_around | Yifan |
| gap_detection_right | state_gap_handling | Yifan |
| gap_detection_left | state_gap_handling | Yifan |
| go_straight_priority | state_drive_parallel | Yorrick & Matthijs |
| Camera | / | Hicham |
Progress
Week 1
(All)
- Installed and setup all the software
- Went through the ros beginner tutorials and c++ tutorials
Week 2
(All)
- Finishing up the tutorials that weren't yet completed
- Initial architecture design: condition and state functions.
- The main architectural idea is to keep a clear distinction between conditions and states.
- Conditions: In what kind of situation is pico?
- State: How should pico act to his current situation?
Week 3
(All)
- Continued architecture design, and begin of implementation.
- Simulation with drive safe example.
(MA & YO)
- Created state_drive_parallel function
(YI)
- Created custom mazes in Gazebo
(KO)
- Created state_stop function
Testing on Pico: (All)
- First time testing on Pico. Just figuring everything out.
Week 4
(MA & YO)
- Worked on gap handling
- Tuning state_drive_parallel
(KO & YI & HI)
- Worked on gap detection
(All)
- Simulating corridor left and right
Testing on Pico: (All)
- After some tuning drive_parallel worked well.
- After some tuning gap_detection worked well (we learned to remove the first and last 20 points that reflect on Pico).
- We tuned the radius of gap_handling down. In practise we want pico to take slightly smaller corners.
- We tuned down the cornering speed a bit to be very stable in every type of corridor and gap width (from about 60cm to 1m+)
- We are ready for the corridor competition.
Week 5
(MA & YO)
- Removed scanning functionality from the states and conditions and put it in a seperate function that returns a struct "Laser_data" containing info about wall locations and scanner range/resolution etc. Did some tuning on the gap_detection algorithm to make it more robust and made some minor changes on the decision tree. (now only checks nect condition if previous one returns false).
- Improved the decision tree to satisfy the required priorities for a wall follower strategy. The priorities for navigation are: 1) Take right gaps 2) Drive par 3) Take left turns. In order to only take left turns when there is nothing interesting ahead or to the right a new condition is introduced: go_straight_priority. When this condition returns false it is ok to take a left turn should there be a gap.
- Further improvements (w.r.t robustness) on gap_detection and dead_end_detection. Due to the new decision tree "number_of_spins" are now counted inside of the states (gap_handling), rather than inside the conditions.
Testing on Pico: (MA & YO & YI) : We learned that when there's a gap further ahead, Pico's laser doesn't see a clear jump in distance, but instead see several points (reflection?) within the gap. This is taken into account when designing for robustness.
- At the time of testing the priorities were not working as intended for the abovementioned reason, this has been improved later that day. Will be tested again next week.
- Speeds are tuned for now to x_vel = 0.2 in state_drive_par and z_rot = 0.15 in state_gap_handling and state_turn_around.
- Dead_end_detection worked as intended when there was a dead end, but sometimes also detected a dead end when there was none. This has been improved that same day. Also the distance when this condition checks in front has been improved. Will be tested again next week.
- state_turn_around was already finished ahead of scedule. Therefore it was already tested on Pico this week and is working as intended.
- feedback control in state_drive_parallel was not implemented yet, and therefore is also not tested and tuned. This will be done next testing session.
Week 6
(KO)
- Modified the condition "maze_finished". Pico will first check in front is there is anything closer then 2 meter (variable). When this is not the case it will continue checking a range of approximately 150 degrees ahead for obstacles. When there is still nothing closer then 2 meters, Pico is done!
- When the condition "maze_finished" is satisfied Pico will be in the state "finalize". It will move with a constant translation velocity of 0.3 [m/s] until anyone hit the emergency button.
(HI & KO & YO & YI)
- Worked on improving gap handling. We implemented 'flexible' corners: when Pico starts to go around a corner, his current orientation is taken into account when determining the counter k that represents the total number of spins pico should rotate. In addition a constant tuning factor is included in k, which helps in simulation. This factor might be retuned when testing this friday.
(HI & YO)
- Worked on implementing proportional feedback in state_drive_parallel for the purpose of faster settling times (reach setpoint faster) and more stable behaviour while driving straight. We implemented a PD controller that is tuned to work well in the simulation and friday this will be re-tuned to work well on Pico.
(HI & YO)
- Created a new node for the camera functionality: camera.cpp. This node subscribes to the camera and calls "camera_controller.h" when data is published to the camera topic. The camera controller will process the camera data and detect arrows, which can be published by the camera node to our main node theseus. Hicham will work on processing the camera data and arrow detection.
- Note that CMakeLists will now also make an executable of camera.cpp. In addition manifest.xml now also depends on the opencv packages. In order to run both nodes use: rosrun theseus2 theseus camera
Testing on pico: (KO & YI & YO)
- Things which went good:
- Driving parallel to the right wall. We improved/tuned the control parameters on Pico.
- Turn around after detecting a dead end.
- Gap handling went good after tuning some parameters.
- Things to do:
- Improve robustness of detecting gaps (either right and left).
- Improve exit the maze. It makes a corner to the right when he leaves the maze.
- Check this again next week when the other states/conditions are improved.
(YO)
- In a t-split where pico had an orientation that was slightly rotated to the right (negative theta) he detects the gap on the left first and started cornering to the left. Therefore we split the counter variable number_of_spins into number_of_spins_left and number_of_spins_right. This helps to prevent errors when go_straight priority is not working correctly, because the right cornering takes over.
- When testing on Pico we found that when taking a wide corner, after finishing the corner, he would detect another corner if pico was not yet in the next corridor. This is now prevented by a new function reset_corner that requires pico to see a small corridor part before allowing a new corner in the same direction.
Week 7
(KO & YO & MA)
- Worked on a reset state, that is triggered after crash_avoidance. The reset state should help Pico to continue after a near crash, rather than the previous state stop, that would just end the fun.
(YO & MA)
- Worked again on robustness of dead_end_detection and gap_handling. Just trying to prevent as many possible problems.
(YI & HI)
- Worked on the camera functionality.
(KO)
- Started preparing the presentation.
(All)
- Merging the camera and theseus nodes
Testing on pico (All)
- Things that went well
- Reset corner works as intended and solves the double corner problem.
- Dead end detection seems to work well after tuning.
- After tuning, our crash_avoidance + state_reset combination works well in several tests: wall in front, wall to the side. But possibly if pico ends up in a corner, there may be a problem (test again next week).
- Gap handling and drive parallel worked fine.
- Things to improve
- Camera should work from a greater distance. We need to detect arrows sooner in order to make the correct decision.
- Perhaps if we detect an arrowshape ahead, we should lower the speed of drive_parallel? Yi & Hi should judge if this may help.
- Exit maze still didn't work as we designed it. Very low priority, since pico exits the maze fully which is acceptable in the challenge. With people standing around outside of the maze, the exit maze will nog work anyway.
Week 8
Testing on Pico (All)
- The camera worked from a bigger distance. Our camera node detected the arrows in time.
- There was an error in the communication between our nodes. The bool arrow_left was not published to the topic. After a while we found out we used ros::Spin() instead of ros::SpinOnce(), which prevented communication. Unfortunately this cost us a lot of time during testing.
- When this was solved Pico reacted correctly on an arrow. But the reset condition for the arrow detection was very bad (onrobust). The idea was to publish a bool from theseus to the camera node when a corner is finished.
(All)
- Implemented a more robust reset condition for arrow detection. When a corner is finished the arrow detection is reset. Unfortunately there was no time to test this anymore.
- We decided it wasn't necessary to lower the speed if a corner is ahead, because we detect the arrows in time now.
(KO)
- Created and prepared the presentation. He practiced once for the group, and group gave feedback for improvement. In the end we wanted to emphasize two things in the presentations:
- Clear split between conditions (information processing) and conditions (how should pico actuate).
- Iterative approach of testing and tuning (and therefore seeing how each change to the code works).
PICO usefull info
- minimal angle = 2,35739 rad
- maximal angle = -2,35739 rad
- angle increment = 0,00436554 rad
- scan.range.size() = 1081
We have defined the following conventions:
- We use a right turning orthogonal base w.r.t Pico:
- the pos x-axis is pointing forward w.r.t Pico
- the pos y axis is pointing to the left w.r.t Pico
- the pos z axis is then pointing up w.r.t.Pico
- the pos z rotation is then CCW
Design approach
Our approach for this project is to start from a very simple working example. From this starting point an iterative approach of adding, extending or improving functionality and then testing and tuning the new functionality right away. The benefit of this approach is getting instant feedback of the functionality: do the new functions work as intended, are they tuned well (both for simulation and pico), and do they work together with the other parts?
Our ambition is to create effective functionality that is challenging out our own level, yet understandable for everybody within the group, rather than trying to sound intensely intelligent with convoluted third party algorithms. Discussing the ideas before implementation and testing after implementation is key in our approach. Some of these concepts are explained in the video on this page: [1]
Maze solving strategy
For navigating through the maze we use a right wall follower strategy. This means that the robot will always stick to the right wall and always find it's way to the exit. As a result we get the following priorities:
- 1) Take right turns (if they are there).
- 2) Go straight.
- 3) Go left (we only go left if we can't go straight or to the right, this is achieved with the go_straight_priority function).
But there's a few exceptions to these priorities:
- If a gap is a dead end really quickly, we detect that, and skip it.
- If there is an arrow to the left detected by the camera node, we prioritize left and act on it as soon as the gap to the left is detected.
Software architecture
- We use one package named Theseus2
- We use a node theseus (20 Hz) that subscribes to pico/laser and pico/cam_data and publishes velocities.
- The main architectural idea has been to keep a clear distinction between conditions and states.
- Conditions: In what kind of situation is pico?
- State: How should pico act to his current situation?
Theseus node
When pico/laser publishes data, theseus_controller is called. theseus_controller contains our main functionality.
1) Process the laserdata for future use.
2) Gather conditions (each conditions is explained elsewhere on the wiki)
3) Based on the conditions a state will be chosen and executed. In some situations (f.e gap_handling) the previous state is also considered to determine the current state (Markov chain principle)
4) The chosen state will set the velocities that can be published by the node.
The figure below depicts the simplified architecture of the program at this point.
General files
- datastructures.h: all global variables and datastructures are gathered here.
- send_velocities.h: this functions is used for theseus to publish the velocities.
- laser_processor.h: this function pre-processes the laserdata for future use.
Camera node
We use a second node camera that spins on 5 Hz, subscribes to pico/camera and puslishes bool arrowleft to the topic pico/cam_data. Because of our right wall follower strategy, we only publish data of left arrows. When pico/camera publishes something camera_controller is called which processes the images and when an arrow to the left is detected sets arrow_left to true.
camera_controller contains our main functionality. The method of detecting arrows is explained elsewhere.
Conditions/States
Crash and reset functions
condition_crash_avoidance:
Pico is not allowed to hit the walls, so there when Pico gets too close to the wall, it should stop driving. This is carried out in the next loop:
- If the shortest distance from the wall to Pico is less than 32 cm (to make sure rotating doesn't run Pico's rearside into the wall), Pico will go into state_reset.
state_reset:
This state is being called when Pico is about to crash. After waiting approximately a second to see if the problem might have resolved itself, it will go into the loop depicted in the following picture:
In words: Pico scans the laser data to determine the index of the shortest distance. This index is then used to determine what the best course of action is to make sure pica can continue. If the shortest distance is to the left or right, Pico will rotate away from the wall until going forward will increase the shortest distance, such that pico will go away from the wall. If the shortest distance is in front, Pico will drive backwards until a certain threshold is met, and then continue with drive_parallel.
Maze exit funtions
condition_maze_finished:
When Pico exists the maze the condition "Finished" is reached. The following steps are carried out to check if Pico behaves in this condition:
- Read out the laser data from -135 to +135 degrees w.r.t the front of Pico
- Check if all distances are larger than 1.5 meters. When this is the case. Maze finished!
state_final:
State Final is called when Pico satisfies the condition Finalize. This state will ensure that Pico will stop moving by sending 0 to the wheels for translation and rotation.
condition_maze_exit:
Pico is always looking for the exit of the maze. This will be done in two steps:
1) Check if the shortest distance, within a range of +- 5 degrees w.r.t. the front of Pico, is larger then 1.5 meters
2) Check if the shortest distance, within a range of 145 degrees w.r.t. the walls, is larger then 1.5 meters.
When both steps are true, Pico is at the end of the maze a must switch to the state "exit". We use two steps just to reduce The steps are depicted in the figure below.
state_exit:
This state ensures that Pico is driving straight out of the maze with a constant velocity.
Gap detection and Handling functions
condition_gap_detection_right:
During the going straight state, if there exists a gap to the rightt side, the condition "Gap detection right" is reached. The following steps are carried out to check if Pico behaves in this condition:
- Pico will continue checking the laser date of right side between upper and lower index (variables) during going straight.
- If the distance within the upper and lower index is larger than the product of sensitivity (variable) and set point ([math]\displaystyle{ laser.scan.ranges[i] \gt sensitivity * setpoint }[/math]), a internal counter will start to count.
- As soon as the counter reaches 35 AND Boolean right_corner_finished is FALSE (this condition will be discussed later), it's for sure that there is a gap to the right side. Pico will jump to state "gap handling" and start to turn.
condition_gap_detection_left:
This conditions is the same as gap detection right, but obviously for the left side.
state_gap_handling:
When gap handling is entered, a 90 degrees rotation to the left or right (based on the gap_detection conditions) is made. The overall shortest distance of the laser is used as a radius for the corner. The relation: x_vel = radius * z_rot is used to make a nice corner. When Pico might come close to a wall the radius will be smaller, so also the corner Pico makes will be smaller, which helps in the situation of a small gap in a wide corridor. At the same time a minimum radius is set to ensure that pico will not make the corner too small.
When gap handling is entered, we consider Pico's current orientation (theta) and use this to enforce Pico to keep rotating for 90 degrees + theta. This helps to make corners a bit more flexible and ensures that pico will come out of gap_handling with a good orientation. This gives a good performance should several corners come after eachother.
condition_reset_corner:
This condition is used to ensure that Pico will not turn twice at the same corner. The following steps are carried out to check if Pico behaves in this condition:
- After gap_handling finished, Boolean right_corner_finished or left_corner_finished (depends on which turn Pico just takes) will be set to TRUE.
- Pico will start to look at the laser range at right or left side, as soon as the distance at it's right or left side is smaller than sensitivity (which is set to 0.8 meter in practice), a counter will start to count.
- When the counter reaches 30, the Boolean right_corner_finished or left_corner_finished will be set to FALSE. This means that the corner is fully finished, and Pico is now entering a new corridor. If everything goes well, this will take exactly 1.5 seconds since the spin frequency of the laser is 20 Hz.
Priorities and driving functions
condition go_straight_priority:
This condition is necessary because of the right wall follower strategy: when there is a gap to the left, you might want to go straight instead if there is something interesting to the front or right side. In that case go straight priority will return true. Otherwise when there's nothing ahead or to the right (only walls), go straight priority returns false and it's ok to take a left turn.
state_drive_parallel:
Drive parallel is the state that allows Pico to drive between two walls. In this state a setpoint is calculated as the middle of the closest point to the left and right of pico. On top of that we define the deviation from this setpoint as the error (positive error = right of setpoint), and the current rotation as theta (positive theta = CCW, parallel to wall theta = 0), both relative to closest point left and right. By feeding back the error and theta as the rotation velocity we keep Pico in the middle of corridors which has the benefit that per default it tries not to hit any obstacles.
We do this by setting a constant translation velocity, and a PD controlled rotation velocity that feeds back both the error and theta (P-action) and their derivatives (D-action);
[math]\displaystyle{ velocity.Zrot = f(error,derror, theta, dtheta) = kpe * error + kde * derror - kpt * theta - kdt * dtheta }[/math]
Dead end functions
condition_dead_end_detection:
When Pico facing a dead end, the condition "Dead end" is reached. The following steps are carried out to check if Pico behaves in this condition:
- Check if the condition "Dead end" is active. If active, keeps Pico turning around until Pico facing backward to the dead end.
- If the condition "Dead end" is not active, read out the laser data from -5 to +5 degree w.r.t the Pico heading direction.
- Check if the distance from -5 to +5 degree are shorter than sensitivity times setpoint to see if there is a dead end in the front. When this is the case, set Boolean "dead_end_infront" to TRUE.
- When "dead_end_infront" is TRUE, calculate the differences of two nearby laser distance from -90 to +90 degree with respect to the robot.
- When all the difference is less than 0.2 meters, Pico reaches dead end, jump to state "Turn around".
state_turn_around:
Pico is switched to this state when a dead end is detected. When Pico enters this state he will make a clean rotation on the spot of 180 degrees and is kept in this state untill finished rotating. Turning Pico is done by a simple open loop function. An angular velocity is send to the wheels and for a pre-calculated number of iterations corresponding to 180 degrees. We don't use any feedback to compensate slip and friction etc. In terms of accuracy this will not be the best solution but the small error due to slip and friction will be handled by the state drive_parallel which does contain a feedback controller.
Camera node functions
Arrow detection:
At a junction there is a possibility that an arrow is located at the wall. Pico can detect this arrow by using it's camera.
When Pico detects the arrow it has to determine whether the arrows points right or left and either turn right or left.
Camera_controller: This function contains the code for detecting the arrow and determine whether the arrow is left (or not right). To assure that we don't detect lines or red pixels outside of the corridors of the maze we have bounded Pico's camera view. This is shown in the below picture.
In order to detect arrows we first want to detect horizontal lines. After detecting the lines we divided the arrow in a left and a right part. To determine whether an arrow is pointed to the left or right we loop over the red pixels in the left and right part. Because of the shape of the arrow, the red pixels are not equally divided. By counting the red pixels we determine the arrow direction, and we start at the left point of the detected line. However because the camera spins 5 times per second, we get each time different amount of red pixel on the left and right side. To make the code more robuust we let the loop over the red pixels several times and if it detects an arrow to the left for example more than three times, we set the boolean arrow left to true!
Function description:
- Loop over left and right part of arrow and start at left point of the detected line.
- Count the red pixels.
- Compare the amount of red pixels on left and right side.
- If amount of red pixels on the left is greater than on the right, set the counter counter_arrow to 1.
- Loop again over the two parts and keep looping till the counter count_arrow is 3 or greater than 3.
- Set the boolean arrow_left true or false.
After setting the boolean to true or false, the data is send to the theseus controller function. In this function, when detecting a gap, the camera_controller is called. If: - there is a gap on the right and no arrow, Pico turn right. - there is a gap on the left and no arrow, Pico turns right. - there is both a gap on the left and right and there is an arrow, the function checks if the arrow points to the left, if not turn right. If arrow_left is true, go left. - When detecting an arrow and setting the arrow_boolean to true or false, Pico makes a turn. After finishing that turn, the function resets the counter to 0 and the boolean to false. This is handled in the camera_reset function.
Node:
The camera function is build in a seperate node. We made a camera topic called cam_data and we subscribed the camera data to this topic. In the main function of the theseus node we published it so the camera_data can be processed in the theseus_controller function.
Gazebo Simulation
Pico is able to solve the maze without the camera node in Gazebo simulation. A video is recorded and shared via YouTube here: Gazebo Simulation
Things to note:
- When going around a corner (which we call state_gap_handling), the exact number of iterations varies. We consider pico's current orientation when starting gap handling, and use it to adjust the number of iterations such that pico will exit the gap handling state parallel to the new corridor (or next corner). This helps in every corner, but in particular the top right part, with many corners in a small space.
- In the "tricky part" on the left crash avoidance is triggered twice to prevent crashes, and help Pico continue his journey.
- In the end, the exit_maze condition is shown, which makes pico exit the maze in a straight line, and when he is out of the maze stop. This should also work in practise, but there's always people around, so often Pico will keep going.
Corridor Competition
We succesfully passed the corridor competition with the 2nd fastest time. A video impression is shared here: Corridor competition Theseus
Maze Competition
During the maze competition we had two interesting attempts. In the end we didn't solve the maze, but got very close and were awarded 3rd place. Here is a short report.
Attempt 1 (with camera node)
We started the first run with camera. At the first t-junction with the arrow to the left, we detected it correctly, and Pico took a left turn. However although the counter for resetting arrow detection was reset, the bool wasn't reset. Therefore the priorities in our code werent reset, and pico continued with taking left turns first. Although we didn't hit a wall, we decided to stop, and use our time for a second attempt without camera.
Attempt 2 (without camera)
In attempt 2, Pico followed the right wall, and therefore went right first at the first t-junction. After rotating at the dead end Pico got close to a wall, but didn't hit it. Then we got near the exit, but Pico didn't detect the exit (right gap). Although some of us were standing near, and some of us were watching the terminal output (combined with viewing the video), we didn't understand what went wrong there. Pico detected the gap very late, and therefore got too close to the end of the gap, which caused it to go back to the entrance by following the new right wall. The only thing we can think of is that someone was standing near the exit (without trying to blame anyone, or be sore losers), so that Pico didn't detect it in time. In our gap detection approach it is critical that the exit is free.
A video impression of attempt two is shared here. Maze competition Theseus
On the positive side:
- We got very close to solving the maze.
- We were able to have two good attempts demonstating all parts of our functionality.
- Our reset state gave a good robust performance. We never hit a wall.
- In attempt 1 we demonstrated that we can detect arrows and react to them.
On the negative side:
- Due to the small corridors compared to what we tested, we went into crash_avoidance quite often.
- Camera reset functionality didn't work as intended. We forgot one line of code.
Presentation
Koen has presented the design and approach of our efforts. Because it is difficult to give a lot of detail in 5 minutes, we hope that our wiki can elaborate further on our choices.
The slides are available here (in zipped format because ppt isn't allowed): File:EMC03.zip

