Embedded Motion Control 2013 Group 2: Difference between revisions
| (220 intermediate revisions by 5 users not shown) | |||
| Line 29: | Line 29: | ||
<td>0731296</td> | <td>0731296</td> | ||
<td>[mailto:n.h.cheng@student.tue.nl n.h.cheng@student.tue.nl]</td> | <td>[mailto:n.h.cheng@student.tue.nl n.h.cheng@student.tue.nl]</td> | ||
</table> | </table> | ||
== Planning == | == General Planning == | ||
{| | {| | ||
! align="left"| Week: | ! align="left"| Week: | ||
! Activities: | ! Activities: | ||
|- | |- | ||
==== Week 1: Sep 2 - Sep 8 ==== | |||
{| | |||
|- | |- | ||
| || Start ROS & C++ tutorials | | || Start ROS & C++ tutorials | ||
| Line 46: | Line 47: | ||
| || Project planning & brainstorming | | || Project planning & brainstorming | ||
|- | |- | ||
|Week 2: Sep 9 - Sep 15 | |} | ||
==== Week 2: Sep 9 - Sep 15 ==== | |||
{| | |||
|- | |- | ||
| || Conclude software troubleshoot. | | || Conclude software troubleshoot. | ||
| Line 53: | Line 57: | ||
| || Start simulations in Gazebo for sensors and actuators identification. | | || Start simulations in Gazebo for sensors and actuators identification. | ||
|- | |- | ||
|Week 3: Sep 16 - Sep 22 | |} | ||
==== Week 3: Sep 16 - Sep 22 ==== | |||
{| | |||
|- | |- | ||
| || Code development, module based. | | || Code development, module based. | ||
| Line 63: | Line 70: | ||
| || First real robot trial (Sep 20, 13.00 - 14:00 hrs) | | || First real robot trial (Sep 20, 13.00 - 14:00 hrs) | ||
|- | |- | ||
|Week 4: Sep 23 - Sep 29 | |} | ||
==== Week 4: Sep 23 - Sep 29 ==== | |||
{| | |||
|- | |- | ||
| || Last minute preparations for Corridor Competition | | || Last minute preparations for Corridor Competition | ||
| Line 76: | Line 86: | ||
| || 2nd Real robot test (Sep 26, 11.00 - 12:00 hrs) | | || 2nd Real robot test (Sep 26, 11.00 - 12:00 hrs) | ||
|- | |- | ||
|Week 5: Sep 30 - Oct 6 || | |} | ||
==== Week 5: Sep 30 - Oct 6 ==== | |||
{| | |||
|- | |||
| || Keep developing modular approach | |||
|- | |||
|- | |||
| || Problem solving, corridor competition | |||
|- | |||
|- | |- | ||
| || 3rd Real robot test (Oct 3, 11.00 - 12:00 hrs) | | || 3rd Real robot test (Oct 3, 11.00 - 12:00 hrs) | ||
|- | |- | ||
|Week 6: Oct 7 - Oct 13 || | |} | ||
==== Week 6: Oct 7 - Oct 13 ==== | |||
{| | |||
|- | |||
| || Code Integration and Testing | |||
|- | |||
|- | |||
| || Bug detection and corrections | |||
|- | |||
|- | |- | ||
| || 4th Real robot test (Oct 10, 11.00 - 12:00 hrs) | | || 4th Real robot test (Oct 10, 11.00 - 12:00 hrs) | ||
|- | |- | ||
|Week 7: Oct 14 - Oct 20 || | |} | ||
==== Week 7: Oct 14 - Oct 20 ==== | |||
{| | |||
|- | |||
| || Final testing and corrections | |||
|- | |||
|- | |- | ||
| || 5th Real robot test (Oct 17, 11.00 - 12:00 hrs) | | || 5th Real robot test (Oct 17, 11.00 - 12:00 hrs) | ||
|- | |- | ||
|Week 8: Oct 21 - Oct 27 || | |} | ||
==== Week 8: Oct 21 - Oct 27 ==== | |||
{| | |||
|- | |||
| || Last minute preparations | |||
|- | |||
|- | |- | ||
| || Maze Competition (Oct 23) | | || Maze Competition (Oct 23) | ||
| Line 98: | Line 138: | ||
<tr> | <tr> | ||
<td width="150px"><b>Team Member:</b></td> | <td width="150px"><b>Team Member:</b></td> | ||
<td width="1000px"><b> | <td width="1000px"><b>Activities:</b></td> | ||
</tr> | </tr> | ||
<tr> | <tr> | ||
| Line 111: | Line 151: | ||
<tr> | <tr> | ||
<td>Koen Meeusen</td> | <td>Koen Meeusen</td> | ||
<td> | <td>Corner detection, testing & debugging.</td> | ||
<tr> | |||
<td>Ngo Hin Cheng</td> | |||
<td>Situation identification</td> | |||
</table> | </table> | ||
| Line 118: | Line 161: | ||
{| | {| | ||
|- | |- | ||
=====Software installation===== | |||
{| | |||
|- | |- | ||
| The goal of the first week was to install all necessary software. The installation of Ubuntu went well in general. In one case (on the 2013 TU/e laptop) Ubuntu would install correctly (it said) but when Ubuntu was started the desktop screen of Ubuntu was not loaded. Instead a command prompt like screen was displayed and reports where shown that there were missing files. The problem was eventually solved as follows: | | The goal of the first week was to install all necessary software. The installation of Ubuntu went well in general. In one case (on the 2013 TU/e laptop) Ubuntu would install correctly (it said) but when Ubuntu was started the desktop screen of Ubuntu was not loaded. Instead a command prompt like screen was displayed and reports where shown that there were missing files. The problem was eventually solved as follows: | ||
| Line 124: | Line 168: | ||
The other required software installed well except Qt. By a few persons Qt did not install. Therefore the choise has been made to use eclipse to type the c++ code. The disadvantage is that in eclipse you will have to rebuild your “cmake” and project files every time you change something in the script. This requires a restart of eclipse. Qt does not have this problem. An advantage of eclipse over Qt is that eclipse can handle vector programming easier then Qt. | The other required software installed well except Qt. By a few persons Qt did not install. Therefore the choise has been made to use eclipse to type the c++ code. The disadvantage is that in eclipse you will have to rebuild your “cmake” and project files every time you change something in the script. This requires a restart of eclipse. Qt does not have this problem. An advantage of eclipse over Qt is that eclipse can handle vector programming easier then Qt. | ||
|} | |||
|- | |- | ||
=====Problem investigation===== | |||
{| | |||
|- | |- | ||
|In order to solve the maze problem some important questions had to be answered, namely: | |In order to solve the maze problem some important questions had to be answered, namely: | ||
| Line 137: | Line 183: | ||
If the maze contains islands the solution won’t be totally unique, because there are multiple ways to solve the maze. With islands it is even possible to get stuck in a loop around the island in the maze. With only one path which is correct (a unique solution) and no islands a solution to the maze can be to follow the right hand wall of the robot. In case of the corridor challenge, the solution is not unique, since there are to exits (a correct one and a false one). Although the strategy to follow the right hand wall will in this case give the correct solution. | If the maze contains islands the solution won’t be totally unique, because there are multiple ways to solve the maze. With islands it is even possible to get stuck in a loop around the island in the maze. With only one path which is correct (a unique solution) and no islands a solution to the maze can be to follow the right hand wall of the robot. In case of the corridor challenge, the solution is not unique, since there are to exits (a correct one and a false one). Although the strategy to follow the right hand wall will in this case give the correct solution. | ||
|} | |||
|} | |} | ||
| Line 144: | Line 189: | ||
{| | {| | ||
|- | |- | ||
=====Testing laser data acquisition===== | |||
{| | |||
|- | |- | ||
| Simulated laser data (Laura and Joep) | | Simulated laser data (Laura and Joep) | ||
| Line 151: | Line 197: | ||
|- | |- | ||
|- | |- | ||
| | |} | ||
=====Structure message from laser:===== | |||
{| | |||
<table> | <table> | ||
| Line 215: | Line 263: | ||
{| | {| | ||
=====Structure message for Velocity:===== | |||
{| | |||
|- | |- | ||
|~$ rostopic type /pico/cmd_vel | |~$ rostopic type /pico/cmd_vel | ||
| Line 255: | Line 305: | ||
{| | {| | ||
|- | |- | ||
=====Testing 3D simulation and visualization===== | |||
{| | |||
|- | |- | ||
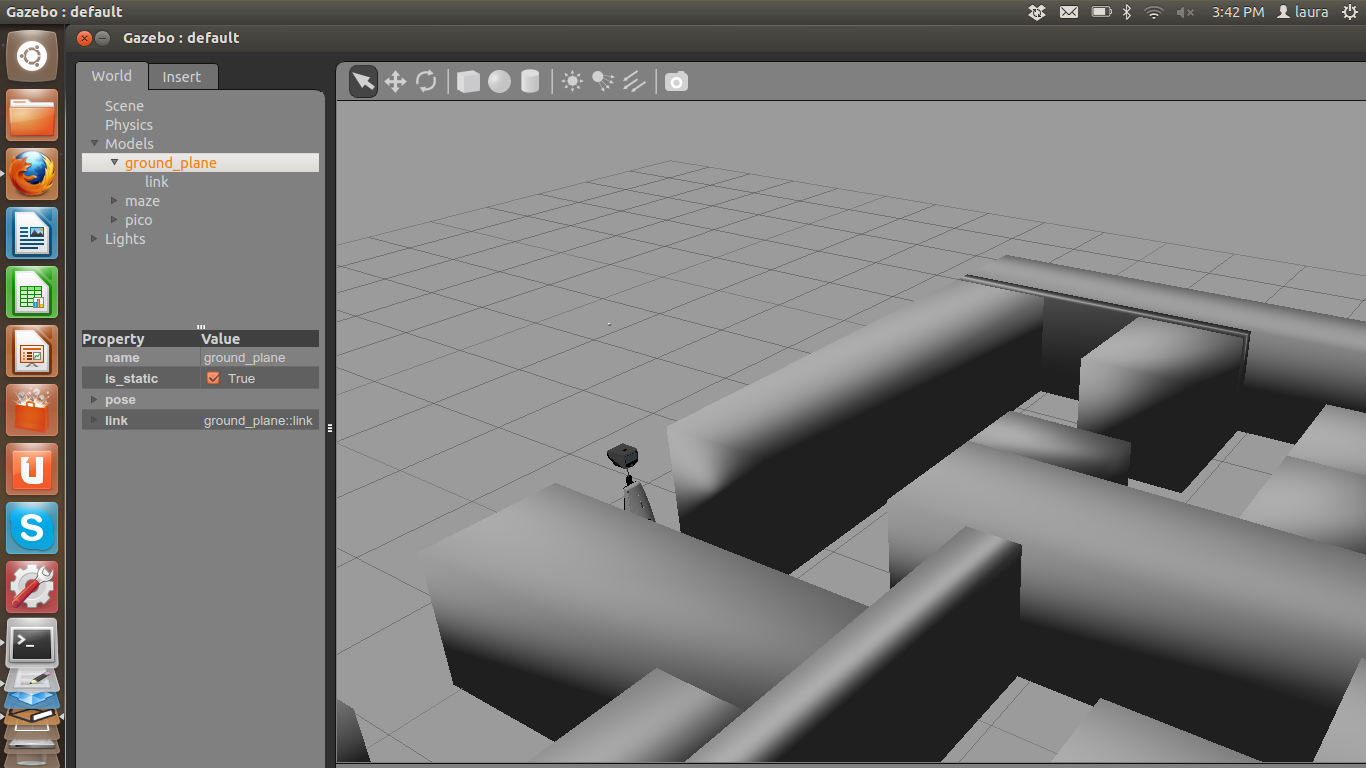
|The goal for the third week was to ensure the complete functionality of the working environment. After applying the changes included in the updated wiki the complete functionality of Gazebo was achieved. The maze was succesfully spawned and the urdf file of the robot was displayed correctly. | |The goal for the third week was to ensure the complete functionality of the working environment. After applying the changes included in the updated wiki the complete functionality of Gazebo was achieved. The maze was succesfully spawned and the urdf file of the robot was displayed correctly. | ||
|- | |- | ||
|[[File:Group2_Gazebo_jazz.png| | |[[File:Group2_Gazebo_jazz.png|centre|600px|]] | ||
|- | |- | ||
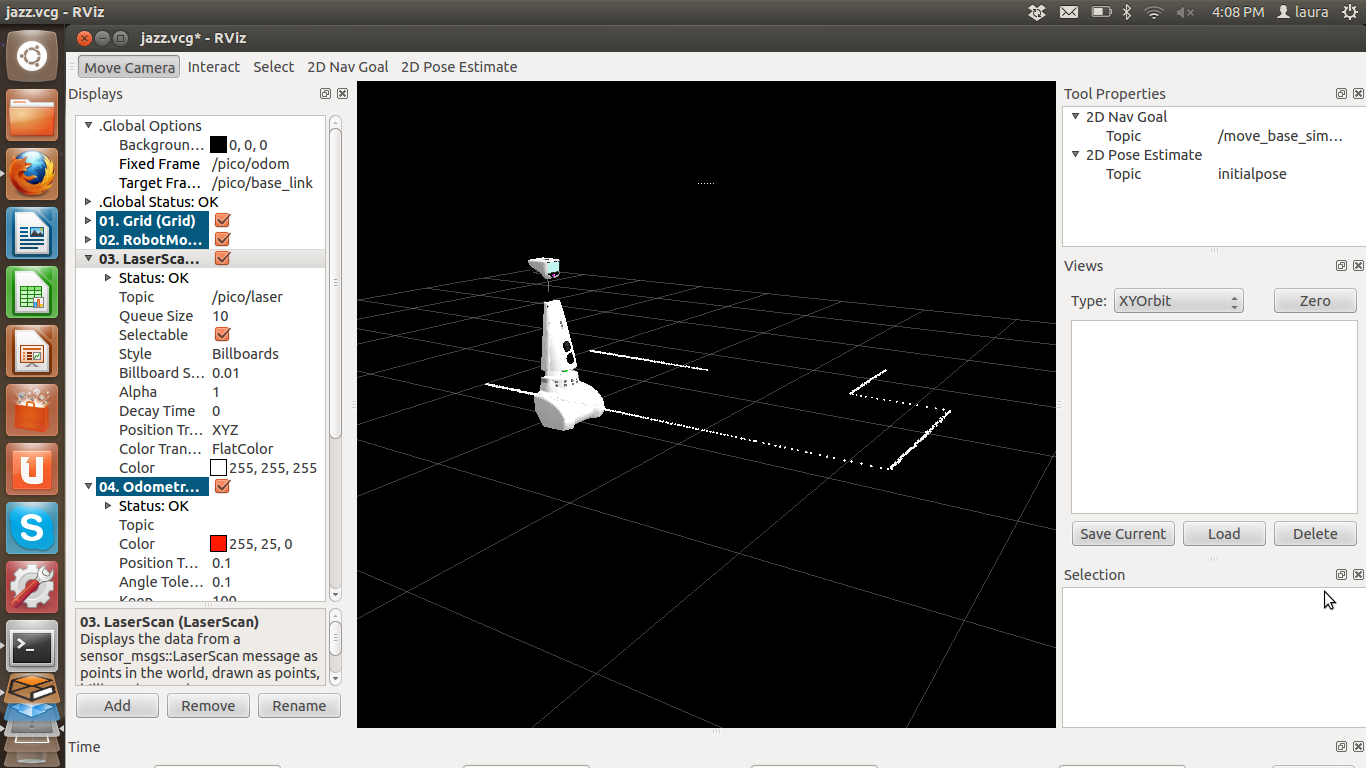
|The visualization of the robot in rviz was also achieved in all computers and the laser data was as well displayed. The topic to which we have to subscribe in order to visualize this data is /pico/laser which is of type [sensor_msgs/LaserScan]. The contents of this message are shown in last week's post. | |The visualization of the robot in rviz was also achieved in all computers and the laser data was as well displayed. The topic to which we have to subscribe in order to visualize this data is /pico/laser which is of type [sensor_msgs/LaserScan]. The contents of this message are shown in last week's post. | ||
|- | |- | ||
|[[File:Group2_Rviz_jazz.png| | |[[File:Group2_Rviz_jazz.png|centre|600px|]] | ||
|- | |- | ||
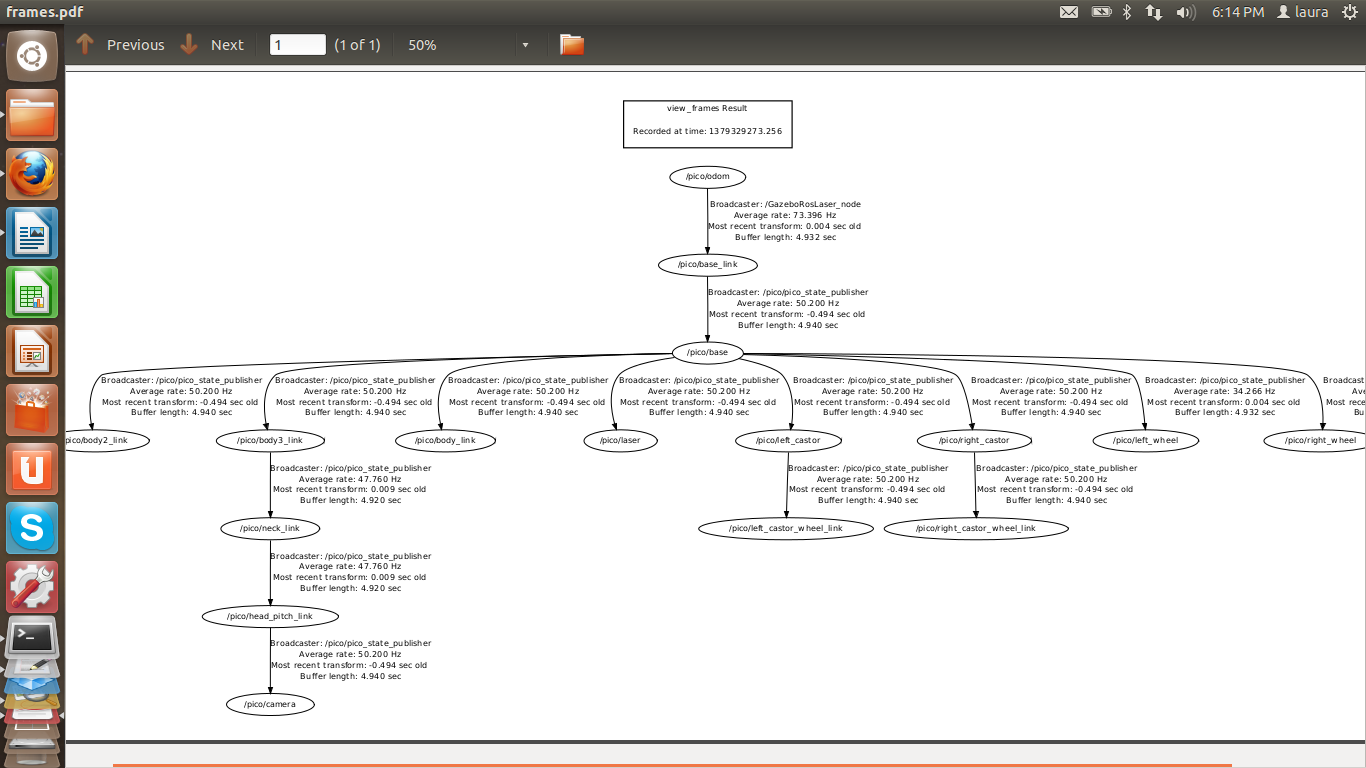
|We could also identify that reference frame transformation data as well as odometry data are already provided in the general repository. The following screenshot shows the reference frame transformation tree of our system. If we wanted to have a fixed reference frame we would have to add it before the odometry one. | |We could also identify that reference frame transformation data as well as odometry data are already provided in the general repository. The following screenshot shows the reference frame transformation tree of our system. If we wanted to have a fixed reference frame we would have to add it before the odometry one. | ||
|- | |- | ||
|[[File:Group2_Tf_view_frames.png| | |[[File:Group2_Tf_view_frames.png|centre|600px|]] | ||
|- | |- | ||
| | |} | ||
=====Defining our system's architecture===== | |||
{| | |||
|- | |- | ||
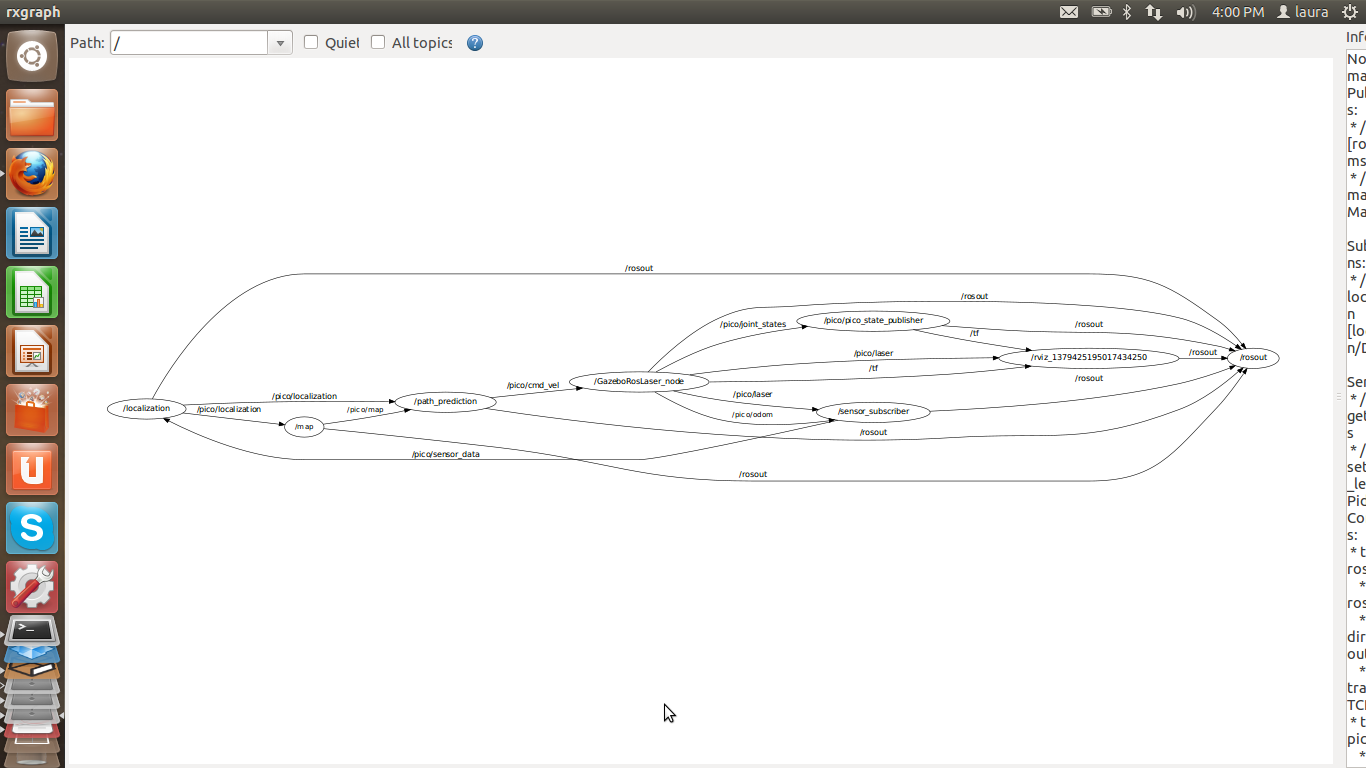
|During this week we also decided on our system's architecure which we defined as a modular one. This enables us to work simultaneously in several algorithms, delegate work and also use ROS's functionality and communication infrastructure. We decided to create our own .msg files and headers in order to structure data comprenhensively. The following image shows a print screen of our architecture as displayed by rxgraph. We programed nodes for each package that subscribed to and published the topics we will later use. In this way, we only have to edit the nodes' source code and add the algorithms for each module. We have already uploaded this set of packages to our svn repository. We choose to divide the the main functionality of the robot within the ros-environment into different modules that are coupled sequentially. The system is divided into 5 main nodes: sensors, location, map, trajectory planner and robot movement. The nodes will use a structure to communicate. The main name of this "Data", each node will add sub cell into the structure beginning with the name of the node, followed by the variable that is added. Example: "Data.location.theta_wall". Furthermore, we will use SI units. | |During this week we also decided on our system's architecure which we defined as a modular one. This enables us to work simultaneously in several algorithms, delegate work and also use ROS's functionality and communication infrastructure. We decided to create our own .msg files and headers in order to structure data comprenhensively. The following image shows a print screen of our architecture as displayed by rxgraph. We programed nodes for each package that subscribed to and published the topics we will later use. In this way, we only have to edit the nodes' source code and add the algorithms for each module. We have already uploaded this set of packages to our svn repository. We choose to divide the the main functionality of the robot within the ros-environment into different modules that are coupled sequentially. The system is divided into 5 main nodes: sensors, location, map, trajectory planner and robot movement. The nodes will use a structure to communicate. The main name of this "Data", each node will add sub cell into the structure beginning with the name of the node, followed by the variable that is added. Example: "Data.location.theta_wall". Furthermore, we will use SI units. | ||
|- | |- | ||
|[[File:Group2_Rxgraph_architecture.png| | | | ||
|- | |||
|[[File:Group2_Rxgraph_architecture.png|centre|600px|]] | |||
|- | |- | ||
|We can see in this graph that we have, up to now, a communication structure with 8 nodes: | |We can see in this graph that we have, up to now, a communication structure with 8 nodes: | ||
| Line 284: | Line 340: | ||
|- | |- | ||
|- | |- | ||
| ' | |} | ||
=====Movement of the robot===== | |||
{| | |||
|- | |||
|- | |||
| A movement function has been programmed in order to work with Pico's linear and angular displacement. For Pico to drive within the middle of the corridor, a second function takes care on fixing the direction of the robot. This fixing procedure is activated once the robot detects an obstacle closer than 30cm or when it detects the robot orientation, with respect to the middle line, changes more than 20 degrees. These functions have been implemented successfully with the rest of the code for the corridor competition in the simulation. In simulation the robot is able to go forward in the corridor without hitting any walls. | |||
|- | |||
|- | |||
|} | |||
=====Test plan for September 20===== | |||
{| | |||
|- | |- | ||
|1. Follow wiki's instruction on using Pico to set it up. | |1. Follow wiki's instruction on using Pico to set it up. | ||
| Line 293: | Line 359: | ||
|- | |- | ||
|- | |- | ||
|} | |||
|} | |} | ||
| Line 298: | Line 365: | ||
{| | {| | ||
|- | |- | ||
=====Localization Algorithm===== | |||
{| | |||
|- | |- | ||
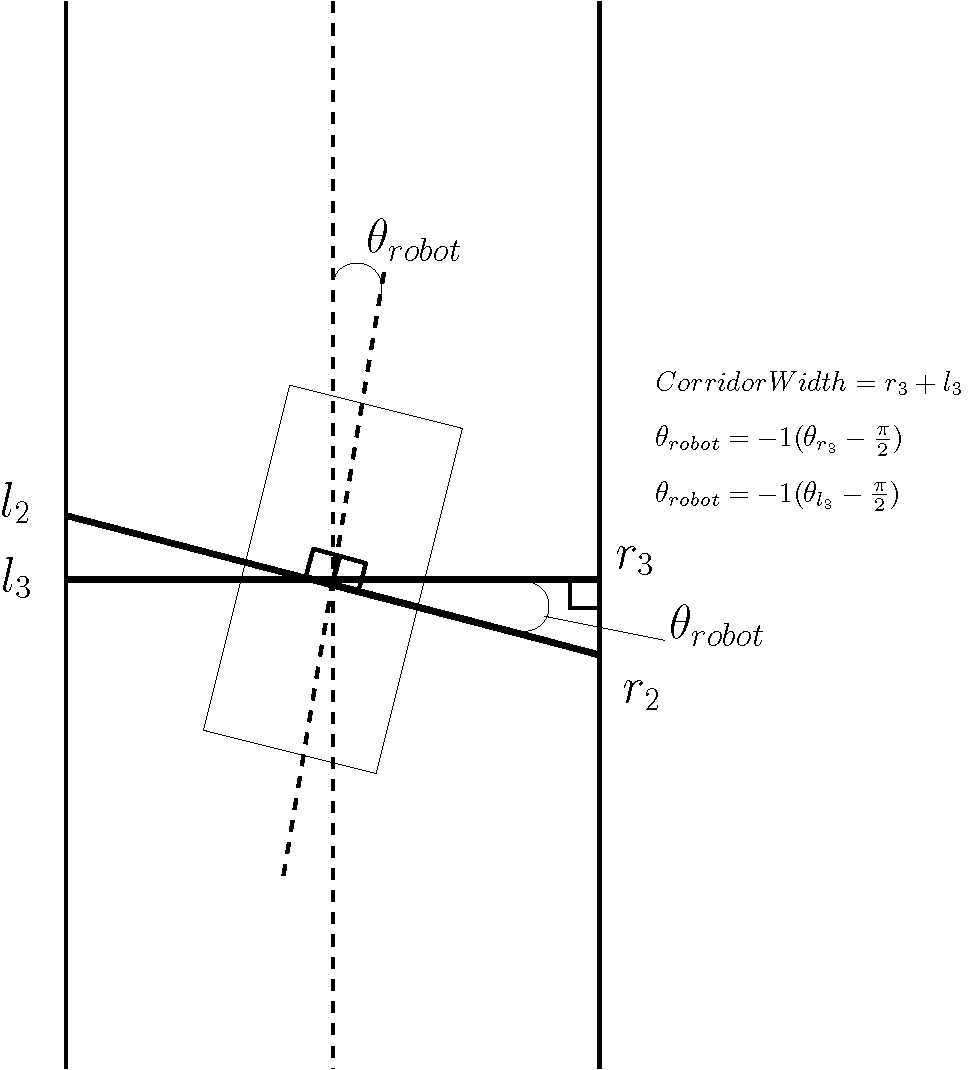
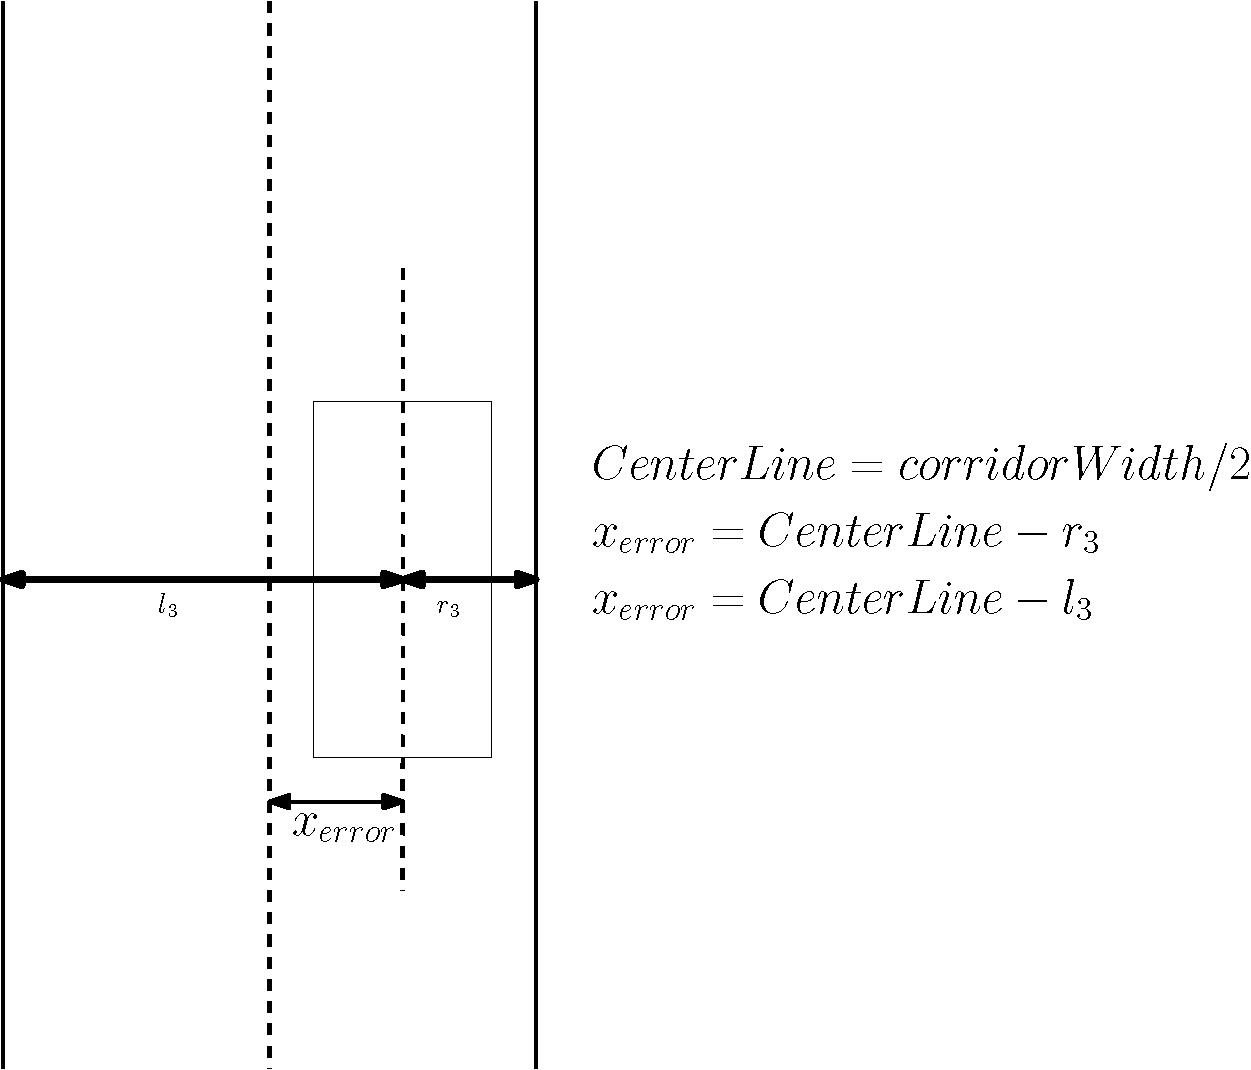
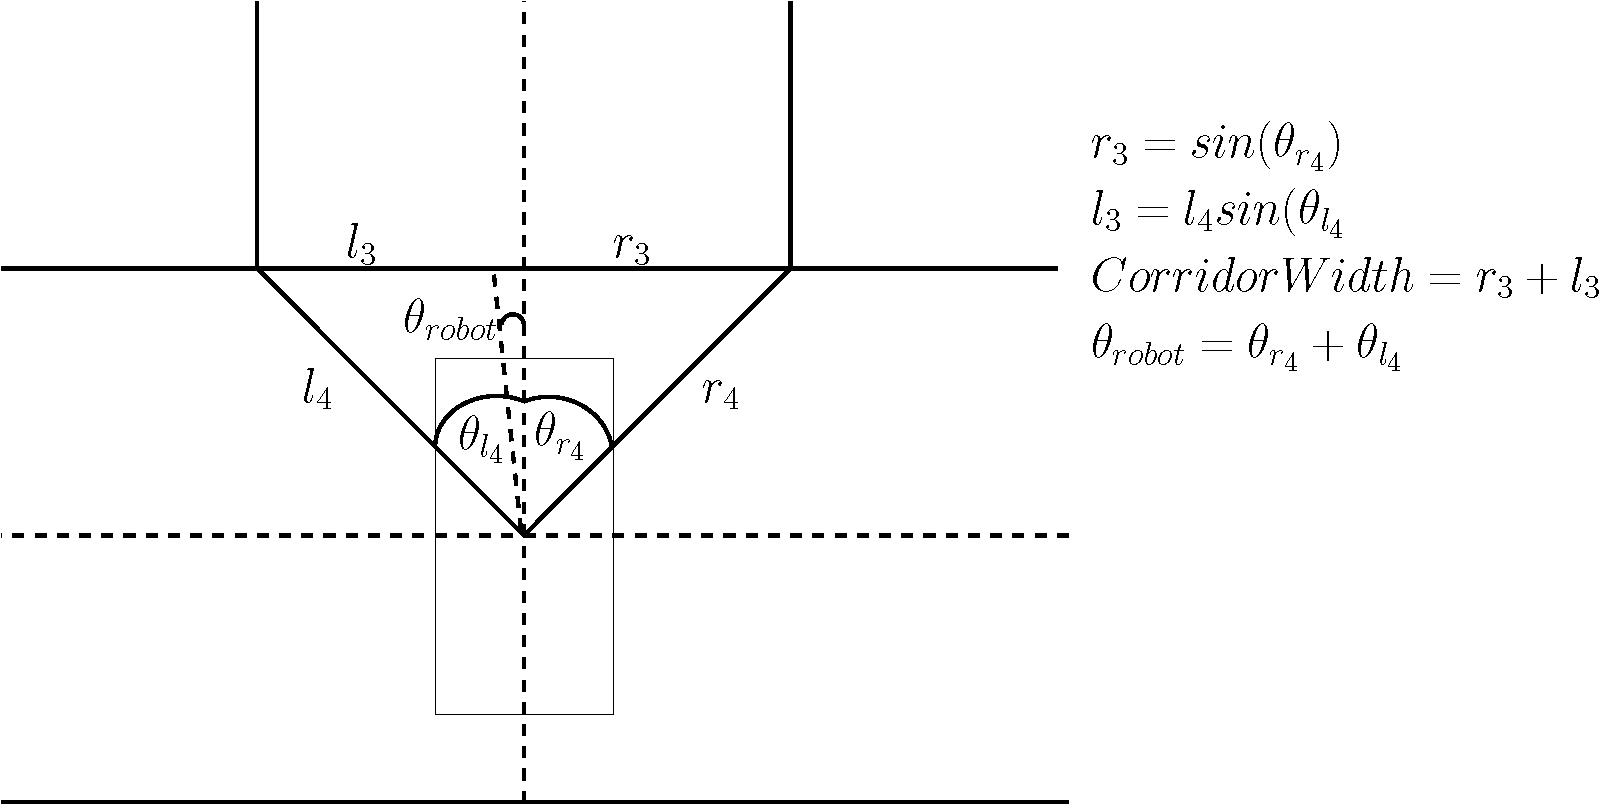
| The localization algorithm is based on the | | The localization algorithm is based on the sketches you can find in the following figures. In a closed corridor it uses 4 points and the corresponding angles to calculate the orientation of the robot compared to the center line of the corridor and the x-position compared to the center line (e.a. the line perpendicular to the center line of the corridor). Two points are the points perpendicular to the center line of the robot and 2 points are the points perpendicular to the walls. | ||
|- | |- | ||
| The algorithm takes into account 4 different situations. The first situation is when the robot is in a closed corridor, in this situation all the desired points are available. The second situation is when the robot has an opening on the left/right, in this situation the corner on which side the opening is is used to calculate what the width of the corridor is. The third situation is when the robot has turned to change to different corridor | | The algorithm takes into account 4 different situations. The first situation is when the robot is in a closed corridor, in this situation all the desired points are available. The second situation is when the robot has an opening on the left/right, in this situation the corner on which side the opening is is used to calculate what the width of the corridor is. The third situation is when the robot has turned to change to different corridor. In this situation the information of the two closest corners is used to calculate the width of the next corridor is, where the center line is located and what the orientation and x-position of the robot is compared to this center line. The output of the algorithm is in angle "Theta_robot", which is the angle between the center line of the robot and the x-position, which is the distance to the center line of the corridor. Values larger than zero means that the robot is on the right of the center line, values smaller than zero means that the robot is on the left of the center line. | ||
{| align="center" | |||
| [[File:EMC02 Localization.png|centre|400px|]] | |||
| [[File:EMC02_Localizaiton_lateral_error.png|centre|400px|]] | |||
| [[File:EMC02_Localization_open_cor.png|centre|400px|]] | |||
|} | |||
|} | |||
=====Corner Detection Algorithm===== | |||
{| | |||
| | |||
|- | |||
| In order to know where the side corridors are and which way to go, a solution had to be found in order to solve these problems. A way to determine which ways to go is to map the surroundings area of the robot. The mapping of the area can be done locally or globally. In case of a local map, only the area which can be seen by the robot is mapped. By the global mapping the position of the robot is determined in relation to a global reference point. All the local mappings of the robot can be stored a put together in order to create a global map. In both cases the local mapping needs to be solved first, but in case of global mapping there still is a lot after processing in order to build the global map. | |||
| | |||
|- | |||
| There has been chosen to not create an advanced path seeking algorithm to search for a path through the maze. In place of that there has been chosen to follow the right of left wall. This is done because the maze is unknown the global mapping has a map of only the part where the robot already has been, There is no information of the unknown parts where the robot has not been yet. Therefore the right or left wall following will be applied. This reduces the mapping algorithm to a local mapping algorithm. | |||
| | |||
|- | |- | ||
| | | The base behind the mapping algorithm is that the robot will drive straight between the walls. A corner detection algorithm will detect corner points and the specific situation will determine (by example: corner to the right). And the algorithm will take after the corner point a right turn. So for the mapping of the environment a function has been created in order to detect the edges of the maze. Before the detection algorithm was build the following requirement to the algorithm were made: | ||
| | |||
|- | |- | ||
| The corner detection function should: | |||
| | |||
|- | |||
|• Detect corners / edges. | |||
| | |||
|- | |- | ||
| | |• Detect corner types. | ||
| | | | ||
|- | |- | ||
| | |• Store locations and types. | ||
• Store locations and types. | |||
| | | | ||
|- | |- | ||
| The different corner types are divided into a number of types. In order to identify the type of each corner the following type-names have been given to the numbers by using an enumerate. | | The different corner types are divided into a number of types. In order to identify the type of each corner the following type-names have been given to the numbers by using an enumerate. | ||
| | |||
| | | | ||
|- | |- | ||
| | |0. Unknown_Corner_type | ||
| | | | ||
|- | |- | ||
| | |1. Left_outside | ||
| | | | ||
|- | |- | ||
| | |2. Left_inside | ||
| | |||
|- | |||
|3. Right_inside | |||
| | |||
|- | |||
|4. Right_outside | |||
| | |||
|- | |||
|5. Blind_left | |||
| | |||
|- | |||
|6. Blind_right | |||
| | |||
|- | |||
|7. Leftback_inside | |||
| | |||
|- | |||
|8. Leftback_outside | |||
| | |||
|- | |||
|9. Rightback_inside | |||
| | |||
|- | |||
|10. Rightback_outside | |||
| | |||
| | |||
|- | |||
|For each type of corner can be specified by using the measuring data. The localization algorithm provides the angle of the robot in relation the corridor. So the first step is to rotate all the laser data of the robot so they are parallel to the corridor. With the angle of the robot in relation to the corridor the measured X and Y positions are translated into the coordinate system parallel to the corridor. The new Y direction lies parallel to the heart line of the corridor and the new X direction lies perpendicular to the heart line of the corridor. These new coordinates are called the normalized coordinates. With these normalized coordinates the position of the edge are calculated. The positions of the edges are later on translated back to the robot coordinate system. | |||
| | |||
|- | |||
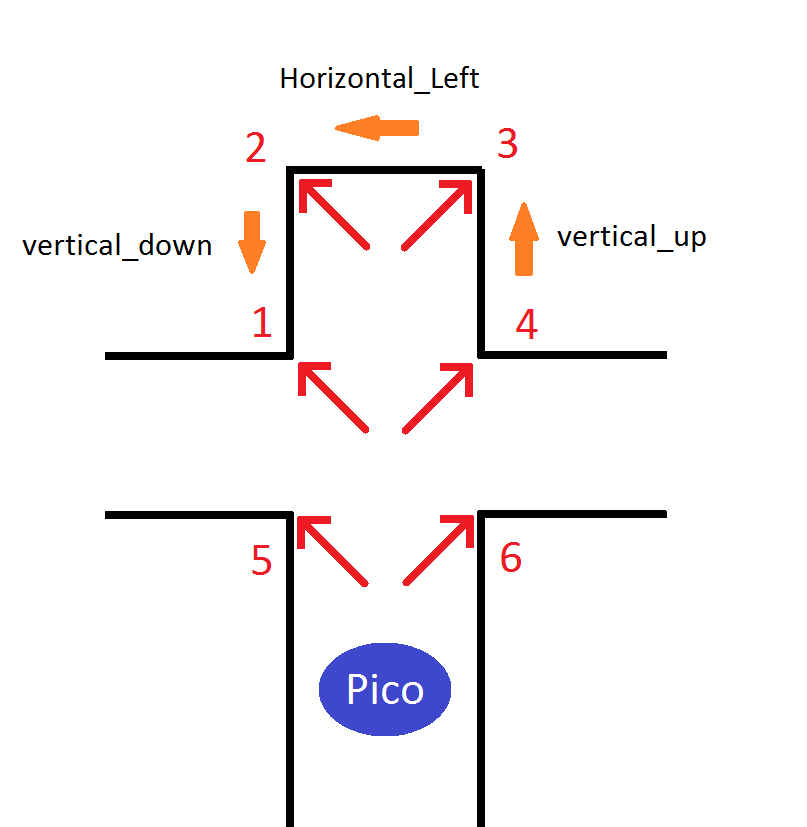
|With the normalized coordinates the direction of the wall is determined. A wall can go vertical or horizontal within certain margins / deviations. Besides the general direction the direction of measurement is also important. For the detection of the different types of edges the difference is made between vertical_up, vertical_down, Horizontal_left and Horizontal_right. The directions are shown in the figure below. When the normalized Y-coordinate becomes larger than the defined margin the direction vertical_up is detected, when the normalized y-coordinate becomes smaller the direction vertical_down is detected. (These names are chosen due to the top-view of the situation.) | |||
| | |||
|- | |||
|In the figure below the directions of measurement are shown and the corner type when the Pico robot approaches a crossing with a dead end straight ahead. | |||
| | |||
|- | |||
|[[File:Emc02_pico_corner_detection.png|centre|500px|]] | |||
| | |||
|- | |||
|When the measured direction changes, there must have been an edge (assuming no errors). Since there are errors in the environment (by example: gaps between walls) and the measurements, certain margins are applied to avoid that due to the errors edges are detected. The algorithm checks whether the previous point lies within a certain margin of the current point. The check considers the normalized X and Y direction of the point. If by example the current direction is horizontal the normalized Y values should be constant (within the margin). If the change in normalized Y values changes to much (more than the margin) the direction is changed. By checking the normalized X value the new direction can be determined (Horizontal_left or Horizontal_right). The combinations of the measured directions result in a corner type and a corner location. | |||
| | |||
|- | |||
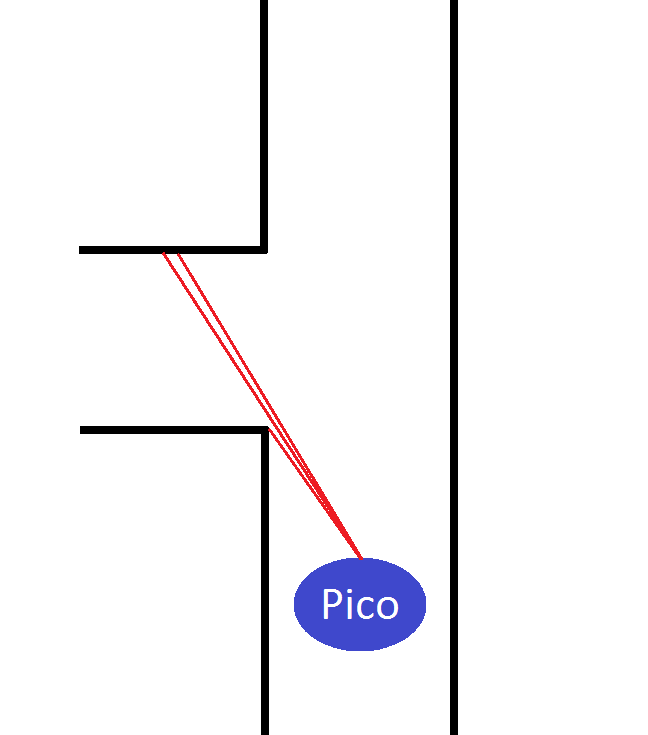
|In case of the corner types 5 and 6, the blind corners, new values of both X and Y are outside the margin. This means that a blind corner has been found. | |||
| | |||
|- | |||
|[[File:Emc02_pico_corner_detection_2.png|centre|300px|]] | |||
| | |||
|- | |||
|As can be seen in the figure above, a clear jump in measured coordinates can be detected. The new direction is now unknown, since the direction of the wall detected behind the blind edge is yet unknown. The next normalized coordinate will show whether the newly detected wall is vertical or horizontal and set the new direction. When a jump in measurement data is detected, depending whether the coordinates have become closed or further to the robot determines the different between type 5 and 6. | |||
| | |||
|- | |||
|The required output of the function should be a vector containing the data of the corner points. After a change in direction is found the data are send to a second algorithm whicl will store the corner point. This algorithm checks the previous direction of the wall and compares it with the current or new direction. The combination of the directions will as said before provide a specific corner type. | |||
| | |||
|- | |- | ||
| | |} | ||
=====Corridor competition===== | |||
{| | |||
|- | |||
|For the corridor competition some of the main algorithms like the localization and corner detection were still work in process due to the lack in time. Besides that the algorithm that should move the robot, let it turn and drive forward again were not finished either. Therefore the decision has been made to construct a simplified algorithm for the resolution of the corridor competition. This means a work around needs to be built just for the corridor competition. The goal was to implement as many of the finished bits as possible but still a lot work was needed to make part purely for the corridor competition, in the maze completion these parts are not usable. | |||
| | |||
|- | |||
|For the corridor challenge we programmed the robot in a state machine style in order to make its execution sequential. The straight line driving was programmed with a controller which should keep the robot in the middle of the corridor. This algorithm was then implemented as a state. When the right or left hand wall disappeared on the side of the robot, it meant that the corridor was reached. This requirement means that the programs switches from state 1 (straight line driving) to state 2 (turning). State 2 contains the algorithm, based on simple geometry and the laser data, for making the turn of the robot on the intersection of the heart lines of the main corridor and the side corridor. So the turning is done without forward driving. After State 2 is completed the robot should switch bas to state 1 drive forward to the end of the corridor challenge. | |||
| | |||
|- | |||
|The corridor test consisted of a corridor with an open ended main corridor with a side corridor on the left after approximately 4 to 5 meters. In simulation the Robot was able to finish the corridor challenge a number of times. With only one hour of testing on the robot before the corridor challenge it was still unknown to us how the simulation compared to the actual robot. During the one hour of testing with real robot the focus had been to find out important questions, like the number of data points per scan, the scanning direction and the amount of slip of the robot when driving. So when the robot was fired up during the corridor test, it moved slightly forward and got stuck in a infinite loop between state 1 and state 2. The same occurred during the second attempt meaning the corridor challenge was not completed successfully. | |||
| | |||
|- | |||
|Already during the corridor challenge the problem was detected that caused the robot to fail. The incoming data of the laser were not filtered and the deviations of the laser data compared to the previous measurement were quite large. This caused a problem to the algorithm which controlled the switching between the states. The algorithm should switch if one of the walls disappeared, but due to the variations in the measurement data the detection of the wall failed. One data set the wall was still there, and the next data set the wall was gone activation the next state. The third data set the wall was found again caused a switch back to state 1. This infinite loop caused the robot to fail. | |||
| | |||
|- | |||
|The following decisions have been made after the corridor challenge: | |||
| | |||
|- | |||
| • The incoming data need to be filtered | |||
| | |||
|- | |||
| • Further testing of the robot is required in order to understand the incoming data and the behavior of the robot. | |||
| | |||
|- | |||
|• The algorithms need to be made more robust, since the straight line driving algorithm will be used later on. | |||
| | |||
|- | |||
| | |||
|} | |} | ||
| Line 348: | Line 505: | ||
{| | {| | ||
|- | |- | ||
=====Data-Filtering===== | |||
{| | |||
|- | |- | ||
|Shortly after the corridor | |Shortly after the corridor competition the PICO robot was rebuild. We were the first group to test with the rebuild robot. During the testing the following observation has been done: | ||
Due to the removal of a control layer inside the robot, the laser data can now contain zero-values. These zeros correspond to measurements which have deflected and not returned to the laser. In the old robot control corrections were made to avoid zero-values. In order to prevent the robot to fail on the zero-values an algorithm has been made which removes the zero-values and also evens out fluctuations in the measurement data. With the newly build vector (without zeroes) the other algorithm can determine the next step of the robot. | Due to the removal of a control layer inside the robot, the laser data can now contain zero-values. These zeros correspond to measurements which have deflected and not returned to the laser. In the old robot control corrections were made to avoid zero-values. In order to prevent the robot to fail on the zero-values an algorithm has been made which removes the zero-values and also evens out fluctuations in the measurement data. With the newly build vector (without zeroes) the other algorithm can determine the next step of the robot. | ||
| | |||
| | |||
|} | |||
|- | |||
=====Testing laser data reading errors===== | |||
{| | |||
|- | |||
|After running a testing routine for the laser data being read we found out the following: | |||
|- | |||
|''Observations:'' | |||
|- | |||
|1. The size of the array is not always 1081. | |||
|- | |||
|2. The amount of packets (arrays) that are corrupted is not as high (41 wrong out of 7500).This changed during other experiments when we saw that the wrong data increases as you get closer to the walls. | |||
|- | |||
|3. We think that the first 5 iterations give wrong laser data. | |||
|- | |||
|4. There is a significant variance in the distances from the robot to the walls (not sure if the problem is from our algorithm or from the data given by the laser driver). | |||
|- | |||
|5.Variance | |||
|- | |||
|''Routines to program for robustness'' | |||
|- | |||
|1. Consider the size of the array as a variable (use sizeof() instead of a constant of 1081) | |||
|- | |||
|2. Consider not using the data given by the first 5 iterations of laser data acquisition. | |||
|- | |||
|3. Filter data twice: the first time throw away the first and last 10° of the laser data, then identify garbage values and normalize the overall data (using for example a Gaussian distribution->Koen's algorithm). | |||
|- | |||
|4.Program regularly used routines into functions (for instance get minimum value of an array). | |||
|- | |||
|5. Consider the redistribution of our architecture, we could have a decision making node for example coordinating the processes with a hierarchical peer-to-peer structural model or orchestra. | |||
|- | |||
|6.Modify the algorithm to keep the robot in the middle or the corridor. So far we have been implementing routines based on trigonometry, however, since the data of the laser is not so reliable, we now think we should program a proportional controller. | |||
|- | |||
|7.Modify the turning function. | |||
|- | |||
|SUMMARY: | |||
|- | |||
|1. We need to have reliable data for our algorithms to work correctly ->filtering of laser data function. | |||
|- | |||
|2. The focus is in the turning and going forward functions, if they work well we can implement a very simple algorithm to solve the maze ->turning and going forward (centered) functions. | |||
|- | |||
|3. According to the algorithms we are going to use we should redistribute our architecture as convenient. | |||
|- | |||
|} | |||
=====Situation identification===== | |||
{| | |||
| | |||
|- | |||
| The action of the robot depends on the surroundings of the robot, therefore it is necessary to identify the situation. Basically, there are eight main situations, these are shown in the figure below. If the robot does not detect any corner points, then it is located in a corridor. In this case the robot can go straight on. On the other hand, if the robot detects any corner points, then it might need to turn. Whether it needs to turn, depends on the situation. | |||
|- | |||
|[[File:EMC02_Situation_IdentificationII.png|centre|500px]] | |||
|- | |||
| | |||
|- | |||
| Corner points determine the situation, hence corner points are inputs for the situation identification process. The input consist of the x- and y-position of the corner points, corner points ID and the type of the corner points as mentioned in Corner Detection Algorithm. The order of incoming corner points could not be determined in advance, e.g. for situation (c) the left corner point or the right corner point could both be the first incoming corner point. Besides the situation, the algorithm will give two ordered corner points as output. These two points determine the direction (the corridor) that the robot will take, and the center line of the new corridor can be calculated. The order of these two corner points is determined anticlockwise, starting from the viewpoint of the robot. In this way, the robot will turn right if it has multiple options. If it is not possible to turn right, then the robot will go straight on and turn left is the last option in cases with multiple options. | |||
| | |||
|- | |||
| One way to program this function is by using if else statements with combinations of several conditions to determine the situation. In this way, the conditions would be extensive, because the order of incoming corner points is not known. In this case the condition (in words) for situation (c) is as follows: | |||
If ((received 2 points AND type of point 1 == 2 AND type of point 2 == 6) or (received 2 points AND type of point 1 == 6 AND type of point 2 == 2)) | |||
| | |||
|- | |||
|Another way is to use two iterators to deal with the order of incoming corner points. Each iterator represents the type of a corner point. Once the first iterator finds a corner point, the second iterator will look for another corner point that can make a match with the first corner point. In this way the conditions in the if else statements are much reduced. A disadvantage of this method is that the algorithm makes combinations of 2 corner types, therefore the algorithm cannot identify an intersection. An intersection will be recognized as “straight right”. This is not a problem for PICO because of the right hand rule. That is, PICO will turn right for both situations and both output coordinates are the same. So using 2 corner point types, 6 combinations are possible. These combinations and the direction output are shown in the tables below. | |||
| | |||
|- | |||
|[[File: EMC02_Direction.png|centre|600px]] | |||
| | |||
|- | |||
|The iterators keep working until no corners are detected. The consequence is that all combinations of corner points will be identified. Due to the right hand rule, the situations where the robot can turn right have priority. Hence, if multiple situations are detected, the algorithm has to compare the importance of the detected situations. The importance of the situations is ordered as follows: | |||
| | |||
|- | |||
|1. Straight right | |||
| | |||
|- | |||
|2. Right turn | |||
| | |||
|- | |||
|3. T-junction | |||
| | |||
|- | |||
|4. Dead end | |||
| | |||
|- | |||
|5. Straight left | |||
| | |||
|- | |||
|6. Left turn | |||
| | |||
|- | |||
| | |||
[[File: EMC02_Example_direction.png|centre|100px]] | |||
| | |||
|- | |||
|So in the situation above, PICO will recognize the options “straight left” and “right turn” but it will take the last option. Furthermore, if the same direction is possible multiple times, then the robot will take the first possibility. | |||
| | |||
|- | |||
|A possible problem with the iterators is the case when corner detection does not function robust. If the algorithm gives too much corners points due to the noise, then the situation identification algorithm might make combinations of several corners points and gives situations that actually do not exist. In order to deal with these problems, some extra conditions must be used, like the distances between 2 corners points must be smaller/greater than a certain value. | |||
| | |||
|- | |||
|} | |||
=====Communication between algorithms===== | |||
{| | |||
| | |||
|- | |||
|For the communication between the different functions there has been chosen to use one structure or class of data. In this data structure the data of the previous algorithms is stored so that the next algorithm receives all information of the previous algorithms. In case of the corner detection this means that the laser data and the position of the robot within the maze are received in one structure. The result data of the corner detection is then added to the data structure which is then published as output of the function. The advantage is that only one data structure is send round and all available information can be accessed within all algorithms. When calling the functions in the main function the in- and output of the functions (with exception of the input of the first function) have been made this data structure since this contains all information needed for the algorithms. | |||
| | |||
|- | |||
|The data structure has been build as a class. This class consists of vectors and structures, depending on the type of information. The laser data are stored in a vector of structures. Each structure contains and angle and a measured distance. This vector can be accessed by an iterator within each function. The position data of the robot within the maze are stored in a structure, since there can only be one position of the robot relative to the maze. For the detected corners a vector has been used again. Like the laser data the vector is a vector containing structures. Each structure contains information about the detected corner (x and y position, type). For the other algorithms a similar approach has been done as well. | |||
| | |||
|- | |||
|} | |||
|} | |} | ||
| Line 357: | Line 629: | ||
{| | {| | ||
|- | |- | ||
| | =====New Ros-structure===== | ||
{| | |||
|- | |||
| | |||
In the old ros structure almost all the main components like the mapping and localization were placed in separate nodes. During programming of the different algorithms we have come to the conclusion that almost all these processes work sequential. For the mapping of the area the localization is required (for our algorithms). The advantage of using different nodes is that the nodes will run parallel to each other. In case of sequential algorithms, running parallel is not wanted since some of the nodes might not have had the correct data yet.So a new structure is proposed, which will consist of a smaller number of nodes. In each node now runs a sequential process which can consists of multiple algorithms. The different nodes which are left should run parallel. Together with a controller and the parallel processes control layers can be build, with the advantage that a higher control layer can overrule a lower control layer. | |||
|- | |||
The decision algorithm gets input from the situation identification algorithm. The input for this algorithm are two corners in the situation with the corresponding information to the corners and the type of situation. The angle of the robot compared to the center line of the corridor and the lateral position of the robot compared to the centre line of the corridor. | |||
|- | |||
|} | |||
=====General Architecture===== | |||
{| | |||
|- | |||
|The figure below contains the general architecture of the system. The set up makes it possible to add vision information later into it and when this is not possible solve the maze only based on laser data. The first step is to load the laser data and filter this. This data is sent to the localization algorithm, which determines in the position of the robot in the local environment. The localization algorithm calculates what the lateral error is compared to the center line and the angular error compared to the center line and sends this information to the decision making algorithm and the corner detection algorithm. The filtered sensor data is also sent to the corner detection algorithm in the local environment. | |||
|- | |||
|The algorithm uses the coordinates of the two corners to calculate what the center of the corridor is which the robot has to turn in. Than the robot drives to the intersection of the two center lines of the current corridor and the new corridor, makes a 90 degrees clockwise turn and drives straight again. When these tasks are performed the algorithm reset the output to zero and new information can be fed into the algorithm. When a situation is identified and the robot is in it’s driving mode, the robot stays in these driving modes until the end of the cycle is reached. Each mode is a state in the process/tasks the robot has to perform to drive through the corner. | |||
|- | |||
|[[File:EMC02_Architecture.png|centre|400px|]] | |||
|- | |||
|} | |||
=====Decision making===== | |||
{| | |||
|- | |||
|The are 8 different situations possible as mentioned in “Situation Identification”, based on these situation there is some desired driving behavior, turning right is preferred over going straight, straight is preferred over going left and in at a dead end the robot has to turn 180 degrees counter clockwise. This leads to 4 basic driving modes, drive straight, turn right, turn left, u turn 180 degrees counter clockwise. Depending on the situation the robot is in, the robot has to follow a certain procedure to for example take a left turn. In normal mode only the laser data will be used to determine what the situation is. However it is possible to overrule the decision based on the laser data if the vision would detect and arrow. | |||
|- | |||
|In the figure on the right a step plan is presented that the algorithm go through to make a left turn. Based on the coordinates of the points detected the algorithm calculates the reference point it wants to the robot to drive to before the robot starts turning. Until this point or a small area around this point is reached to robot will keep driving forward. When the desired area is reached the algorithm that makes the actual turn will be called. When the turn is finished, a signal will be sent to the desisicon making algorithm that the takes of making the turn is completed and that the robot is ready to receive new instructions. | |||
|- | |||
{| align="center" | |||
| [[File:EMC02_Desison.png|centre|400px|]] | |||
| [[File:EMC02_Make_left_turn.png|centre|400px|]] | |||
|} | |||
=====Testing and Debugging of the corner detection algorithm===== | |||
{| | |||
|- | |||
|During the testing and debugging of the corner detection algorithm a number of errors came forward. The biggest problem is the wrong or incorrect output of the algorithm. The cause of the wrong output is the incorrect detection of the corners. The detection is done by detecting changes in the direction of the measurement data. The data which is used by the algorithm should be as raw as possible. When the data is filtered to mush the differences which should be detected are evened out. This can cause that the differences are too small now and no corners are detected. If there is a real step in the data due to a blind corner, then averaging the data can result in evening out this step into multiple smaller steps. These steps do not lead to corner detection due to the fact that the steps between the points are now too small again to classify the corner as a blind corner (in which case there should be a big step in the data). | |||
| | |||
|- | |||
|A second error concerning the input data is the distance to the corner, when the robot is further from the corners the points will be further apart of each other. When the robot comes closer to the actual edges which it should detect the point will be closer to each other. This means that when the robot approaches the corners the points can be so close that no change in direction is detected since the change is every time within the margins. | |||
| | |||
|- | |||
|} | |||
|} | |||
==== Week 7: October 14 - October 20 ==== | |||
{| | |||
=====180 degrees turn===== | |||
{| | |||
|- | |||
| A turn of 180 degrees will be realized by turning twice 90 degrees counterclockwise. | |||
|- | |||
|} | |||
=====Backup Algorithm===== | |||
This movie shows our backup algorithm, version of Friday 18th October. This version is able to drive straight and take a right turn. | |||
{| | |||
[[File:EMC02 Pico movie.PNG|400px|center|link=http://www.youtube.com/watch?v=Xo14PQDt-hU&feature=youtube_gdata]] | |||
|} | |||
=====Visualizaton===== | |||
{| | |||
|- | |||
|In the original ROS-structure with the nodes there was an option to use the camera on the Pico robot for visualization. With the visualization the arrows placed in the maze could be recognized and overrule the right hand wall algorithm in order to find the exit of the maze faster. Straight from the beginning it was planned to implement the visualization last. The most important part in the beginning was to create a working platform for the robot. This means that all the basic functionalities of the robot should work before the visualization was implemented. It’s nice to detect an arrow to the left, but of its impossible to make a left turn the functionality is still useless. | |||
| | |||
| | |||
|- | |||
|As stated before the laser data provided by the robot contained a number of issues which needed to be solved with first. Therefore there was no reason to implement the visualization. With the core structure finished the remaining time was limited and the amount of work (learning the new tools, build the algorithm and do the implementation) large, the decision was made to not implement the visualization into the robots program. | |||
| | |||
|} | |} | ||
|} | |||
{| | |||
=====Final implementation of the laser data filtering===== | |||
{| | |||
|- | |||
|During the last weeks one of the major challenges we had to endure in order to guarantee our algorithm's robustness was having reliable sensor data to work with. On previous weeks we had decided to program a filter that would basically solve the three main issues of the unreliable laser data: 1) zero values in the array, 2) variable size of the raw data array, 3) high variance of the raw data values.Following are the steps we took to implement these three conditions and the modifications we made to them: | |||
|- | |||
|'''1. Managing garbage values in laser data array''' | |||
|- | |||
|The algorithm we implemented at first averaged the adjacent non-zero values in order to replace the current zero value. However, after testing it in the actual robot we realized that the outcome fixed value was not always reliable since the data that was being used to fix the value might differ from the actual value. Since we know that this garbage values are generated whenever a part of the robot's body is sensed or whenever the distance sensed is too large we have decided to just ignore them and not use them in the subsequent algorithms. In every algorithm there is a condition that states that whenever the laser data value to use is <0.02 (m), the value shouldn't be further used. | |||
|- | |||
|'''2. Variable size of the raw data array''' | |||
|- | |||
|During a couple of the test sessions we had, the size of the raw laser data array was different from what was expected (1081). Sometimes the size of the array would be 1080 and even on a couple of occasions it changed to be less than 500. This last problem arose when the configuration files of the Hokuyo laser driver where not set properly and we couldn't intervene on that (suggestion is to verify the proper functionality of this since it can lead to time leaks during the test sessions which are quite limited). We implemented an algorithm to ensure the size of the array would always be 1081 as shown in the following figure. | |||
|- | |||
|[[File:Emc02_Filter_1.jpg|centre|600px|]] | |||
|- | |||
|'''3. High variance of the raw laser data''' | |||
|- | |||
|Finally we implemented a solution for the high variance of the raw laser data. We first implemented a filter with a normal distribution giving weights of 0.4 to the current value and 0.24 and 0.06 to the adjacent values as shown in the following figure. | |||
|- | |||
|[[File:Emc02_Filter_2.jpg|centre|600px|]] | |||
|- | |||
|However we soon realized that the laser data values for every index were actually varying on time. We programmed an algorithm that generated a new array with 1081 values, each of which is an average of N number of samples. Each one of this samples is taken every time the laser_callback function subscribes to the data the hokuyo_node is sending. The following figure shows how this last filter was implemented. In order to find the most adequate number of samples several tests were run on the actual robot. | |||
|- | |||
|[[File:Emc02_Filter_3.jpg|centre|600px|]] | |||
|- | |||
|} | |||
=====Final algorithm===== | |||
{| | |||
The final implementation is a simplified approach of the previously described. We decided to implement the full solution in just one node and the modular structure was achieved through the use of several functions which are called by a control function. This control function has a state machine structure. The following figure shows the general structure of the algorithm. Basically, the robot is going to drive forward as long as it doesn't find a corner. If it finds a corner it is always going to try to turn right (state 2) unless there is a dead end or a u turn to the left in which case it will try to turn left (state 3). The robot will leave state 2 and state 3 whenever it stops sensing a corner and detects that it can keep driving forward. | |||
{| align="center" | |||
| [[File:Emc02_flow_chart.png|centre|400px|]] | |||
|} | |||
Following is a more detailed explanation of the algorithm used for every state of the algorithm. | |||
'''1. State 1: Foward_RightWall.''' Using laser data, the minimum distance to the right wall is calculated. This is denoted by V2 in the following figure. Using this same information an angle theta v2, which informs the robot about its orientation, is calculated. During this state there are two user defined references, one for the desired minimum distance and one for the desired orientation of the robot. Then a proportional controller is used to correct for these two errors with the objective of maintaining the robot in a straight line trajectory. | |||
'''2. Corner detection: Corner?''' The robot is at all time running two small algorithms that determine the existence of corners. In order to detect right corners, the information around the minimum distance to the right wall is observed. This is done by generating two vectors denoted by V3 in the following figure. These V3 vectors can be calculated by defining a pair of V1 vectors and performing the trigonometric operations shown in the figure. Whenever there is a 180° angle between these two V3 vectors the robot stays in state 1:forward_RightWall. | |||
{| align="center" | |||
| [[File:EMC02_Ernesto_angle.png|centre|400px|]] | |||
|} | |||
When the angle between the V3 vectors is of 90°, then the algorithm identifies the existence of a right corner. The same algorithm is used in order to detect corners that require a left turn, the only difference is that now we observe for an angle of -90° between the vectors and the algorithm is applied along all the laser data for the right plane of the robot. The algorithm searches throughout the data for a corner that requires a left turn and, if found, calculates the distance to that corner. Once the distance is below a threshold a left turn will be executed. | |||
{| align="center" | |||
| [[File:EMC02_Ernesto_corner.png|centre|400px|]] | |||
|} | |||
'''3. State2:Turn_right'''. When the detected corner leads to an exit to the right the robot is going to turn in the clockwise direction until the two V3 vectors have again a 180° angle between them. This is done as well using a proportional controller, which was tuned during the experimental sessions. | |||
'''4. State3:Turn_left.''' Whenever the detected corner leads to an exit to the left the robot will start rotating in the counterclockwise direction until it senses a straight corridor again. The following figure shows how this is done. An angle Beta is calculated between the V3 vector and the Y coordinate of the robot's reference system. When this angle is equal to 5° then the robot jumps again to state 1 since it senses that it can drive forward once again. In the case in which there is a U turn to the left of the robot, then this turning left algorithm is performed twice. | |||
{| align="center" | |||
| [[File:EMC02 Ernesto left corner.png|centre|400px|]] | |||
|} | |||
Robustness was given to the mentioned algorithm by applying constraints that limit the right/left turns in case of wrong data that could be interpreted as a corner detection (for example, the resulting vector when the laser observes the opening of a hall while turning left or right, or the resulting vectors when some of the laser data is zeros due to undetectable points). | |||
|} | |||
=====Finished Backup Algorithm in simulation===== | |||
{| | |||
This movie shows the backup algorithm we use, to find the exit of the maze. As can be seen in the movie the algorithm is able to find the exit in the maze in simulation. The algorithm only uses laser data. | |||
{| | |||
[[File:EMC02_Pico_maze.PNG|400px|center|link=http://www.youtube.com/watch?v=h6n7e6zuPQo&feature=youtube_gdata]] | |||
|} | |||
|} | |||
|} | |||
==== Week 8: October 21 - October 28 ==== | |||
{| | |||
'''Evaluation of the Maze Competition''' | |||
|- | |||
| | |||
The Maze Competition was a success, our demo behaved as expected and managed to find its way through the maze without trouble. | |||
Our only concern was the last dead end that the robot encountered in the maze. This dead end was considerably smaller than the ones we have tested before with our application and we were afraid the algorithm wouldn't interpret it correctly. It was a situation that we had considered as a possible "code breaker", but yet our solution gave a good result. As an improvement, we could clearly include this kind of specific situations into our algorithm (small dead ends) in order to make it even more robust. In second terms we have also missed to implement vision into our algorithm and this last piece of the puzzle would have made our demo even more competitive. An area of opportunity would be as well to exploit the possibility of vision in order to give a faster solution for the maze. | |||
|- | |||
| | |||
In general terms we are satisfied with the result and glad to know we managed to implement successfully what we have learned throughout the course. Programming a solution for the maze was a good challenge and we learned much in the process. | |||
|- | |||
| | |||
Final result, finishing the maze | |||
{| | |||
[[File:EMC02_ending_the_Maze_Final_competion.PNG|400px|center|link=http://www.youtube.com/watch?v=mNoiemEcj5w&feature=youtube_gdata]] | |||
|} | |||
|} | |||
== Doubts & Questions == | == Doubts & Questions == | ||
{| | {| | ||
| Line 425: | Line 866: | ||
|} | |} | ||
== | == Additional comments and suggestions == | ||
{| | |||
| '''Major challenges during the project''' | |||
|- | |||
|1. Non-Reliable sensor data: One of the challenges that was the hardest to overcome was that all sensor data from the odometry was not trustworthy. As a consequence the team decided not to use odometry data at all and stick to laser data alone. | |||
| | |||
|- | |||
|2. Learning new programming languages and systems: There was a large difference of knowledge about C or C++ programming languages and the Robot Operating System between the different team members which lead to organizational issues. | |||
| | |||
|- | |||
|3. Lack of availability of time spaces for robot testing: There were few hours available for testing the robot so most of the algorithms were tested in simulation in which noise was obviously no taken into account. Moreover, the team was sometimes not able to prepare an efficient test plan during the sessions with the robot. | |||
|- | |||
|4. Making the architecture work in individual ROS nodes. Sending and receiving messages gave us problems and furthermore in ROS all the nodes wok in parallel while our algorithm used a more sequential approach. In the end we choose to use only one ROS node. | |||
|- | |||
| '''Suggestions for future editions of Embedded Motion Control''' | |||
|- | |||
|1. The amount of time spent on the course is not in relation with the amount of credits received. We spent on average about 150 hours on the project, which is more in line with 5 credits than the 3 we get. It should be more balanced. | |||
|- | |||
|2. Try to open more time slots for testing with the robot. | |||
|- | |||
|3. Make sure beforehand that whenever there is going to be a team testing their algorithms in the robot everything is working fine. Mainly: | |||
Verify that the drivers for the hokuyo laser are correctly configured. For example during some tests, the size of the array that was being delivered by the hokuyo driver was 470 instead of 1081. | |||
Revert changes to other configuration files before the students have to test their algorithms. For example, changes to systems variables like ROS_PACKAGE_PATH. | |||
|- | |||
|} | |||
Latest revision as of 23:01, 27 October 2013
Group Members
| Name: | Student id: | Email: |
| Joep Alleleijn | 0760626 | j.h.h.m.alleleijn@student.tue.nl |
| E. Romero Sahagun | 0827538 | e.romero.sahagun@student.tue.nl |
| L. Galindez Olascoaga | 0867854 | l.i.galindez.olascoaga@student.tue.nl |
| Koen Meeusen | 0657087 | k.a.meeusen@student.tue.nl |
| Ngo Hin Cheng | 0731296 | n.h.cheng@student.tue.nl |
General Planning
Week 1: Sep 2 - Sep 8
| Week: | Activities: |
|---|
| Start ROS & C++ tutorials | |
| Prepare software (Ubuntu, ROS, Gazebo, etc..) | |
| Project planning & brainstorming |
Week 2: Sep 9 - Sep 15
| Conclude software troubleshoot. | |
| Start simulations in Gazebo for sensors and actuators identification. |
Week 3: Sep 16 - Sep 22
| Code development, module based. | |
| Code implementation for Corridor Competition, tests on simulation. | |
| First real robot trial (Sep 20, 13.00 - 14:00 hrs) |
Week 4: Sep 23 - Sep 29
| Last minute preparations for Corridor Competition | |
| Second real robot trial (to schedule..) | |
| Corridor Competition (Sep 25) | |
| 2nd Real robot test (Sep 26, 11.00 - 12:00 hrs) |
Week 5: Sep 30 - Oct 6
| Keep developing modular approach | |
| Problem solving, corridor competition | |
| 3rd Real robot test (Oct 3, 11.00 - 12:00 hrs) |
Week 6: Oct 7 - Oct 13
| Code Integration and Testing | |
| Bug detection and corrections | |
| 4th Real robot test (Oct 10, 11.00 - 12:00 hrs) |
Week 7: Oct 14 - Oct 20
| Final testing and corrections | |
| 5th Real robot test (Oct 17, 11.00 - 12:00 hrs) |
Week 8: Oct 21 - Oct 27
| Last minute preparations | |
| Maze Competition (Oct 23) |
Current Work
| Team Member: | Activities: |
| Joep Alleleijn | System architecture, message structure between nodes-> which information is communicated and how. Determine location within the environment based on laser data, build in functionality so it still works when there is an opening in the maze. |
| E. Romero Sahagun | Movement module/functions (move forward, backward, turn left/right) |
| L. Galindez Olascoaga | System architecture, interfaces and integration/path planning algorithm |
| Koen Meeusen | Corner detection, testing & debugging. |
| Ngo Hin Cheng | Situation identification |
Progress
Week 1: September 2 - September 8
Software installation
| The goal of the first week was to install all necessary software. The installation of Ubuntu went well in general. In one case (on the 2013 TU/e laptop) Ubuntu would install correctly (it said) but when Ubuntu was started the desktop screen of Ubuntu was not loaded. Instead a command prompt like screen was displayed and reports where shown that there were missing files. The problem was eventually solved as follows:
In case the laptop has been fitted with a small ssd parallel to the main harddisk (like the 2013 TU/e laptop), Ubuntu will not install properly. Because the ssd-drive and the harddisk are placed parallel the laptop will start faster since the ssd provides a fast start-up. When Ubuntu starts it requires files which are not present on the ssd, which causes Ubuntu to fail. The solution is to disable the raid configuration of the laptop. This disables the ssd-drive and its advantages but Ubuntu will start now since all the required files are received from the harddisk. In some cases the Raid is called Intel RST (rapid storage technology). Switching of the raid system in BIOS might result in losing your windows and all your data on the disk. So it is not recommended ( We have never tried it before). Login in windows and open the Intel Rapid Storage Technology program and disable raid support in a less brutal way to avoid such risks. The other required software installed well except Qt. By a few persons Qt did not install. Therefore the choise has been made to use eclipse to type the c++ code. The disadvantage is that in eclipse you will have to rebuild your “cmake” and project files every time you change something in the script. This requires a restart of eclipse. Qt does not have this problem. An advantage of eclipse over Qt is that eclipse can handle vector programming easier then Qt. |
Problem investigation
| In order to solve the maze problem some important questions had to be answered, namely:
- Is the maze unique? (In other words, is there only one solution?) - Are there island in the maze? (walls which are not connected to the outside of the maze) The answered to these questions are yes, the maze is unique and no, there are no island. With these questions answered a simple strategy has been made to solve the maze: If the maze contains islands the solution won’t be totally unique, because there are multiple ways to solve the maze. With islands it is even possible to get stuck in a loop around the island in the maze. With only one path which is correct (a unique solution) and no islands a solution to the maze can be to follow the right hand wall of the robot. In case of the corridor challenge, the solution is not unique, since there are to exits (a correct one and a false one). Although the strategy to follow the right hand wall will in this case give the correct solution. |
Week 2: September 9 - September 15
Testing laser data acquisition
| Simulated laser data (Laura and Joep) |
Structure message from laser:
| Header header | # timestamp in the header is the acquisition time of |
| # the first ray in the scan. | |
| # | |
| # in frame frame_id, angles are measured around | |
| # the positive Z axis (counterclockwise, if Z is up) | |
| # with zero angle being forward along the x axis | |
| float32 angle_min | # start angle of the scan [rad] |
| float32 angle_max | # end angle of the scan [rad] |
| float32 angle_increment | # angular distance between measurements [rad] |
| float32 time_increment | # time between measurements [seconds] - if your scanner |
| # is moving, this will be used in interpolating position | |
| # of 3d points | |
| float32 scan_time | # time between scans [seconds] |
| float32 range_min | # minimum range value [m] |
| float32 range_max | # maximum range value [m] |
| float32[] ranges | # range data [m] (Note: values < range_min or > range_max should be discarded) |
| float32[] intensities | # intensity data [device-specific units]. If your |
| # device does not provide intensities, please leave | |
| # the array empty. |
Structure message for Velocity:
| ~$ rostopic type /pico/cmd_vel
geometry_msgs/Twist ~$ rosmsg show geometry_msgs/Twist geometry_msgs/Vector3 linear float64 x float64 y float64 z geometry_msgs/Vector3 angular float64 x float64 y float64 z |
To be refered using the following C++ lines of code:
geometry_msgs::Twist cmd_msg; cmd_msg.linear.x = 0; cmd_msg.angular.z = 0; cmd_msg.linear.y = 0; cmd_msg.linear.z = 0; cmd_msg.angular.x = 0; cmd_msg.angular.y = 0; cmd_pub.publish(cmd_msg); |
Week 3: September 16 - September 22
Testing 3D simulation and visualization
Defining our system's architecture
Movement of the robot
| A movement function has been programmed in order to work with Pico's linear and angular displacement. For Pico to drive within the middle of the corridor, a second function takes care on fixing the direction of the robot. This fixing procedure is activated once the robot detects an obstacle closer than 30cm or when it detects the robot orientation, with respect to the middle line, changes more than 20 degrees. These functions have been implemented successfully with the rest of the code for the corridor competition in the simulation. In simulation the robot is able to go forward in the corridor without hitting any walls. |
Test plan for September 20
| 1. Follow wiki's instruction on using Pico to set it up. |
| 2. Be able to read and interpret sensor data (laser and odometry) |
| 3. If any of the algorithms (mapping, wall detection, localization, trajectory planning...) have already been tested in simulation we could try implementing them. |
Week 4: September 23 - September 29
Localization Algorithm
Corner Detection Algorithm
| In order to know where the side corridors are and which way to go, a solution had to be found in order to solve these problems. A way to determine which ways to go is to map the surroundings area of the robot. The mapping of the area can be done locally or globally. In case of a local map, only the area which can be seen by the robot is mapped. By the global mapping the position of the robot is determined in relation to a global reference point. All the local mappings of the robot can be stored a put together in order to create a global map. In both cases the local mapping needs to be solved first, but in case of global mapping there still is a lot after processing in order to build the global map. | ||
| There has been chosen to not create an advanced path seeking algorithm to search for a path through the maze. In place of that there has been chosen to follow the right of left wall. This is done because the maze is unknown the global mapping has a map of only the part where the robot already has been, There is no information of the unknown parts where the robot has not been yet. Therefore the right or left wall following will be applied. This reduces the mapping algorithm to a local mapping algorithm. | ||
| The base behind the mapping algorithm is that the robot will drive straight between the walls. A corner detection algorithm will detect corner points and the specific situation will determine (by example: corner to the right). And the algorithm will take after the corner point a right turn. So for the mapping of the environment a function has been created in order to detect the edges of the maze. Before the detection algorithm was build the following requirement to the algorithm were made: | ||
| The corner detection function should: | ||
| • Detect corners / edges. | ||
| • Detect corner types. | ||
| • Store locations and types. | ||
| The different corner types are divided into a number of types. In order to identify the type of each corner the following type-names have been given to the numbers by using an enumerate. | ||
| 0. Unknown_Corner_type | ||
| 1. Left_outside | ||
| 2. Left_inside | ||
| 3. Right_inside | ||
| 4. Right_outside | ||
| 5. Blind_left | ||
| 6. Blind_right | ||
| 7. Leftback_inside | ||
| 8. Leftback_outside | ||
| 9. Rightback_inside | ||
| 10. Rightback_outside | ||
| For each type of corner can be specified by using the measuring data. The localization algorithm provides the angle of the robot in relation the corridor. So the first step is to rotate all the laser data of the robot so they are parallel to the corridor. With the angle of the robot in relation to the corridor the measured X and Y positions are translated into the coordinate system parallel to the corridor. The new Y direction lies parallel to the heart line of the corridor and the new X direction lies perpendicular to the heart line of the corridor. These new coordinates are called the normalized coordinates. With these normalized coordinates the position of the edge are calculated. The positions of the edges are later on translated back to the robot coordinate system. | ||
| With the normalized coordinates the direction of the wall is determined. A wall can go vertical or horizontal within certain margins / deviations. Besides the general direction the direction of measurement is also important. For the detection of the different types of edges the difference is made between vertical_up, vertical_down, Horizontal_left and Horizontal_right. The directions are shown in the figure below. When the normalized Y-coordinate becomes larger than the defined margin the direction vertical_up is detected, when the normalized y-coordinate becomes smaller the direction vertical_down is detected. (These names are chosen due to the top-view of the situation.) | ||
| In the figure below the directions of measurement are shown and the corner type when the Pico robot approaches a crossing with a dead end straight ahead. | ||
 |
||
| When the measured direction changes, there must have been an edge (assuming no errors). Since there are errors in the environment (by example: gaps between walls) and the measurements, certain margins are applied to avoid that due to the errors edges are detected. The algorithm checks whether the previous point lies within a certain margin of the current point. The check considers the normalized X and Y direction of the point. If by example the current direction is horizontal the normalized Y values should be constant (within the margin). If the change in normalized Y values changes to much (more than the margin) the direction is changed. By checking the normalized X value the new direction can be determined (Horizontal_left or Horizontal_right). The combinations of the measured directions result in a corner type and a corner location. | ||
| In case of the corner types 5 and 6, the blind corners, new values of both X and Y are outside the margin. This means that a blind corner has been found. | ||
 |
||
| As can be seen in the figure above, a clear jump in measured coordinates can be detected. The new direction is now unknown, since the direction of the wall detected behind the blind edge is yet unknown. The next normalized coordinate will show whether the newly detected wall is vertical or horizontal and set the new direction. When a jump in measurement data is detected, depending whether the coordinates have become closed or further to the robot determines the different between type 5 and 6. | ||
| The required output of the function should be a vector containing the data of the corner points. After a change in direction is found the data are send to a second algorithm whicl will store the corner point. This algorithm checks the previous direction of the wall and compares it with the current or new direction. The combination of the directions will as said before provide a specific corner type. |
Corridor competition
| For the corridor competition some of the main algorithms like the localization and corner detection were still work in process due to the lack in time. Besides that the algorithm that should move the robot, let it turn and drive forward again were not finished either. Therefore the decision has been made to construct a simplified algorithm for the resolution of the corridor competition. This means a work around needs to be built just for the corridor competition. The goal was to implement as many of the finished bits as possible but still a lot work was needed to make part purely for the corridor competition, in the maze completion these parts are not usable. | |
| For the corridor challenge we programmed the robot in a state machine style in order to make its execution sequential. The straight line driving was programmed with a controller which should keep the robot in the middle of the corridor. This algorithm was then implemented as a state. When the right or left hand wall disappeared on the side of the robot, it meant that the corridor was reached. This requirement means that the programs switches from state 1 (straight line driving) to state 2 (turning). State 2 contains the algorithm, based on simple geometry and the laser data, for making the turn of the robot on the intersection of the heart lines of the main corridor and the side corridor. So the turning is done without forward driving. After State 2 is completed the robot should switch bas to state 1 drive forward to the end of the corridor challenge. | |
| The corridor test consisted of a corridor with an open ended main corridor with a side corridor on the left after approximately 4 to 5 meters. In simulation the Robot was able to finish the corridor challenge a number of times. With only one hour of testing on the robot before the corridor challenge it was still unknown to us how the simulation compared to the actual robot. During the one hour of testing with real robot the focus had been to find out important questions, like the number of data points per scan, the scanning direction and the amount of slip of the robot when driving. So when the robot was fired up during the corridor test, it moved slightly forward and got stuck in a infinite loop between state 1 and state 2. The same occurred during the second attempt meaning the corridor challenge was not completed successfully. | |
| Already during the corridor challenge the problem was detected that caused the robot to fail. The incoming data of the laser were not filtered and the deviations of the laser data compared to the previous measurement were quite large. This caused a problem to the algorithm which controlled the switching between the states. The algorithm should switch if one of the walls disappeared, but due to the variations in the measurement data the detection of the wall failed. One data set the wall was still there, and the next data set the wall was gone activation the next state. The third data set the wall was found again caused a switch back to state 1. This infinite loop caused the robot to fail. | |
| The following decisions have been made after the corridor challenge: | |
| • The incoming data need to be filtered | |
| • Further testing of the robot is required in order to understand the incoming data and the behavior of the robot. | |
| • The algorithms need to be made more robust, since the straight line driving algorithm will be used later on. | |
Week 5: September 30 - October 6
Data-Filtering
| Shortly after the corridor competition the PICO robot was rebuild. We were the first group to test with the rebuild robot. During the testing the following observation has been done:
Due to the removal of a control layer inside the robot, the laser data can now contain zero-values. These zeros correspond to measurements which have deflected and not returned to the laser. In the old robot control corrections were made to avoid zero-values. In order to prevent the robot to fail on the zero-values an algorithm has been made which removes the zero-values and also evens out fluctuations in the measurement data. With the newly build vector (without zeroes) the other algorithm can determine the next step of the robot. |
Testing laser data reading errors
| After running a testing routine for the laser data being read we found out the following: |
| Observations: |
| 1. The size of the array is not always 1081. |
| 2. The amount of packets (arrays) that are corrupted is not as high (41 wrong out of 7500).This changed during other experiments when we saw that the wrong data increases as you get closer to the walls. |
| 3. We think that the first 5 iterations give wrong laser data. |
| 4. There is a significant variance in the distances from the robot to the walls (not sure if the problem is from our algorithm or from the data given by the laser driver). |
| 5.Variance |
| Routines to program for robustness |
| 1. Consider the size of the array as a variable (use sizeof() instead of a constant of 1081) |
| 2. Consider not using the data given by the first 5 iterations of laser data acquisition. |
| 3. Filter data twice: the first time throw away the first and last 10° of the laser data, then identify garbage values and normalize the overall data (using for example a Gaussian distribution->Koen's algorithm). |
| 4.Program regularly used routines into functions (for instance get minimum value of an array). |
| 5. Consider the redistribution of our architecture, we could have a decision making node for example coordinating the processes with a hierarchical peer-to-peer structural model or orchestra. |
| 6.Modify the algorithm to keep the robot in the middle or the corridor. So far we have been implementing routines based on trigonometry, however, since the data of the laser is not so reliable, we now think we should program a proportional controller. |
| 7.Modify the turning function. |
| SUMMARY: |
| 1. We need to have reliable data for our algorithms to work correctly ->filtering of laser data function. |
| 2. The focus is in the turning and going forward functions, if they work well we can implement a very simple algorithm to solve the maze ->turning and going forward (centered) functions. |
| 3. According to the algorithms we are going to use we should redistribute our architecture as convenient. |
Situation identification
| The action of the robot depends on the surroundings of the robot, therefore it is necessary to identify the situation. Basically, there are eight main situations, these are shown in the figure below. If the robot does not detect any corner points, then it is located in a corridor. In this case the robot can go straight on. On the other hand, if the robot detects any corner points, then it might need to turn. Whether it needs to turn, depends on the situation. | |
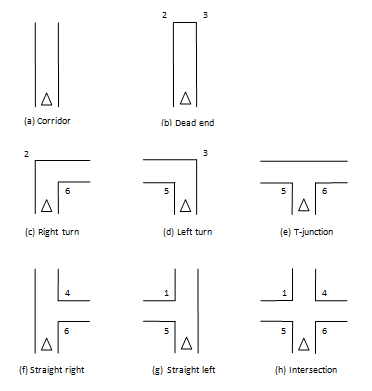 | |
| Corner points determine the situation, hence corner points are inputs for the situation identification process. The input consist of the x- and y-position of the corner points, corner points ID and the type of the corner points as mentioned in Corner Detection Algorithm. The order of incoming corner points could not be determined in advance, e.g. for situation (c) the left corner point or the right corner point could both be the first incoming corner point. Besides the situation, the algorithm will give two ordered corner points as output. These two points determine the direction (the corridor) that the robot will take, and the center line of the new corridor can be calculated. The order of these two corner points is determined anticlockwise, starting from the viewpoint of the robot. In this way, the robot will turn right if it has multiple options. If it is not possible to turn right, then the robot will go straight on and turn left is the last option in cases with multiple options. | |
| One way to program this function is by using if else statements with combinations of several conditions to determine the situation. In this way, the conditions would be extensive, because the order of incoming corner points is not known. In this case the condition (in words) for situation (c) is as follows:
If ((received 2 points AND type of point 1 == 2 AND type of point 2 == 6) or (received 2 points AND type of point 1 == 6 AND type of point 2 == 2)) |
|
| Another way is to use two iterators to deal with the order of incoming corner points. Each iterator represents the type of a corner point. Once the first iterator finds a corner point, the second iterator will look for another corner point that can make a match with the first corner point. In this way the conditions in the if else statements are much reduced. A disadvantage of this method is that the algorithm makes combinations of 2 corner types, therefore the algorithm cannot identify an intersection. An intersection will be recognized as “straight right”. This is not a problem for PICO because of the right hand rule. That is, PICO will turn right for both situations and both output coordinates are the same. So using 2 corner point types, 6 combinations are possible. These combinations and the direction output are shown in the tables below. | |
 |
|
| The iterators keep working until no corners are detected. The consequence is that all combinations of corner points will be identified. Due to the right hand rule, the situations where the robot can turn right have priority. Hence, if multiple situations are detected, the algorithm has to compare the importance of the detected situations. The importance of the situations is ordered as follows: | |
| 1. Straight right | |
| 2. Right turn | |
| 3. T-junction | |
| 4. Dead end | |
| 5. Straight left | |
| 6. Left turn | |
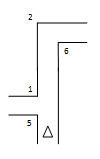 |
|
| So in the situation above, PICO will recognize the options “straight left” and “right turn” but it will take the last option. Furthermore, if the same direction is possible multiple times, then the robot will take the first possibility. | |
| A possible problem with the iterators is the case when corner detection does not function robust. If the algorithm gives too much corners points due to the noise, then the situation identification algorithm might make combinations of several corners points and gives situations that actually do not exist. In order to deal with these problems, some extra conditions must be used, like the distances between 2 corners points must be smaller/greater than a certain value. |
Communication between algorithms
| For the communication between the different functions there has been chosen to use one structure or class of data. In this data structure the data of the previous algorithms is stored so that the next algorithm receives all information of the previous algorithms. In case of the corner detection this means that the laser data and the position of the robot within the maze are received in one structure. The result data of the corner detection is then added to the data structure which is then published as output of the function. The advantage is that only one data structure is send round and all available information can be accessed within all algorithms. When calling the functions in the main function the in- and output of the functions (with exception of the input of the first function) have been made this data structure since this contains all information needed for the algorithms. | |
| The data structure has been build as a class. This class consists of vectors and structures, depending on the type of information. The laser data are stored in a vector of structures. Each structure contains and angle and a measured distance. This vector can be accessed by an iterator within each function. The position data of the robot within the maze are stored in a structure, since there can only be one position of the robot relative to the maze. For the detected corners a vector has been used again. Like the laser data the vector is a vector containing structures. Each structure contains information about the detected corner (x and y position, type). For the other algorithms a similar approach has been done as well. |
Week 6: October 7 - October 13
New Ros-structure
|
In the old ros structure almost all the main components like the mapping and localization were placed in separate nodes. During programming of the different algorithms we have come to the conclusion that almost all these processes work sequential. For the mapping of the area the localization is required (for our algorithms). The advantage of using different nodes is that the nodes will run parallel to each other. In case of sequential algorithms, running parallel is not wanted since some of the nodes might not have had the correct data yet.So a new structure is proposed, which will consist of a smaller number of nodes. In each node now runs a sequential process which can consists of multiple algorithms. The different nodes which are left should run parallel. Together with a controller and the parallel processes control layers can be build, with the advantage that a higher control layer can overrule a lower control layer. |
General Architecture
| The figure below contains the general architecture of the system. The set up makes it possible to add vision information later into it and when this is not possible solve the maze only based on laser data. The first step is to load the laser data and filter this. This data is sent to the localization algorithm, which determines in the position of the robot in the local environment. The localization algorithm calculates what the lateral error is compared to the center line and the angular error compared to the center line and sends this information to the decision making algorithm and the corner detection algorithm. The filtered sensor data is also sent to the corner detection algorithm in the local environment. |
| The algorithm uses the coordinates of the two corners to calculate what the center of the corridor is which the robot has to turn in. Than the robot drives to the intersection of the two center lines of the current corridor and the new corridor, makes a 90 degrees clockwise turn and drives straight again. When these tasks are performed the algorithm reset the output to zero and new information can be fed into the algorithm. When a situation is identified and the robot is in it’s driving mode, the robot stays in these driving modes until the end of the cycle is reached. Each mode is a state in the process/tasks the robot has to perform to drive through the corner. |
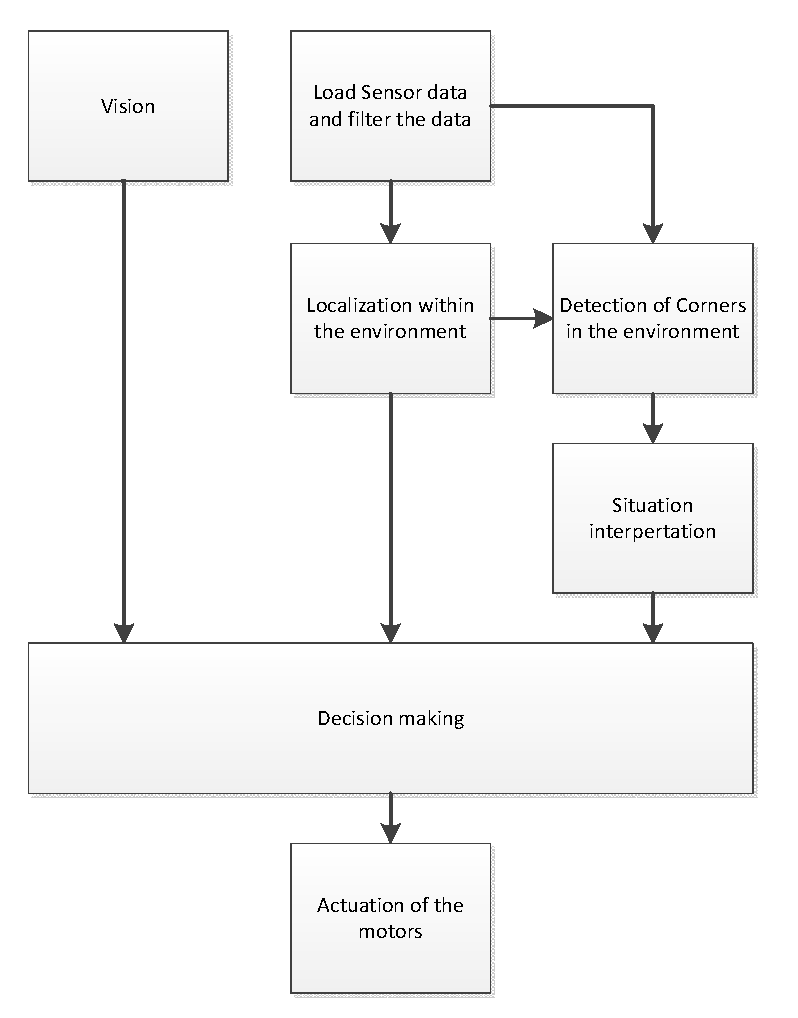 |
Decision making
| The are 8 different situations possible as mentioned in “Situation Identification”, based on these situation there is some desired driving behavior, turning right is preferred over going straight, straight is preferred over going left and in at a dead end the robot has to turn 180 degrees counter clockwise. This leads to 4 basic driving modes, drive straight, turn right, turn left, u turn 180 degrees counter clockwise. Depending on the situation the robot is in, the robot has to follow a certain procedure to for example take a left turn. In normal mode only the laser data will be used to determine what the situation is. However it is possible to overrule the decision based on the laser data if the vision would detect and arrow. |
| In the figure on the right a step plan is presented that the algorithm go through to make a left turn. Based on the coordinates of the points detected the algorithm calculates the reference point it wants to the robot to drive to before the robot starts turning. Until this point or a small area around this point is reached to robot will keep driving forward. When the desired area is reached the algorithm that makes the actual turn will be called. When the turn is finished, a signal will be sent to the desisicon making algorithm that the takes of making the turn is completed and that the robot is ready to receive new instructions. |
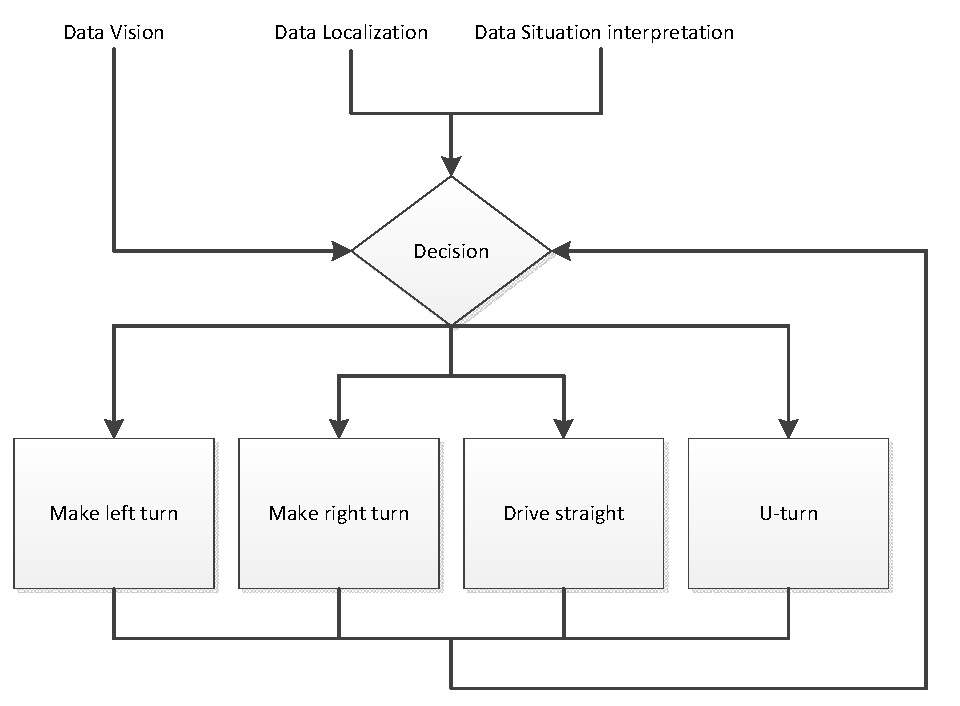 |
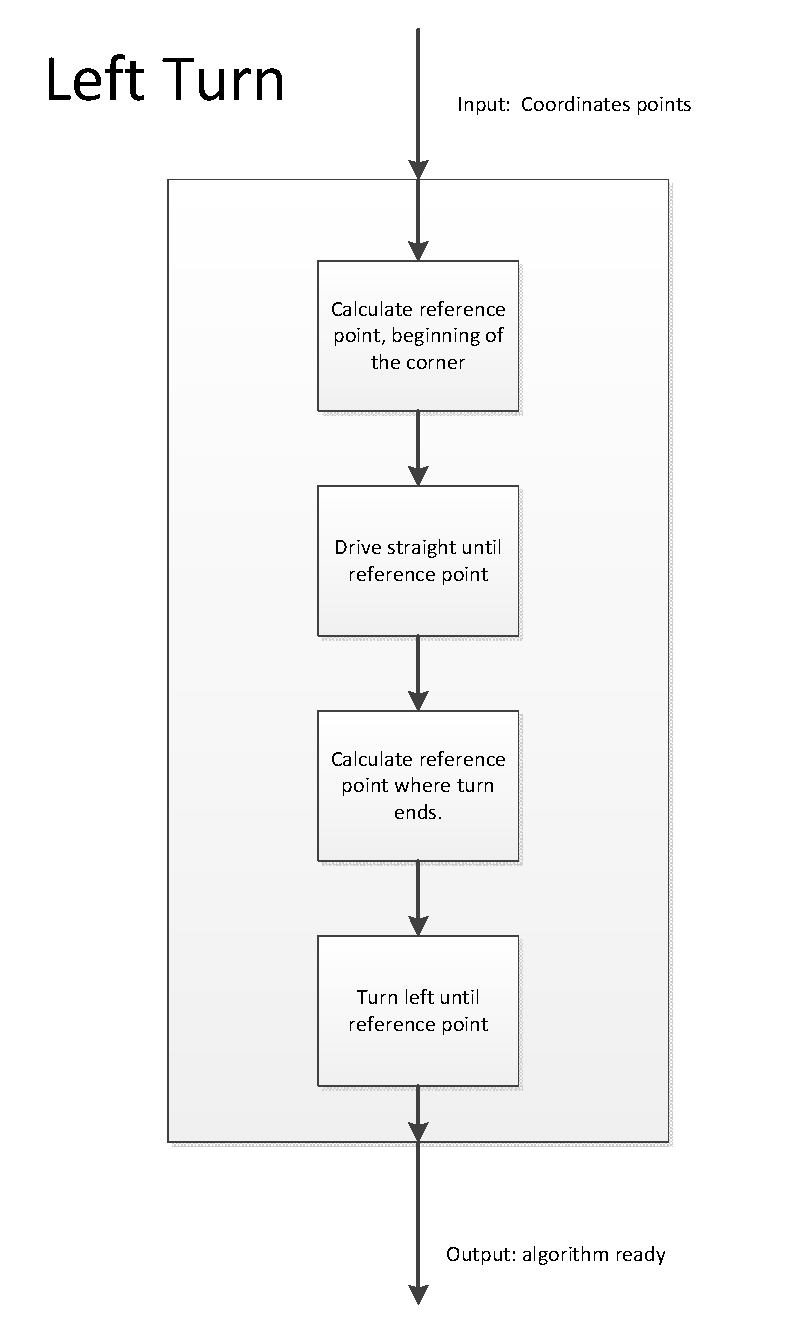 |
Testing and Debugging of the corner detection algorithm
| During the testing and debugging of the corner detection algorithm a number of errors came forward. The biggest problem is the wrong or incorrect output of the algorithm. The cause of the wrong output is the incorrect detection of the corners. The detection is done by detecting changes in the direction of the measurement data. The data which is used by the algorithm should be as raw as possible. When the data is filtered to mush the differences which should be detected are evened out. This can cause that the differences are too small now and no corners are detected. If there is a real step in the data due to a blind corner, then averaging the data can result in evening out this step into multiple smaller steps. These steps do not lead to corner detection due to the fact that the steps between the points are now too small again to classify the corner as a blind corner (in which case there should be a big step in the data). | |
| A second error concerning the input data is the distance to the corner, when the robot is further from the corners the points will be further apart of each other. When the robot comes closer to the actual edges which it should detect the point will be closer to each other. This means that when the robot approaches the corners the points can be so close that no change in direction is detected since the change is every time within the margins. |
Week 7: October 14 - October 20
180 degrees turn
| A turn of 180 degrees will be realized by turning twice 90 degrees counterclockwise. |
Backup Algorithm
This movie shows our backup algorithm, version of Friday 18th October. This version is able to drive straight and take a right turn.
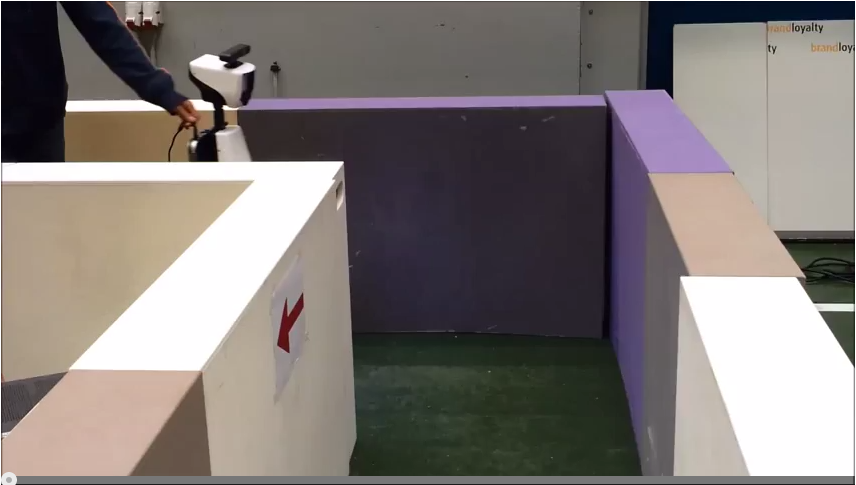
Visualizaton
| In the original ROS-structure with the nodes there was an option to use the camera on the Pico robot for visualization. With the visualization the arrows placed in the maze could be recognized and overrule the right hand wall algorithm in order to find the exit of the maze faster. Straight from the beginning it was planned to implement the visualization last. The most important part in the beginning was to create a working platform for the robot. This means that all the basic functionalities of the robot should work before the visualization was implemented. It’s nice to detect an arrow to the left, but of its impossible to make a left turn the functionality is still useless. | ||
| As stated before the laser data provided by the robot contained a number of issues which needed to be solved with first. Therefore there was no reason to implement the visualization. With the core structure finished the remaining time was limited and the amount of work (learning the new tools, build the algorithm and do the implementation) large, the decision was made to not implement the visualization into the robots program. |
Final implementation of the laser data filtering
| During the last weeks one of the major challenges we had to endure in order to guarantee our algorithm's robustness was having reliable sensor data to work with. On previous weeks we had decided to program a filter that would basically solve the three main issues of the unreliable laser data: 1) zero values in the array, 2) variable size of the raw data array, 3) high variance of the raw data values.Following are the steps we took to implement these three conditions and the modifications we made to them: |
| 1. Managing garbage values in laser data array |
| The algorithm we implemented at first averaged the adjacent non-zero values in order to replace the current zero value. However, after testing it in the actual robot we realized that the outcome fixed value was not always reliable since the data that was being used to fix the value might differ from the actual value. Since we know that this garbage values are generated whenever a part of the robot's body is sensed or whenever the distance sensed is too large we have decided to just ignore them and not use them in the subsequent algorithms. In every algorithm there is a condition that states that whenever the laser data value to use is <0.02 (m), the value shouldn't be further used. |
| 2. Variable size of the raw data array |
| During a couple of the test sessions we had, the size of the raw laser data array was different from what was expected (1081). Sometimes the size of the array would be 1080 and even on a couple of occasions it changed to be less than 500. This last problem arose when the configuration files of the Hokuyo laser driver where not set properly and we couldn't intervene on that (suggestion is to verify the proper functionality of this since it can lead to time leaks during the test sessions which are quite limited). We implemented an algorithm to ensure the size of the array would always be 1081 as shown in the following figure. |
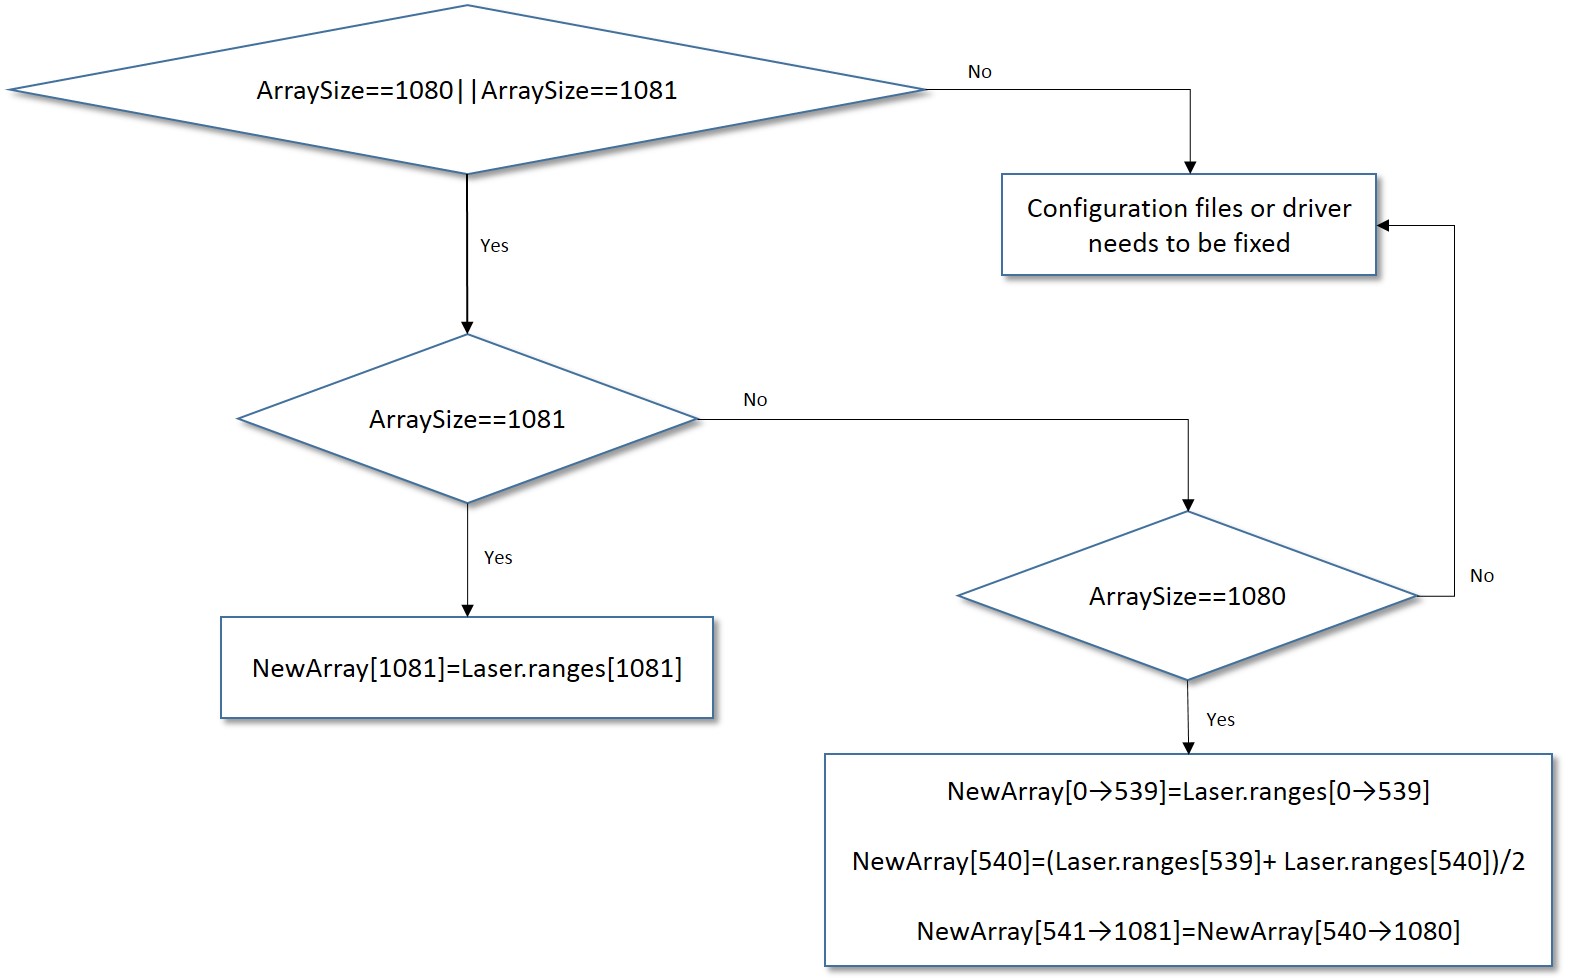 |
| 3. High variance of the raw laser data |
| Finally we implemented a solution for the high variance of the raw laser data. We first implemented a filter with a normal distribution giving weights of 0.4 to the current value and 0.24 and 0.06 to the adjacent values as shown in the following figure. |
 |
| However we soon realized that the laser data values for every index were actually varying on time. We programmed an algorithm that generated a new array with 1081 values, each of which is an average of N number of samples. Each one of this samples is taken every time the laser_callback function subscribes to the data the hokuyo_node is sending. The following figure shows how this last filter was implemented. In order to find the most adequate number of samples several tests were run on the actual robot. |
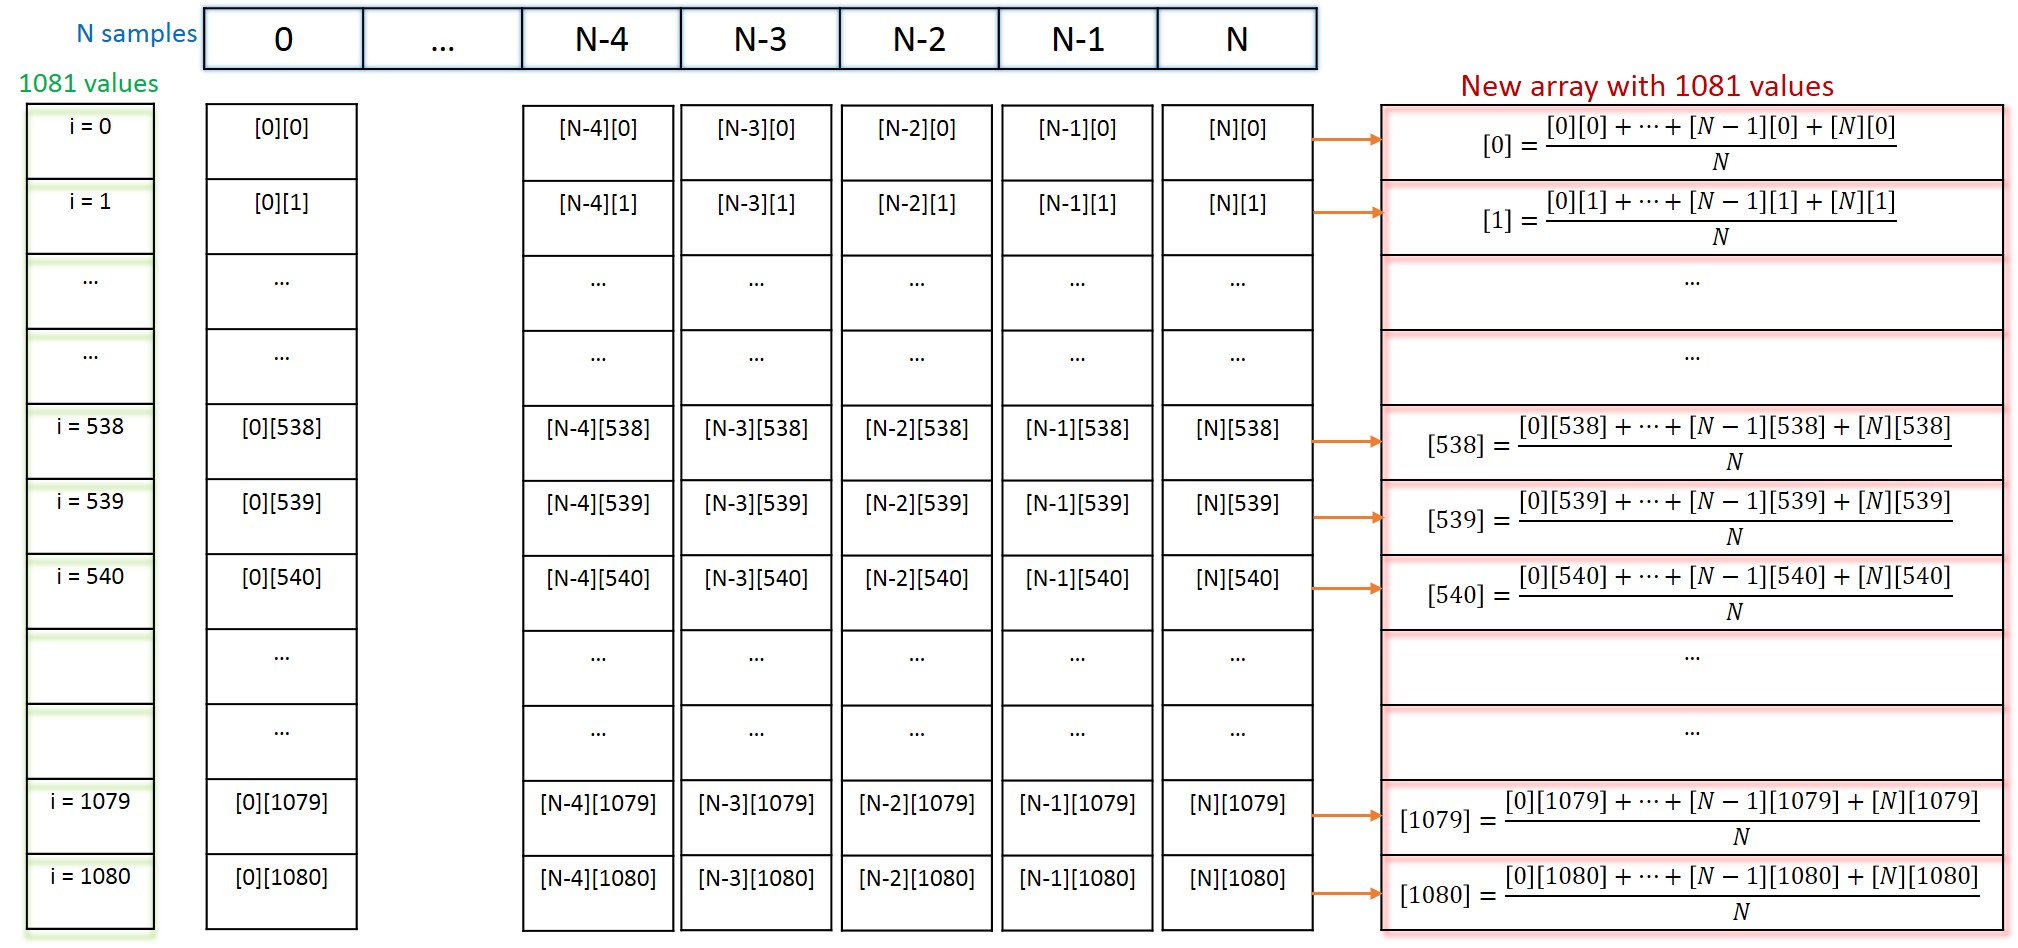 |
Final algorithm
The final implementation is a simplified approach of the previously described. We decided to implement the full solution in just one node and the modular structure was achieved through the use of several functions which are called by a control function. This control function has a state machine structure. The following figure shows the general structure of the algorithm. Basically, the robot is going to drive forward as long as it doesn't find a corner. If it finds a corner it is always going to try to turn right (state 2) unless there is a dead end or a u turn to the left in which case it will try to turn left (state 3). The robot will leave state 2 and state 3 whenever it stops sensing a corner and detects that it can keep driving forward.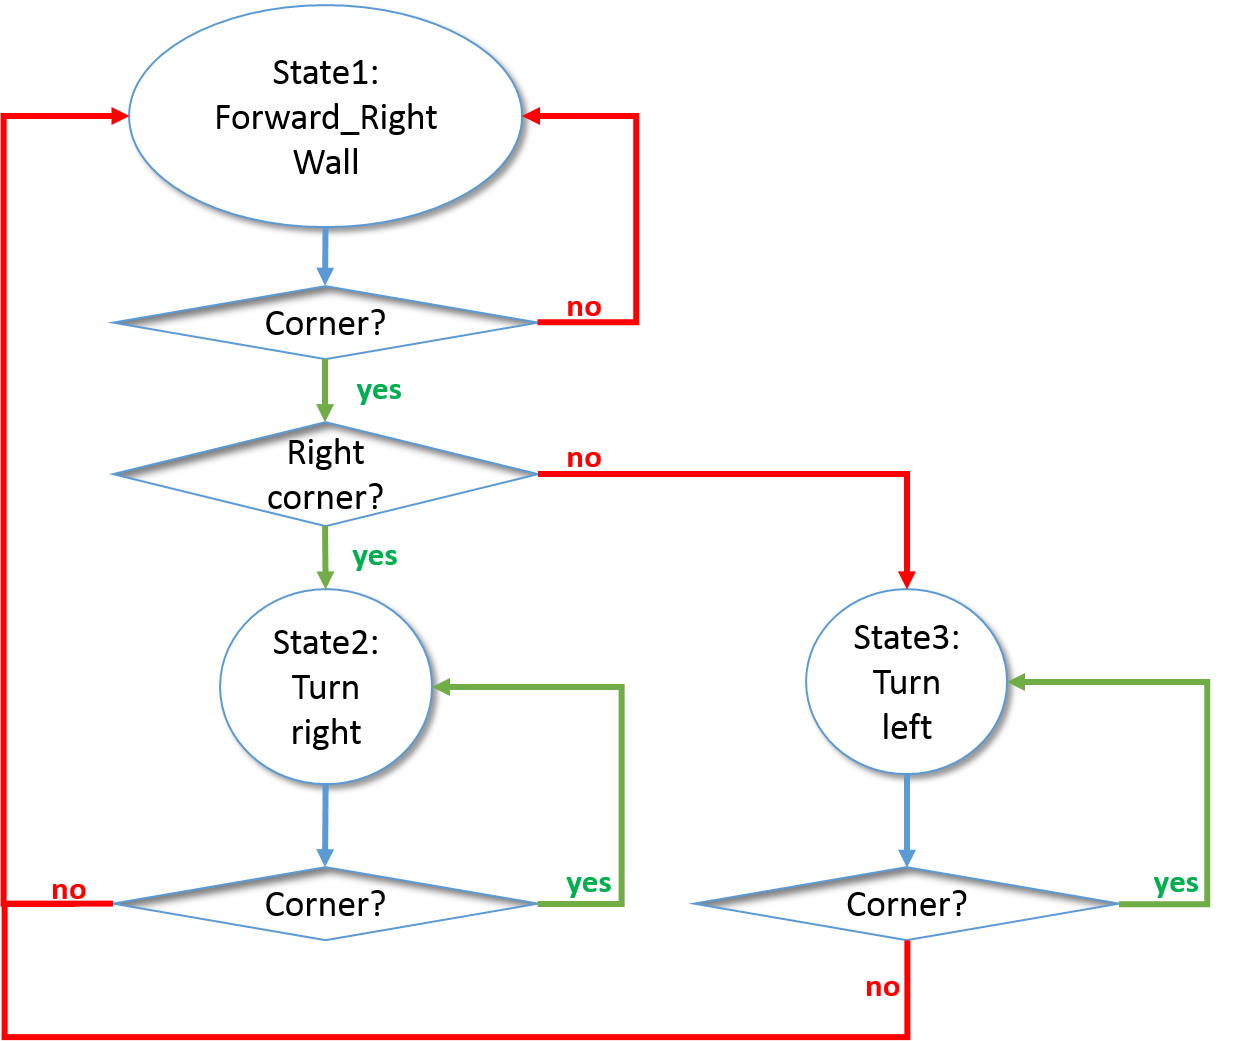 |
Following is a more detailed explanation of the algorithm used for every state of the algorithm.
1. State 1: Foward_RightWall. Using laser data, the minimum distance to the right wall is calculated. This is denoted by V2 in the following figure. Using this same information an angle theta v2, which informs the robot about its orientation, is calculated. During this state there are two user defined references, one for the desired minimum distance and one for the desired orientation of the robot. Then a proportional controller is used to correct for these two errors with the objective of maintaining the robot in a straight line trajectory.
2. Corner detection: Corner? The robot is at all time running two small algorithms that determine the existence of corners. In order to detect right corners, the information around the minimum distance to the right wall is observed. This is done by generating two vectors denoted by V3 in the following figure. These V3 vectors can be calculated by defining a pair of V1 vectors and performing the trigonometric operations shown in the figure. Whenever there is a 180° angle between these two V3 vectors the robot stays in state 1:forward_RightWall.
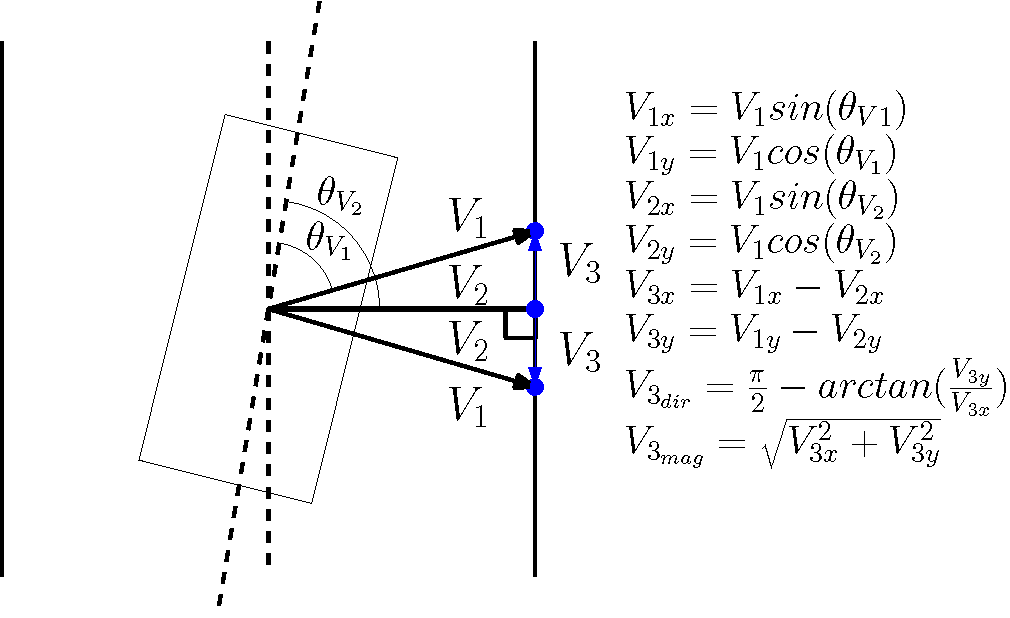 |
When the angle between the V3 vectors is of 90°, then the algorithm identifies the existence of a right corner. The same algorithm is used in order to detect corners that require a left turn, the only difference is that now we observe for an angle of -90° between the vectors and the algorithm is applied along all the laser data for the right plane of the robot. The algorithm searches throughout the data for a corner that requires a left turn and, if found, calculates the distance to that corner. Once the distance is below a threshold a left turn will be executed.
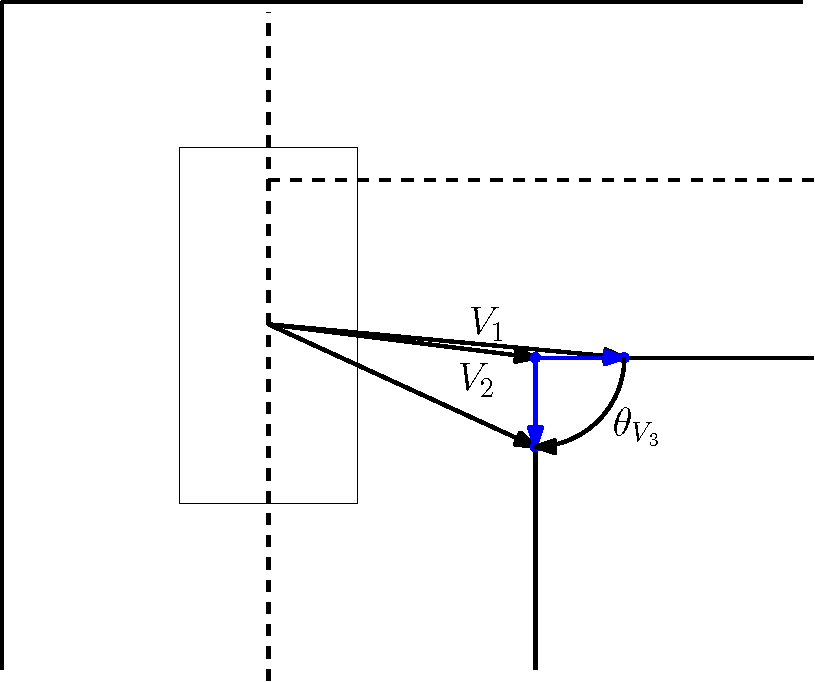 |
3. State2:Turn_right. When the detected corner leads to an exit to the right the robot is going to turn in the clockwise direction until the two V3 vectors have again a 180° angle between them. This is done as well using a proportional controller, which was tuned during the experimental sessions.
4. State3:Turn_left. Whenever the detected corner leads to an exit to the left the robot will start rotating in the counterclockwise direction until it senses a straight corridor again. The following figure shows how this is done. An angle Beta is calculated between the V3 vector and the Y coordinate of the robot's reference system. When this angle is equal to 5° then the robot jumps again to state 1 since it senses that it can drive forward once again. In the case in which there is a U turn to the left of the robot, then this turning left algorithm is performed twice.
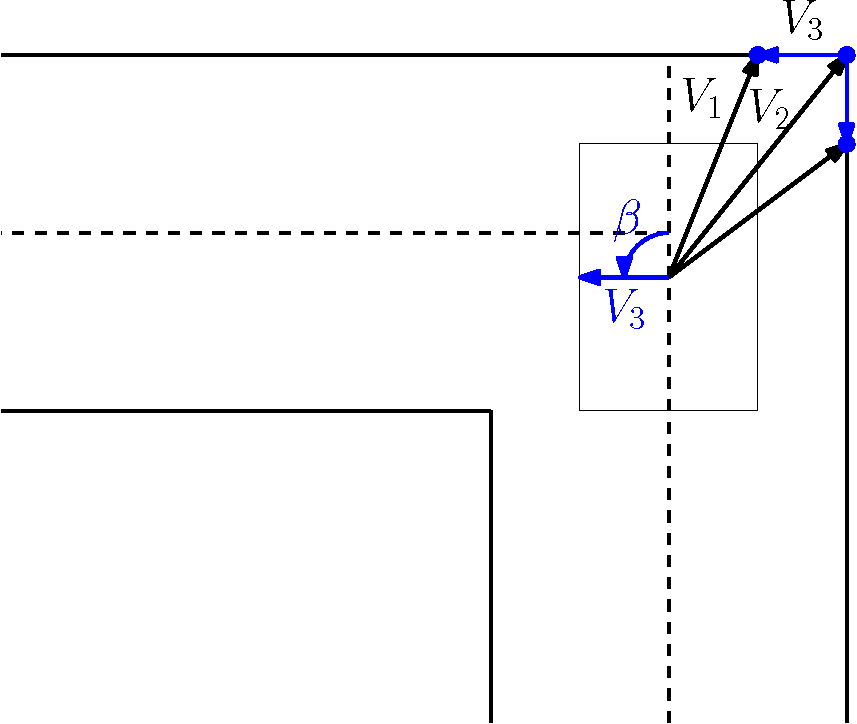 |
Robustness was given to the mentioned algorithm by applying constraints that limit the right/left turns in case of wrong data that could be interpreted as a corner detection (for example, the resulting vector when the laser observes the opening of a hall while turning left or right, or the resulting vectors when some of the laser data is zeros due to undetectable points).
Finished Backup Algorithm in simulation
This movie shows the backup algorithm we use, to find the exit of the maze. As can be seen in the movie the algorithm is able to find the exit in the maze in simulation. The algorithm only uses laser data.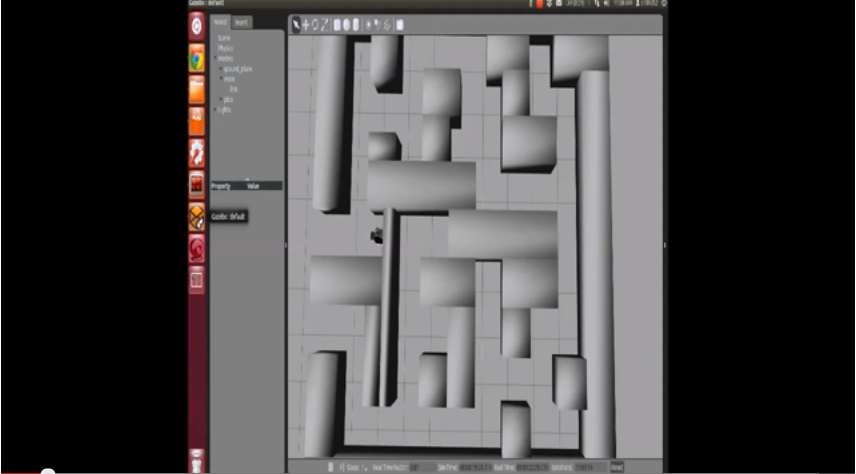
Week 8: October 21 - October 28
Evaluation of the Maze Competition|
The Maze Competition was a success, our demo behaved as expected and managed to find its way through the maze without trouble. Our only concern was the last dead end that the robot encountered in the maze. This dead end was considerably smaller than the ones we have tested before with our application and we were afraid the algorithm wouldn't interpret it correctly. It was a situation that we had considered as a possible "code breaker", but yet our solution gave a good result. As an improvement, we could clearly include this kind of specific situations into our algorithm (small dead ends) in order to make it even more robust. In second terms we have also missed to implement vision into our algorithm and this last piece of the puzzle would have made our demo even more competitive. An area of opportunity would be as well to exploit the possibility of vision in order to give a faster solution for the maze. | |
|
In general terms we are satisfied with the result and glad to know we managed to implement successfully what we have learned throughout the course. Programming a solution for the maze was a good challenge and we learned much in the process. | |
|
Final result, finishing the maze 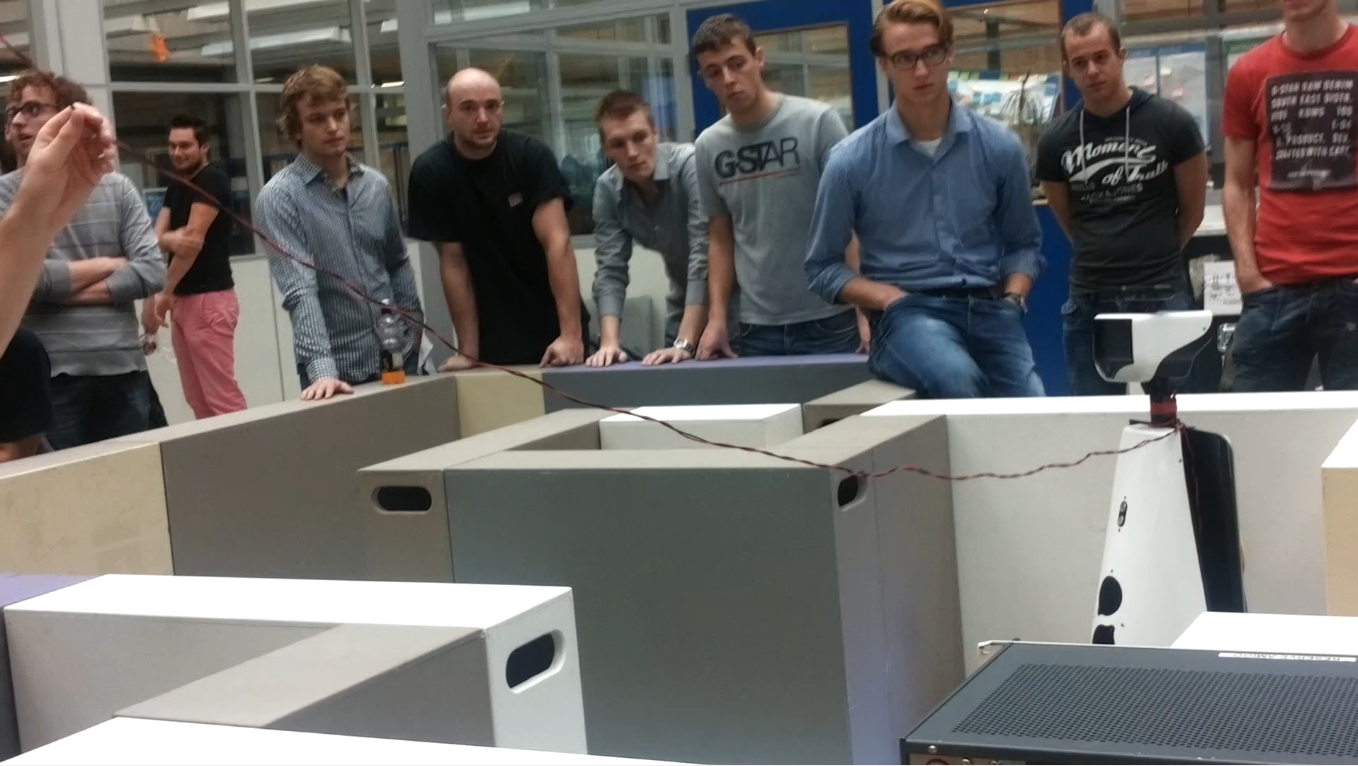 |
Doubts & Questions
| Week: | Doubts: |
|---|---|
| Sep 2 - Sep 8 | |
| Issues related with software installation | |
| Sep 9 - Sep 15 | |
| Issues related with software installation | |
| More details about the project | |
| Sep 16 - Sep 22 | |
| What is the sample frequency and scan methodology of the system/laser? - we have to figure that out. | |
| Orientation coordinate system - we can define that. | |
| Frequency the robot - we have to figure this out | |
| Obstacles in the hall competition/maze? - no, just the walls. | |
| Is it possible to get more days available every week to work on the robot? no, we should make a test plan, limited time is part of the challenge. | |
| Is it possible to test again on the real robot early next week? no | |
| Is there a time limit to complete the maze? No | |
| How reliable is the simulation? If we manage to communicate properly with the robot on Friday, and we test our solution later on the simulation, can we trust it?? We have to run tests both in simulation and in the actual robot in order to define how reliable the first one is. | |
| Are we allowed to use motion planning algorithms available in ROS repositories? Yes, but we should be able to generate our own solutions to the problem, it is not advisable. | |
| Sep 23 - Sep 29 | |
| ... | |
| Sep 30 - Oct 6 | |
| ... | |
| Oct 7 - Oct 13 | |
| ... | |
| Oct 14 - Oct 20 | |
| ... | |
| Oct 21 - Oct 27 | |
| ... |
Additional comments and suggestions
| Major challenges during the project | |
| 1. Non-Reliable sensor data: One of the challenges that was the hardest to overcome was that all sensor data from the odometry was not trustworthy. As a consequence the team decided not to use odometry data at all and stick to laser data alone. | |
| 2. Learning new programming languages and systems: There was a large difference of knowledge about C or C++ programming languages and the Robot Operating System between the different team members which lead to organizational issues. | |
| 3. Lack of availability of time spaces for robot testing: There were few hours available for testing the robot so most of the algorithms were tested in simulation in which noise was obviously no taken into account. Moreover, the team was sometimes not able to prepare an efficient test plan during the sessions with the robot. | |
| 4. Making the architecture work in individual ROS nodes. Sending and receiving messages gave us problems and furthermore in ROS all the nodes wok in parallel while our algorithm used a more sequential approach. In the end we choose to use only one ROS node. | |
| Suggestions for future editions of Embedded Motion Control | |
| 1. The amount of time spent on the course is not in relation with the amount of credits received. We spent on average about 150 hours on the project, which is more in line with 5 credits than the 3 we get. It should be more balanced. | |
| 2. Try to open more time slots for testing with the robot. | |
| 3. Make sure beforehand that whenever there is going to be a team testing their algorithms in the robot everything is working fine. Mainly:
Verify that the drivers for the hokuyo laser are correctly configured. For example during some tests, the size of the array that was being delivered by the hokuyo driver was 470 instead of 1081. Revert changes to other configuration files before the students have to test their algorithms. For example, changes to systems variables like ROS_PACKAGE_PATH. |
