Embedded Motion Control 2018 Group 6: Difference between revisions
| (62 intermediate revisions by 3 users not shown) | |||
| Line 5: | Line 5: | ||
<td width="150px"><b>Report name:</b></td> | <td width="150px"><b>Report name:</b></td> | ||
<td width="100px"><b>Student id:</b></td> | <td width="100px"><b>Student id:</b></td> | ||
</tr> | |||
<tr> | |||
<td> Rokesh Gajapathy </td> | |||
<td> R. Gajapathy </td> | |||
<td> 1036818 </td> | |||
</tr> | </tr> | ||
| Line 16: | Line 22: | ||
<td> Raaf Bartelds </td> | <td> Raaf Bartelds </td> | ||
<td> R. Bartelds </td> | <td> R. Bartelds </td> | ||
<td> | <td> 0912153 </td> | ||
</tr> | </tr> | ||
| Line 23: | Line 29: | ||
<td> J. Geijsberts </td> | <td> J. Geijsberts </td> | ||
<td> 0896965 </td> | <td> 0896965 </td> | ||
</tr> | </tr> | ||
| Line 52: | Line 52: | ||
= Initial Design = | = Initial Design = | ||
== Link to | == Link to important pdf == | ||
The report for the initial design can be found [[Media:Initial-design-report-G6.pdf|here]]. | The report for the initial design can be found [[Media:Initial-design-report-G6.pdf|here]].<br> | ||
The first presentation can be found [[Media:Presentation_Embedded.pdf|here]].<br> | |||
The final presentation can be found [[Media:Final_presentation.pdf|here]].<br> | |||
== Requirements and Specifications == | == Requirements and Specifications == | ||
| Line 68: | Line 70: | ||
=== Use cases for Hospital Room=== | === Use cases for Hospital Room=== | ||
1. Mapping | 1. Mapping | ||
| Line 77: | Line 78: | ||
4. Navigate | 4. Navigate | ||
=== Requirements and specification list === | === Requirements and specification list === | ||
| Line 143: | Line 143: | ||
== Code Architecture == | == Code Architecture == | ||
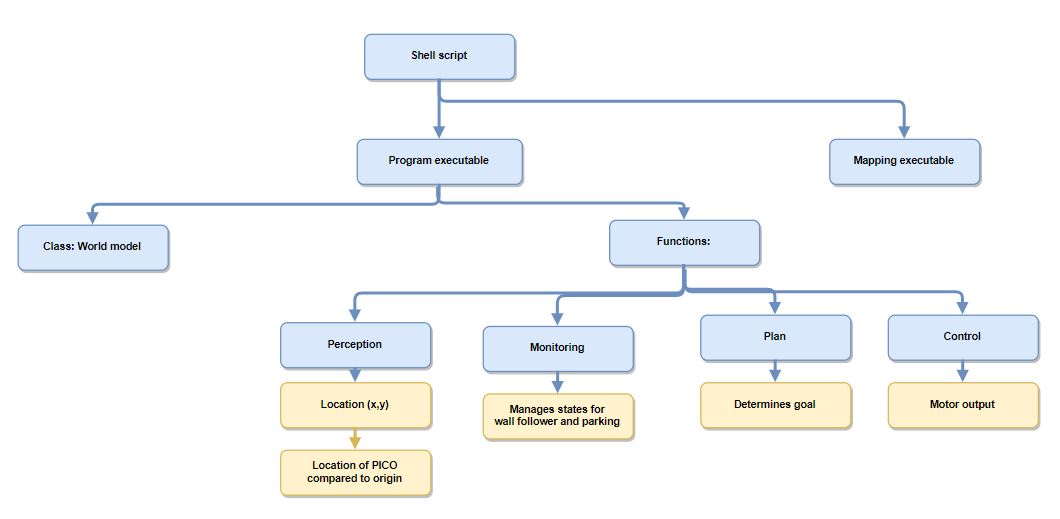
The code architecture is based on the '''Task Software Architecture''', the source code consist of a main program with a class the worldmodel and several functions perception, monitoring, plan and control. This is implemented as a single thread code. | |||
<br>Main Program: | |||
* Initializes the PICO sensor data and sets the execution rate of the program in Hz. | |||
* Object classes are also initialized and executed. | |||
<br>Worldmodel: | |||
* Initialized using the input/output of the PICO. | |||
* The states of the Monitoring and Plan are defined, datatypes related to perception and control are also defined. | |||
* This object consist all of PICO information in real-time. | |||
<br>Perception: | |||
* Initialized using the worlmodel object. | |||
* A function which is used to map the environment based on the LRF data. | |||
<br>Monitoring: | |||
* Initialized using the worlmodel object. | |||
* A function to determine the state of the robot at each time instance. | |||
<br>Plan: | |||
* Initialized using the worlmodel object. | |||
* A function which determine the next state of the robot based on the existing information from worldmodel. | |||
<br>Control: | |||
* Initialized using the worlmodel object. | |||
* A function which helps the PICO to move in desired direction with desired velocity and distance. | |||
[[File:Part3.JPG|Overview of Architecture]] | |||
== Gmapping == | == Gmapping == | ||
[[File:TF_overview.png|right|thumb|400px|Figure X: Overview of the transitions required for gmapping]] | [[File:TF_overview.png|right|thumb|400px|Figure X: Overview of the transitions required for gmapping]] | ||
Making a map is crucial for the second challenge. An easy way to detect the object placed in the hospital is by first determining the initial state of the empty environment. Then during the searching phase compare the current state to the initial one and determine the location of the object. For this, the initial state of the environment (i.e. the hospital corridor and the rooms) has to be stored in some way. This can be done in various ways, one of which is mapping. By initially mapping the environment, all changes can be detected by comparing the current state of the environment to the initial mapped environment. Mapping itself can also be done in many ways. Another important element is the location of PICO during the entire challenge. The software needs to know the current location of the robot to determine its relative position to walls, the object or the initial position and the tasks it should perform like park or drive to the object. | |||
There are a lot of different ways to solve these two problems. No perfect solution exists, the existing solutions are adapted to the scenario and the available sensor data. In the robotics field, an often used approach tackles the localization and the mapping together in the so-called computational problem SLAM (Simultaneous localization and mapping).SLAM maps the environment and simultaneously improves the accuracy of the current position based on previously mapped features. There are a lot of ways to solve this computational problem [https://en.wikipedia.org/wiki/Simultaneous_localization_and_mapping#Algorithms]. The choice depends on the available resources. In the case of PICO there are three types of sensor data: control effort, odometry data, and Laser rangefinder data. The choice was made to use the gmapping algorithm to solve the SLAM problem. There are a lot of SLAM algorithms available, one of which is a ROS package called Gmapping. This Gmapping package uses a ROS node under the name of slam_gmapping that provides laser-based SLAM [http://wiki.ros.org/gmapping]. | |||
The library used by this ROS package is the library from OpenSlam [https://openslam-org.github.io/gmapping.html]. The herein developed approach uses a particle filter in which each particle carries an individual map of the environment. Since the robot moves around, these particles get updated information about the environment to provide a very accurate estimate of the robot's location and thereby the provided map. | The library used by this ROS package is the library from OpenSlam [https://openslam-org.github.io/gmapping.html]. The herein developed approach uses a particle filter in which each particle carries an individual map of the environment. Since the robot moves around, these particles get updated information about the environment to provide a very accurate estimate of the robot's location and thereby the provided map. | ||
| Line 156: | Line 185: | ||
* Computation time | * Computation time | ||
* Environment has to stay constant | * Environment has to stay constant | ||
* Small objects can't be detected as they are filtered out by the averaging | |||
'''Result:''' | '''Result:''' | ||
Getting gmapping to work within the emc framework took quite some effort, but as seen below: it works! | Getting gmapping to work within the emc framework took quite some effort, but as seen below: it works! The map created by gmapping is saved as a matrix in the world model. Each value in the matrix can take on 3 different values: 100 for known occupied space, in other words, the walls. 0 for known empty space and -1 for unknown space, space that can't be reached by the laser. Saving the map in this format is very convenient.<br> | ||
With the map saved as a matrix in the world model several tasks can then easily be performed:<br> | |||
- A path planning algortihm can be implemented using Dijkstra.<br> | |||
- Room and door regonizition can be performed. <br> | |||
[[File:gmapping_demo.gif|thumb|left|800px|Visualization of gmapping when running the wall follower.]] | [[File:gmapping_demo.gif|thumb|left|800px|Visualization of gmapping when running the wall follower.]] | ||
[[File:Gmapping_vs_map.png|center|thumb|800px|Figure X2: The original map compared to the map created by gmapping]]{{Clear}} | [[File:Gmapping_vs_map.png|center|thumb|800px|Figure X2: The original map compared to the map created by gmapping]] | ||
{{Clear}} | |||
== Map Analysis == | |||
'''First design''' | |||
After a geometric map has been made, theoretically a semantic map (a tree structure with a corridor, doors and rooms) could be made. The first approach was to make such a map: OpenCV aligns the map (<code>cv::minAreaRect()</code> and <code>cv::warpAffine</code>), splits the map in different sections (<code>cv::distanceTransform()</code> and <code>cv::watershed()</code>) and fits rooms (<code>cv::minAreaRect()</code>) on every section. If the semantic map could be made, the room for which the robot has to pass to highest number of doors is easily found. First results were promising, as can be seen in Figure X3. However, the used method was very sensitive to changes in corridor form and size and it could not cope with doors at the corners of a room. Therefore, the high level hint was neglected, and the only focus was to find the new object. | |||
[[File:Opencv_failed.png|center|thumb|800px|Figure X3: Failed approach to detect rooms, doors and the corridor]]{{Clear}} | |||
'''Final implementation''' | |||
Without using the high level hint, the object can be found by comparing current and original maps. After the first map is completed, it is stored in an OpenCV <code>cv::Mat</code> object. The robot starts to follow the wall again and gmapping continues to map the environment. Every time gmapping has updated, the function <code>Perception::mapCompare()</code> compares the new map with the old map. To overcome minor differences due to noise in the maps, the black walls are made a little bit thicker (<code>cv::erode()</code>). The original map is subtracted by the new map (<code>cv::subtract()</code>). The noise of scanning artifacts are removed with another <code>cv::erode()</code>, which acts in the opposite direction, as the seen objects are now white. If there are white pixels present in the resulting image, an object has been found. OpenCV locates and marks the object (<code>cv::findCounters()</code> and <code>cv::circle()</code>) and stores a picture with the object. The steps are visualised in Figure X4. | |||
[[File:opencv_cycle.gif|center|thumb|800px|Figure X4: Animation of the steps OpenCV makes to detect objects]]{{Clear}} | |||
'''Problems''' | |||
Gmapping sees new objects as scan-artefacts and only accepts them as objects after multiple scans, therefore it takes some time before PICO recognises the object. Also, the erode-subtract-erode method is not very robust, only a little shift and noise-difference between the maps is allowed, making it unusable for large floorplans. The coordinates of the object in the picture is not translated to gmapping coordinates, and as there is no navigation function, the robot cannot drive to the found object yet. | |||
== Available functions == | == Available functions == | ||
=== Wall follower === | === Driving algorithm: Wall follower === | ||
[[File:Wall_follower2.png|400px|thumb|right|Working principle wall follower]] | |||
The wall follower is the basic driving algorithm used for the two challenges. It was used on its own to escape the room and it served as driving algorithm during the hospital challenge. | |||
A good wall follower has a few characteristics:<br> | |||
- It does not get stuck <br> | |||
- It can be started at any location<br> | |||
- It doesn't hit the wall<br> | |||
Working of the algorithm:<br> | |||
Upon starting, PICO drives in a straight line towards the first wall. When the distance to this wall becomes smaller than 0.45 m it stops and enters the wall following mode. | |||
At each execution of the algorithm, it checks the squares shown in the figure. If no obstacle is detected in the square on its left, it turns left. If an obstacle is detected in the square to it's left, it checks the one in the front. If this one is free it drives forward. If there is an obstacle in front as well it turns right. | |||
'''Encountered problems:'''<br> | |||
A problem encountered when first writing the wall follower was that it got stuck in the corners. The cause of this issue was the following: When the algorithm could not drive left or forward, it started turning right, but that meant that it could turn left again. This creates a loop that kept rotating the robot. It was solved by improving the squares and changing the turn right motor output. | |||
{{Clear}} | |||
=== Localization and orientation === | === Localization and orientation === | ||
| Line 173: | Line 251: | ||
=== Parking === | === Parking === | ||
[[File:Simplescreenrecorder-2018-06-06_13.06.29.gif|thumb|Right|800px|Parking algorithm in the simulation.]] | [[File:Simplescreenrecorder-2018-06-06_13.06.29.gif|thumb|Right|800px|Parking algorithm in the simulation.]] | ||
One of the function to be performed by the PICO during the hospital challenge is to park the robot after mapping and reaching the initial position. The PICO has to be parked | One of the function to be performed by the PICO during the hospital challenge is to park the robot backward against the wall after mapping and reaching the initial position. The PICO has to be parked backward touching the wall. Once parked the PICO should say "I am Parked!". Parking can be performed based on different data. Firstly it can be performed based on the odometry data. When reaching the initial position, the distance to the front can be measured. Than PICO should rotate and drive this distance backward. This method is simple but inaccurate. It was discovered in early tests that the odometry data is not reliable due to slip. Therefore the odometry data cannot be used to always turn an exact amount of degrees. Another way to park is based on the data from gmapping. Once back at the begin position, the distance and orientation with respect to the begin position (assuming that PICO starts straight) can be measured. Then based on the orientation from gmapping the rotation can be performed accurately and the backward motion can be set in. But in this method, the backward driving remains open loop, if the robot goes slightly of parking will not happen at the wall. The solution to that would be the usage of the control effort. Once backward motion is engaged, control effort is to be checked. To this accurately, the last 5 control effort measurement can be averaged. If a spike appears, meaning the wall is reached, the backward motion is to be stopped and PICO should be parked. | ||
<br> | It was planned to integrate the data from gmapping in the parking, but due to time constraints, we did not get it working in time. Therefore the implemented solution works on odometry data. | ||
The world model object consist of the monitoring, plan, perception and control states. | |||
This function is implemented using Task software architecture.<br> | |||
<br> World Model:<br> | |||
<br>The world model object consist of the monitoring, plan, perception and control states.<br> | |||
<br>Monitoring: | <br>Monitoring: | ||
* mo_obstacle_parking (Found an obstacle while parking) | * mo_obstacle_parking (Found an obstacle while parking) | ||
| Line 187: | Line 268: | ||
* pl_movebackward_parking (PICO moves backward) | * pl_movebackward_parking (PICO moves backward) | ||
* pl_stop_parking (PICO stops once it touches the wall) | * pl_stop_parking (PICO stops once it touches the wall) | ||
<br>Control: | |||
* If initial position is reached the PICO will rotate 180 degree. | |||
* After rotation will move backward. | |||
* If the control effort is more than a certain value stop. | |||
* Finally, IO.speak "I am Parked!". | |||
{{Clear}} | {{Clear}} | ||
=== Finding the Door, Driving Through It === | === Finding the Door, Driving Through It === | ||
| Line 250: | Line 334: | ||
video file link: https://drive.google.com/open?id=1Lwc4l8tbk_NFR4zeFK-r6-r6EjG1Ca2d | video file link: https://drive.google.com/open?id=1Lwc4l8tbk_NFR4zeFK-r6-r6EjG1Ca2d | ||
= Challenges approach and evaluation = | = Challenges approach and evaluation = | ||
| Line 305: | Line 387: | ||
The chosen approach has | The chosen approach has one major drawback: speed. It would not have been the best for winning the competition as it would nearly map the entire environment twice. It doesn't take into account the high-level hint. This would save a lot of time in the finding of the object. Furthermore no path planning algorithm is available. Such an algorithm would increase the speed of the second challenge. | ||
=== Result and Evaluation === | === Result and Evaluation === | ||
| Line 320: | Line 402: | ||
List of possible improvements: | '''List of possible improvements:'''<br> | ||
- Include odometry data reset in the shell script. | - Include odometry data reset in the shell script.<br> | ||
- Instead of mapping with a wall follower, use data from gmapping to map until all the known space is enclosed. | - Instead of mapping with a wall follower, use data from gmapping to map until all the known space is enclosed.<br> | ||
- Treat matrix data in a way to determine doors and rooms from the map matrix. | - Treat matrix data in a way to determine doors and rooms from the map matrix.<br> | ||
- Use high-level hint to determine the room where the object is | - Use the high-level hint to determine the room where the object is.<br> | ||
- Implement Dijkstra based path-planning algorithm. <br> | |||
= Conclusion = | = Conclusion = | ||
[[File:DSC00289.JPG|center|thumb|800px|First place at the Escape Room Challenge, second place at the Hospital Challenge]]{{Clear}} | |||
= Code = | = Code = | ||
TF listener to extract PICO position from gampping data: [https://gitlab.tue.nl/EMC2018/group6/snippets/54]<br> | |||
Wall following code: [https://gitlab.tue.nl/EMC2018/group6/snippets/55]<br> | |||
Overview of Plan function which serves as a state-machine: [https://gitlab.tue.nl/EMC2018/group6/snippets/60]<br> | |||
Overview of mapping algorithm: [https://gitlab.tue.nl/EMC2018/group6/snippets/61]<br> | |||
Latest revision as of 14:00, 23 May 2019
Group members
| Name: | Report name: | Student id: |
| Rokesh Gajapathy | R. Gajapathy | 1036818 |
| Thomas Bosman | T.O.S.J. Bosman | 1280554 |
| Raaf Bartelds | R. Bartelds | 0912153 |
| Josja Geijsberts | J. Geijsberts | 0896965 |
| Tim Albu | T. Albu | 19992109 |
| Marzieh Farahani | Marzieh Farahani | Tutor |
Introduction
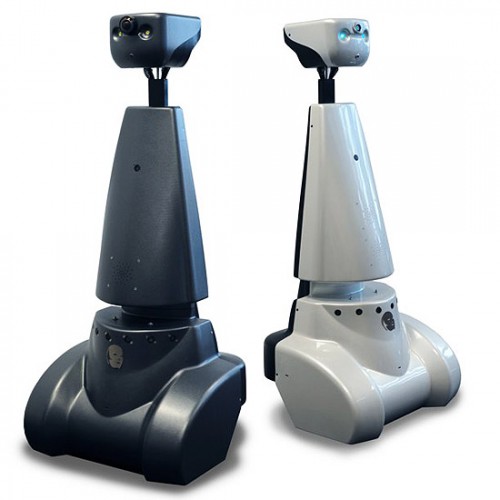
The course "Embedded Motion Control" is about designing a software able to operate on an autonomous robot. It teaches the students the basics of designing software with the aim of reactive real-time autonomous task performing. The goal was to design a software to be implemented in the robot PICO to make him perform tasks by himself. Those tasks include driving out a room, creating a map of the environment, park against the wall and finding an object that was previously absent.
This wiki page details the design of Group 6. In Section 1 the requirements, specifications and initial design are explained. In Section 2 an insight is given about the architecture of the code, the mapping algorithm and the functions developed for the course. Next, Section 3 the approach to each challenge is explained and evaluated based on the results. Finally Section 5 will resume the work and give some explanation about the lessons learned.
Initial Design
Link to important pdf
The report for the initial design can be found here.
The first presentation can be found here.
The final presentation can be found here.
Requirements and Specifications
Use cases for Escape Room
1. Wall and Door Detection
2. Move with a certain profile
3. Navigate
Use cases for Hospital Room
1. Mapping
2. Move with a certain profile
3. Orient itself
4. Navigate
Requirements and specification list
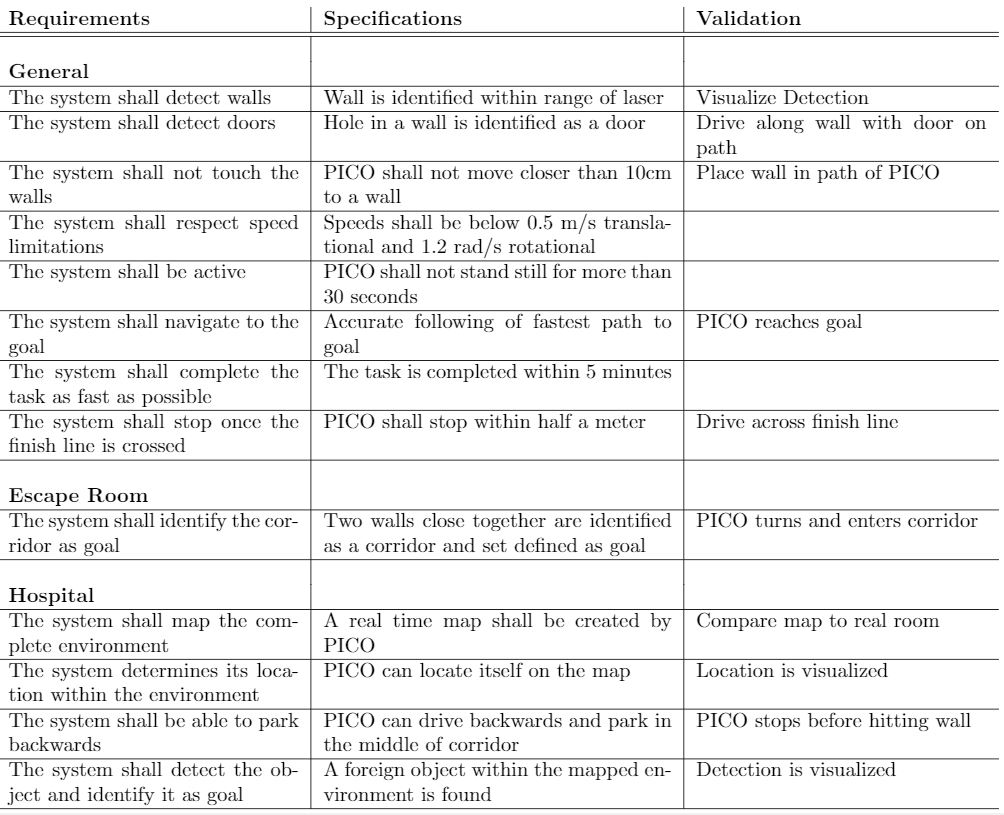
In the table below the requirements for the system and their specification as well as a validation are enumarated.
Functions, Components and Interfaces
The software that will be deployed on PICO can be categorized in four different components: perception, monitoring, plan and control. They exchange information through the world model, which stores all the data. The software will have just one thread and will give control in turns to each component, in a loop: first perception, then monitoring, plan, and control. Adding multitasking in order to improve performance might be applied in a later stage of the project. Below, the functions of the four components are described. What these components will do is described for both the Escape Room Challenge (ERC) and the Hospital Challenge (HC).
In the given PICO robot there are two sensors: a laser range finder (LRF) and an odometer. The function of the LRF is to provide the detailed information of the environment through the beam of laser. The LRF specifications are shown in the table bellow,
| Specification | Values | Units |
| Detectable distance | 0.01 to 10 | meters [m] |
| Scanning angle | -2 to 2 | radians [rad] |
| Angular resolution | 0.004004 | radians [rad] |
| Scanning time | 33 | milliseconds [ms] |
At each scanning angle point a distance is measured with reference from the PICO. Hence an array of distances for an array of scanning angle points is obtained at each time instance with respect to the PICO.
The three encoders provides the odometry data (i.e) position of the PICO in x, y and &theta directions at each time instance. The LRF and Odometry observers' data plays a crucial role in mapping the environment. The mapped environment is preprocessed by two major blocks Perception and Monitoring and given to the World Model. The control approach to achieve the challenge is through Feedforward, since the observers provide the necessary information about the environment so that the PICO can react accordingly.
Interfaces and I/O relations
The figure below summarizes the different components and their input/output relations.
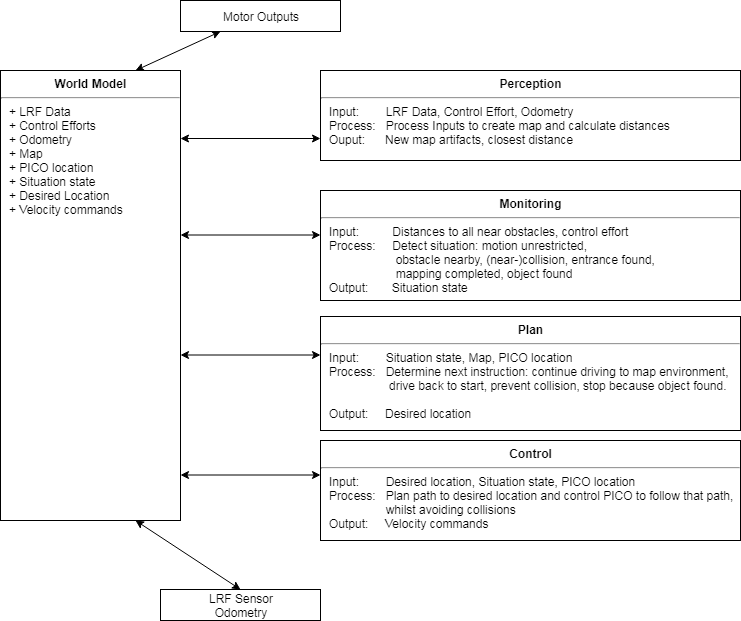
Overview of the interface of the software structure:
The diagram below provides a graphical overview of what the statemachine will look like. Not shown in the diagram is the case when the events Wall was hit and Stop occur. The occurence of these events will be checked in each state, and in the case they happened, the state machine will navigate to the state STOP. The state machine is likely to be more complex, since some states will comprise a sub-statemachine.
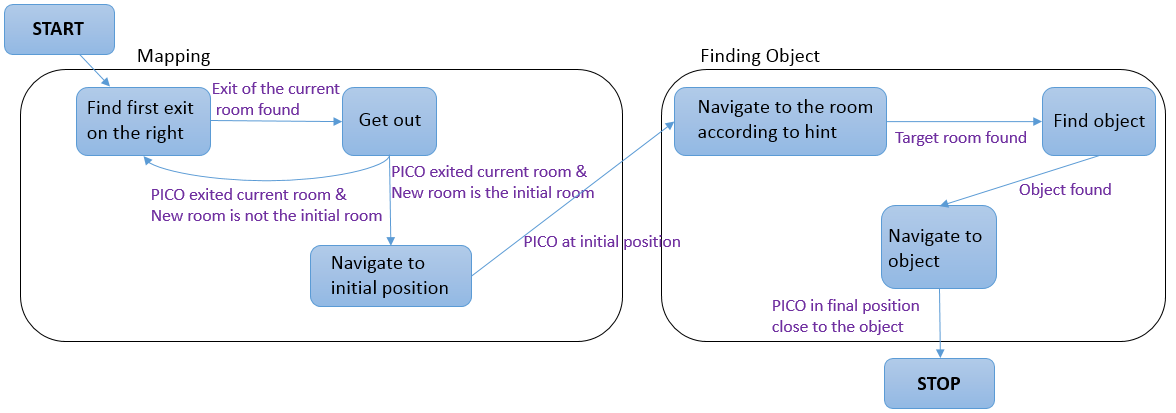
Code structure and components
Code Architecture
The code architecture is based on the Task Software Architecture, the source code consist of a main program with a class the worldmodel and several functions perception, monitoring, plan and control. This is implemented as a single thread code.
Main Program:
- Initializes the PICO sensor data and sets the execution rate of the program in Hz.
- Object classes are also initialized and executed.
Worldmodel:
- Initialized using the input/output of the PICO.
- The states of the Monitoring and Plan are defined, datatypes related to perception and control are also defined.
- This object consist all of PICO information in real-time.
Perception:
- Initialized using the worlmodel object.
- A function which is used to map the environment based on the LRF data.
Monitoring:
- Initialized using the worlmodel object.
- A function to determine the state of the robot at each time instance.
Plan:
- Initialized using the worlmodel object.
- A function which determine the next state of the robot based on the existing information from worldmodel.
Control:
- Initialized using the worlmodel object.
- A function which helps the PICO to move in desired direction with desired velocity and distance.
Gmapping
Making a map is crucial for the second challenge. An easy way to detect the object placed in the hospital is by first determining the initial state of the empty environment. Then during the searching phase compare the current state to the initial one and determine the location of the object. For this, the initial state of the environment (i.e. the hospital corridor and the rooms) has to be stored in some way. This can be done in various ways, one of which is mapping. By initially mapping the environment, all changes can be detected by comparing the current state of the environment to the initial mapped environment. Mapping itself can also be done in many ways. Another important element is the location of PICO during the entire challenge. The software needs to know the current location of the robot to determine its relative position to walls, the object or the initial position and the tasks it should perform like park or drive to the object.
There are a lot of different ways to solve these two problems. No perfect solution exists, the existing solutions are adapted to the scenario and the available sensor data. In the robotics field, an often used approach tackles the localization and the mapping together in the so-called computational problem SLAM (Simultaneous localization and mapping).SLAM maps the environment and simultaneously improves the accuracy of the current position based on previously mapped features. There are a lot of ways to solve this computational problem [1]. The choice depends on the available resources. In the case of PICO there are three types of sensor data: control effort, odometry data, and Laser rangefinder data. The choice was made to use the gmapping algorithm to solve the SLAM problem. There are a lot of SLAM algorithms available, one of which is a ROS package called Gmapping. This Gmapping package uses a ROS node under the name of slam_gmapping that provides laser-based SLAM [2].
The library used by this ROS package is the library from OpenSlam [3]. The herein developed approach uses a particle filter in which each particle carries an individual map of the environment. Since the robot moves around, these particles get updated information about the environment to provide a very accurate estimate of the robot's location and thereby the provided map.
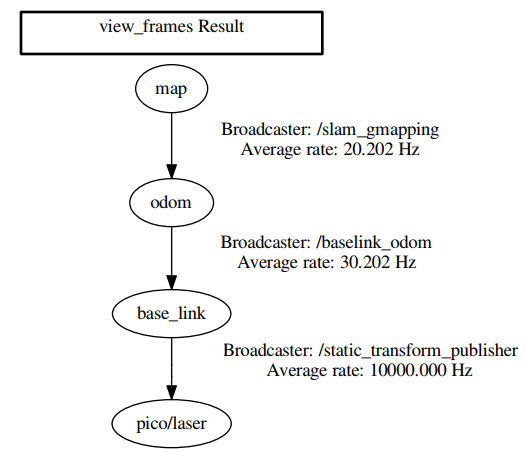
Gmapping requires three transitions between coordinate frames to be present, one between the map and the odometry, one between the odometry and baselink and one between baselink and the laser. Gmapping provides the first transition but the remaining two have to be developed. The second transition has to be made by a transform broadcaster that broadcasts the relevant information published by the odometry. The final link is merely a static transform between the baselink and the laser and can thereby be published via a static transform publisher. These transforms are made using TF2 [4]. An overview on the required transformations can be requested using the view_frames command of the TF2 package, which is shown in Figure X.
Gmapping definitely has various limitations, such as:
- Limited map size
- Computation time
- Environment has to stay constant
- Small objects can't be detected as they are filtered out by the averaging
Result:
Getting gmapping to work within the emc framework took quite some effort, but as seen below: it works! The map created by gmapping is saved as a matrix in the world model. Each value in the matrix can take on 3 different values: 100 for known occupied space, in other words, the walls. 0 for known empty space and -1 for unknown space, space that can't be reached by the laser. Saving the map in this format is very convenient.
With the map saved as a matrix in the world model several tasks can then easily be performed:
- A path planning algortihm can be implemented using Dijkstra.
- Room and door regonizition can be performed.


Map Analysis
First design
After a geometric map has been made, theoretically a semantic map (a tree structure with a corridor, doors and rooms) could be made. The first approach was to make such a map: OpenCV aligns the map (cv::minAreaRect() and cv::warpAffine), splits the map in different sections (cv::distanceTransform() and cv::watershed()) and fits rooms (cv::minAreaRect()) on every section. If the semantic map could be made, the room for which the robot has to pass to highest number of doors is easily found. First results were promising, as can be seen in Figure X3. However, the used method was very sensitive to changes in corridor form and size and it could not cope with doors at the corners of a room. Therefore, the high level hint was neglected, and the only focus was to find the new object.

Final implementation
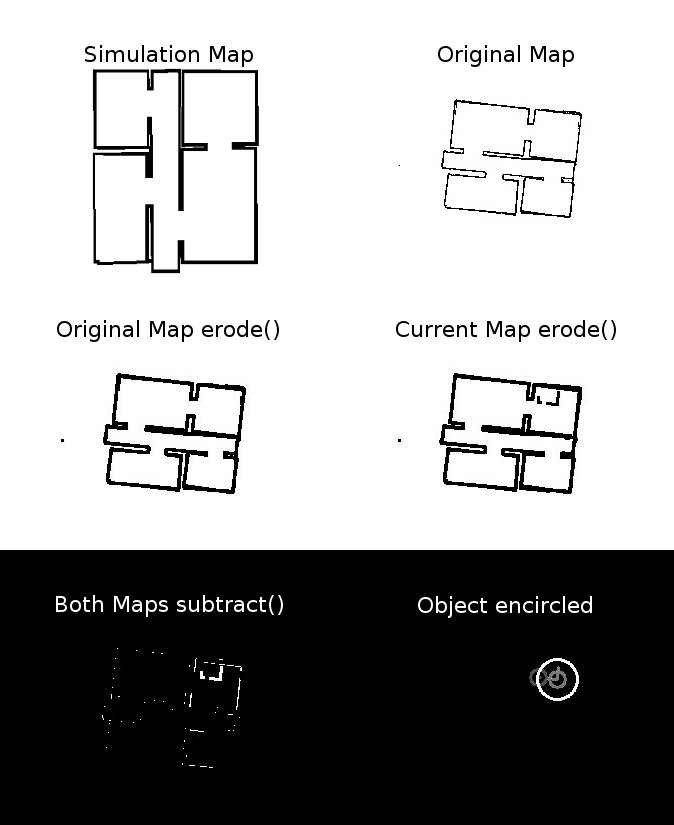
Without using the high level hint, the object can be found by comparing current and original maps. After the first map is completed, it is stored in an OpenCV cv::Mat object. The robot starts to follow the wall again and gmapping continues to map the environment. Every time gmapping has updated, the function Perception::mapCompare() compares the new map with the old map. To overcome minor differences due to noise in the maps, the black walls are made a little bit thicker (cv::erode()). The original map is subtracted by the new map (cv::subtract()). The noise of scanning artifacts are removed with another cv::erode(), which acts in the opposite direction, as the seen objects are now white. If there are white pixels present in the resulting image, an object has been found. OpenCV locates and marks the object (cv::findCounters() and cv::circle()) and stores a picture with the object. The steps are visualised in Figure X4.
Problems
Gmapping sees new objects as scan-artefacts and only accepts them as objects after multiple scans, therefore it takes some time before PICO recognises the object. Also, the erode-subtract-erode method is not very robust, only a little shift and noise-difference between the maps is allowed, making it unusable for large floorplans. The coordinates of the object in the picture is not translated to gmapping coordinates, and as there is no navigation function, the robot cannot drive to the found object yet.
Available functions
Driving algorithm: Wall follower

The wall follower is the basic driving algorithm used for the two challenges. It was used on its own to escape the room and it served as driving algorithm during the hospital challenge.
A good wall follower has a few characteristics:
- It does not get stuck
- It can be started at any location
- It doesn't hit the wall
Working of the algorithm:
Upon starting, PICO drives in a straight line towards the first wall. When the distance to this wall becomes smaller than 0.45 m it stops and enters the wall following mode. At each execution of the algorithm, it checks the squares shown in the figure. If no obstacle is detected in the square on its left, it turns left. If an obstacle is detected in the square to it's left, it checks the one in the front. If this one is free it drives forward. If there is an obstacle in front as well it turns right.
Encountered problems:
A problem encountered when first writing the wall follower was that it got stuck in the corners. The cause of this issue was the following: When the algorithm could not drive left or forward, it started turning right, but that meant that it could turn left again. This creates a loop that kept rotating the robot. It was solved by improving the squares and changing the turn right motor output.
Localization and orientation
gMapping solves the Simultaneous localization and mapping algorithm. It publishes information about the current position compared to the initial position. We want this position to be stored in the world model as a lot of choices depending on the position of the robot. The position can be obtained by listening to the transformation from the frame map, the fixed world frame created by gMapping to the frame "base_link" which is situated at the base of the robot. From this transformation, we want to know three things: the (x,y) compared to the initial position of the robot and the orientation of the robot compared to its initial orientation. This is achieved by creating a listener that listens to the broadcasted transform from the map to the "base_link" frame and saves the position and the orientation as doubles in the world model.
Parking

One of the function to be performed by the PICO during the hospital challenge is to park the robot backward against the wall after mapping and reaching the initial position. The PICO has to be parked backward touching the wall. Once parked the PICO should say "I am Parked!". Parking can be performed based on different data. Firstly it can be performed based on the odometry data. When reaching the initial position, the distance to the front can be measured. Than PICO should rotate and drive this distance backward. This method is simple but inaccurate. It was discovered in early tests that the odometry data is not reliable due to slip. Therefore the odometry data cannot be used to always turn an exact amount of degrees. Another way to park is based on the data from gmapping. Once back at the begin position, the distance and orientation with respect to the begin position (assuming that PICO starts straight) can be measured. Then based on the orientation from gmapping the rotation can be performed accurately and the backward motion can be set in. But in this method, the backward driving remains open loop, if the robot goes slightly of parking will not happen at the wall. The solution to that would be the usage of the control effort. Once backward motion is engaged, control effort is to be checked. To this accurately, the last 5 control effort measurement can be averaged. If a spike appears, meaning the wall is reached, the backward motion is to be stopped and PICO should be parked. It was planned to integrate the data from gmapping in the parking, but due to time constraints, we did not get it working in time. Therefore the implemented solution works on odometry data.
This function is implemented using Task software architecture.
World Model:
The world model object consist of the monitoring, plan, perception and control states.
Monitoring:
- mo_obstacle_parking (Found an obstacle while parking)
- mo_parking (When the PICO reach the initial position and during the complete parking plan)
- mo_parked (When the PICO has completed parking)
Plan:
- pl_initial_position_reached (After mapping the initial position reached)
- pl_moveforward_parking (PICO moves forward)
- pl_standstill_parking (PICO stops once the obstacle is found)
- pl_rotate_parking (PICO rotates 180 degrees)
- pl_movebackward_parking (PICO moves backward)
- pl_stop_parking (PICO stops once it touches the wall)
Control:
- If initial position is reached the PICO will rotate 180 degree.
- After rotation will move backward.
- If the control effort is more than a certain value stop.
- Finally, IO.speak "I am Parked!".
Finding the Door, Driving Through It
The room escape challenge and the hospital challenge have a set of basic skills in common. Among them are detecting a door, and driving through it.In the following we describe a solution we considered.
Requirements:
R1. The robot shall find the position of the door.
R2. The robot shall drive through the door.
R3. At all time, the robot shall not touch the walls.
Assumption:
A1. For the sake of simplicity, this solution makes the assumption that the robot can see all the walls around it -- that is, at any position of the robot inside the room, all the walls are within scanning distance.
A2. The robot is inside the room, at a distance from the walls that allows it to rotate without touching them -- considering the small radial movements that occur during a rotation in practice.
Design Decisions:
DD1. Based on A2, the robot shall find new information by scanning 360 degrees.
DD2. Based on A2, it can however happen that from the initial position the robot won't be able to find the door, let alone drive through it -- for instance if the initial position is close to a corner and the door is located at one of the adjacent walls. Therefore, we split our algorithm into several parts: find a position from where the robot can surely see the door, navigate there, and from there scan again to find the door. After that, drive through it.
DD3. Based on DD3, we want the robot to first find the "middle" of the room. We calculate it as the center of mass of the scanned points.
DD4. Our algorithm will perform the following:
1. Scan 360 degrees.
2. Calculate the center of mass for the scanned points, and navigate to it.
3. Scan again 360 degrees.
4. Calculate the position of the door.
5. Calculate the position of the middle of the door.
6. Drive though the middle of the door.
Remark: The best solution for step 4 is to indentify the door by finding the two discontinuities at the two margins of the door. In our solution, for the time being, we have however assumed that scanning the door will give very small values (since the distance is very large, and then the robot gives values that should be considered wrong). This solution works for the room escape challenge.
Remark: Step 6 can go wrong if the direction of driving through the middle of the door is not orthogonal to the door -- then the robot might drive through the door at a small angle and might touch the doorposts, or a wall very close to them. Therefore, after step 5, we should have:
6'. Find the point 40cm in front of the middle of the door, and navigate to it.
7'. Drive from there through the middle of the door.
For reasons related to lack of time, we implemented the solution with steps 1 - 6.
Result: In the following video we can see a test-case scenario.
video file link: https://drive.google.com/open?id=1Lwc4l8tbk_NFR4zeFK-r6-r6EjG1Ca2d
Challenges approach and evaluation
Escape Room Challenge
Approach
A simple code was used for the escape room challenge. It is a code that follows a wall. The idea is as follows: Once started PICO first drives in a straight line, stopping 30 cm from the first encountered wall. Once a wall is detected PICO aligns it's left side with the wall and starts following the wall. Once PICO is following the wall it is testing in each loop if it can turn left. If an obstacle is detected, it checks if it can drive forward. If it can't drive forward, it will start turning right until it is aligned with the wall in front of it. Then it starts the loop again. This application is very simple but it is robust. As long as PICO is aligned with the wall to it's left and nothing is in front of it, it will drive forward. When it reaches a corner it will turn and follow the other wall. If it drives past a door it will detect empty space on it's left and turn. Due to the simple geometry of the room, the code should be sufficient for the simple task of getting out.
In the following section, more details are given about the different components of the code (perception, modeling, plan, control, world model, main)
The world model is a class with all the information stored inside. The other components, perception, modeling, plan and control function which are called at a frequency of 20 Hz by the main loop.
- World model: For this simple task, the world model is relatively simple. It contains serves as a communication interface for the other functions. each function stores data in the WM and extracts the information it requires.
- Perception: In this function, the data from the laser rangefinder is treated. First, a simple filter is applied to the data to filter are the fault data points where the laser beams hit PICO. This is done by filtering out the distances smaller than 10 cm. Then the index of each data point and the angle increment are used to calculate the angle at which the measurement was taken. Then the angle and the distance are used to convert the measurement into cartesian coordinates.
- Monitoring: In monitoring selective parts of the data are used to determine if there are obstacles to the left or front of the robot.
- Plan: For this challenge, the plan function does not add a lot of functionality. It relays the information of the monitoring. It was implemented because it is going to be used for the more complicated challenge and would simplify implementation.
- Control: In the control function, speed requirements are sent to the actuators of PICO depending on the positions of the obstacles.
The script was simple and included some elements that were not necessary but would be required for the next challenge. They were included to ease implementation at a later stage.
Advantages and disadvantages
The main advantages of the solution explained in the previous paragraph is the simplicity and the robustness.
Result
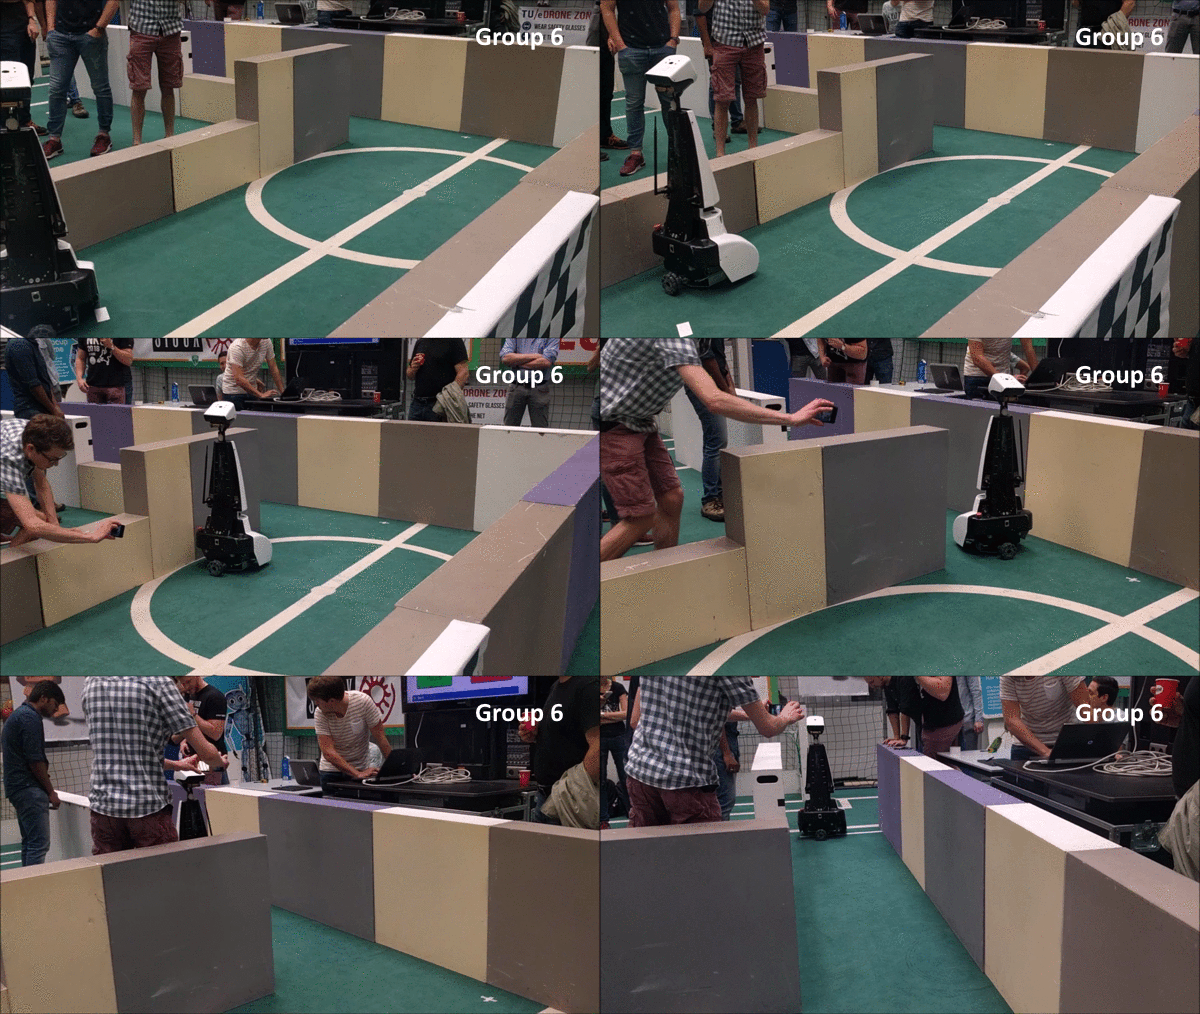
Merely two teams made it out of the room, one of which was us! We also had the fastest time so we won the Escape the Room Challenge!
Hospital challenge
Approach
The hospital challenge had three distinct tasks that were to be performed for the challenge to be completed. First, the entire environment was to be mapped. Once back at the initial position PICO should park backward against the wall and then finally it had to find the object and drive to it.
The used approach in the challenge was a simpler version of the planned one due to time constraints. The planned approach is explained first. Upon starting PICO drives towards the wall on its left and the wall follower is used to follow the wall and map the entire environment. In parallel, the (x,y) extracted from gMapping are used to determine the straight line distance to the origin. Once this distance has exceeded 1m the algorithm starts comparing the distance with a reference value of 0.4 m. This distances is no magic number, it was derived based on the information that the maximal width of the corridor was 1.5m and PICO is approximately 0.4m wide. When the distance to the origin becomes smaller than the reference value PICO will be close to its starting point and the parking algorithm can be started. Always hugging the left wall is enough, for this challenge, to satisfy that the entire environment is mapped. Once the initial position is reached, PICO turns 90 degrees based on the orientation from gMapping and than drives in a straight line backward, checking the control effort to determine when the wall is reached. When parking is done the map is saved as a big matrix. This matrix is used in combination with the high-level hint to determine the location of the door to the room where the object is located. A path planning algorithm based on Dijkstra would determine a path to the location of the door. Using a path following algorithm PICO would drive to the room entrance. Once the entrance reached it would map the room a second time and use OpenCV to determine the location of the object. Finally, the combination of the path planning and path following algorithm would be used to drive towards the object.
The final approach is a lot simpler and will be detailed next. Up to the parking, the approach is the same. Another approach is used to located and drive towards the object.
Upon parking, a version of the map at that time is saved as an independent file. Once PICO has parked it starts following the left wall again. But this time in parallel it compares the map saved map with the version that the mapping algorithm has updated. With the use of OpenCV the most probable location of the object is determined. Once the location of the object determine PICO keeps following the wall until one of its coordinates (x,y) is the same as the corresponding one of the object. Because the wall is always on PICO's left, when one of the coordinates of PICO is the same as the one of the object, the object will always be on PICO's right. Therefore PICO simply drives right and compares its current location with the object's location, when it comes within 0.3 m of the object it stops and says that it has found the object.
Advantages and Disadvantages
The main advantages of the solution implemented in PICO are the robustness and simplicity. The wall follower that was written for the escpape room is very robust. Under no condition present in the challenge would it get stuck or hit a wall. This served as a solid foundation for the rest of the approach. It would not be the fastest but it would be robust and work under all conditions.
The chosen approach has one major drawback: speed. It would not have been the best for winning the competition as it would nearly map the entire environment twice. It doesn't take into account the high-level hint. This would save a lot of time in the finding of the object. Furthermore no path planning algorithm is available. Such an algorithm would increase the speed of the second challenge.
Result and Evaluation
The hospital challenge didn't entirely go as expected. We were not able to complete the entire challenge. Even though we ended second! The mapping part of the challenge went very well. We were able to map the entire environment without hitting a wall and display the map using rviz. But upon returning to the begin position the parking algorithm did not switch on and PICO just kept following the wall. The wall follower worked extremely well, never was a wall hit nor did it get stuck. It had a little trouble with crossing small corridors because of the security distances implemented to avoid collisions. The only consequence was that it was slow to drive through corridors. This could have been solved by either reducing the safety distances or by making the distance detection in a smarter way. Furthermore, gmapping worked very well, the map was consistent with the hospital.
Several problems were encountered. First, the initial position used by gmapping is determined based on the odometry data upon executing the algorithm. For the challenge, PICO was not reset in between test and therefore the initial position was wrongly determined outside of the hospital. This was the reason the parking algorithm did not turn on. The fix to this issue is adding in the shell script a line that restarts pico and resets it's odometry data. After the challenge, another test was performed where PICo was reset before the start. During that trial, the transition to parking worked but the control effort data was not tuned properly and PICO did not stop upon hitting the wall. During a post-challenge test with reset odometry data, the parking algorithm did indeed Furthermore, the parking algorithm used the control effort data but the limit set not tuned correctly. An additional hour of testing would have been enough for us to determine the required value and change it in the main code.
Another problem which was not encountered but would have would parking have been fine was the transition to driving to the object. The final integration of the code was done in a rush. Upon finding the object PICO would have said that it had found it but kept on following the wall without making the transition to drive toward the object.
List of possible improvements:
- Include odometry data reset in the shell script.
- Instead of mapping with a wall follower, use data from gmapping to map until all the known space is enclosed.
- Treat matrix data in a way to determine doors and rooms from the map matrix.
- Use the high-level hint to determine the room where the object is.
- Implement Dijkstra based path-planning algorithm.
Conclusion

Code
TF listener to extract PICO position from gampping data: [5]
Wall following code: [6]
Overview of Plan function which serves as a state-machine: [7]
Overview of mapping algorithm: [8]
