Embedded Motion Control 2016 Group 5: Difference between revisions
No edit summary |
|||
| (104 intermediate revisions by 2 users not shown) | |||
| Line 8: | Line 8: | ||
| 0976553 | | 0976553 | ||
| Parth Sharma | | Parth Sharma | ||
| | | p dot sharma at student dot tue dot nl | ||
|- | |- | ||
| 0977462 | | 0977462 | ||
| Xixiao Wang | | Xixiao Wang | ||
| | | y dot wang dot 7 at student dot tue dot nl | ||
|- | |- | ||
| 0977242 | | 0977242 | ||
| Satyaki Chaudhuri | | Satyaki Chaudhuri | ||
| |[mailto:s.chaudhuri@student.tue.nl s.chaudhuri@student.tue.nl] | | |[mailto:s.chaudhuri@student.tue.nl s.chaudhuri@student.tue.nl] | ||
|- | |||
| Tutor | |||
| Wouter Kuijpers | |||
| w dot j dot p dot kuijpers at student dot tue dot nl | |||
|- | |- | ||
|} | |} | ||
| Line 114: | Line 118: | ||
The design presentation can be downloaded [http://cstwiki.wtb.tue.nl/images/First_presentation_of_design.pdf here] | The design presentation can be downloaded [http://cstwiki.wtb.tue.nl/images/First_presentation_of_design.pdf here] | ||
='''Corridor Challenge''' = | |||
The corridor challenge requires the robot to travel through a corridor without any wall collision. It needs to detect an exit either on the right or the left and perform the exit operation. The team decided to break down the various tasks in to simple function blocks. The environment is being studied in the main while loop, based on the conditions the relevant function blocks would be activated. The LRF Data was used to inspect the surroundings in order to understand local position and orientation. Odometer data was used only to track small changes in the displacement of the robot. We understood that due to wheel-slip, odometer data would be unreliable for larger motion. In the corridor challenge, the map was divided into two parts. One was the corridor where the robot was expected to travel straight with out any collision. The other part included the junction of the corridor an the exit. | The corridor challenge requires the robot to travel through a corridor without any wall collision. It needs to detect an exit either on the right or the left and perform the exit operation. The team decided to break down the various tasks in to simple function blocks. The environment is being studied in the main while loop, based on the conditions the relevant function blocks would be activated. The LRF Data was used to inspect the surroundings in order to understand local position and orientation. Odometer data was used only to track small changes in the displacement of the robot. We understood that due to wheel-slip, odometer data would be unreliable for larger motion. In the corridor challenge, the map was divided into two parts. One was the corridor where the robot was expected to travel straight with out any collision. The other part included the junction of the corridor an the exit. | ||
| Line 146: | Line 150: | ||
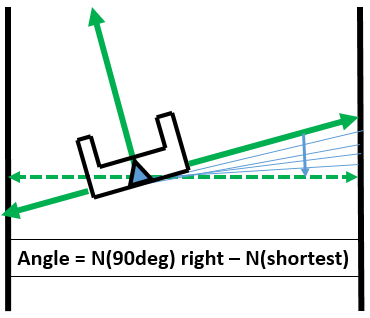
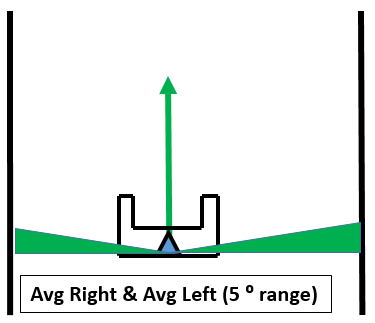
#Safety: The safety function included software to center the robot, align it along the wall and also avoid collision with the walls. It was active during the corridor part of the maze. Two laser data bundles were averaged to obtain the values (Average Value Right)AVR and (Average Value Left)AVL as illustrated in the diagram below. The difference between these values were considered to be the centering error, based on which the robot was provided with an appropriate lateral velocity. For the align task, we inspect the bundle of data from 0 degs (front of PICO) to the last laser data on the right hand side. The alignment correction angle is equal to the difference between the shortest distance data and the data to the right ( no. 107 ). based on the angle of the shortest distance, the decision to turn either left or right is used. | #Safety: The safety function included software to center the robot, align it along the wall and also avoid collision with the walls. It was active during the corridor part of the maze. Two laser data bundles were averaged to obtain the values (Average Value Right)AVR and (Average Value Left)AVL as illustrated in the diagram below. The difference between these values were considered to be the centering error, based on which the robot was provided with an appropriate lateral velocity. For the align task, we inspect the bundle of data from 0 degs (front of PICO) to the last laser data on the right hand side. The alignment correction angle is equal to the difference between the shortest distance data and the data to the right ( no. 107 ). based on the angle of the shortest distance, the decision to turn either left or right is used. | ||
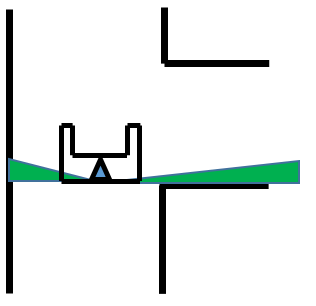
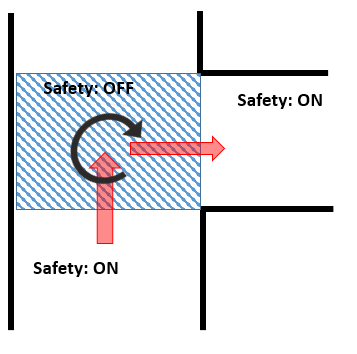
# Turn: Average Value Right 1(AVR1) and Average Value Left 1(AVL1) are smaller laser data bundles as depicted in the image below. A sharp rise in any of these values indicate the presence of an exit. Once an exit is detected, the safety function is turned off using a flag. The robot is made to move forward by a certain distance which is measured using the odometer data, turn left or right by 90 degs followed by a measured movement in the straight direction. Once the robot has exited the junction of the exit, the safety function is turned on till the robot make the final exit form the corridor. | #Turn: Average Value Right 1(AVR1) and Average Value Left 1(AVL1) are smaller laser data bundles as depicted in the image below. A sharp rise in any of these values indicate the presence of an exit. Once an exit is detected, the safety function is turned off using a flag. The robot is made to move forward by a certain distance which is measured using the odometer data, turn left or right by 90 degs followed by a measured movement in the straight direction. Once the robot has exited the junction of the exit, the safety function is turned on till the robot make the final exit form the corridor. | ||
{|style:"margin: 0 auto;" | {|style:"margin: 0 auto;" | ||
| Line 162: | Line 166: | ||
|} | |} | ||
= | =='''Simulation Video'''== | ||
We are | |||
{|style:"margin: 0 auto;" | |||
|[[File:corridor_potential.PNG|center|250px|link=https://www.youtube.com/watch?v=XrPGwGzKsRU&feature=youtu.be]] | |||
|} | |||
=='''Evaluation of Corridor Challenge''''== | |||
Our software wasn't able to complete the corridor challenge. We should have used classes instead of functions as it would make the software structure more robust and systematic. Some of the global variables were passing through multiple conditions and this caused contradicting information in certain situations. Also, we used odometry data but the odo meter was not reset before we started the experiment. We realised that using Potential Field for the Corridor Challenge would ensure a smoother manoeuvre with a much simpler logic. The simulation above is using Potential Field and confirms that Potential Field is a better methodology to use in a similar Challenge. | |||
='''Final Design''' = | |||
[[File:Software_structure.PNG|frame|center|Software Structure]] | |||
The Final Design included software to negotiate the maze for the Amazing challenge. The team identified the critical functions and decided to accordingly segment our software. The "Detection" block is responsible for processing and judging the nature of the environment. It passes on local environment data to the Decision Making Block. The "Decision Making" block is responsible for instructing PICO about its movement at intersections. The Decision Making block passes on its judgement to the "Movement Block" which uses virtual potential field function to negotiate PICO through the maze while avoiding collision with walls. | |||
=='''DETECTION'''== | |||
{|style:"margin: 0 auto;" | |||
|[[File:rohan_detection.PNG|frame|Detection Function data flow]] | |||
|} | |||
The '''Detection Function Block''' is responsible for processing the robot local environment data and relaying this information to the subsequent '''Decision Making Block''' and '''Movement Block'''. | |||
We use three primary laser data bundles to understand PICO's surroundings. Average Value Left 1 (AVL1), Average Value Right 1 (AVR1) and Average Value Straight 1 (AVS1). Based on the values of these laser data bundles, the environment is analysed. A separate flag is raised in each of the scenarios which is eventually passed on to the Decision Making block. There are five different scenarios which are detected namely : | |||
*'''Left Turn :''' When the data bundle AVL1 goes beyond a certain value, a left turn is detected. | |||
{|style:"margin: 0 auto;" | |||
|[[File:Detection_left.PNG|frame|Detection of a left turn]] | |||
|} | |||
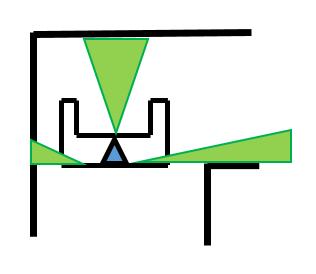
*'''Right Turn:''' When the data bundle AVR1 goes beyond a certain value, a right turn is detected. | |||
{|style:"margin: 0 auto;" | |||
|[[File:Detection_right.PNG|frame|Detection of a right turn]] | |||
|} | |||
*'''T-Junction:''' When both the bundles AVR1 & AVL1 go beyond a certain value but AVS1 is limited, a T-junction is detected. | |||
{|style:"margin: 0 auto;" | |||
|[[File:Detection_t.PNG|frame|Detection of a T-Junction]] | |||
|} | |||
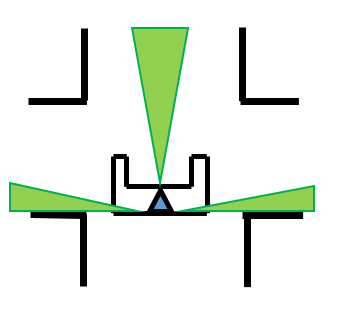
* '''Four-way Junction:''' In the case where all the three values AVL1, AVR1 and AVS1 go beyond a certain value, a four way intersection is detected. | |||
{|style:"margin: 0 auto;" | |||
|[[File:Detection_intersection.PNG|frame|Detection of a four-way junction]] | |||
|} | |||
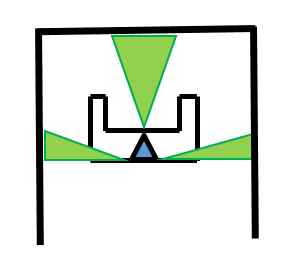
* '''Dead-end:''' In the case where all the three values AVL1, AVR1 and AVS1 are limited to a certain value, a dead-end is detected. PICO gives out a beep at every dead-end and waits for 5 seconds. This is implemented using counters. If the dead-end doesn't give away an open door, PICO turns around and continues to other parts of the maze. | |||
{|style:"margin: 0 auto;" | |||
|[[File:Detection_deadend.PNG|frame|Detection of a dead-end]] | |||
|} | |||
=='''DECISION MAKING'''== | |||
{|style:"margin: 0 auto;" | |||
|[[File:wang_decision_flow.PNG|frame|Decision Making Data Flow]] | |||
|} | |||
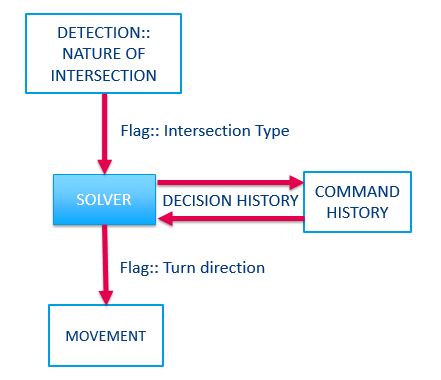
The '''DECISION MAKING''' Block receives information flags about the nature of intersections from the '''DETECTION''' Block. It implements a very simple algorithm where PICO is instructed to turn Right and the instruction history is stored in an array. After every five Right turns, the instruction is changed to go Left the next 5 times. The variable Length History stores all the turn count while the variable Length History Mod stores the immediate turn decisions of the same type, it is reset after every 5 count. After a decision count of 20, Random Walk is implemented. This is to ensure that PICO doesn't travel in a loop. | |||
The image below represents the decision making algorithm. | |||
{|style:"margin: 0 auto;" | |||
|[[File:wang_decision_flow_2.PNG|frame|Decision Making Algorithm]] | |||
|} | |||
You may have a look at the Decision Making Function in the below available link . | |||
[https://gist.github.com/anonymous/d65cd26e9d339db93210efa345d67f8e] | |||
=='''MOVEMENT'''== | |||
{|style:"margin: 0 auto;" | |||
|[[File:parth_software_flow.PNG|frame|Movement Function Data Flow]] | |||
|} | |||
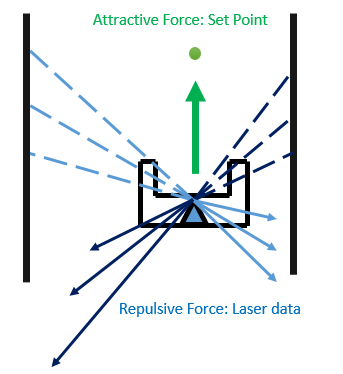
The team decided to use a simple but effective implementation of the '''Artificial Potential Field''' method for obstacle avoidance. The movement of the robot was realised through one of the 3 primary blocks, the '''Movement Block'''.The Movement Block satisfied two primary functions, to avoid collision with walls and obstacles and to execute turns based on data from the Decision Making Block. There are 2 fundamental forces which decide the movement of the robot. The '''Attractive Force''' is calculated based on a fixed set point in-front of PICO. The '''Repulsive Force''' is calculated based on the laser data PICO generates.Repulsive Force is calculated along the direction of each of the laser range data, dependant on the distance of the obstacle or the wall from the robot. Each wall point or obstacle was given a repulsive force which was inversely proportional to the distance to the bot and along the direction of the Laser Range Data. An attractive force set point was put at a constant small distance in-front of PICO. The resultant force was calculated by summing all forces along the longitudinal and lateral direction. The resultant forces was then further extracted into horizontal and vertical directions in order to extract velocity for each direction. | |||
{|style:"margin: 0 auto;" | |||
|[[File:pico_lcs.PNG|frame|PICO Local Coordinate System]] | |||
|} | |||
The '''Movement Function''' has the following inputs: | |||
# x and y coordinates of PICO. Which are by default (0,0) as we are considering it in the PICO Local Coordinate System. | |||
# x and y coordinates of the set point . It is a constant distance in front of PICO. (K,0) | |||
# Direction Flag which can be a number between 1 to 4. 1-Left Turn, 2-Right Turn, 3-Straight Motion, 4-None. | |||
The Outputs are : Translational Velocity in the X and the Y-axis and Rotational Velocity about the Z-axis. | |||
{|style:"margin: 0 auto;" | |||
|[[File:parth_pf_collision.PNG|frame|Collision Avoidance using Artificial Potential Field]] | |||
|} | |||
*'''Collision Avoidance''' - The effective forces in the longitudinal and lateral directions are computed based on the Attractive and Repulsive Forces. | |||
# Attractive Force is a constant Force pushing PICO to move forward. | |||
<code> | |||
// attractive force | |||
AttF_x = 8* (Xg - Xr); //in x direction ATTRACTIVE FORCE | |||
AttF_y = 0* (Yg - Yr); //in y direction ATTRACTIVE FORCE | |||
</code> | |||
Here Xg and Yg refer to the set-point coordinates while Xr and Yr refer to PICO coordinates. | |||
We want to make it clear that these values were constant at all points of time, it was implemented to provide PICO will a forward motion while the Repulsive Forces controlled the Lateral Motion. | |||
# Repulsive Force depends on the Laser data. It is the summation of the Repulsive Forces due to each of the Laser Data. Force is the inverse of the cube of the distance to the obstacle d[i] and a Scaling Factor Sf. Using the cube of the distance ensures strong repulsive forces when PICO is very close to the walls, this way the collision avoidance algorithm is more robust. | |||
{|style:"margin: 0 auto;" | |||
|[[File:parth_repulsive_force.PNG|frame|Repulsive Force]] | |||
|} | |||
*'''Turn Execution''' | |||
# '''Simple Turns:''' In the case of simple right or left turns, the Collision Avoidance Algorithm is adequate to negotiate the turn. PICO initiates the turn due to the repulsive forces from the wall infront of it, the Attractive Force setpoint rotates with PICO which eventually ensures that PICO executes a manoeuvre around the corner without colliding with the walls. | |||
# '''Complex Intersections:''' The Movement Block receives the Integer Direction Flag from the Decision making Block. Based on the value of the Direction Flag, a turn is executed at intersections. | |||
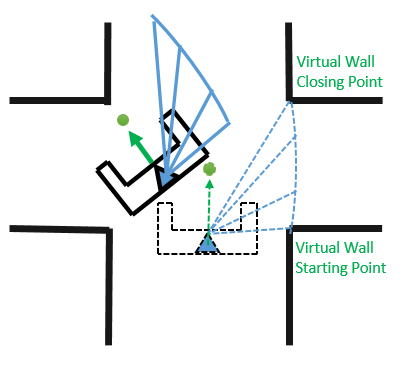
Once the flag has been identified, PICO uses a '''Virtual Wall''' methodology to execute the turn. It is a simple logic which limits the laser range finder data d[i] used to calculate the repulsive force in the direction of that specific Range Finder. Taking the instance of a left turn at an intersection. PICO identifies the shortest distance in the range finder array range of 107(exact right of PICO) to 500(Straight Ahead). The value is stored, say at the variable N. In the Data used to calculate the repulsive force along each of the range finder directions, the d[i] values from i as 107 to N are restricted to a small constant value. In the image below the Virtual Wall Starting[i=500] and Closing Points[i=N] are illustrated. This imitates the presence of a wall in the direction opposite to the turn direction. The array values are restricted till PICO has negotiated the turn and a corridor has been detected. | |||
{|style:"margin: 0 auto;" | |||
|[[File:parth_pf_virtualwall.PNG|frame|Virtual Wall]] | |||
|} | |||
Code for calculation of wall Closing Point. | |||
<code> | |||
case LEFT: CALC WALL CLOSING PT; | |||
for (int i=303;i<500;i++){ //Scan 45 degrees starting from right towards center | |||
if(scan.ranges[i] > 0 && scan.ranges[i] < lowestDistance){ | |||
lowestDistance = scan.ranges[i]; | |||
wallClosingPoint = i; | |||
} | |||
} | |||
</code> | |||
Code for Limiting Values to create Virtual Wall. | |||
<code> | |||
break; | |||
case LEFT: VIRTUAL WALL | |||
if (i < wallClosingPoint) d = virtualWall; | |||
else d = scan.ranges[i]; | |||
break; | |||
</code> | |||
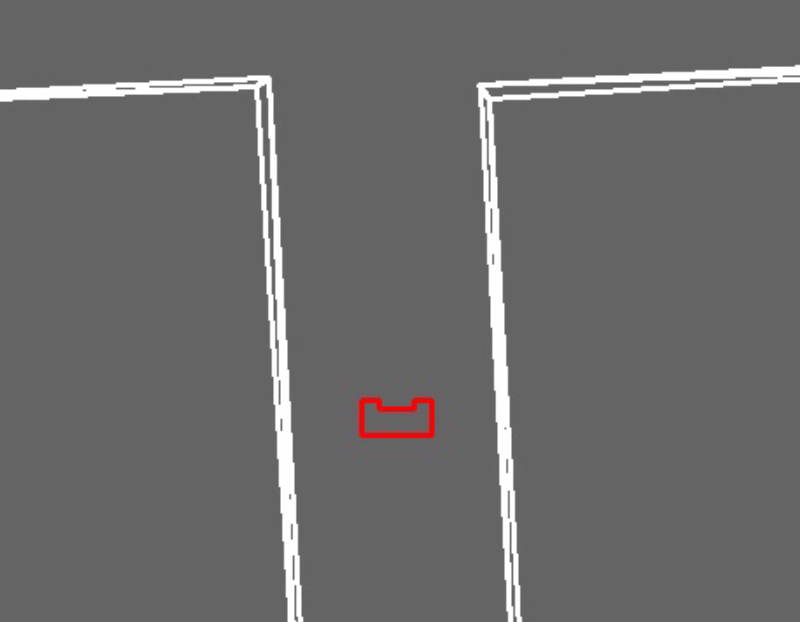
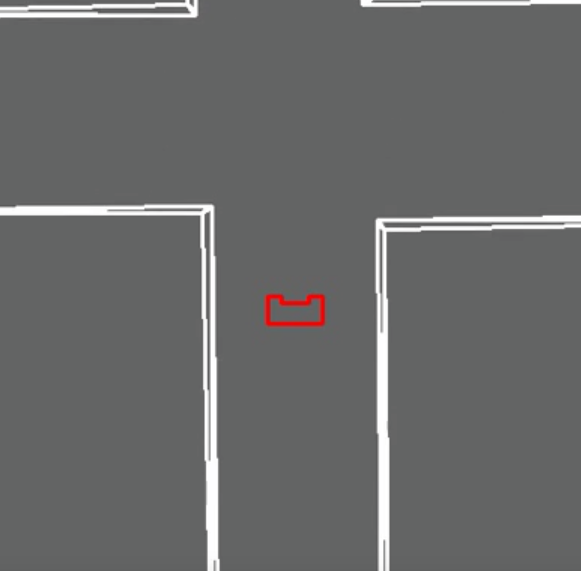
Simulation of PICO executing turns at the intersections using Virtual Wall. | |||
*Left Turn | |||
{|style:"margin: 0 auto;" | |||
|[[File:parth_left_sim.PNG|center|250px|link=https://www.youtube.com/watch?v=bvW2GWah--E&feature=youtu.be]] | |||
|} | |||
*Right Turn | |||
{|style:"margin: 0 auto;" | |||
|[[File:parth_right_sim.PNG|center|250px|link=https://www.youtube.com/watch?v=cgsK9UWYjtI&feature=youtu.be]] | |||
|} | |||
Finally Generation of Movement Data. Lambda is the angle between the Resultant forces along the X and Y Axis. Translational velocities in the X and Y directions and rotational about the Z axis. | |||
<code> | |||
ResF_x = AttF_x + RepF_x; //resultant force in x direction RESULTANT FORCES | |||
ResF_y = AttF_y + RepF_y; //resultant force in y direction RESULTANT FORCES | |||
if (ResF_x != 0) | |||
{ | |||
lambda = atan2(ResF_y, ResF_x); //keep on rotating until resultant force in y direction is TURNING VELOCITY | |||
} | |||
angleV = 0.8 * lambda; // scaled angular velocity | |||
if (abs(angleV) > 1.2) cout << "AV out of bounds" << endl; //for tuning | |||
SpeedX = 0.5 * ResF_x; //extract velocity in x direction | |||
SpeedY = 0.2 * ResF_y; //extract velocity in y direction | |||
</code> | |||
* '''Artificial Potential Field Code and Videos:''' | |||
We think that our Artificial Potential Field Algorithm worked well as PICO didn't collide with walls or obstacles at any point of time. The Virtual Wall approach to turn negotiations worked well without any errors. We would like to present a code snippet of the Artificial Potential Field Function Block which was responsible for Collision Avoidance and Turn Negotiation. | |||
https://gist.github.com/anonymous/6b9700c3353f81b70ee8b3655d511682 | |||
{|style:"margin: 0 auto;" | |||
|[[File:Pico_zigzag.PNG|center|250px|link=https://www.youtube.com/watch?v=llPO_nOxaYE&feature=youtu.be]] | |||
|} | |||
{|style:"margin: 0 auto;" | |||
|[[File:Pico_circuit.PNG|center|250px|link=https://www.youtube.com/watch?v=QL20HlrMHwY]] | |||
|} | |||
='''Evaluation of Maze Challenge ''' = | |||
The Team managed to bag the third position in the Corridor Challenge. Even though we were unable to detect the door and make it open, PICO managed to go about the enclosed area in a systematic manner without any collision. A few points w would like to highlight here which would have made a huge difference to our performance. | |||
* The Door Detect Function was not efficient enough to detect side doors. A Dead-End requires a certain amount of depth to be recognised as a Dead-End scenario. In our case, the side door lacked the adequate amount of depth. PICO's Potential Field did not allow it to go into the Side Door due to high Repulsive Forces. Thus PICO wandered around the Side door but eventually went the wrong way. | |||
* We were able to detect Open-Spaces and our plan was to carry out a wall-follower execution in case of an Open Space. We were able to detect the existence of an open space but the software was unable to carry out a wall follower step. | |||
Here is a video of the Maze Challenge. | |||
{|style:"margin: 0 auto;" | |||
|[[File:group_5_final.PNG|center|250px|link=https://www.youtube.com/watch?v=t9HHACBM6DI]] | |||
|} | |||
=='''Lessons Learnt'''== | |||
* In our final design the software was implemented with a main body and three primary functions. We were unsuccessful in clearing the corridor challenge with a similar approach. Our initial plan was to implement classes in to the software for the Amazing challenge but due to numerous constraints we were unable to do so. Even though our Software structure using functions was more systematic and robust in the Amazing Challenge, we believe that using Classes instead of functions has multiple advantages. | |||
* There are often Global variables which enter simultaneous loops due to incorrect definition of conditions. This is of utmost importance as such a situation can cause complete failure of the software. It is always advisable to use well-defined and non-contradicting conditions. | |||
* Detection is a very important part of the software as the first step for PICO in negotiating the maze is to understand its local environment. Our Detection algorithm could have been made more robust, as a result we failed to detect the Dead End in a Side Door scenario. | |||
* Simulation is inadequate. Our software for the Corridor challenge worked perfectly fine in the simulator but PICO failed to complete the challenge due to numerous reasons. Testing is of utmost importance and simulation is not a substitute to Testing. | |||
Here is a photo of the group with our mentor Wouter. You may notice that Parth has grown rather fond of PICO, wants to share his beer with it. | |||
{|style:"margin: 0 auto;" | |||
|[[File:thegroup5.jpg|frame|group 5 \m/ ]] | |||
|} | |||
Latest revision as of 23:26, 17 June 2016
Group Members
| 0976517 | Rohan Lakhotia | r dot lakhotia at student dot tue dot nl |
| 0976553 | Parth Sharma | p dot sharma at student dot tue dot nl |
| 0977462 | Xixiao Wang | y dot wang dot 7 at student dot tue dot nl |
| 0977242 | Satyaki Chaudhuri | s.chaudhuri@student.tue.nl |
| Tutor | Wouter Kuijpers | w dot j dot p dot kuijpers at student dot tue dot nl |
Basic Design Idea
Requirements
For this assignment, we are expected to develop and implement a software code so that Pico can autonomously solve a maze. The assignment consists of the following challenges:
- Corridor Challenge
- Pico must drive through a corridor and take the first exit.
- It must not touch the wall.
- Must detect the exit on its own.
- We have total 5 minutes to complete the challenge.
- Maze Challenge
- Pico must be able to solve the maze and find the exit point which is not known.
- It should detect the door and send the request command for the door to open.
- The door opens when the robot is stationary.
- We have total 7 minutes to complete the challenge.
Functionality
Based on the requirements mentioned above, certain functionalities of the robot at task were detected. Based on levels of complexity these can be divided into 3 main groups:
- Highest Abstraction Level- Tasks
These tasks directly lead to the realization of the goal, they are considerably complex and use various combination of skills for their accomplishment.
- Maze Solving Algorithm
This is the highest level of logic, decision algorithms which enable the autonomous system to negotiate the maze in the shortest time possible. Critical decisions like recognizing dead-ends and intersections and the optimum turning direction fall in this category. This involved various skill selection at different stages of the maze.
- Track Position of Robot: The robot should be able to track the time variance of its
position with respect to a Global Coordinate System (planer). This will be beneficial in avoiding movement in closed loop trajectories.
Skills are localized decision making event which enable realization of Tasks, they are of a lower complexity level and often involve computation in a specific situation.
- Avoid Collision with walls: The robot is required to maintain a safe distance from the walls at all points of time. This skill will typically be incorporated at all points of the maze and corridor challenge.
- Recognizing Intersections: The robot should be able to detect intersection of walls. In case of a simple turn in the maze, the robot will be able to decide the correct turning direction. A three way intersection will have to be judged based on the position trajectory of the robot.
- Recognizing Dead-Ends: The robot identifies a dead-end and beeps for a door to be opened. It has to wait a certain amount of time and monitor the walls for them to open.
- Detect End of the Maze: The robot should be able to detect the end of the maze once it appears and complete it eventually.
- Lowest Abstraction Level Functions:
These are the very basic functions of the robot which enable the realization of the skills and eventually the tasks. These are the fundamental abilities of the robot which do not involve development of any algorithms on our part.
- Mobility: The robot is equipped with holonomic wheels which enable it to translate and rotate on a planar field. Due to the nature of the challenge, these actuators are sufficient for the robot to complete the maze.
- Sensors: The robot is equipped with Laser Range Finder and Wide Angle Camera to perceive its environment and be able to relay this information to higher levels of functional abstractions.
Components and Specifications
- Hardware components:
- Laser Range Finder: A laser range finder uses a laser beam to determine the distance to an object. Here, the laser range finder will be used to calculate the distance between Pico and the walls.
- Wheel encoders/Rotary encoder/Shaft encoder: It is an electro-mechanical device that converts the angular position or motion of a shaft or axle to an analog or digital code. Here, it can be used to get information of robot such as speed, distance and position.
- Wide Angle Camera: With good image processing algorithm, it can be used to localize the position of the robot with respect to the surrounding environment, also to differentiate between walls and door and to interpret different signs (if there is a visual difference between the two).
- Computer with intel i7 processor
- Actuators
- Wheels & Motors: Omni wheels. The effect is that the wheel can be driven with full force, but will also slide laterally with great ease.
- Pan/ Tilt Head: The head can be moved to look around for obstacles.
- Software Components
- Ubuntu 14.04
- Qt Creator
Interface
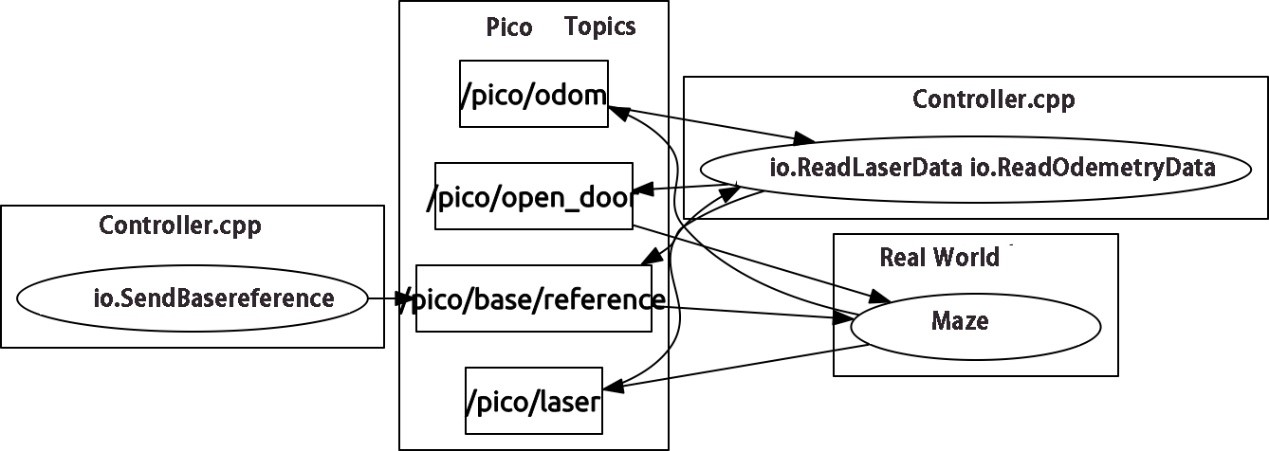
The control of robots can be done by calling the functions in the emc library, which will communicate with ROS topics for data exchange. By running C++ programs, data can be obtained, processed and transmitted from and to certain topics.
- The libraries are: < emc=rate:h > < emc=io:h >
- The sensor data can be obtained by: io.readLaserData(), io.readOdometryData().
- The structures of data are saved in: emc::LaserData, emc::OdometryData.
- For driving the robot: io.sendBaseReference & io.sendBaseVelocity.
The figure below shows the interface:
Design Document Download
The design document can be downloaded here
First Design Presentation
Functionality
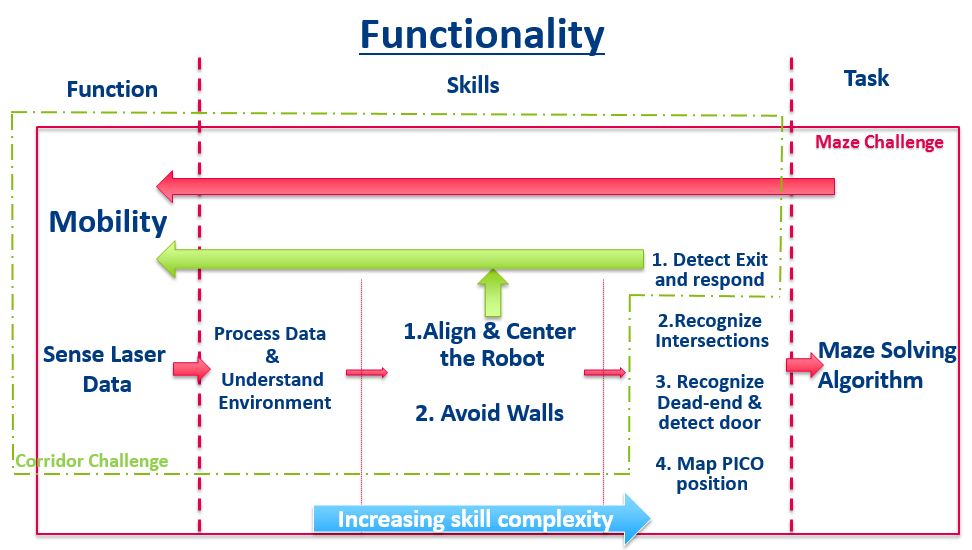
We realised that a detailed inspection and understanding of the robot functionalities was essential, this would enable us to design the software structure. On the most generic level, functionality was divided into Functions, Skills and Tasks as described in our Design Idea. Skills consisted of a tasks which were of wide complexity, we have further divided that into three different segments.
- Basic Complexity: This consists Processing Laser Range-finder and Odometer data. This skill segment enables PICO to understand the environment and also provide data for high levels of skill-sets.
- Medium Complexity: This skill-set performs the safety function. It consists of two actions. The first one is to align and center the robot at all points of its travel in the corridor. The second one is to maintain a certain amount of distance from walls at all points of time, it avoids collision.
- Higher Complexity: This skill-set uses the environment data to detect intersections and their nature. In the corridor challenge, it will consist of software which will detect the exit and respond accordingly. While in the maze challenge, the software will have to map the robot position in the maze, in order to avoid travelling in loops.It will also enable PICO to find the exit to the maze.
Composition Pattern
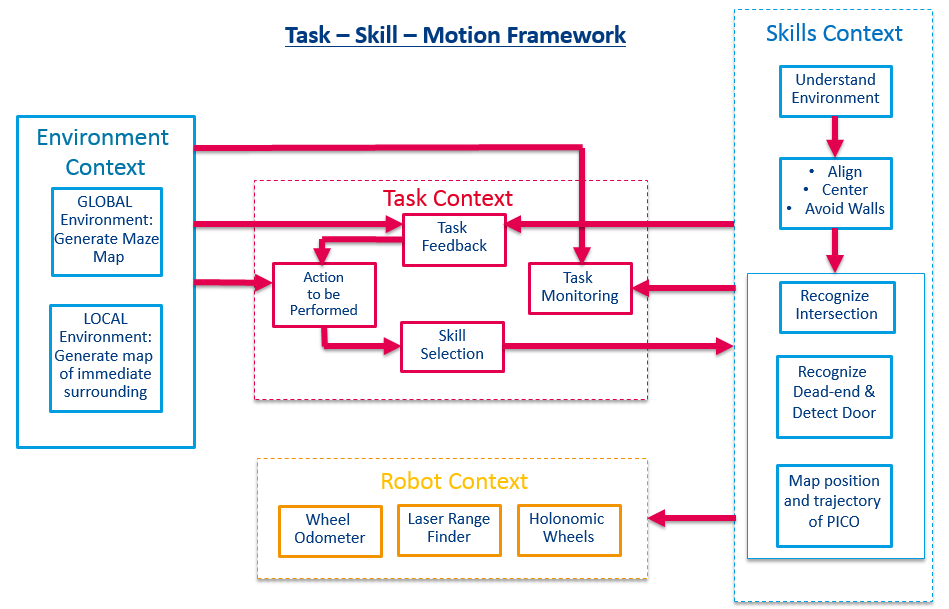
The software aims to evaluate the robot's surrounding and accordingly provide motion instruction and monitor the execution. In order to understand and implement this software, we have used a structured system architecture. The system is divided in to structure, behaviour and action. Behaviour is the system reaction to the environment, action is the implementation of what the algorithm instructs the robot to perform. Structure is the realisation between behaviour and action. The task-skill-motion diagram helps us explain the behaviour of the system.
- Task Context : The decision making process works in a loop. Starting with the "Action to be Performed", the system decides on a certain immediate goal. A skill-set is decided upon to realise the goal. "Task Monitoring" & "Task Feedback" process data from the Environment and Skills Context to evaluate the execution of the decision and also the current position of the robot.
- Skills Context : Contains all skill sets as mentioned in the Functionality Diagram. The skills are performed in increasing order of complexity.
- Robot Context : It consists the hardware capabilities of the robot. The Laser Range-Finder and the Odometer relay environment data to the Task Context while the motion instruction data is provide to the Holonomic wheels to actuate the robot.
- Environment Context : This consists of two blocks. The Local Environment pertains to the immediate surrounding of the robot, this information is used to avoid collision with the walls, center and align the robot and also detect intersections and their nature. The Global Environment data is used to generate an understanding of the maze structure, avoid travelling in loops and eventually find the exit of the maze.
The design presentation can be downloaded here
Corridor Challenge
The corridor challenge requires the robot to travel through a corridor without any wall collision. It needs to detect an exit either on the right or the left and perform the exit operation. The team decided to break down the various tasks in to simple function blocks. The environment is being studied in the main while loop, based on the conditions the relevant function blocks would be activated. The LRF Data was used to inspect the surroundings in order to understand local position and orientation. Odometer data was used only to track small changes in the displacement of the robot. We understood that due to wheel-slip, odometer data would be unreliable for larger motion. In the corridor challenge, the map was divided into two parts. One was the corridor where the robot was expected to travel straight with out any collision. The other part included the junction of the corridor an the exit.
 header files
 .
 .
 double Safety()          // Collision Avoidance - Centring and Alignment.
 double Turn()            // Take a right or a left turn based on the Laser Scanner Readings.
 double GoStraight()      // Continue moving straight.
 .
 .
 int main(){
 .
 .
 while (condition 1);     // Call specific functions based on the environment conditions.
 .
 while (condition 2);
 .
 .
 .
 sendBaseReference(x,y,θ)
 .}
Some of the relevant function blocks and working principles have been discussed below.
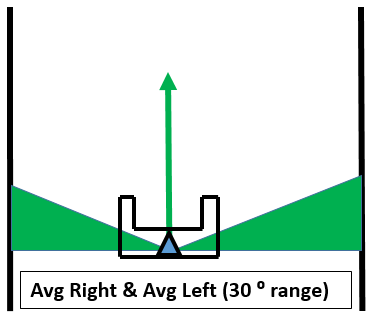
- Safety: The safety function included software to center the robot, align it along the wall and also avoid collision with the walls. It was active during the corridor part of the maze. Two laser data bundles were averaged to obtain the values (Average Value Right)AVR and (Average Value Left)AVL as illustrated in the diagram below. The difference between these values were considered to be the centering error, based on which the robot was provided with an appropriate lateral velocity. For the align task, we inspect the bundle of data from 0 degs (front of PICO) to the last laser data on the right hand side. The alignment correction angle is equal to the difference between the shortest distance data and the data to the right ( no. 107 ). based on the angle of the shortest distance, the decision to turn either left or right is used.
- Turn: Average Value Right 1(AVR1) and Average Value Left 1(AVL1) are smaller laser data bundles as depicted in the image below. A sharp rise in any of these values indicate the presence of an exit. Once an exit is detected, the safety function is turned off using a flag. The robot is made to move forward by a certain distance which is measured using the odometer data, turn left or right by 90 degs followed by a measured movement in the straight direction. Once the robot has exited the junction of the exit, the safety function is turned on till the robot make the final exit form the corridor.
 |
 |
 |
The images below depict the detection of the corridor exit and the exit methodology used in the corridor challenge.
 |
 |
Simulation Video
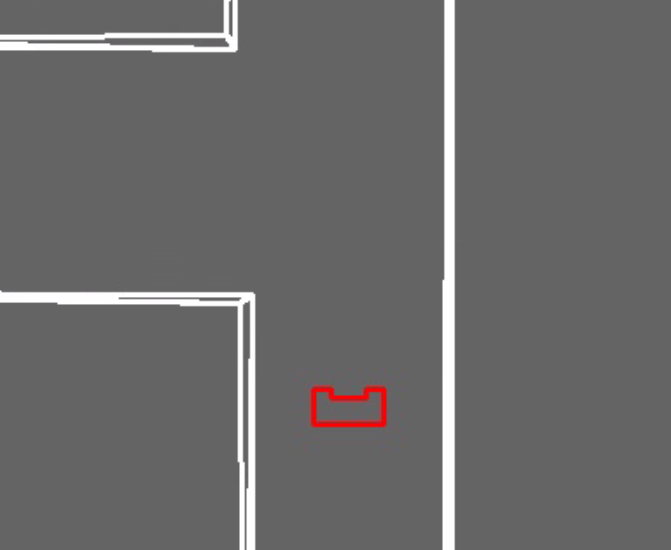 |
Evaluation of Corridor Challenge'
Our software wasn't able to complete the corridor challenge. We should have used classes instead of functions as it would make the software structure more robust and systematic. Some of the global variables were passing through multiple conditions and this caused contradicting information in certain situations. Also, we used odometry data but the odo meter was not reset before we started the experiment. We realised that using Potential Field for the Corridor Challenge would ensure a smoother manoeuvre with a much simpler logic. The simulation above is using Potential Field and confirms that Potential Field is a better methodology to use in a similar Challenge.
Final Design
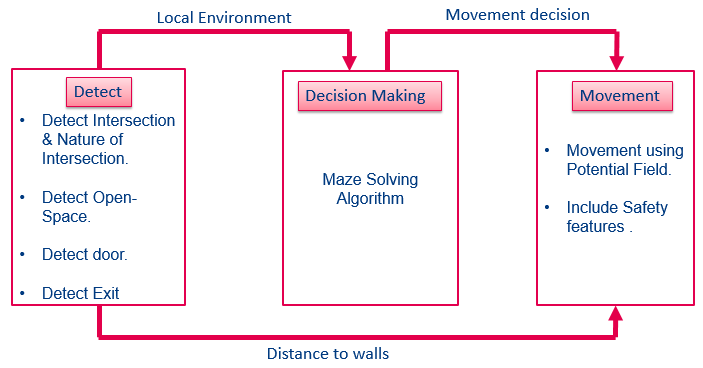
The Final Design included software to negotiate the maze for the Amazing challenge. The team identified the critical functions and decided to accordingly segment our software. The "Detection" block is responsible for processing and judging the nature of the environment. It passes on local environment data to the Decision Making Block. The "Decision Making" block is responsible for instructing PICO about its movement at intersections. The Decision Making block passes on its judgement to the "Movement Block" which uses virtual potential field function to negotiate PICO through the maze while avoiding collision with walls.
DETECTION
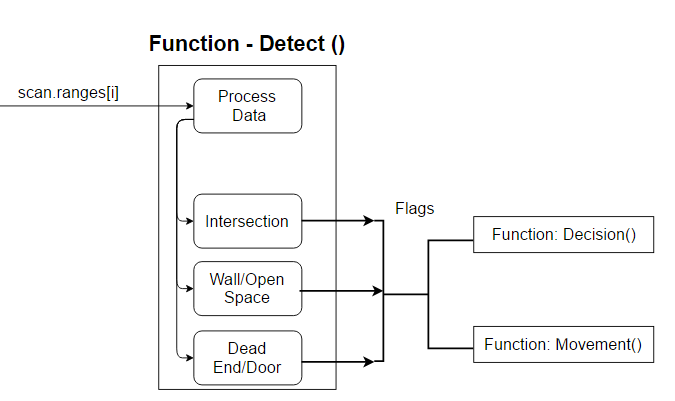 |
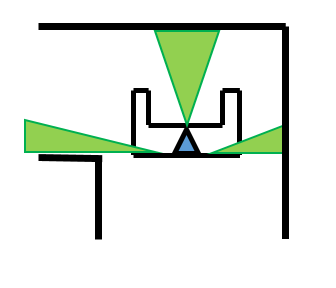
The Detection Function Block is responsible for processing the robot local environment data and relaying this information to the subsequent Decision Making Block and Movement Block. We use three primary laser data bundles to understand PICO's surroundings. Average Value Left 1 (AVL1), Average Value Right 1 (AVR1) and Average Value Straight 1 (AVS1). Based on the values of these laser data bundles, the environment is analysed. A separate flag is raised in each of the scenarios which is eventually passed on to the Decision Making block. There are five different scenarios which are detected namely :
- Left Turn : When the data bundle AVL1 goes beyond a certain value, a left turn is detected.
 |
- Right Turn: When the data bundle AVR1 goes beyond a certain value, a right turn is detected.
 |
- T-Junction: When both the bundles AVR1 & AVL1 go beyond a certain value but AVS1 is limited, a T-junction is detected.
 |
- Four-way Junction: In the case where all the three values AVL1, AVR1 and AVS1 go beyond a certain value, a four way intersection is detected.
 |
- Dead-end: In the case where all the three values AVL1, AVR1 and AVS1 are limited to a certain value, a dead-end is detected. PICO gives out a beep at every dead-end and waits for 5 seconds. This is implemented using counters. If the dead-end doesn't give away an open door, PICO turns around and continues to other parts of the maze.
 |
DECISION MAKING
 |
The DECISION MAKING Block receives information flags about the nature of intersections from the DETECTION Block. It implements a very simple algorithm where PICO is instructed to turn Right and the instruction history is stored in an array. After every five Right turns, the instruction is changed to go Left the next 5 times. The variable Length History stores all the turn count while the variable Length History Mod stores the immediate turn decisions of the same type, it is reset after every 5 count. After a decision count of 20, Random Walk is implemented. This is to ensure that PICO doesn't travel in a loop.
The image below represents the decision making algorithm.
 |
You may have a look at the Decision Making Function in the below available link .
MOVEMENT
 |
The team decided to use a simple but effective implementation of the Artificial Potential Field method for obstacle avoidance. The movement of the robot was realised through one of the 3 primary blocks, the Movement Block.The Movement Block satisfied two primary functions, to avoid collision with walls and obstacles and to execute turns based on data from the Decision Making Block. There are 2 fundamental forces which decide the movement of the robot. The Attractive Force is calculated based on a fixed set point in-front of PICO. The Repulsive Force is calculated based on the laser data PICO generates.Repulsive Force is calculated along the direction of each of the laser range data, dependant on the distance of the obstacle or the wall from the robot. Each wall point or obstacle was given a repulsive force which was inversely proportional to the distance to the bot and along the direction of the Laser Range Data. An attractive force set point was put at a constant small distance in-front of PICO. The resultant force was calculated by summing all forces along the longitudinal and lateral direction. The resultant forces was then further extracted into horizontal and vertical directions in order to extract velocity for each direction.
 |
The Movement Function has the following inputs:
- x and y coordinates of PICO. Which are by default (0,0) as we are considering it in the PICO Local Coordinate System.
- x and y coordinates of the set point . It is a constant distance in front of PICO. (K,0)
- Direction Flag which can be a number between 1 to 4. 1-Left Turn, 2-Right Turn, 3-Straight Motion, 4-None.
The Outputs are : Translational Velocity in the X and the Y-axis and Rotational Velocity about the Z-axis.
 |
- Collision Avoidance - The effective forces in the longitudinal and lateral directions are computed based on the Attractive and Repulsive Forces.
- Attractive Force is a constant Force pushing PICO to move forward.
// attractive force
 AttF_x = 8* (Xg - Xr);          //in x direction ATTRACTIVE FORCE
 AttF_y = 0* (Yg - Yr);          //in y direction ATTRACTIVE FORCE
Here Xg and Yg refer to the set-point coordinates while Xr and Yr refer to PICO coordinates. We want to make it clear that these values were constant at all points of time, it was implemented to provide PICO will a forward motion while the Repulsive Forces controlled the Lateral Motion.
- Repulsive Force depends on the Laser data. It is the summation of the Repulsive Forces due to each of the Laser Data. Force is the inverse of the cube of the distance to the obstacle d[i] and a Scaling Factor Sf. Using the cube of the distance ensures strong repulsive forces when PICO is very close to the walls, this way the collision avoidance algorithm is more robust.
 |
- Turn Execution
- Simple Turns: In the case of simple right or left turns, the Collision Avoidance Algorithm is adequate to negotiate the turn. PICO initiates the turn due to the repulsive forces from the wall infront of it, the Attractive Force setpoint rotates with PICO which eventually ensures that PICO executes a manoeuvre around the corner without colliding with the walls.
- Complex Intersections: The Movement Block receives the Integer Direction Flag from the Decision making Block. Based on the value of the Direction Flag, a turn is executed at intersections.
Once the flag has been identified, PICO uses a Virtual Wall methodology to execute the turn. It is a simple logic which limits the laser range finder data d[i] used to calculate the repulsive force in the direction of that specific Range Finder. Taking the instance of a left turn at an intersection. PICO identifies the shortest distance in the range finder array range of 107(exact right of PICO) to 500(Straight Ahead). The value is stored, say at the variable N. In the Data used to calculate the repulsive force along each of the range finder directions, the d[i] values from i as 107 to N are restricted to a small constant value. In the image below the Virtual Wall Starting[i=500] and Closing Points[i=N] are illustrated. This imitates the presence of a wall in the direction opposite to the turn direction. The array values are restricted till PICO has negotiated the turn and a corridor has been detected.
 |
Code for calculation of wall Closing Point.
case LEFT: CALC WALL CLOSING PT;
     for (int i=303;i<500;i++){  //Scan 45 degrees starting from right towards center
       if(scan.ranges[i] > 0 && scan.ranges[i] < lowestDistance){
         lowestDistance = scan.ranges[i];
         wallClosingPoint = i;
       }
     }
Code for Limiting Values to create Virtual Wall.
break;
       case LEFT: VIRTUAL WALL
         if (i < wallClosingPoint) d = virtualWall;
         else d = scan.ranges[i];
       break;
Simulation of PICO executing turns at the intersections using Virtual Wall.
- Left Turn
 |
- Right Turn
 |
Finally Generation of Movement Data. Lambda is the angle between the Resultant forces along the X and Y Axis. Translational velocities in the X and Y directions and rotational about the Z axis.
 ResF_x = AttF_x + RepF_x;           //resultant force in x direction RESULTANT FORCES
 ResF_y = AttF_y + RepF_y;           //resultant force in y direction RESULTANT FORCES
 if (ResF_x != 0)
 {
   lambda = atan2(ResF_y, ResF_x);        //keep on rotating until resultant force in y direction is   TURNING VELOCITY
 }
 angleV = 0.8 * lambda;         // scaled angular velocity
 if (abs(angleV) > 1.2) cout << "AV out of bounds" << endl;      //for tuning
 SpeedX = 0.5 * ResF_x;      //extract velocity in x direction
 SpeedY = 0.2 * ResF_y;      //extract velocity in y direction
- Artificial Potential Field Code and Videos:
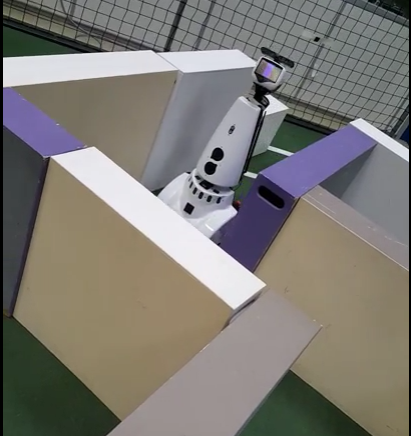
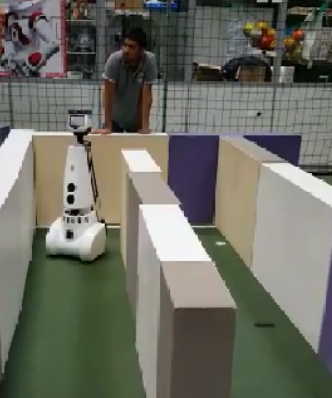
We think that our Artificial Potential Field Algorithm worked well as PICO didn't collide with walls or obstacles at any point of time. The Virtual Wall approach to turn negotiations worked well without any errors. We would like to present a code snippet of the Artificial Potential Field Function Block which was responsible for Collision Avoidance and Turn Negotiation.
https://gist.github.com/anonymous/6b9700c3353f81b70ee8b3655d511682
 |
 |
Evaluation of Maze Challenge
The Team managed to bag the third position in the Corridor Challenge. Even though we were unable to detect the door and make it open, PICO managed to go about the enclosed area in a systematic manner without any collision. A few points w would like to highlight here which would have made a huge difference to our performance.
- The Door Detect Function was not efficient enough to detect side doors. A Dead-End requires a certain amount of depth to be recognised as a Dead-End scenario. In our case, the side door lacked the adequate amount of depth. PICO's Potential Field did not allow it to go into the Side Door due to high Repulsive Forces. Thus PICO wandered around the Side door but eventually went the wrong way.
- We were able to detect Open-Spaces and our plan was to carry out a wall-follower execution in case of an Open Space. We were able to detect the existence of an open space but the software was unable to carry out a wall follower step.
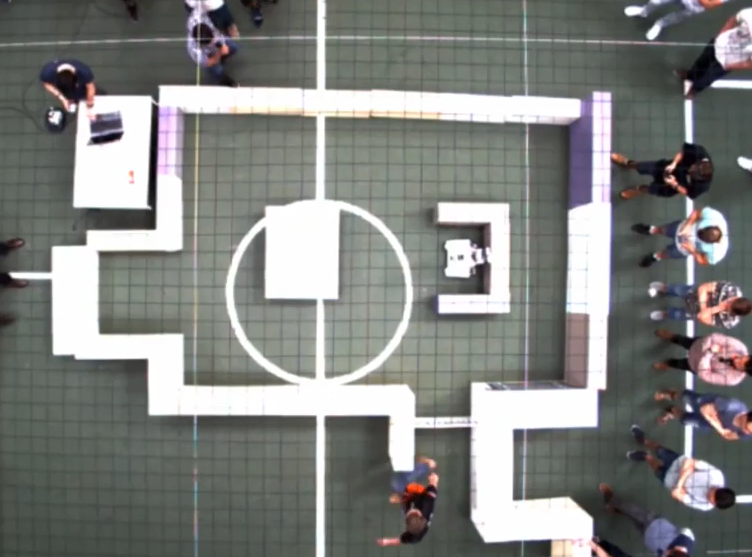
Here is a video of the Maze Challenge.
 |
Lessons Learnt
- In our final design the software was implemented with a main body and three primary functions. We were unsuccessful in clearing the corridor challenge with a similar approach. Our initial plan was to implement classes in to the software for the Amazing challenge but due to numerous constraints we were unable to do so. Even though our Software structure using functions was more systematic and robust in the Amazing Challenge, we believe that using Classes instead of functions has multiple advantages.
- There are often Global variables which enter simultaneous loops due to incorrect definition of conditions. This is of utmost importance as such a situation can cause complete failure of the software. It is always advisable to use well-defined and non-contradicting conditions.
- Detection is a very important part of the software as the first step for PICO in negotiating the maze is to understand its local environment. Our Detection algorithm could have been made more robust, as a result we failed to detect the Dead End in a Side Door scenario.
- Simulation is inadequate. Our software for the Corridor challenge worked perfectly fine in the simulator but PICO failed to complete the challenge due to numerous reasons. Testing is of utmost importance and simulation is not a substitute to Testing.
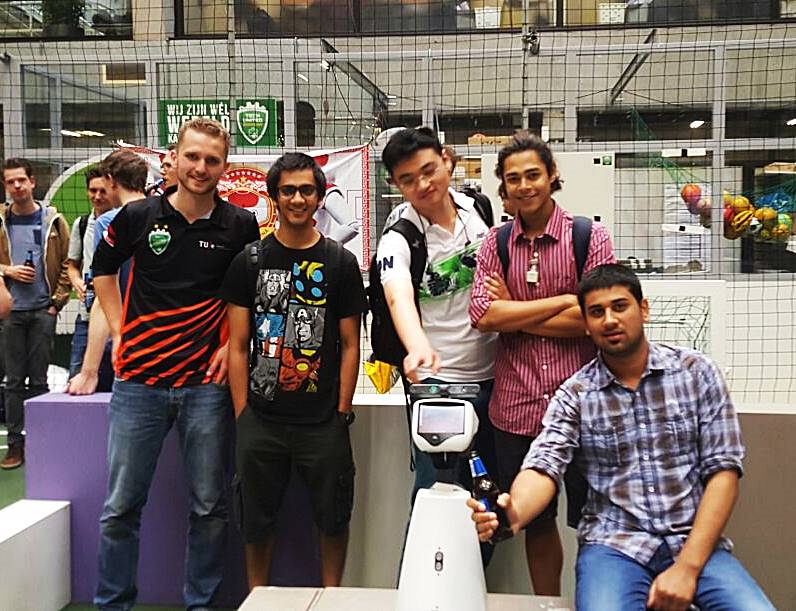
Here is a photo of the group with our mentor Wouter. You may notice that Parth has grown rather fond of PICO, wants to share his beer with it.
 |