RoboShark: Difference between revisions
| (102 intermediate revisions by 2 users not shown) | |||
| Line 1: | Line 1: | ||
Project by Twan Haazen <br> | Project by Twan Haazen <br> | ||
Supervisor Rob Janssen | Supervisor Rob Janssen <br> | ||
This wiki contains information about my Bachelor Final Project. | |||
This wiki | |||
== Introduction == | == Introduction == | ||
After watching the video of Festo's [http://www.festo.com/cms/en_corp/9780.htm AirPenguin] and [http://www.festo.com/cms/en_corp/9789.htm AirRay], I decided to do a similar project. An autonomously flying helium filled balloon is the goal of the project. What first needs to be decided is what the balloon will look like. A shark is a large and robust fish that has a good shape for making it into a balloon. Therefore project RoboShark is born. The goal of the project is to make a helium filled balloon that looks like a shark and can navigate by itself through the air.<br> | |||
The first couple of weeks consisted of brainstorm sessions. In these weeks loads of videos and articles were looked at. Several designs were drawn and thoughts about how to move the balloon came to mind. The most important parts of these brainstorm sessions are discussed in the following section. Next to that the lifting force of helium is calculated. The mathematical derivation is stated and analyzed. Also the construction material for the final product is discussed.<br> | |||
In the following section the design of the tail section is shown. After the brainstorm sessions this is the first part that is fully designed and prototyped. The process of sketching and model building is pointed out. The prototype is discussed and conclusions are drawn out of the tests.<br> | |||
The section thereafter is about the design of the body. This design is changed a lot overtime. Multiple variants are made and tested on there feasibility and realism. One of the designs is turned into a prototype and tested. Improvements on this prototype and its original design follow after the testing period.<br> | |||
In the last section the final prototype is pointed out. The problems in developing the components of the shark are stated. During this process contact is made with a design bureau and some suppliers of the raw material. After discussing the actual final prototype, future work on the project and the main conclusion about the whole project is given. In this section solutions to the main problems of the project are given and possible follow up projects are stated.<br> | |||
== Pre-Design Research == | |||
In this section two things are discussed. First the most important parts of the brainstorm sessions are pointed out. Some basic design problems are stated and taken into account. The second part is about helium. Because the balloon of the shark will be filled with helium, it is important to know what amount of weight the helium can actually lift. The mathematical derivation is discussed and the relation between weight and amount of helium needed is stated.<br> | |||
=== Brainstorm Sessions === | |||
[[File:Sketch1.jpg|300px|thumb|right|Figure (1): First Sketch]] | |||
[[File:Sketch2.jpg|300px|thumb|right|Figure (2):Second Sketch]] | |||
After the decision was made to base the design on the shape of a shark, the actual brainstorm sessions began. The most important parts of these brainstorm sessions will be discussed here.<br> | |||
The first thing that came to mind, was to search for as much information as possible about projects that did about the same as I was planning to do. When discussing the assignment, the German company Festo had some interesting videos and projects about helium filled balloons. The [http://youtu.be/jPGgl5VH5go Air Penguin] is an autonomously flying penguin that communicates with other penguins in the air. The Air Penguin makes sure it does not hit any walls or obstacles by using ultrasound to pinpoint its location. The [http://youtu.be/c3-wIICjAhE Air Ray] is a remote controlled helium filled balloon that imitates the smooth swimming behavior of a manta ray. Both these projects are closely related to the product I would like to produce. By exploring the website of Festo and contacting the people that worked on these projects, I tried to get as much information as possible to get a clear vision on how to design my shark.<br> | |||
Festo supplied me with some promotion flyers about these two projects. In these flyers a short description was given of the products and what pushed Festo to develop them. One of the first things that can be concluded from of both of these projects is that the construction has to be very light. The Air Penguin, with a length of 4 meters and a maximum diameter of 80 centimeters, had a total weight of only 1 kg. This requires well use of construction material and space.<br> | |||
<br> | |||
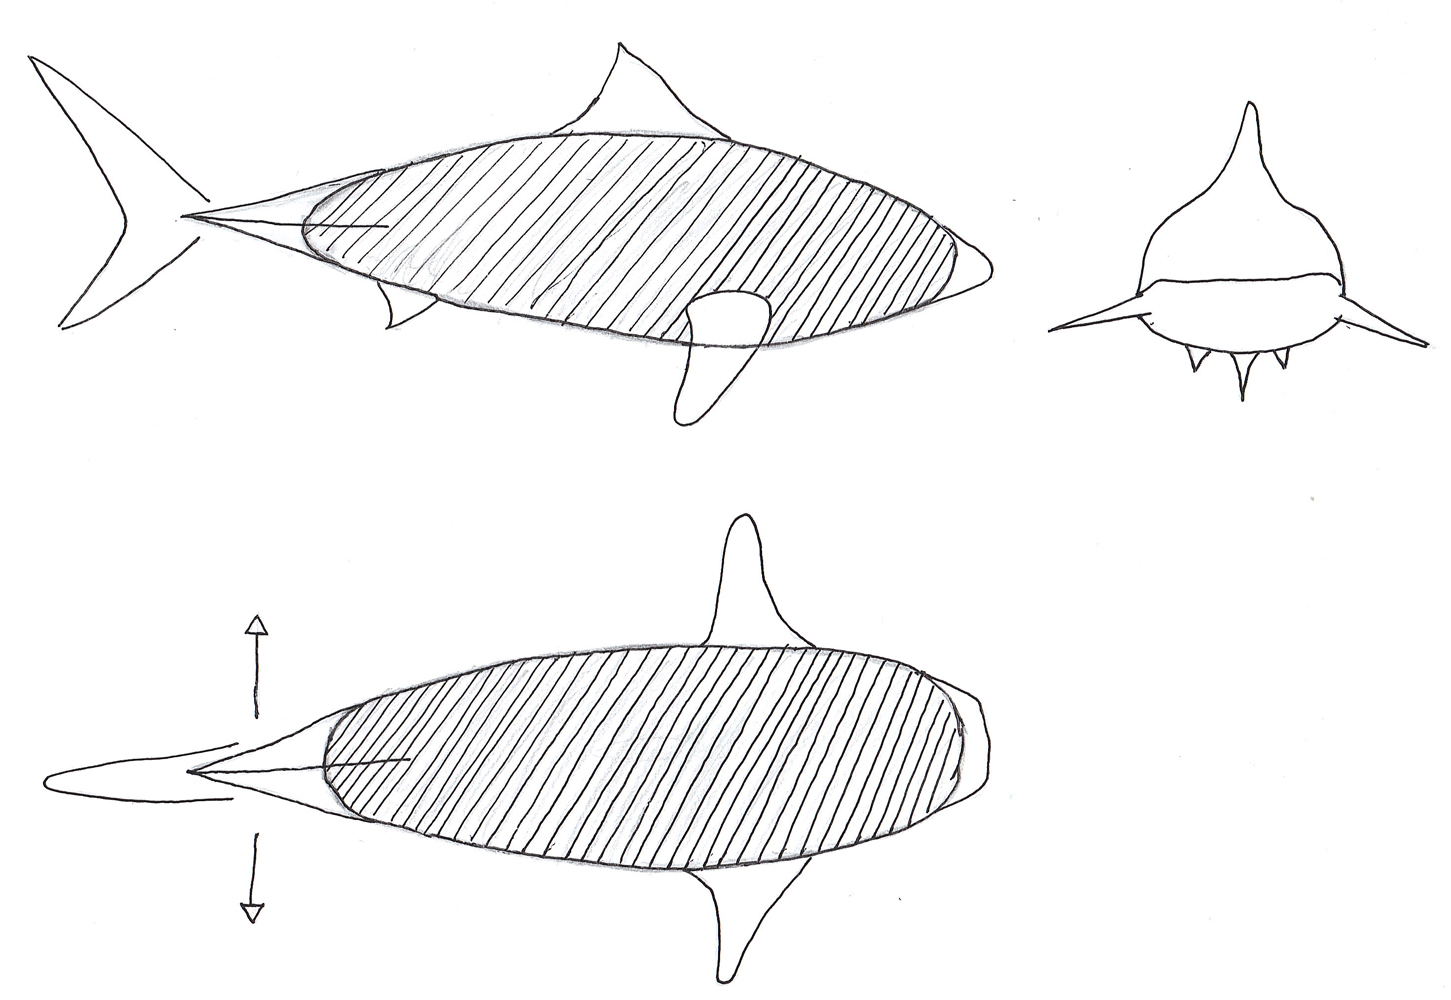
After studying the designs of Festo, the first sketch of the prototype is drawn. The first idea consists of a large balloon filled with helium, produced in the shape of a shark's body. Onto this large sack the several components of the shark are attached. The tail section is made out of several thin rods which will be moved in horizontal direction by a servo. This part will function as the propulsion of the shark. With the side fins the shark can turn and move up and down. The fins can be rotated and the tips can be moved up and down to make steering possible. Next to that the top fin can also be used like a rudder to enhance the steering procedure. The fin can be rotated around it's vertical axis, hereby producing drag at one side of the body, resulting into a yaw in that direction. The first sketch is shown in figure (1).<br> | |||
<br> | |||
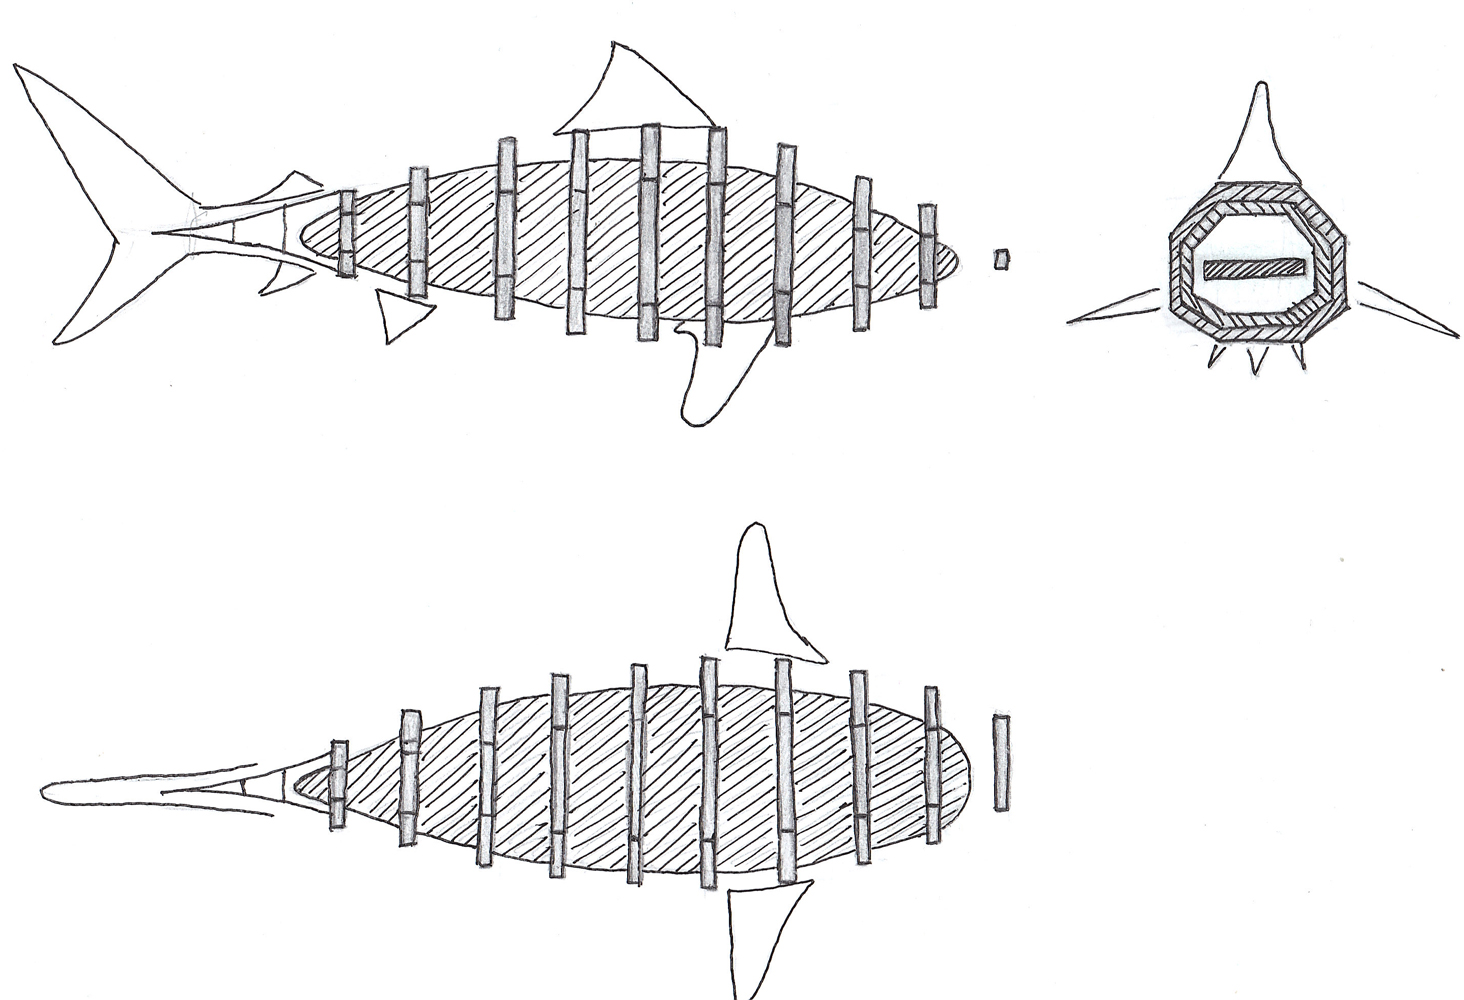
In the second sketch the design has changed. To make the structure more rigid and to keep the shape better defined a frame is added. The tail section consists of a frame section instead of only 4 single rods as in the previous design. The propulsion is still the same, with the tail section moving in horizontal direction using a servo. The steering in this second design can be done in two ways. One option is using the same steering mechanism as used in the first sketch, by using the side fins. The second method is to steer by deforming the balloon using the frame. Thin wires are run through holes in the frame section from beginning to end. By pulling on these wires, the body will deform and the nose will bend in the direction it wants to move. Due to a change of airflow alongside of the shark, a resulting force will push the shark's body in the right direction. The second sketch is shown in figure (2). A problem with this sketch is that the weight of the total frame construction might be to heavy for the helium filled balloon to keep the shark neutrally buoyant.<br> | |||
<br> | |||
Using the ideas of the brainstorms sessions, the several parts of the shark can now be designed using both paper as well as a 3D CAD-design. But first needs to be determined how much weight the helium can lift.<br> | |||
=== Helium === | === Helium === | ||
== | The shark will float through the air by using helium. To determine how much helium is needed to make the shark neutrally buoyant [http://en.wikipedia.org/wiki/Buoyancy Archimedes’ principle] is used. This principle states that any object, wholly or partially immersed in a fluid, is buoyed up by a force equal to the weight of the fluid displaced by the object. In the following section a relationship between the mass of the shark and the volume of the balloon needed is derived. Following Archimedes' principle, the upward lift is defined in equation (1). <br> | ||
<br> | |||
<center><math> F_a = \rho_{air} \cdot g \cdot V \qquad (1)</math> </center><br> | |||
The whole shark will have a certain weight which results in a gravitational force. The total amount of gravitational force is given in equation (2).<br> | |||
<br> | |||
<center><math>F_z = M \cdot g = (M_{shark} + M_{helium} ) \cdot g = (M_{shark} + \rho_{helium} \cdot V) \cdot g \qquad (2)</math></center><br> | |||
To make the shark neutrally buoyant the force from the upward lift has to be equal to the force applied by gravity, which is displayed in equation (3). If the upward lift equals the gravitational force, no net force in vertical direction will be present. <br> | |||
Substituting the terms from equation (1) and (2) in to equation (3), a relation between the mass of the shark and the amount of helium needed can be derived. This relation is given in equation (5).<br> | |||
<br> | |||
<center><math> F_a = F_z \qquad (3)</math> <br><br> | |||
<math> \rho_{air} \cdot g \cdot V = (M_{shark} + \rho_{helium} \cdot V) \cdot g \qquad (4)</math><br><br> | |||
<math> M_{shark} = (\rho_{air} - \rho_{helium} ) \cdot V \qquad (5)</math><br><br> | |||
With: <math>\qquad \rho = \frac {MP}{RT} \qquad (6)</math></center><br> | |||
In equation (6) M is the molar mass, P is the pressure, R is the universal gas constant, and T is the absolute temperature. If the assumption is made that the temperature is equal to 293K and the pressure is 1 bar, the density of air is, according to equation (6), equal to 1,204 kg per cubic meter. At the same conditions the density of helium is 0,1787 kg per cubic meter. Using these values for the densities of air and helium, 1 cubic meter of helium can make approximately 1 kg neutrally buoyant. | |||
Using equation (5), the size of the balloon needed to make the shark neutrally buoyant can be determined. | |||
=== | === Construction Material === | ||
From the previous section the conclusion can be drawn that the shark should be as light as possible. This has some consequences for the material that is used for the frame sections and the balloon that contains the helium. The choice on what kind of material to use for what part is derived from the documents Festo provided about their products. For the balloon the aluminum metalized PET-foil will be used, which is much lighter than the rubber foil that is used for normal balloons. This PET-foil has a specific mass of 32 grams per square meter. Also, because of the aluminum metalization process, the balloon will be more gas tight than a normal balloon. The PET-foil also does not stretch out when being inflated. This is an advantage because the shapes of the balloons can now be made from the foil in real size, without having to take the change of shape and size due to inflation into account.<br> | |||
The material used for the frame sections is carbon fiber. The combination of strength and low weight makes this the best material to use. Because the strength of the carbon fiber is very high, the thickness of the material can be kept low. Other materials like MDF actually have smaller densities than the carbon fiber, but due to its lack of strength the thickness of these kind of materials and thus the actual weight will be higher.<br> | |||
Other components like the servos and batteries will be chosen when the construction of the balloon is completed. The weight of these components will have to be kept as low as possible. To make sure the shark stays neutrally buoyant, a larger balloon than initially intended will have to be designed. | |||
== | == Tail Section == | ||
[[File:Rear.jpg|300px|thumb|right|Figure (3): Rear Section Sketch]] | |||
[[File:TaleAssembly1.jpg|250px|thumb|right|Figure (4): 3D CAD-design]] | |||
[[File:ProtoTail1.jpg|250px|thumb|right|Figure (5): Tail Section Prototype]] | |||
[[File:ProtoTail2.jpg|250px|thumb|right|Figure (6): Tail Bending Test]] | |||
In this section the tail section of the shark is designed and tested. The design phase is pointed out and a prototype has been build. The results of the test are also discussed.<br> | |||
=== Tail Section Design === | |||
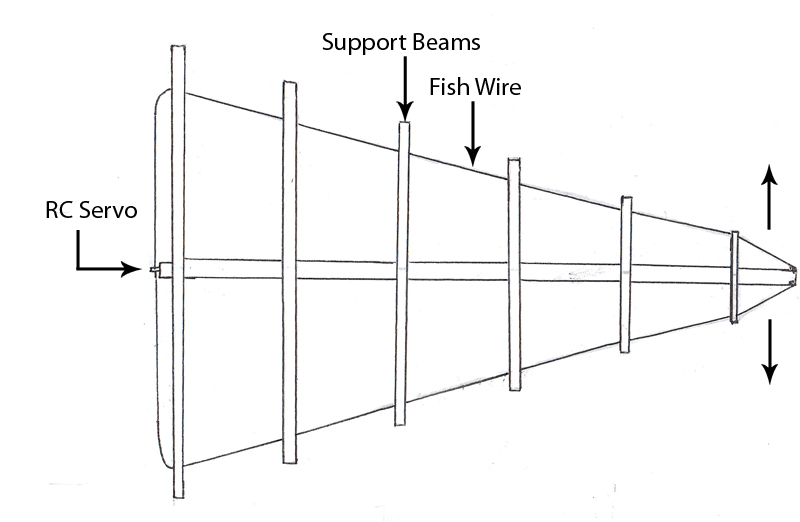
The first part of the shark that is designed, is the tail section of the shark. This part will function as the propulsion of the fish. In figure (3) the sketch of the rear section is shown. At the right side of the sketch the tail fin will be attached, and the left part of the sketch will be attached to the body of the shark. By studying the movement of a shark, the part that actually moves of the shark's tale is the part between the tail fin and the body section. This part makes a horizontal translation by moving sideways. To model this into my prototype, a flexible rod in the center will be used as the backbone of the tail section. On this flexible rod several support beams are mounted to define the shape of the tail section and to guide the fish wire that is used. The fish wire is used to obtain the needed deformation of the center flexible rod. The fish wire is connected to the tip of the flexible rod and is run through the support beams to the RC servo that is mounted at the start of the flexible rod. If pulled on one end of the fish wire, the flexible rod will deform in such a way that it will bend in the direction of the side where the force is applied. If the force is applied first on one side and, after the desired deformation is acquired, on the other side and this is repeated every time, it will result in the desired movement of the tail section. Using this method the horizontal translation that is needed for the proper propulsion of the shark is obtained. <br> | |||
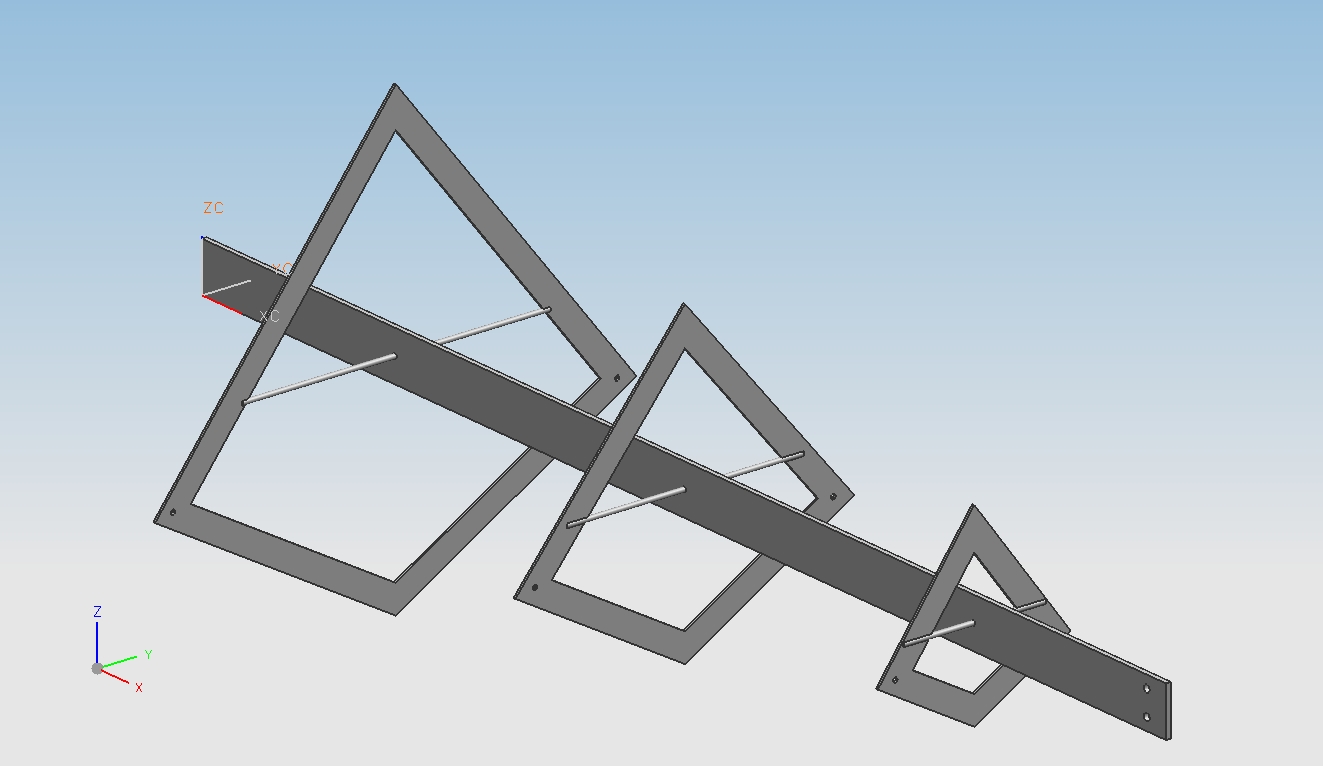
Next to a sketch of this idea, a 3D CAD-design has also been made. This design is show in figure (4). In this design only three support beams are used, this will give enough shape definition throughout the length of the tail section. Using only three sections will also make sure the design stays light weighted. Adding more support beams will add a lot of mass to the shark. The 3D CAD-design will be used to make the prototype of this section. Next to that it can also be used to calculate the weight of different parts involved in the design. The weight will be important when the balloon is designed and the helium will have to lift the tail section. <br> | |||
=== Tail Section Prototype === | === Tail Section Prototype === | ||
After the designing phase, a prototype has been build. The flexible rod is a part of flexible plastic | After the designing phase, a prototype has been build. The flexible rod is a part of flexible plastic with a length of 50cm. The support beams are made out of MDF. Using the dimensions from the 3D-CAD design the representation of the support beams are the same as those in the model. Small holes have been drilled into these beams to allow the fish wire to run through it. Afterwards the prototype is assembled using a two component adhesive and skewers. When applying force to these wires the tale of the shark bends as required. The prototype and the bending of the tail can be seen in figures (5) and (6). Testing of this prototype was successful. The desired movement of the tails section is achieved and the weight is kept low. Thus this prototype can be used in the actual helium filled shark. It is clear that the material used in this prototype is not the same as the material that will be used in the final prototype. During the different tests on the prototype, it turned out to be fragile. Several pieces of duck tape are used to ensure the prototype does not fall apart. | ||
== Body Section == | |||
The body section has been changed a lot during the design process. Several ideas were tested and compared on weight and feasibility with respect to the actual prototype building. Each different design will be discussed, one more briefly than the other, according to the time spent on the design. | |||
=== Steering Using Fins === | |||
The first design consisted of a large shark-shaped balloon as body section. Through this body runs a tube that connects both side fins. Using a servo the tube can be rotated and so are the fins. By rotating the fins, the shark can move up and down. The fins will function like [http://en.wikipedia.org/wiki/Lift_(force) airplane wings], if one side is turned upwards and thus the other side is going down, a lift force on the top or bottom will be generated moving the shark either up or down. So by changing the angle of attack of the side fin, different kinds of lift can be generated. The second feature of the fins is the movement of the tip. A servo is build in to make the tip of the fin move up or down. If one tip of the shark is moved up and the tip of the other fin is pointing down, the shark should be able to turn left or right. But this method needs to be tested. <br> | |||
This design might not be the most efficient design there is. The first downside of this design is the complexity of the fins. To make sure the fins can move in each direction, at least three servos are needed. This adds a lot of weight to the shark. Next to that, creating a tube that runs through a gas tight balloon is hard. But one of the most important downsides is that this design does not represent the real movement of a shark. When different videos of sharks are analyzed, it is clear that a shark moves up and down, left and right by turning its torso in the direction it wants to go. The side fins function only as stabilizers and improve the aerodynamics of the shark.<br> | |||
A new design needs to be created that uses the deformation of the torso to make steering of the shark possible.<br> | |||
=== Steering Using Frame === | |||
[[File:BendingBalloon.jpg|250px|thumb|right|Figure (7): Bending Of The Balloon]] | |||
[[File:Prototype1.jpg|250px|thumb|right|Figure (8): First Frame Design]] | |||
[[File:Prototype2.jpg|250px|thumb|right|Figure (9): Second Frame Design]] | |||
[[File:Body1.jpg|250px|thumb|right|Figure (10): First Body Design]] | |||
[[File:Shark.jpg|250px|thumb|right|Figure (11): Complete Shark Assembly]] | |||
[[File:BodyProto1.jpg|250px|thumb|right|Figure (12): Body Section Prototype]] | |||
[[File:BodyProto2.jpg|250px|thumb|right|Figure (13): Body Section Protoype]] | |||
The previous design was not the desired design that is needed to make a realistic representation of the shark. Therefore a different approach is used. Not the side fins are used to make steering possible, but the whole torso section is used. <br> | |||
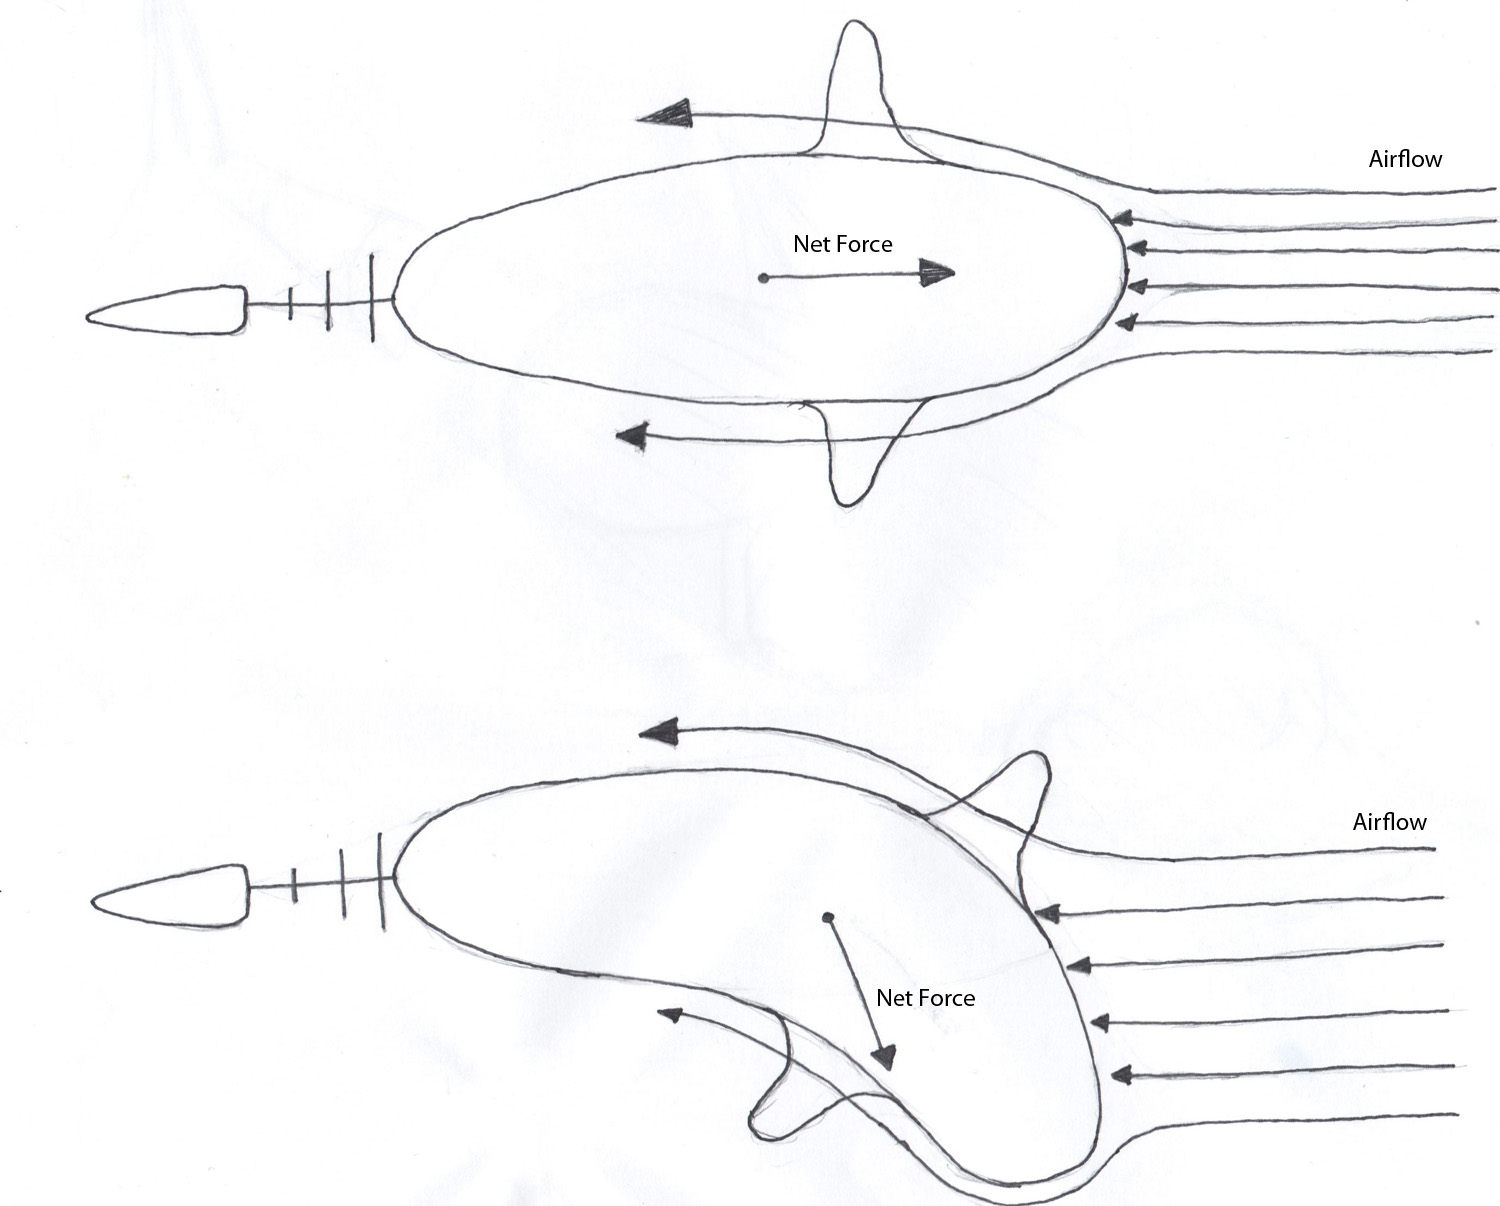
The main part of the body section is the balloon. The balloon will be a large sack which is based on cone shapes to make production more efficient and simplistic. Around this balloon several frame parts are added to provide the distinctive shape of the shark. Through these parts four fish wires will run to make deformation possible. One wire will run over the top of the shark, one over the bottom and one on each side of the shark. The deformation principle is similar to the one used with the tale section. By making the rod shorter on one side and longer on the opposite side, the balloon deforms. If for instance the fish wire on the right side is made shorter and thus the one on the left side is made longer, the nose of the shark will move to the right. Due to this deformation of the sharks body section, the airflow around it will change also. In this case, the pressure on the left side of the shark will be higher than the pressure on the right side of the shark. A net force resulting from this pressure difference will push the shark in the direction the nose is pointing to. Once the desired turn is achieved, the wires are brought back to their original length and the shark will move in a straight horizontal line again. A schematically representation of the bending of the balloon is given in figure (7). The top image gives the shark in normal state. The airflow hits the nose op the shark and produces a drag force straight onto the shark. In the bottom image the balloon is bend. The airflow now hits the side of the shark forcing it to go into another direction. By letting the shark change direction using the deformation of the body, the realistic representation is achieved. Following up on this theoretical idea, an 3D CAD-model is made. <br> | |||
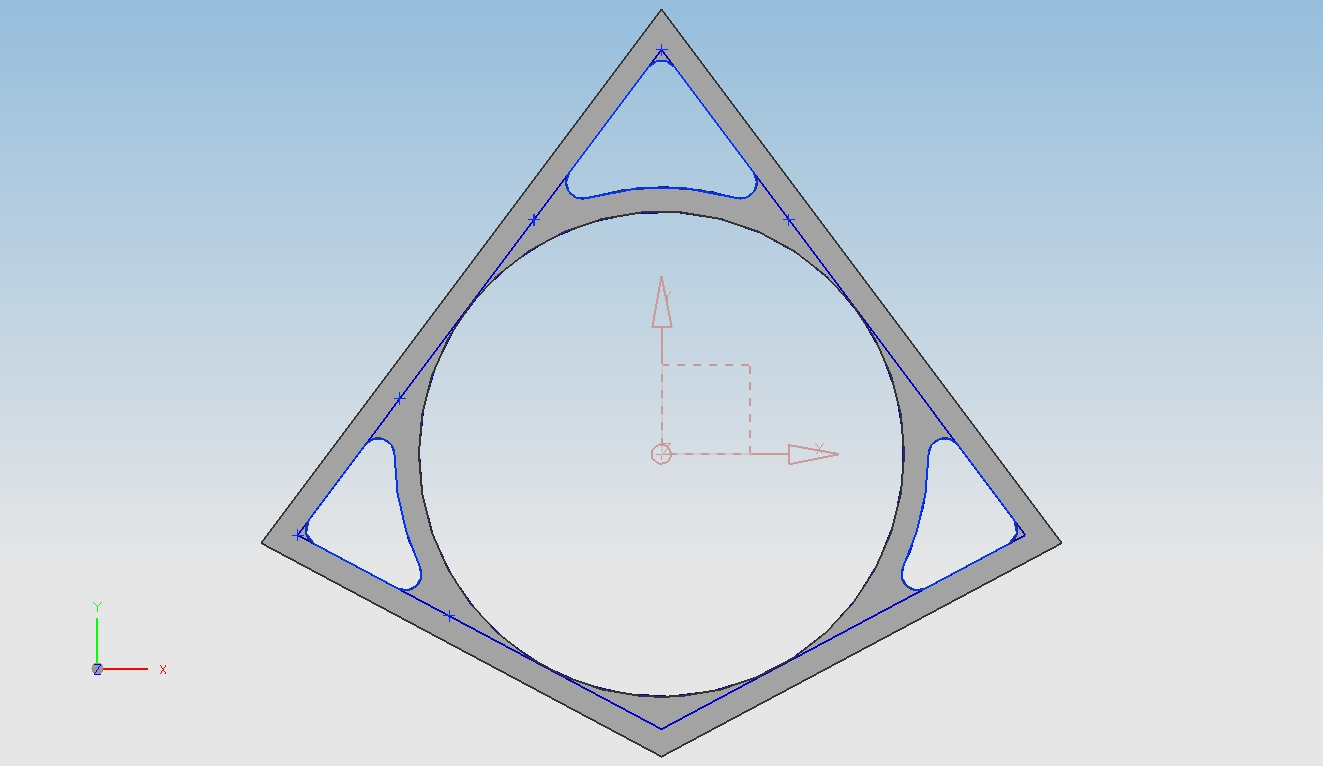
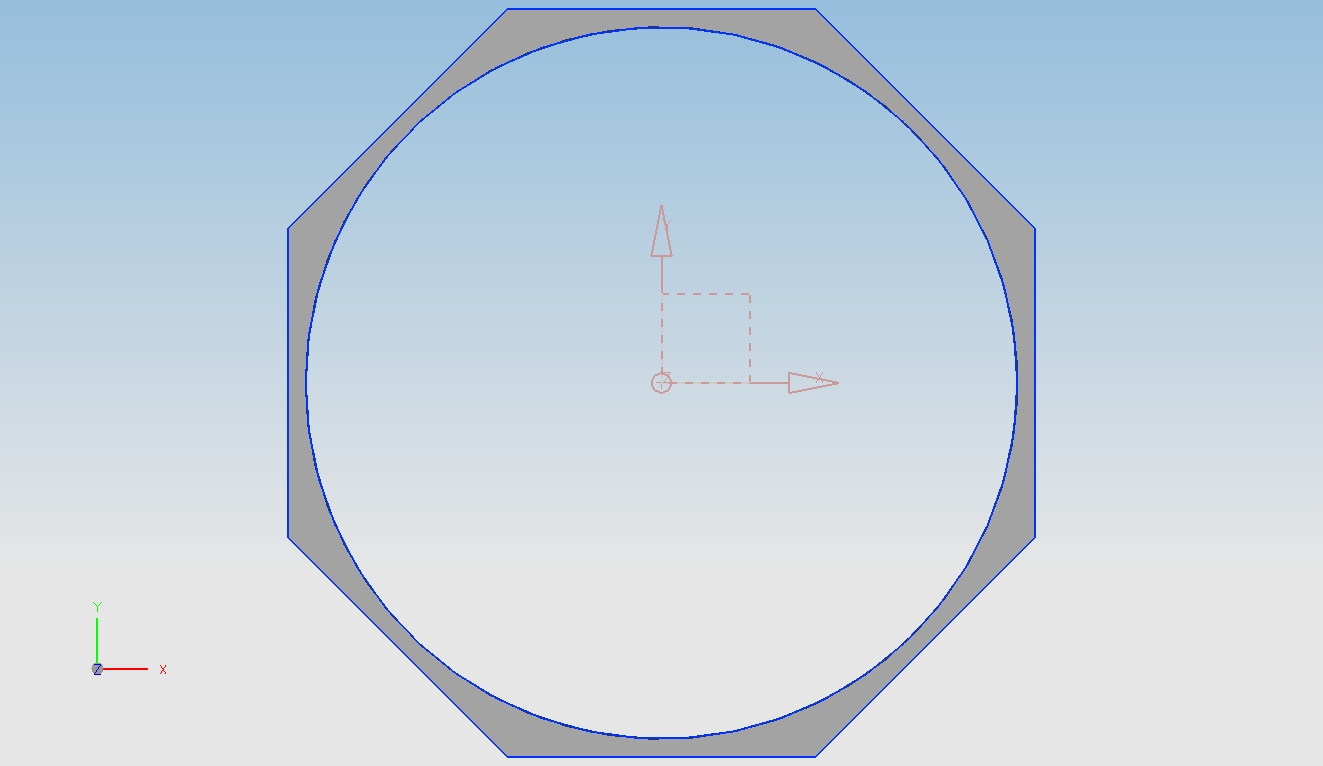
The first design of the frame part is shown in figure (8). A lot of material is still present at the side, which would define the shape of the body. Because there is so much material needed to make the frame design, the weight of the total structure is high. Using the design as in figure (8), the weight of the biggest frame section, the one in the middle of the body with an inner radius of 300mm, is 195 grams. In this case carbon fiber as material for the frame is used, with a density of 1600 grams per cubic meter. The thickness of the frame part of only 1 mm. With the weight of 195 grams, 0,195 cubic meters of helium is needed to make this frame part neutrally buoyant. This corresponds with a length of a balloon, with a radius of 300mm, of almost 70cm. And this is just to make this part neutrally buoyant, if it also has to make batteries, servos and other things neutrally buoyant, extra length needs to be added. Taking this into account, very few frame sections can be added because of their weight or the balloon will have to be much larger to carry all the weight. Therefore the weight of each frame section needs to be lowered.<br> | |||
For this reason, a redesign of the frame section is done. When taking a closer look at the body of a shark, it does not need to have four distinctive sides like modeled in the previous section. It can also be modeled using eight sides. An advantage of this design is that the borders can be thinner, thereby reducing the weight. With the new design, shown in figure (9), the weight is about 75 grams. This also involves using carbon fiber, with an inner radius of 300mm and a thickness of 1mm. The length of the balloon needed to make the frame part neutrally buoyant is now 27cm. This design saves a lot of weight compared to the first design, while still preserving the shape of the shark. Now all of the different frame parts can be designed, as well as the balloon that will contain the helium. With these parts a model of the body section is made.<br> | |||
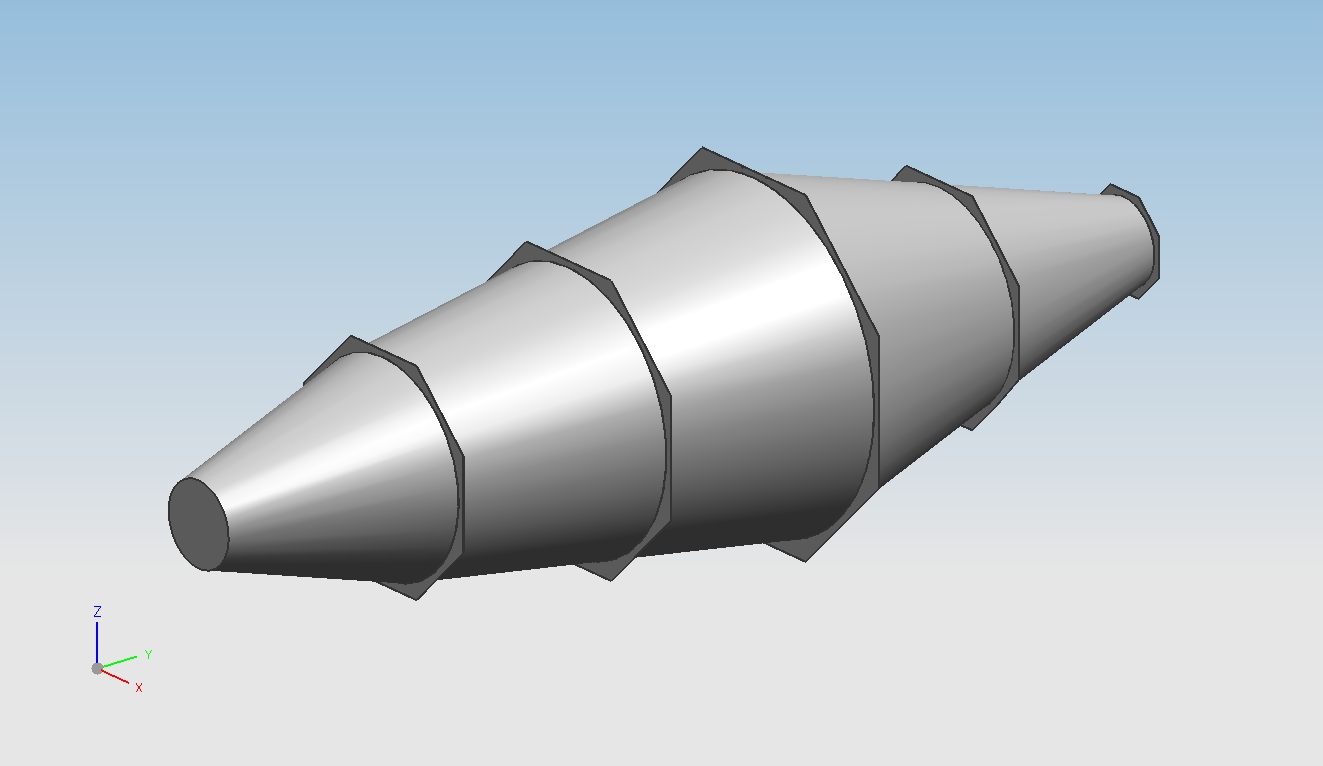
The model of the body section can be seen in figure (10). The model consists of five frame sections. The distance between each section is 50cm. This provides enough volume for the balloon to create enough lift force. The balloon can now hold more than just the frame sections, which is essential as other parts will be added. In each frame section four holes are drilled to guide the fish wire through it. Now the body section is completed, other parts can be added to make the 3D-model complete.<br> | |||
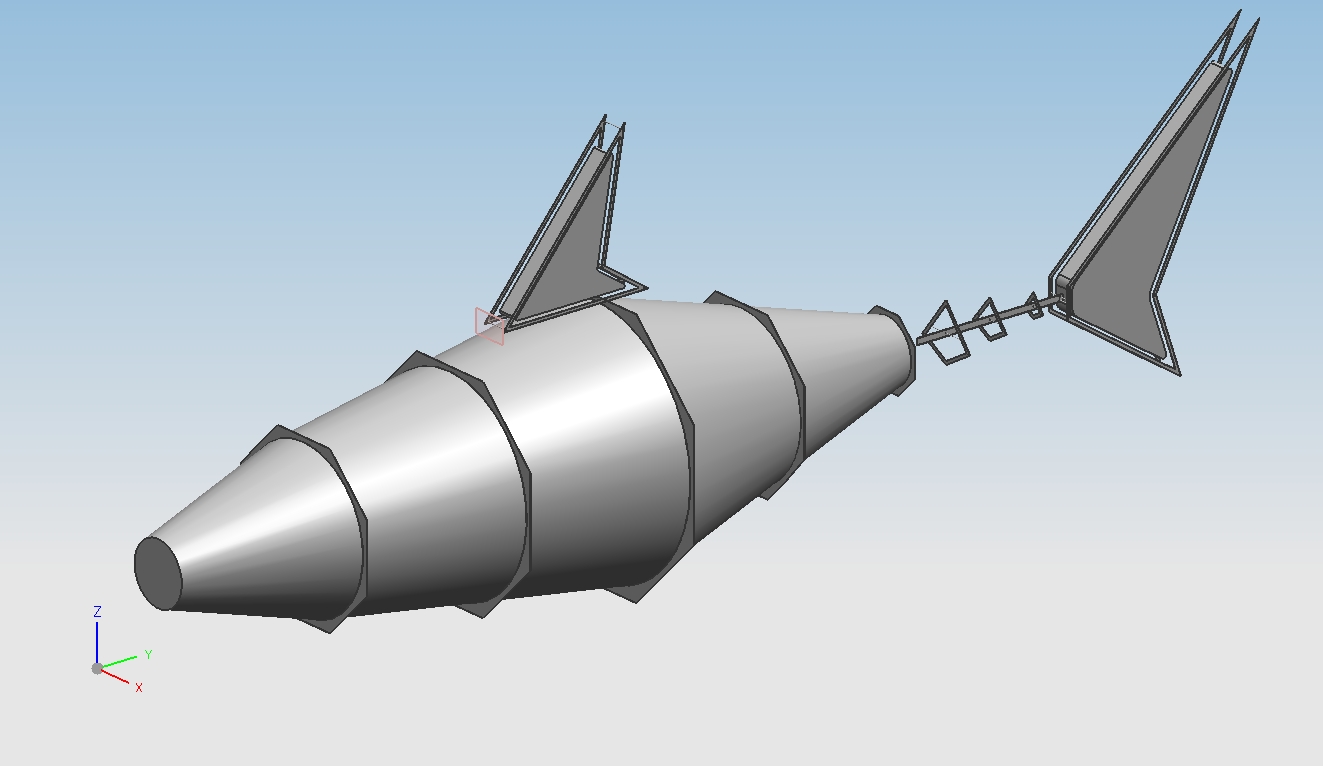
In figure (10) all of the other segments of the shark are added. This completes the 3D CAD-design of the shark. The top fin and the tail fin are made out of a separate frame that can be attached to the main body parts. Inside these frame parts, extra balloons are added to provide more volume for the helium. Table (1) will give a clear overview of the volume that is available for helium when the balloon design in figure (10) is used. The total volume is 0.6234 m<sup>3</sup>, and thus the total weight of the whole shark has to be equal to this weight to make the whole shark neutrally buoyant. When the parts are added as in figure (10), table (2) provides the weights of the several frame sections. Subtracting the total of table (2) from table (1) gives the remaining amount of weight that can be added to the shark. This remaining amount will be used to provide the shark with the servos, batteries and control units. From the tables can be derived that the remaining amount of weight is equal to 116 grams. | |||
<br> | |||
{| border="1" align="center" | |||
|- | |||
! width="150px" | Part | |||
! width="100px" | Volume (m<sup>3</sup>) | |||
|+ Table (1). Parts and volume | |||
|- | |||
| Body Section Balloon | |||
| align="center" | 0.6101 | |||
|- | |||
| Top Fin Balloon | |||
| align="center" | 0.0041 | |||
|- | |||
| Rear Fin Balloon | |||
| align="center" | 0.0092 | |||
|- | |||
| Total | |||
| align="center" | 0.6234 | |||
|} | |||
<br> | |||
{| border="1" align="center" | |||
|- | |||
! width="150px" | Part | |||
! width="100px" | Weight (kg) | |||
|+ Table (2). Parts and weights | |||
|- | |||
| Body Section Frame | |||
| align="center" | 0.32660 | |||
|- | |||
| Top Fin Frame | |||
| align="center" | 0.05268 | |||
|- | |||
| Rear Fin Frame | |||
| align="center" | 0.07769 | |||
|- | |||
| Tail Section Frame | |||
| align="center" | 0.05014 | |||
|- | |||
| Total | |||
| align="center" | 0.50711 | |||
|} | |||
=== Prototype Steering Frame === | |||
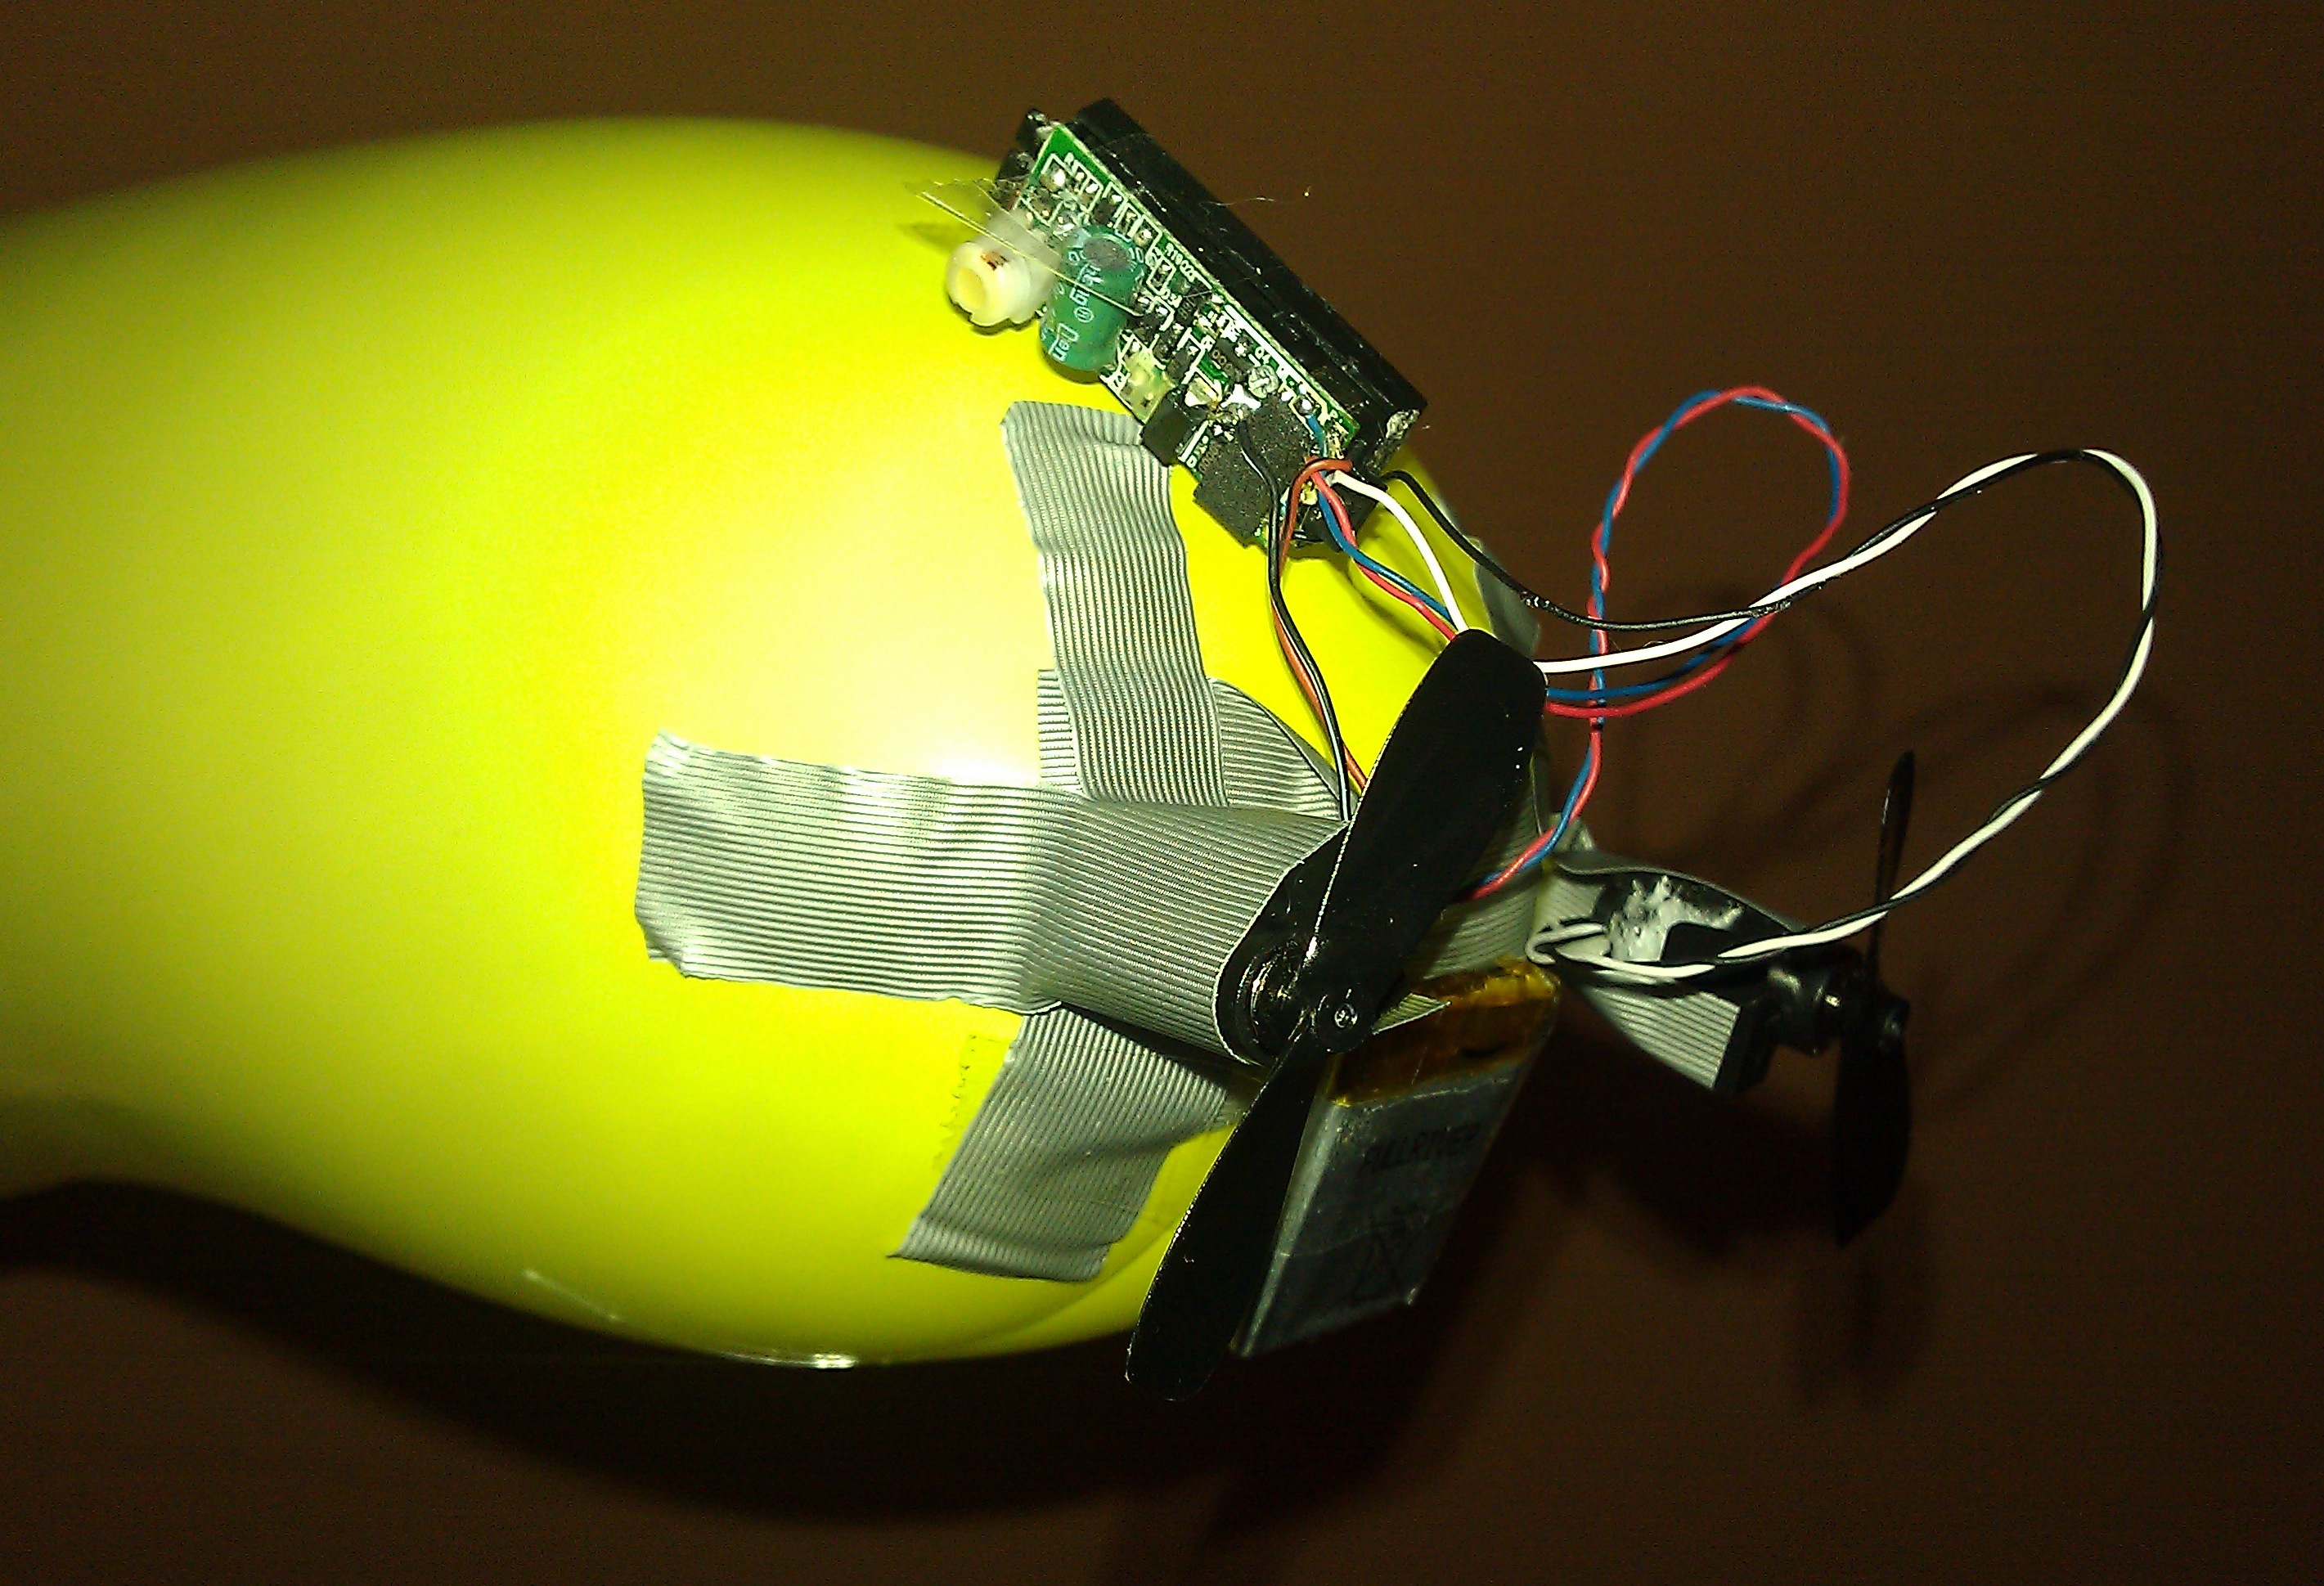
After the designing phase, the steering technique explained in the previous section needs to be tested. For this test a cylindrical balloon has been used to represent the body section of the shark. This balloon is bend in advance using some fish wire to predetermine the direction the balloon should go while in the air. The balloon itself is filled with helium. The propulsion is done by two propellers that come from a RC airplane. These are attached to the end of the balloon. Figures (11) and (12) show the prototype.<br> | |||
The test of this prototype did not go well. The propeller section is too heavy for the balloon and therefore it will not stay in the air by itself. Next to that, due to attaching the propellers at the end of the balloon, the center of gravity shifted from the center of the balloon towards the back. This causes the balloon to tilt with the propeller side pointing down. This causes the balloon to only travel in a vertical direction. During the test, the balloons started to spin around and it did not make the desired movement. A reason for this could be the propulsion system, if the propellers do not spin at the same speed the balloon will behave different. <br> | |||
So this test was not a success. Also the conclusion could be drawn that bending a balloon that is inflated and under surface tension requires more force than was expected. This might not be achievable using lightweight servos. This is the main goal of the design, letting the shark bend into the direction it wants to go is a good way of steering. The fact that the bending of one balloon is hard to achieve, separate balloons are introduced. The design will have to be changed to make the bending of the body section more efficient. | |||
=== Separate Balloons === | |||
[[File:Balloons.jpg|250px|thumb|right|Figure (13): Sketch with separate balloons]] | |||
[[File:Body2.jpg|250px|thumb|right|Figure (14): Part of the 3D-model]] | |||
As can be concluded from the previous section, the body section of the shark is not flexible enough to deform in the desired way. Therefore a new design is made. In the previous section the helium is put into one big balloon. To improve flexibility the one big balloon is now separated into five balloons. Between the balloons a hinge is mounted. In figure (13) a sketch of the separate balloons is shown. <br> | |||
The frame around the balloons is not present anymore. Each frame section is replaced by four small rings that guide the fish wires that run over the body section to bend the balloon. The frame is not necessary anymore because the balloon itself will not bend anymore. The bending is achieved by the hinges which are ball and socket joints. Using these joints the five balloons can taken different positions with respect to each other.<br> | |||
Due to the fact that the frame is not present anymore in the new design, the shape of the shark has to be defined by the balloons itself. So instead of the balloon being conical, it will have a custom design. This gives two advantages: the weight of the frame is not present anymore, which saves according to the previous section at least 320 grams. Next to that, because the balloons are shaped as the shark itself, there is more volume available for the helium. With the conical balloon space is left unused, this is not the case with the custom shaped designs. So more volume is created and less weight is used. There are also disadvantages of this design. The custom shape of the balloons makes them hard to produce. This has to be done by hand. A 3D-model is made to get a representation of the separate balloons and its volume. A part of this model can be seen in figure (14). Analyzing this part proofs that the volume has increased due to usage of the space. The volume of the nose part of the shark has increased from 0.051 m<sup>3</sup> to 0.114 m<sup>3</sup>. Due to lack of time, the 3D-model could not be completed. The decision was made that a working prototype of the shark was more important than perfecting this 3D-model. | |||
== Final Prototype == | |||
The first body section prototype did not work the way it should be. The decision was made that a real life prototype is now the best option. The body section prototype turned out to be too small to make the balloon and all attachments neutrally buoyant. Also to try the new separate balloon design, a full scale prototype is more efficient to produce, because these balloons all have to be custom made. It will get expensive when first a small size prototype has to be built after which a full scale size also has to be made.<br> | |||
In the process a supplier for the construction material and a producer of the balloons needs to be found. The carbon fiber plates that will be used for the frame sections of the shark are available in a lot of places. Several websites offer these carbon fiber plates. The material for the balloons is a lot harder to obtain. The PET-foil is supplied from different Chinese factories, but they only offer an amount of square meters on a roll that is way to much for the prototype. | |||
<br> For the manufacturing of the balloons from the PET-foil, a design bureau was approached. This design bureau already had experience in design larger inflatable objects. [http://www.airdesign.nl Air Design] made several custom made objects like cows and ducks of over 3 meters high. At first they were very interested in the project. But after discussing the usage of the different material where the balloons need to be made of, it became harder for them to turn these ideas into reality. Air Design is used to work with the heavy thick rubber material in combination with a separate air blower. They never made a gas tight balloon designed to contain helium before. Due to several other projects the bureau had running and the whole new concept of balloon design, they decided to not produce these products.<br> | |||
The idea also came to mind to fabricate the balloons ourselves. The several sections will be made out of a styrofoam block that has been sanded into the proper shape of these sections. The PET-foil then will be put over the blocks of styrofoam and the different pieces will be glued together. But for putting this method into action there just was not enough time anymore. The whole process of sanding and making sure the balloons are gas tight would take a couple of weeks. A basic prototype has to be made that will function as a proof of concept for the tail section and the lifting force of the helium. <br> | |||
But even this prototype became a problem. A more simple custom shaped balloon that consists of two sides that need to be glued together is cut out of the PET-foil. A problem with this design is that the balloon stays flat when inflated, minimizing the volume that the helium could use. But the big problem here was making the balloon gas tight. No matter how much effort there was put into making the two sides meet, gas would leak out of the balloon very quickly. After trying several times, also this prototype was terminated. So unfortunately no real prototype is made. | |||
== Conclusion == | |||
In the end, the project did not turn out the way I imagined. The goal was to make an autonomously flying shark, but I ended up with a few prototypes of sections of the shark. The first thing that was dropped out of this first goal was the autonomous flying. Adding all the software and controllers would be a project by itself. What I did learn from the whole project was that it is hard to find reliable resources for your materials and for producing the separate balloons. Eventually it was a big disappointment that after the whole effort of finding a decent design bureau for the balloons, the actual prototype of the separate balloons was not realized. The size of the project has been misjudged and the goals were set too high at the beginning of the project. During the project the goals were adapted according to the time spent on the project and the achievability of the several prototype designs.<br> | |||
Although no real prototype of the whole shark was made, the whole process from brainstorming to finding suppliers and design bureaus has been very educational. I wish the prototype would have been better, but due to unforeseen complications the project did not develop any further as described in the previous sections. <br> | |||
As for the future work on this project, other design bureaus can be sought that could develop the prototype. The steering by using the separate balloons can be tested afterwards and conclusions can be drawn from those experiments. But to make this project reach its original goal, a lot of effort still needs to be spend on the design and implementing everything into different prototypes. If the original goal is reached, a realistic representation of the shark will be produced and it can be used in many promotional events to show people what the university is capable of. | |||
Latest revision as of 15:32, 2 August 2011
Project by Twan Haazen
Supervisor Rob Janssen
This wiki contains information about my Bachelor Final Project.
Introduction
After watching the video of Festo's AirPenguin and AirRay, I decided to do a similar project. An autonomously flying helium filled balloon is the goal of the project. What first needs to be decided is what the balloon will look like. A shark is a large and robust fish that has a good shape for making it into a balloon. Therefore project RoboShark is born. The goal of the project is to make a helium filled balloon that looks like a shark and can navigate by itself through the air.
The first couple of weeks consisted of brainstorm sessions. In these weeks loads of videos and articles were looked at. Several designs were drawn and thoughts about how to move the balloon came to mind. The most important parts of these brainstorm sessions are discussed in the following section. Next to that the lifting force of helium is calculated. The mathematical derivation is stated and analyzed. Also the construction material for the final product is discussed.
In the following section the design of the tail section is shown. After the brainstorm sessions this is the first part that is fully designed and prototyped. The process of sketching and model building is pointed out. The prototype is discussed and conclusions are drawn out of the tests.
The section thereafter is about the design of the body. This design is changed a lot overtime. Multiple variants are made and tested on there feasibility and realism. One of the designs is turned into a prototype and tested. Improvements on this prototype and its original design follow after the testing period.
In the last section the final prototype is pointed out. The problems in developing the components of the shark are stated. During this process contact is made with a design bureau and some suppliers of the raw material. After discussing the actual final prototype, future work on the project and the main conclusion about the whole project is given. In this section solutions to the main problems of the project are given and possible follow up projects are stated.
Pre-Design Research
In this section two things are discussed. First the most important parts of the brainstorm sessions are pointed out. Some basic design problems are stated and taken into account. The second part is about helium. Because the balloon of the shark will be filled with helium, it is important to know what amount of weight the helium can actually lift. The mathematical derivation is discussed and the relation between weight and amount of helium needed is stated.
Brainstorm Sessions
After the decision was made to base the design on the shape of a shark, the actual brainstorm sessions began. The most important parts of these brainstorm sessions will be discussed here.
The first thing that came to mind, was to search for as much information as possible about projects that did about the same as I was planning to do. When discussing the assignment, the German company Festo had some interesting videos and projects about helium filled balloons. The Air Penguin is an autonomously flying penguin that communicates with other penguins in the air. The Air Penguin makes sure it does not hit any walls or obstacles by using ultrasound to pinpoint its location. The Air Ray is a remote controlled helium filled balloon that imitates the smooth swimming behavior of a manta ray. Both these projects are closely related to the product I would like to produce. By exploring the website of Festo and contacting the people that worked on these projects, I tried to get as much information as possible to get a clear vision on how to design my shark.
Festo supplied me with some promotion flyers about these two projects. In these flyers a short description was given of the products and what pushed Festo to develop them. One of the first things that can be concluded from of both of these projects is that the construction has to be very light. The Air Penguin, with a length of 4 meters and a maximum diameter of 80 centimeters, had a total weight of only 1 kg. This requires well use of construction material and space.
After studying the designs of Festo, the first sketch of the prototype is drawn. The first idea consists of a large balloon filled with helium, produced in the shape of a shark's body. Onto this large sack the several components of the shark are attached. The tail section is made out of several thin rods which will be moved in horizontal direction by a servo. This part will function as the propulsion of the shark. With the side fins the shark can turn and move up and down. The fins can be rotated and the tips can be moved up and down to make steering possible. Next to that the top fin can also be used like a rudder to enhance the steering procedure. The fin can be rotated around it's vertical axis, hereby producing drag at one side of the body, resulting into a yaw in that direction. The first sketch is shown in figure (1).
In the second sketch the design has changed. To make the structure more rigid and to keep the shape better defined a frame is added. The tail section consists of a frame section instead of only 4 single rods as in the previous design. The propulsion is still the same, with the tail section moving in horizontal direction using a servo. The steering in this second design can be done in two ways. One option is using the same steering mechanism as used in the first sketch, by using the side fins. The second method is to steer by deforming the balloon using the frame. Thin wires are run through holes in the frame section from beginning to end. By pulling on these wires, the body will deform and the nose will bend in the direction it wants to move. Due to a change of airflow alongside of the shark, a resulting force will push the shark's body in the right direction. The second sketch is shown in figure (2). A problem with this sketch is that the weight of the total frame construction might be to heavy for the helium filled balloon to keep the shark neutrally buoyant.
Using the ideas of the brainstorms sessions, the several parts of the shark can now be designed using both paper as well as a 3D CAD-design. But first needs to be determined how much weight the helium can lift.
Helium
The shark will float through the air by using helium. To determine how much helium is needed to make the shark neutrally buoyant Archimedes’ principle is used. This principle states that any object, wholly or partially immersed in a fluid, is buoyed up by a force equal to the weight of the fluid displaced by the object. In the following section a relationship between the mass of the shark and the volume of the balloon needed is derived. Following Archimedes' principle, the upward lift is defined in equation (1).
The whole shark will have a certain weight which results in a gravitational force. The total amount of gravitational force is given in equation (2).
To make the shark neutrally buoyant the force from the upward lift has to be equal to the force applied by gravity, which is displayed in equation (3). If the upward lift equals the gravitational force, no net force in vertical direction will be present.
Substituting the terms from equation (1) and (2) in to equation (3), a relation between the mass of the shark and the amount of helium needed can be derived. This relation is given in equation (5).
[math]\displaystyle{ \rho_{air} \cdot g \cdot V = (M_{shark} + \rho_{helium} \cdot V) \cdot g \qquad (4) }[/math]
[math]\displaystyle{ M_{shark} = (\rho_{air} - \rho_{helium} ) \cdot V \qquad (5) }[/math]
In equation (6) M is the molar mass, P is the pressure, R is the universal gas constant, and T is the absolute temperature. If the assumption is made that the temperature is equal to 293K and the pressure is 1 bar, the density of air is, according to equation (6), equal to 1,204 kg per cubic meter. At the same conditions the density of helium is 0,1787 kg per cubic meter. Using these values for the densities of air and helium, 1 cubic meter of helium can make approximately 1 kg neutrally buoyant. Using equation (5), the size of the balloon needed to make the shark neutrally buoyant can be determined.
Construction Material
From the previous section the conclusion can be drawn that the shark should be as light as possible. This has some consequences for the material that is used for the frame sections and the balloon that contains the helium. The choice on what kind of material to use for what part is derived from the documents Festo provided about their products. For the balloon the aluminum metalized PET-foil will be used, which is much lighter than the rubber foil that is used for normal balloons. This PET-foil has a specific mass of 32 grams per square meter. Also, because of the aluminum metalization process, the balloon will be more gas tight than a normal balloon. The PET-foil also does not stretch out when being inflated. This is an advantage because the shapes of the balloons can now be made from the foil in real size, without having to take the change of shape and size due to inflation into account.
The material used for the frame sections is carbon fiber. The combination of strength and low weight makes this the best material to use. Because the strength of the carbon fiber is very high, the thickness of the material can be kept low. Other materials like MDF actually have smaller densities than the carbon fiber, but due to its lack of strength the thickness of these kind of materials and thus the actual weight will be higher.
Other components like the servos and batteries will be chosen when the construction of the balloon is completed. The weight of these components will have to be kept as low as possible. To make sure the shark stays neutrally buoyant, a larger balloon than initially intended will have to be designed.
Tail Section
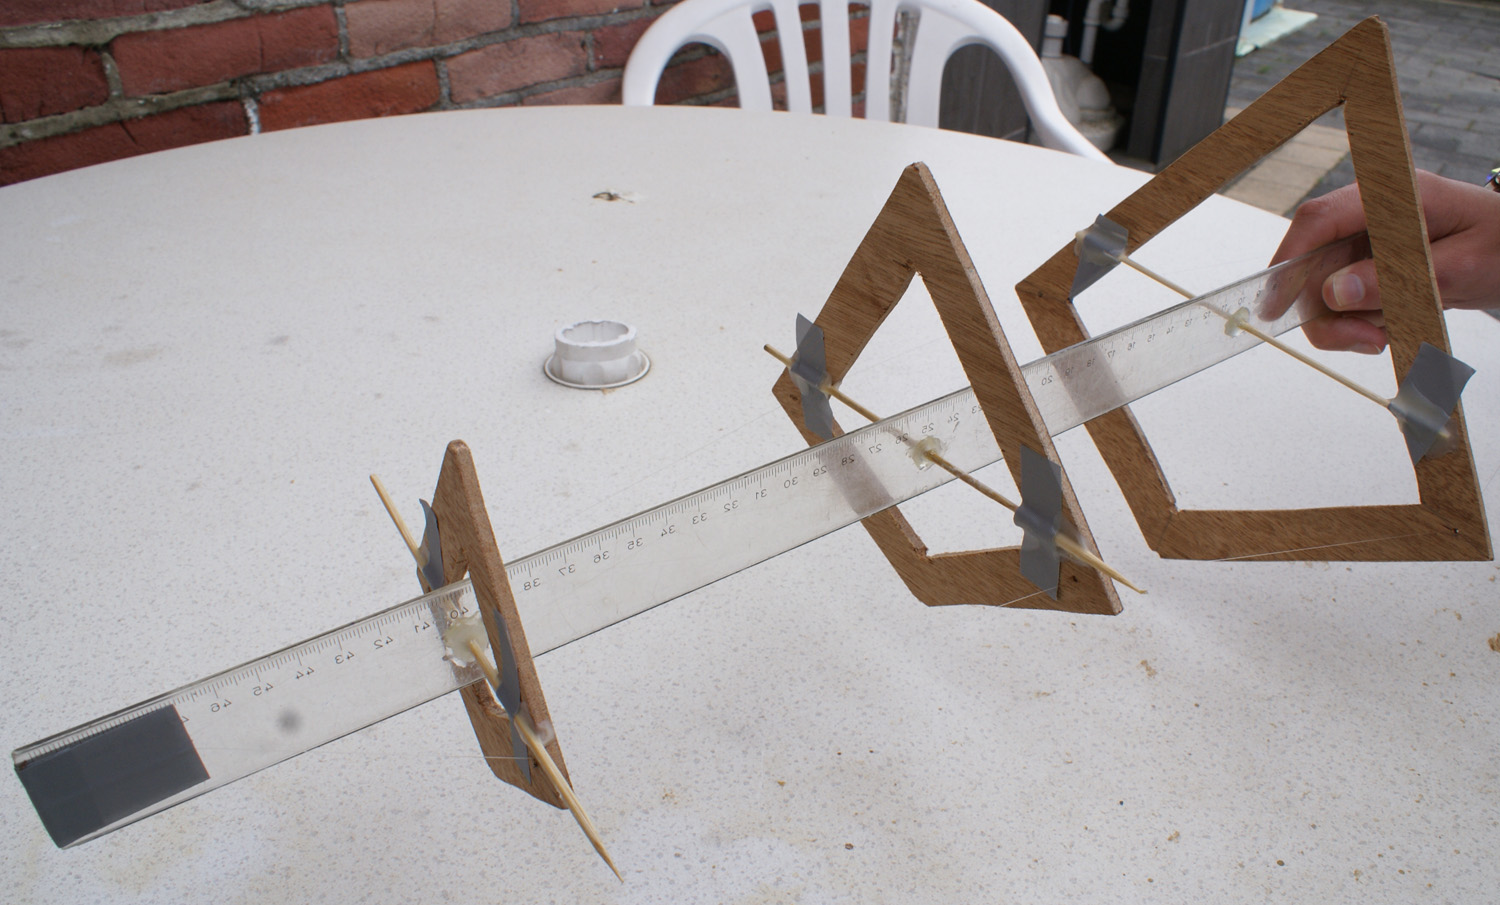
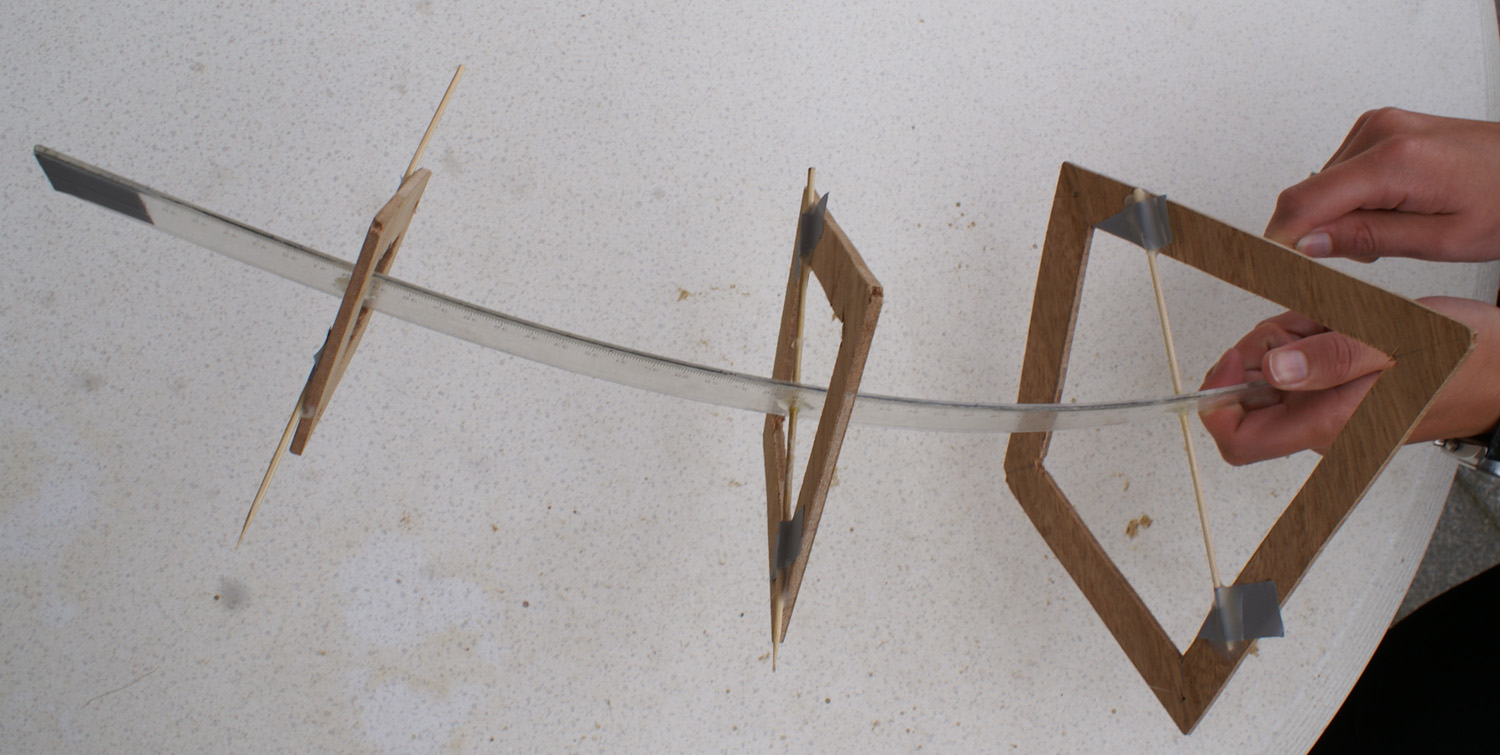
In this section the tail section of the shark is designed and tested. The design phase is pointed out and a prototype has been build. The results of the test are also discussed.
Tail Section Design
The first part of the shark that is designed, is the tail section of the shark. This part will function as the propulsion of the fish. In figure (3) the sketch of the rear section is shown. At the right side of the sketch the tail fin will be attached, and the left part of the sketch will be attached to the body of the shark. By studying the movement of a shark, the part that actually moves of the shark's tale is the part between the tail fin and the body section. This part makes a horizontal translation by moving sideways. To model this into my prototype, a flexible rod in the center will be used as the backbone of the tail section. On this flexible rod several support beams are mounted to define the shape of the tail section and to guide the fish wire that is used. The fish wire is used to obtain the needed deformation of the center flexible rod. The fish wire is connected to the tip of the flexible rod and is run through the support beams to the RC servo that is mounted at the start of the flexible rod. If pulled on one end of the fish wire, the flexible rod will deform in such a way that it will bend in the direction of the side where the force is applied. If the force is applied first on one side and, after the desired deformation is acquired, on the other side and this is repeated every time, it will result in the desired movement of the tail section. Using this method the horizontal translation that is needed for the proper propulsion of the shark is obtained.
Next to a sketch of this idea, a 3D CAD-design has also been made. This design is show in figure (4). In this design only three support beams are used, this will give enough shape definition throughout the length of the tail section. Using only three sections will also make sure the design stays light weighted. Adding more support beams will add a lot of mass to the shark. The 3D CAD-design will be used to make the prototype of this section. Next to that it can also be used to calculate the weight of different parts involved in the design. The weight will be important when the balloon is designed and the helium will have to lift the tail section.
Tail Section Prototype
After the designing phase, a prototype has been build. The flexible rod is a part of flexible plastic with a length of 50cm. The support beams are made out of MDF. Using the dimensions from the 3D-CAD design the representation of the support beams are the same as those in the model. Small holes have been drilled into these beams to allow the fish wire to run through it. Afterwards the prototype is assembled using a two component adhesive and skewers. When applying force to these wires the tale of the shark bends as required. The prototype and the bending of the tail can be seen in figures (5) and (6). Testing of this prototype was successful. The desired movement of the tails section is achieved and the weight is kept low. Thus this prototype can be used in the actual helium filled shark. It is clear that the material used in this prototype is not the same as the material that will be used in the final prototype. During the different tests on the prototype, it turned out to be fragile. Several pieces of duck tape are used to ensure the prototype does not fall apart.
Body Section
The body section has been changed a lot during the design process. Several ideas were tested and compared on weight and feasibility with respect to the actual prototype building. Each different design will be discussed, one more briefly than the other, according to the time spent on the design.
Steering Using Fins
The first design consisted of a large shark-shaped balloon as body section. Through this body runs a tube that connects both side fins. Using a servo the tube can be rotated and so are the fins. By rotating the fins, the shark can move up and down. The fins will function like airplane wings, if one side is turned upwards and thus the other side is going down, a lift force on the top or bottom will be generated moving the shark either up or down. So by changing the angle of attack of the side fin, different kinds of lift can be generated. The second feature of the fins is the movement of the tip. A servo is build in to make the tip of the fin move up or down. If one tip of the shark is moved up and the tip of the other fin is pointing down, the shark should be able to turn left or right. But this method needs to be tested.
This design might not be the most efficient design there is. The first downside of this design is the complexity of the fins. To make sure the fins can move in each direction, at least three servos are needed. This adds a lot of weight to the shark. Next to that, creating a tube that runs through a gas tight balloon is hard. But one of the most important downsides is that this design does not represent the real movement of a shark. When different videos of sharks are analyzed, it is clear that a shark moves up and down, left and right by turning its torso in the direction it wants to go. The side fins function only as stabilizers and improve the aerodynamics of the shark.
A new design needs to be created that uses the deformation of the torso to make steering of the shark possible.
Steering Using Frame
The previous design was not the desired design that is needed to make a realistic representation of the shark. Therefore a different approach is used. Not the side fins are used to make steering possible, but the whole torso section is used.
The main part of the body section is the balloon. The balloon will be a large sack which is based on cone shapes to make production more efficient and simplistic. Around this balloon several frame parts are added to provide the distinctive shape of the shark. Through these parts four fish wires will run to make deformation possible. One wire will run over the top of the shark, one over the bottom and one on each side of the shark. The deformation principle is similar to the one used with the tale section. By making the rod shorter on one side and longer on the opposite side, the balloon deforms. If for instance the fish wire on the right side is made shorter and thus the one on the left side is made longer, the nose of the shark will move to the right. Due to this deformation of the sharks body section, the airflow around it will change also. In this case, the pressure on the left side of the shark will be higher than the pressure on the right side of the shark. A net force resulting from this pressure difference will push the shark in the direction the nose is pointing to. Once the desired turn is achieved, the wires are brought back to their original length and the shark will move in a straight horizontal line again. A schematically representation of the bending of the balloon is given in figure (7). The top image gives the shark in normal state. The airflow hits the nose op the shark and produces a drag force straight onto the shark. In the bottom image the balloon is bend. The airflow now hits the side of the shark forcing it to go into another direction. By letting the shark change direction using the deformation of the body, the realistic representation is achieved. Following up on this theoretical idea, an 3D CAD-model is made.
The first design of the frame part is shown in figure (8). A lot of material is still present at the side, which would define the shape of the body. Because there is so much material needed to make the frame design, the weight of the total structure is high. Using the design as in figure (8), the weight of the biggest frame section, the one in the middle of the body with an inner radius of 300mm, is 195 grams. In this case carbon fiber as material for the frame is used, with a density of 1600 grams per cubic meter. The thickness of the frame part of only 1 mm. With the weight of 195 grams, 0,195 cubic meters of helium is needed to make this frame part neutrally buoyant. This corresponds with a length of a balloon, with a radius of 300mm, of almost 70cm. And this is just to make this part neutrally buoyant, if it also has to make batteries, servos and other things neutrally buoyant, extra length needs to be added. Taking this into account, very few frame sections can be added because of their weight or the balloon will have to be much larger to carry all the weight. Therefore the weight of each frame section needs to be lowered.
For this reason, a redesign of the frame section is done. When taking a closer look at the body of a shark, it does not need to have four distinctive sides like modeled in the previous section. It can also be modeled using eight sides. An advantage of this design is that the borders can be thinner, thereby reducing the weight. With the new design, shown in figure (9), the weight is about 75 grams. This also involves using carbon fiber, with an inner radius of 300mm and a thickness of 1mm. The length of the balloon needed to make the frame part neutrally buoyant is now 27cm. This design saves a lot of weight compared to the first design, while still preserving the shape of the shark. Now all of the different frame parts can be designed, as well as the balloon that will contain the helium. With these parts a model of the body section is made.
The model of the body section can be seen in figure (10). The model consists of five frame sections. The distance between each section is 50cm. This provides enough volume for the balloon to create enough lift force. The balloon can now hold more than just the frame sections, which is essential as other parts will be added. In each frame section four holes are drilled to guide the fish wire through it. Now the body section is completed, other parts can be added to make the 3D-model complete.
In figure (10) all of the other segments of the shark are added. This completes the 3D CAD-design of the shark. The top fin and the tail fin are made out of a separate frame that can be attached to the main body parts. Inside these frame parts, extra balloons are added to provide more volume for the helium. Table (1) will give a clear overview of the volume that is available for helium when the balloon design in figure (10) is used. The total volume is 0.6234 m3, and thus the total weight of the whole shark has to be equal to this weight to make the whole shark neutrally buoyant. When the parts are added as in figure (10), table (2) provides the weights of the several frame sections. Subtracting the total of table (2) from table (1) gives the remaining amount of weight that can be added to the shark. This remaining amount will be used to provide the shark with the servos, batteries and control units. From the tables can be derived that the remaining amount of weight is equal to 116 grams.
| Part | Volume (m3) |
|---|---|
| Body Section Balloon | 0.6101 |
| Top Fin Balloon | 0.0041 |
| Rear Fin Balloon | 0.0092 |
| Total | 0.6234 |
| Part | Weight (kg) |
|---|---|
| Body Section Frame | 0.32660 |
| Top Fin Frame | 0.05268 |
| Rear Fin Frame | 0.07769 |
| Tail Section Frame | 0.05014 |
| Total | 0.50711 |
Prototype Steering Frame
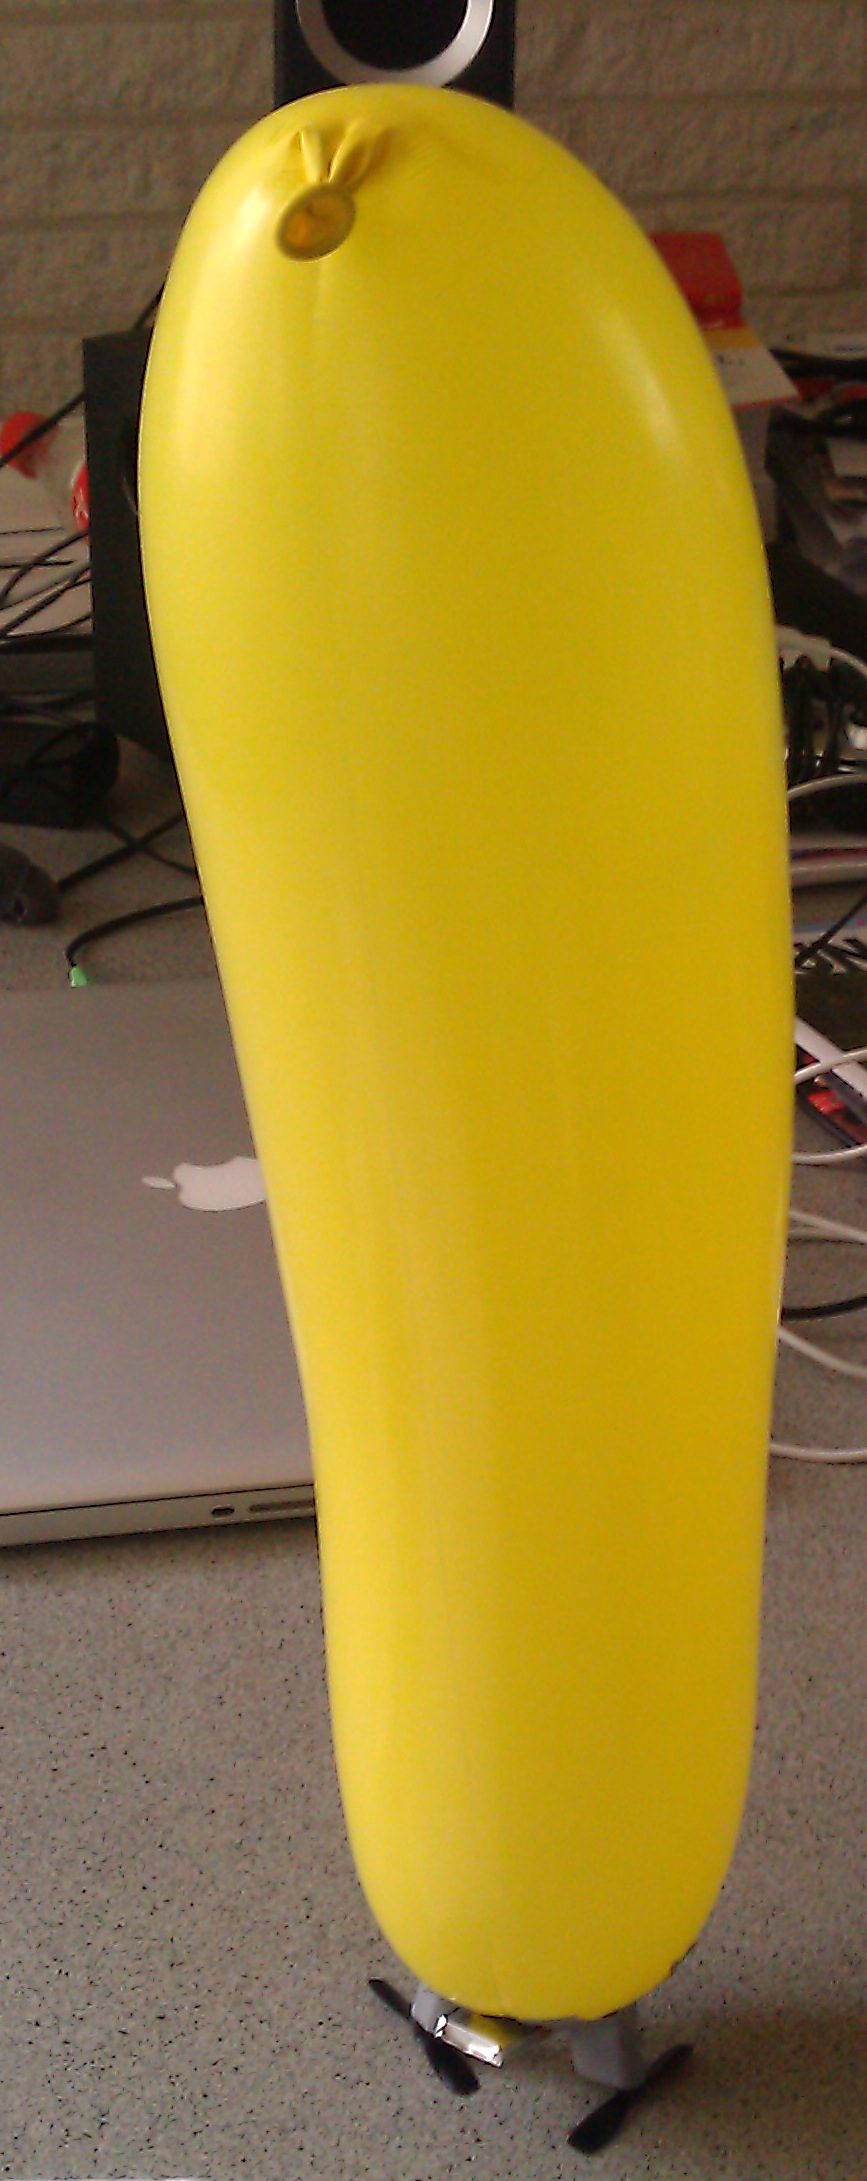
After the designing phase, the steering technique explained in the previous section needs to be tested. For this test a cylindrical balloon has been used to represent the body section of the shark. This balloon is bend in advance using some fish wire to predetermine the direction the balloon should go while in the air. The balloon itself is filled with helium. The propulsion is done by two propellers that come from a RC airplane. These are attached to the end of the balloon. Figures (11) and (12) show the prototype.
The test of this prototype did not go well. The propeller section is too heavy for the balloon and therefore it will not stay in the air by itself. Next to that, due to attaching the propellers at the end of the balloon, the center of gravity shifted from the center of the balloon towards the back. This causes the balloon to tilt with the propeller side pointing down. This causes the balloon to only travel in a vertical direction. During the test, the balloons started to spin around and it did not make the desired movement. A reason for this could be the propulsion system, if the propellers do not spin at the same speed the balloon will behave different.
So this test was not a success. Also the conclusion could be drawn that bending a balloon that is inflated and under surface tension requires more force than was expected. This might not be achievable using lightweight servos. This is the main goal of the design, letting the shark bend into the direction it wants to go is a good way of steering. The fact that the bending of one balloon is hard to achieve, separate balloons are introduced. The design will have to be changed to make the bending of the body section more efficient.
Separate Balloons

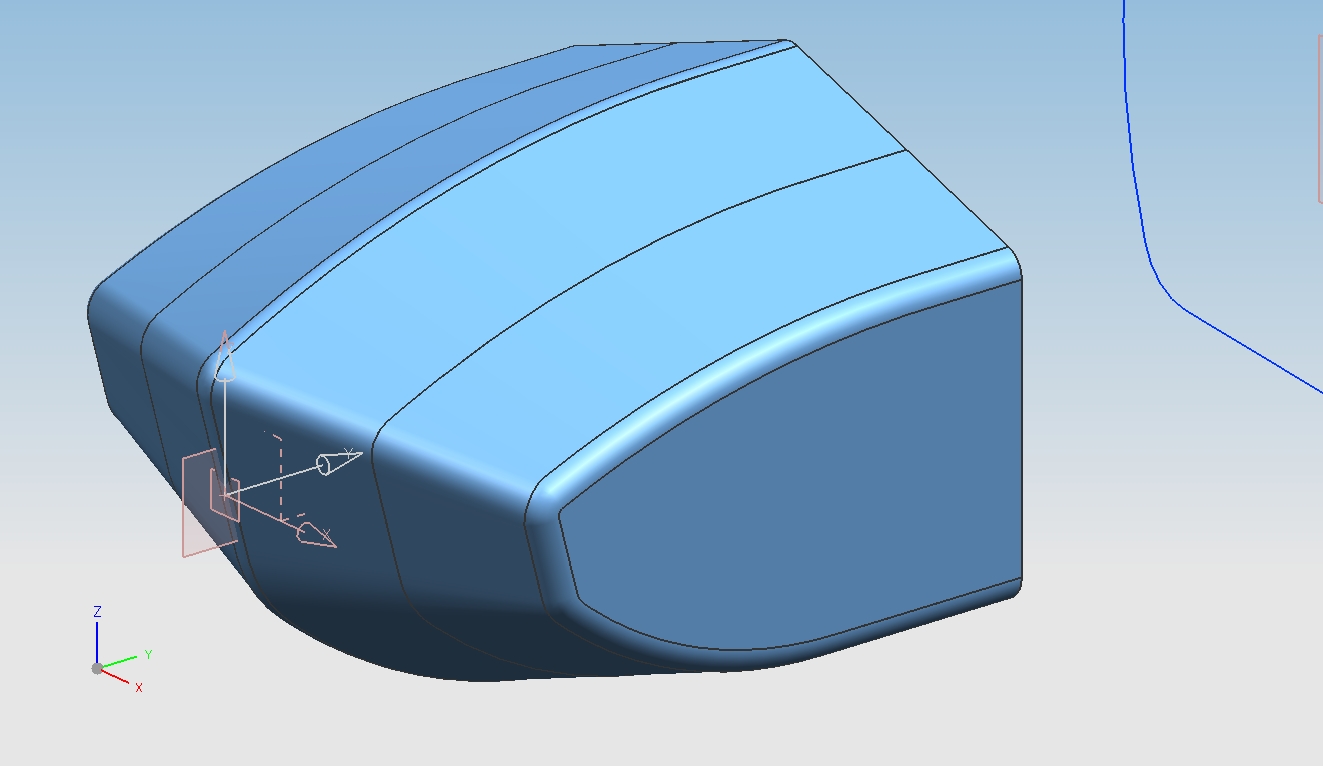
As can be concluded from the previous section, the body section of the shark is not flexible enough to deform in the desired way. Therefore a new design is made. In the previous section the helium is put into one big balloon. To improve flexibility the one big balloon is now separated into five balloons. Between the balloons a hinge is mounted. In figure (13) a sketch of the separate balloons is shown.
The frame around the balloons is not present anymore. Each frame section is replaced by four small rings that guide the fish wires that run over the body section to bend the balloon. The frame is not necessary anymore because the balloon itself will not bend anymore. The bending is achieved by the hinges which are ball and socket joints. Using these joints the five balloons can taken different positions with respect to each other.
Due to the fact that the frame is not present anymore in the new design, the shape of the shark has to be defined by the balloons itself. So instead of the balloon being conical, it will have a custom design. This gives two advantages: the weight of the frame is not present anymore, which saves according to the previous section at least 320 grams. Next to that, because the balloons are shaped as the shark itself, there is more volume available for the helium. With the conical balloon space is left unused, this is not the case with the custom shaped designs. So more volume is created and less weight is used. There are also disadvantages of this design. The custom shape of the balloons makes them hard to produce. This has to be done by hand. A 3D-model is made to get a representation of the separate balloons and its volume. A part of this model can be seen in figure (14). Analyzing this part proofs that the volume has increased due to usage of the space. The volume of the nose part of the shark has increased from 0.051 m3 to 0.114 m3. Due to lack of time, the 3D-model could not be completed. The decision was made that a working prototype of the shark was more important than perfecting this 3D-model.
Final Prototype
The first body section prototype did not work the way it should be. The decision was made that a real life prototype is now the best option. The body section prototype turned out to be too small to make the balloon and all attachments neutrally buoyant. Also to try the new separate balloon design, a full scale prototype is more efficient to produce, because these balloons all have to be custom made. It will get expensive when first a small size prototype has to be built after which a full scale size also has to be made.
In the process a supplier for the construction material and a producer of the balloons needs to be found. The carbon fiber plates that will be used for the frame sections of the shark are available in a lot of places. Several websites offer these carbon fiber plates. The material for the balloons is a lot harder to obtain. The PET-foil is supplied from different Chinese factories, but they only offer an amount of square meters on a roll that is way to much for the prototype.
For the manufacturing of the balloons from the PET-foil, a design bureau was approached. This design bureau already had experience in design larger inflatable objects. Air Design made several custom made objects like cows and ducks of over 3 meters high. At first they were very interested in the project. But after discussing the usage of the different material where the balloons need to be made of, it became harder for them to turn these ideas into reality. Air Design is used to work with the heavy thick rubber material in combination with a separate air blower. They never made a gas tight balloon designed to contain helium before. Due to several other projects the bureau had running and the whole new concept of balloon design, they decided to not produce these products.
The idea also came to mind to fabricate the balloons ourselves. The several sections will be made out of a styrofoam block that has been sanded into the proper shape of these sections. The PET-foil then will be put over the blocks of styrofoam and the different pieces will be glued together. But for putting this method into action there just was not enough time anymore. The whole process of sanding and making sure the balloons are gas tight would take a couple of weeks. A basic prototype has to be made that will function as a proof of concept for the tail section and the lifting force of the helium.
But even this prototype became a problem. A more simple custom shaped balloon that consists of two sides that need to be glued together is cut out of the PET-foil. A problem with this design is that the balloon stays flat when inflated, minimizing the volume that the helium could use. But the big problem here was making the balloon gas tight. No matter how much effort there was put into making the two sides meet, gas would leak out of the balloon very quickly. After trying several times, also this prototype was terminated. So unfortunately no real prototype is made.
Conclusion
In the end, the project did not turn out the way I imagined. The goal was to make an autonomously flying shark, but I ended up with a few prototypes of sections of the shark. The first thing that was dropped out of this first goal was the autonomous flying. Adding all the software and controllers would be a project by itself. What I did learn from the whole project was that it is hard to find reliable resources for your materials and for producing the separate balloons. Eventually it was a big disappointment that after the whole effort of finding a decent design bureau for the balloons, the actual prototype of the separate balloons was not realized. The size of the project has been misjudged and the goals were set too high at the beginning of the project. During the project the goals were adapted according to the time spent on the project and the achievability of the several prototype designs.
Although no real prototype of the whole shark was made, the whole process from brainstorming to finding suppliers and design bureaus has been very educational. I wish the prototype would have been better, but due to unforeseen complications the project did not develop any further as described in the previous sections.
As for the future work on this project, other design bureaus can be sought that could develop the prototype. The steering by using the separate balloons can be tested afterwards and conclusions can be drawn from those experiments. But to make this project reach its original goal, a lot of effort still needs to be spend on the design and implementing everything into different prototypes. If the original goal is reached, a realistic representation of the shark will be produced and it can be used in many promotional events to show people what the university is capable of.